1999 HONDA ODYSSEY clock
[x] Cancel search: clockPage 272 of 343
Lights
6. Put the socket back into the light assembly and turn it clockwise to
lock it in place.
7. Test the light to make sure the new bulb is working.
8. Put the light assembly back into the tailgate. Install the screw and
tighten it securely. Reinstall thelens piece. Replacing a Rear License Bulb
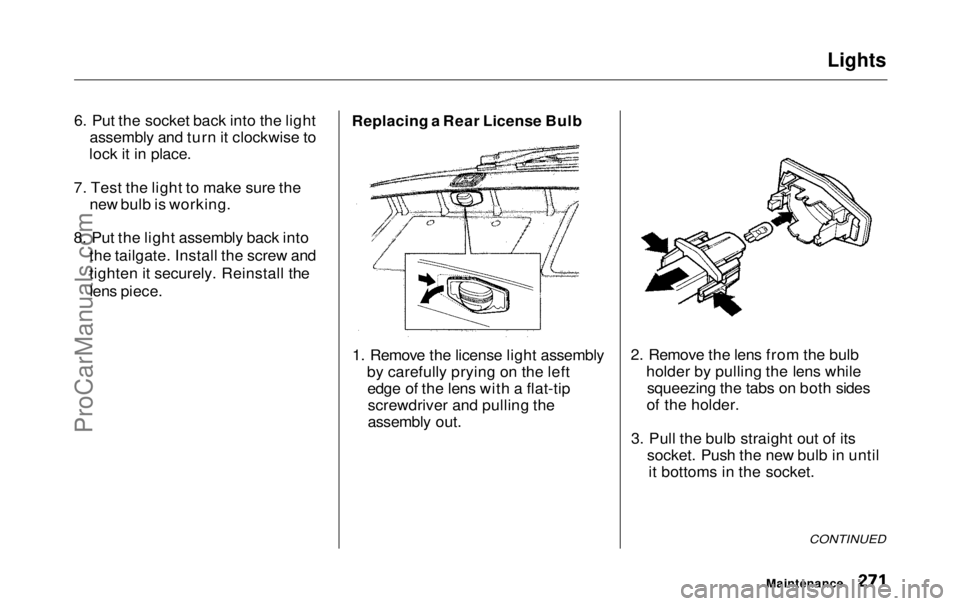
1. Remove the license light assembly by carefully prying on the leftedge of the lens with a flat-tipscrewdriver and pulling the
assembly out. 2. Remove the lens from the bulb
holder by pulling the lens whilesqueezing the tabs on both sides
of the holder.
3. Pull the bulb straight out of its socket. Push the new bulb in untilit bottoms in the socket.
CONTINUED
MaintenanceProCarManuals.comMain Menu Table of Contents s t
Page 287 of 343
Changing a Flat Tire
COVER
3. Open the tailgate. Remove the cargo net.
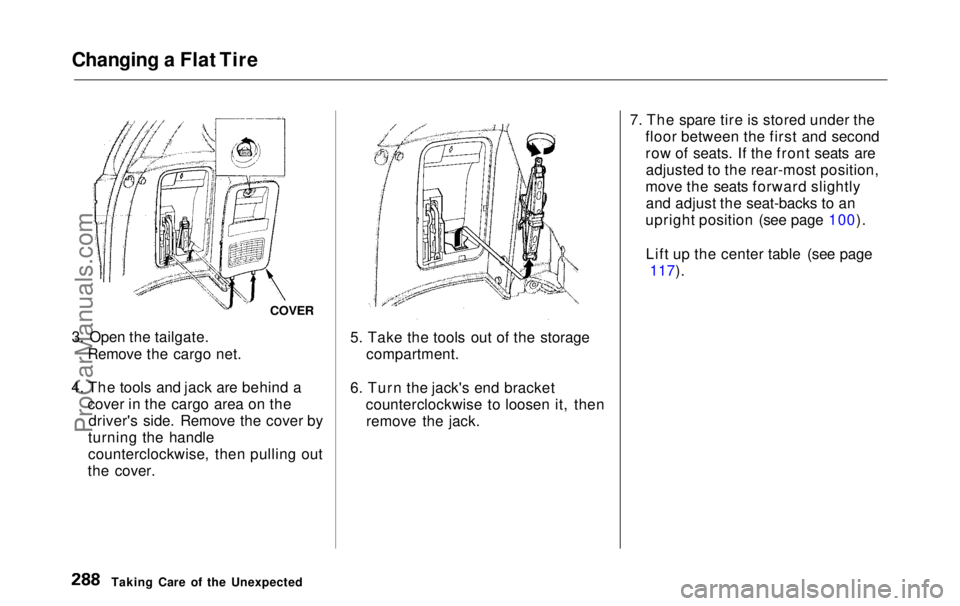
4. The tools and jack are behind a cover in the cargo area on thedriver's side. Remove the cover by
turning the handle
counterclockwise, then pulling out
the cover. 5. Take the tools out of the storage
compartment.
6. Turn the jack's end bracket counterclockwise to loosen it, thenremove the jack. 7. The spare tire is stored under the
floor between the first and second
row of seats. If the front seats areadjusted to the rear-most position,
move the seats forward slightly and adjust the seat-backs to an
upright position (see page 100).
Lift up the center table (see page 117).
Taking Care of the UnexpectedProCarManuals.comMain Menu Table of Contents s t
Page 289 of 343
Changing a Flat Tire
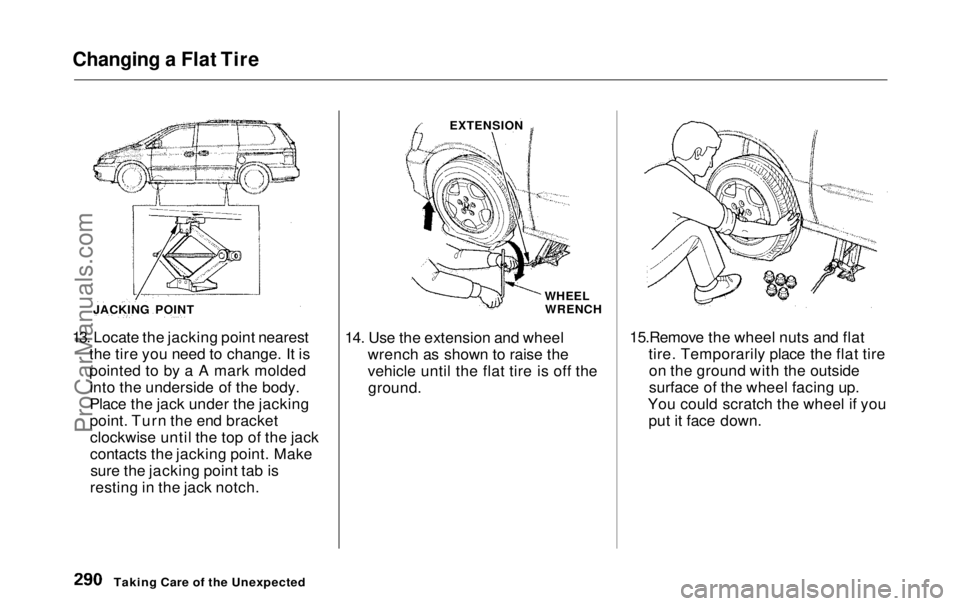
13. Locate the jacking point nearest the tire you need to change. It is
pointed to by a A mark moldedinto the underside of the body.
Place the jack under the jacking
point. Turn the end bracketclockwise until the top of the jack
contacts the jacking point. Makesure the jacking point tab is
resting in the jack notch. WHEEL
WRENCH
14. Use the extension and wheel wrench as shown to raise the
vehicle until the flat tire is off theground. 15.Remove the wheel nuts and flat
tire. Temporarily place the flat tireon the ground with the outside
surface of the wheel facing up.
You could scratch the wheel if you put it face down.
Taking Care of the Unexpected
JACKING POINT
EXTENSIONProCarManuals.comMain Menu Table of Contents s t
Page 294 of 343
Changing a Flat Tire
TIRE MOUNTING WING BOLT
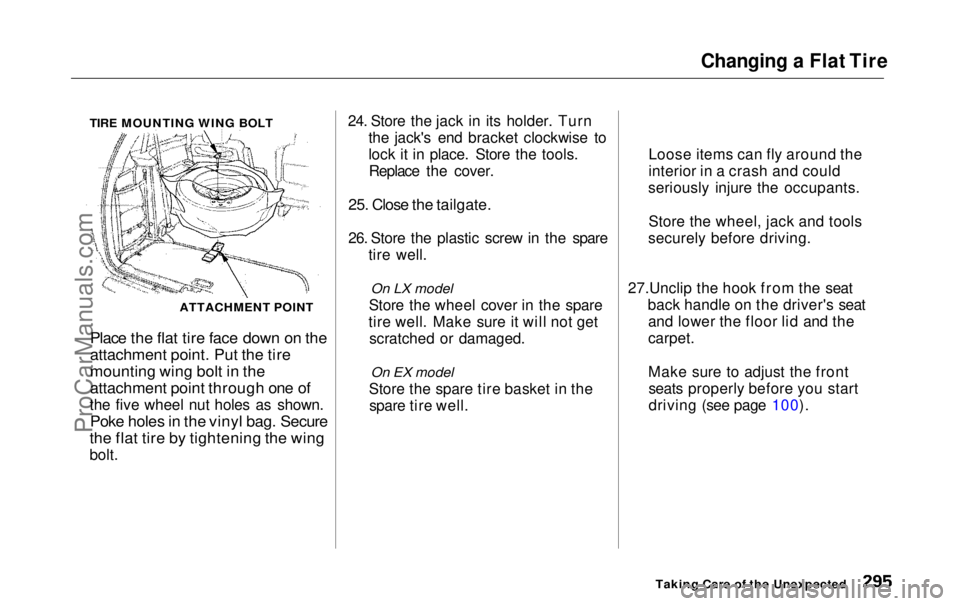
Place the flat tire face down on the
attachment point. Put the tire
mounting wing bolt in the
attachment point through one of
the five wheel nut holes as shown.
Poke holes in the vinyl bag. Secure
the flat tire by tightening the wing
bolt. 24. Store the jack in its holder. Turn
the jack's end bracket clockwise to
lock it in place. Store the tools.Replace the cover.
25. Close the tailgate.
26. Store the plastic screw in the spare tire well.
On LX model
Store the wheel cover in the spare
tire well. Make sure it will not get scratched or damaged.
On EX model
Store the spare tire basket in the spare tire well. 27.Unclip the hook from the seat
back handle on the driver's seatand lower the floor lid and the
carpet.
Make sure to adjust the frontseats properly before you start
driving (see page 100).
Taking Care of the Unexpected
ATTACHMENT POINT
Loose items can fly around the
interior in a crash and could
seriously injure the occupants.
Store the wheel, jack and tools
securely before driving.ProCarManuals.comMain Menu Table of Contents s t
Page 299 of 343
If Your Engine Overheats
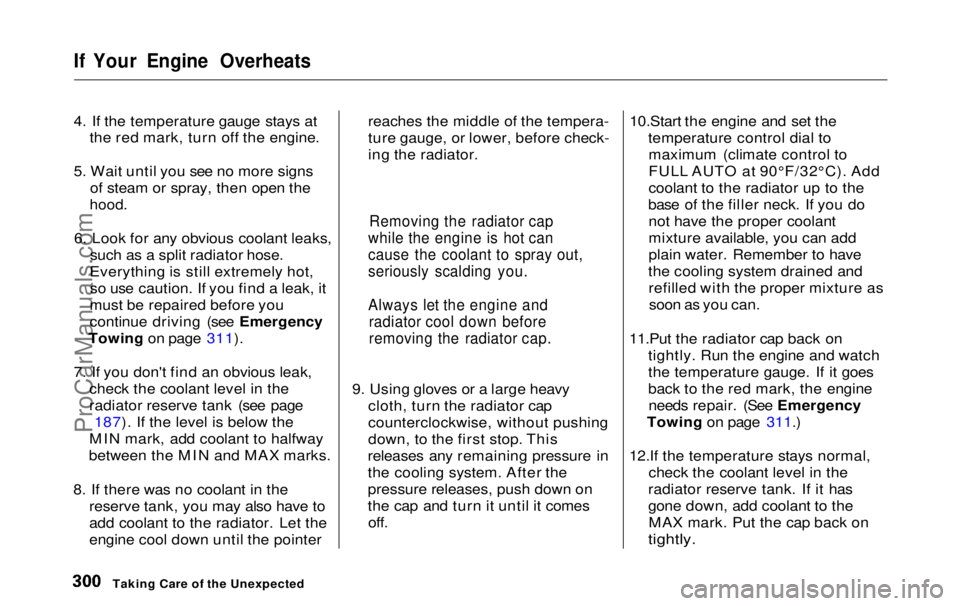
4. If the temperature gauge stays at
the red mark, turn off the engine.
5. Wait until you see no more signs of steam or spray, then open the
hood.
6. Look for any obvious coolant leaks, such as a split radiator hose.
Everything is still extremely hot, so use caution. If you find a leak, it
must be repaired before you
continue driving (see Emergency
Towing on page 311).
7. If you don't find an obvious leak, check the coolant level in the
radiator reserve tank (see page187). If the level is below the
MIN mark, add coolant to halfway
between the MIN and MAX marks.
8. If there was no coolant in the reserve tank, you may also have to
add coolant to the radiator. Let the
engine cool down until the pointer reaches the middle of the tempera-
ture gauge, or lower, before check-
ing the radiator.
9. Using gloves or a large heavy cloth, turn the radiator cap
counterclockwise, without pushing
down, to the first stop. This
releases any remaining pressure in
the cooling system. After the
pressure releases, push down on
the cap and turn it until it comes off. 10.Start the engine and set the
temperature control dial tomaximum (climate control to
FULL AUTO at 90°F/32°C). Add
coolant to the radiator up to the
base of the filler neck. If you do not have the proper coolant
mixture available, you can add
plain water. Remember to have
the cooling system drained and refilled with the proper mixture assoon as you can.
11.Put the radiator cap back on tightly. Run the engine and watch
the temperature gauge. If it goes
back to the red mark, the engineneeds repair. (See Emergency
Towing on page 311.)
12.If the temperature stays normal, check the coolant level in the
radiator reserve tank. If it has
gone down, add coolant to the MAX mark. Put the cap back on
tightly.
Taking Care of the Unexpected
Removing the radiator cap
while the engine is hot can
cause the coolant to spray out,
seriously scalding you.
Always let the engine and radiator cool down before
removing the radiator cap.ProCarManuals.comMain Menu Table of Contents s t
Page 335 of 343
Index
Checklist, Before Driving............. 196
Childproof Door Locks................... 85
Child Safety...................................... 22
Cleaner Element, Air..................... 246
Cleaning
Aluminum Wheels..................... 279
Carpeting.................................... 280
Exterior....................................... 278
Fabric.......................................... 280
Interior........................................ 280
Seat Belts.................................... 280
Vinyl............................................280
Windows..................................... 281
Climate Control System................ 138
Clock, Setting the.......................... 117
Coat Hook....................................... 123
Code, Audio System...................... 180
CO in the Exhaust......................... 323
Coin Holder.................................... 122
Cold Weather, Starting in............. 197
Compact Spare............................... 286
Consumer Information*................ 328
Controls, Instruments and.............. 55
Coolant
Adding......................................... 237
Checking..................................... 187
Proper Solution.......................... 237
Replacing.................................... 239
Temperature Gauge.................... 63
Corrosion Protection..................... 282
Crankcase Emissions Control
System.........................................323
Cruise Control Operation............... 73
Customer Relations Office........... 328
DANGER, Explanation of................. ii
Dashboard.................................... 2, 56
Daytime Running Lights................. 67
Dead Battery, What to Do............ 297
Defects, Reporting Safety............. 332
Defogger, Rear Window................. 71
Defrosting the Windows.......135, 144
DEXRON ®
III Automatic
Transmission Fluid.................... 243
Dimensions..................................... 316
Dimming the Headlights................ 66
Dipstick
Automatic Transmission........... 243
Engine Oil................................... 186
Directional Signals........................... 68
Disabled, Towing Your
Vehicle If..................................... 311
Disc Brake Wear Indicators......... 204
Disposal of Used Oil...................... 236
Doors
Locking and Unlocking............... 79Lockout Prevention..................... 80
Manual Sliding Doors.................. 88
Monitor Light............................... 60
Power Door Locks....................... 79
Power Sliding Doors.................... 90
DOT Tire Quality Grading........... 319
Drive Belts...................................... 256
Driver and Passenger Safety............ 5
Driving............................................ 195 Economy..................................... 188
In Bad Weather.......................... 210
In Foreign Countries................. 322
Economy, Fuel............................... 188
Emergencies on the Road............. 285
Battery, Jump Starting.............. 297
CONTINUEDProCarManuals.comMain Menu s t
Page 340 of 343
Index
Safety Labels, Location of.............. 54 Safety Messages................................ ii
Seat Belt, Additional Information.. 45 Lap/Shoulder Belt....................... 45
Seat Belt Maintenance................ 47
Seat Belt System Components... 45
Seat Belts..................................... 8, 45
Cleaning...................................... 280
Maintenance................................. 47
Reminder Light and Beeper................................. 45, 57
System Components.................... 45
Tether Attachment Points.......... 43 Use During Pregnancy................ 20
Wearing a Lap/Shoulder Belt.... 15
Seats.................................................. 99
Adjustments............................... 100
Folding the Third Seat.............. 110
Head Restraints......................... 104
Passenger Seating....................... 99
Reclining the Second Seat........ 101
Reclining the Third Seat........... 101
Removing the Second
Seats................................108, 109
Third Seat Access...................... 105
Serial Number................................ 314
Service Intervals............................ 224
Service Manual* ............................ 333
Service Station Procedures .......... 183
Setting the Clock........................... 117 Shifting the Automatic Transmission.............................. 199
Shift Lever Position Indicator...... 198
Shift Lock Release......................... 201
Side Marker Lights, Bulb
Replacement in.......................... 267
Signaling Turns................................ 68
Sliding Doors.................................... 88
Snow Tires...................................... 263
Solvent-type Cleaners.................... 278
Sound System.........................149, 161
Spare Tire Inflating....................................... 286
Specifications............................. 317
Spark Plugs..................................... 248
Specifications Charts..................... 316
Speed Control................................... 73 Speedometer.................................... 62
SRS, Additional Information........... 48 Additional Safety Precautions.... 52How the Automatic Seat belt Tensioners Work..................... 50
How the SRS Indicator
Works........................................50
How Your Airbags Work............ 48
SRS Components......................... 48
SRS Service................................... 51
SRS Indicator............................. 50, 58
START (Ignition Key Position)..... 79
Starting the Engine........................ 197 In Cold Weather at HighAltitude................................... 197
With a Dead Battery ................. 297
Steam Coming from Engine......... 299
Steering Wheel Adjustment................................... 72
Anti-theft Column Lock.............. 78
Stereo Sound System............149, 161 Storing Your Vehicle..................... 275
Storage Box.................................... 123 Sunglasses Holder......................... 120
Sun Visor......................................... 121
Supplemental Restraint System Servicing....................................... 51
SRS Indicator..........................50, 58
System Components.................... 48
Synthetic Oil................................... 234ProCarManuals.comMain Menu s t