Page 1648 of 2189
Brake Lights
WNT/GRN
Circuit Diagram
UNDEH HOODFUSEiRELAYBOXBATTERY/-l I No s2 (1sA) |
u/T'\--]-wHrGFNTwfciN_l
tvHORN SYSTEM
INNERTAILL]GHT
GRNMHT
I
AE-'ii,t
Yut#l
IBLK
ffi; I
I l,"l
I I''i
Li;
GRN,4fiHT
l**,,,,I P } BRAKE
Y ilT'
I
I
I
IgLK
I
I:
flatchbackCoupe/SedanSedan 99 mode
ffi; I
i $*i
iri
Li*'']
GRNMHT
I
A b'rt^t-,
Yllf,ll
IBLK
BLK
I
I
I
G601 r Halchback/Coupe/Sedan
BLK
II
II
I
G601 : Haldbackiooup€/Sedan G761 :G601 :G602 :
+ 21W :Coup€/Sedan18W :HalchbackJ I : Wilh cruise control
23-178
Page 1650 of 2189
Dash Lights Brightness Controller
UNDEF.DASHFUSEi RELAY 8OX
|-;il;I-l-*-Tl
I
IREDi 8LK
cotvBiNATloNLIGHT SW]TCH
Circuit Diagram
,4.wHT -tlf- RED/GBN
UNDEF HOOD FUSE/RELAY BOX
23-180
G401G402
Page 1651 of 2189

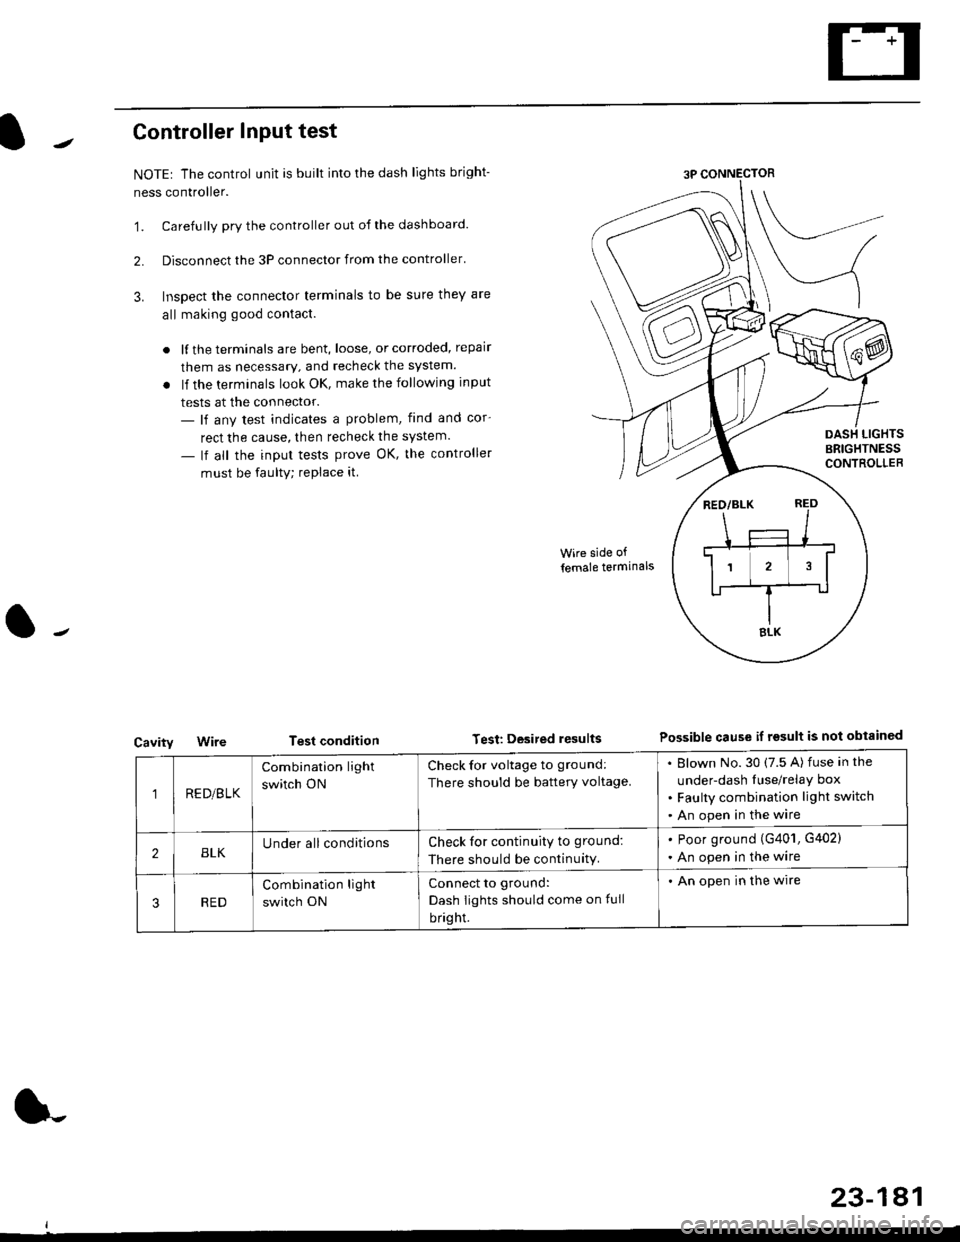
Controller Input test
NOTEr The control unit is built into the dash lights bright-
ness controller.
'1. Carefully pry the controller out of the dashboard.
2. Disconnect the 3P connector from the controller'
3. Inspect the connector terminals to be sure they are
all making good contact.
. lf the terminals are bent, loose, or corroded, repair
them as necessary, and recheck the system.
. lf the terminals look OK, make the following input
tests at the connector.- lf any test indicates a problem, find and cor-
rect the cause, then recheck the system.
- lf all the input tests prove OK, the controller
must be faulty; replace it
Cavity
Wire side of
lemale termlnals
Test condition Test Desited resultsPossible cause if rgsult is not obtainGd
1RE D/B LK
Combination light
switch ON
Check for voltage to ground:
There should be battery voltage.
Blown No.30 (7.5 A) fuse in the
under-dash Iuse/relay box
Faulty combination light switch
An open in the wire
2BLKUnder all conditionsCheck for continuity to ground:
There should be continuity.
. Poor ground (G401, G402)
. An open in the wire
RED
Combination light
switch ON
Connect to ground:
Dash Iights should come on full
bright.
. An open in the wire
23-181
Page 1654 of 2189
Interior Lights
Circuit Diagram (With Spotlights)
SPOT.LGHTS
2
LT GRNlRED
t_:kr
(Wilh key ess enlry syslem)
t-t
-
, LTGRN/BLKKEYLESS RECEIVERCIBCUIT(ln the aLid o unil)
A
Y""I REARI DooF
t;:x::
| | 333i"
GBN L
A
Ttp;:'
Itsl";g;" I
I3331."..,J:
FFONTPASSENGERSDOORSWITCH
ictoseo : 'l
I Door openI Open :L Door closed _J
x I 3.4W :tiSA, Canada produced5W Japan produced*2 8w W lh moofroot5W Wlho!lmoonroof
23-144
UNDEB HOOD FUSEi RELAY BOX
LTGRN/RED
WHT/REDWHT/RED
r*r
I T 1,,'-1
'F!
I
I8LU/8LK
I
I
| *ttt-
| ,Y.
IBLUlBLK
A
Yiri'n
It3f.r'+m:r:r,lBLK
{
G601 G761 rHalchbac(G601 Coupe/Sedan
LTGRN/RED
Page 1659 of 2189
UNDER DASHFUSE/RELAY 80X
r*.i,,";l
I
I
I
I
I
I
IYEUFEDWHTiELU
Circuit Diagram ('96 - 98 modelsl
A15A16
NoJ0 (7 sA)
v
IRED]BLK
RED
I
I
I
J
DASH LIGHTSBRIGHTNESSCONTROLLER
ANTENNALEAD
BRN/WHTBLK
G501
LEFT FHONTDOOF SPEAKER
I RED,^/Er
ILI�l
RIGHT REARSPEAKER
I BLU/YEL
III�t
SPEAKER
q-
IGN TION SWITCHUNDER.HOOD FUSE/FELAY BOX
AUDIO UN T(STEREO RAOLO TUNER)
@
LEFTRIGHTTWEETER
GRY]BLK
23-189
Page 1660 of 2189
Stereo Sound System
UNDER-DASI.]FUSEi RELAY 8OX
l- '-r,*;l
I
I
I
I
I
I
IYEUFED
(Sedan)--l
(Coupe/Horchbach)
Circuit Diagram ('99 - 00 models)
No 30 (7.54)FUSE
V
IRED/BLK
I
I
I
vDASH LGHTSBHIGHTNESSCONTROLLER
F;*";
,,,[.J:,a*[rrl
BLK
G501
/ _- | neolcn;diFnoNi | |DooR SPEAKEF | |
HlGHTTWEETER
UNDER.HOOD FUSE/RELAY BOX
RIGHT REAFSPEAKEBLEFT REARSPEAKEF
LEFTTWEETER
23-190
Page 1666 of 2189
Horn
Component Location Index
SRS components are located in this area. Review the SRS component locations, precautions, and procedures in the SRS
section (24) before performing repairs or service.
CABLE REELReplacement, section 24
(:-, ,,/ t.\
(6\'
\K2
HORN RELAY: '98 - 00 models-
lWire colorsr WHT/GRN, cBY,lIWHT/GRN, BLU/RED ]Test, page 23 87
HORN RELAY: '96 -97 models-lwire colors: WHT/GRN. GBY,I
IWHT/GRN, BLU/RED ITest, page 23-86
UNDER-DASH FUSE/RELAY BOX
23-196
Page 1667 of 2189
Circuit Diagram: '96 - 97 models
HORNRELAY
WHT/GRN
I(H)HoRN
Y
IBLU/REO
I
I
IBtK
I
t-l
G40lG1A2
BATTERY
l-
23-197
Horn Test: '96 - 97 models
1. Remove the front bumper (see section 20).
2. Disconnect the 2P connector from the horn.
Remove the horn.
Test the horn by connecting battery power to one
terminal and grounding the other, lf the horn fails to
sound, replace it.
3.
LOW HORN