Page 164 of 216
²If you do not allow the engine to relearn its idle trim, the idle quality
of your vehicle may be adversely affected until the idle trim is
eventually relearned.
If the battery has been disconnected or a new battery has been installed,
the clock and the preset radio stations must be reset once the battery is
reconnected.
²Always dispose of automotive
batteries in a responsible manner.
Follow your local authorized
standards for disposal. Call your
local authorized recycling center
to find out more about recycling
automotive batteries.
AIR FILTER MAINTENANCE
Refer to the Scheduled Maintenance Guide for the appropriate intervals
for changing the air filter element.
For information on replacement air filter elements, refer toMotorcraft
Part Numbersin theCapacities and specificationschapter.
Do not start your engine with the air cleaner removed and do
not remove it while the engine is running.
Changing the air filter element
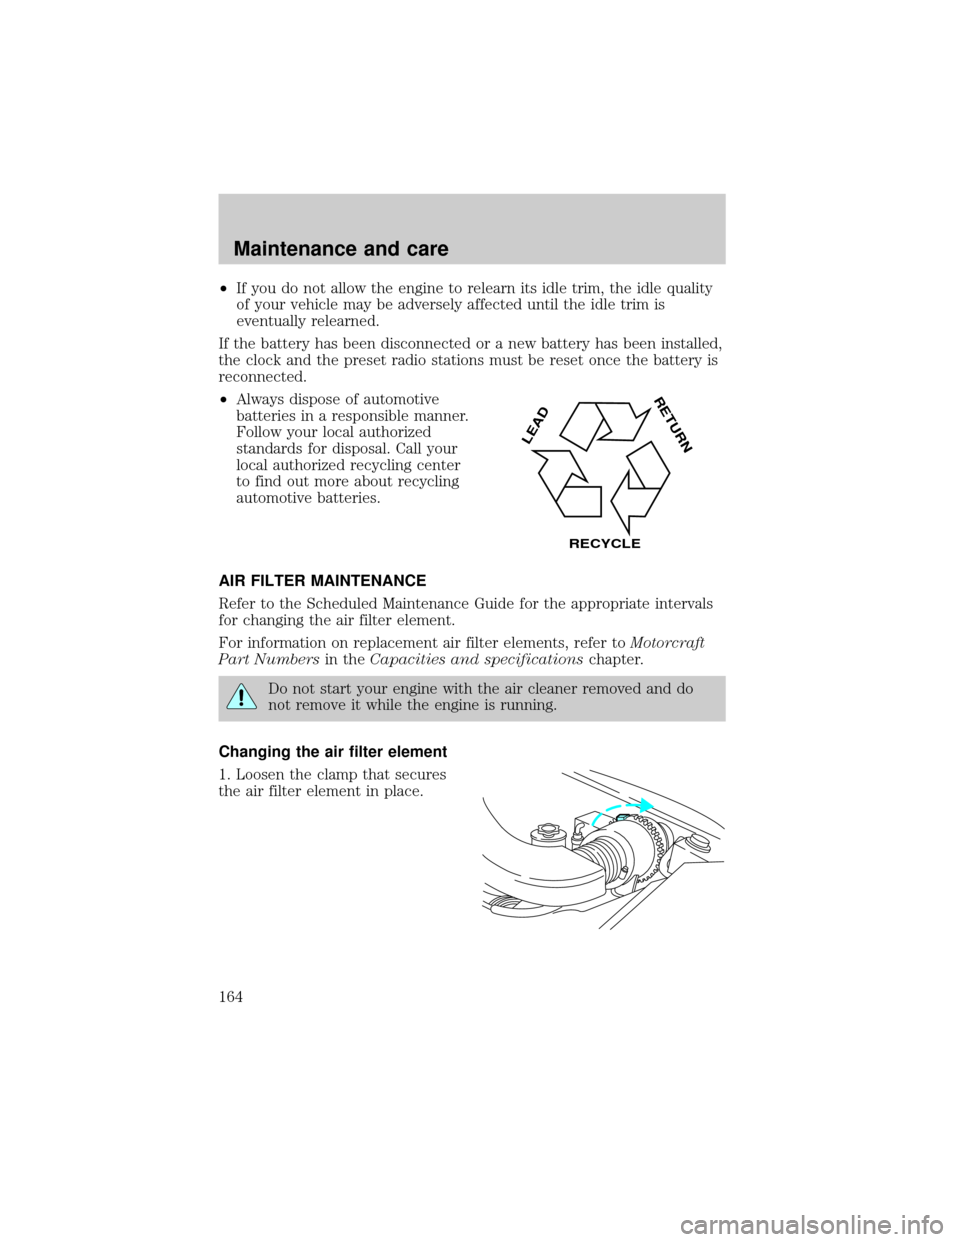
1. Loosen the clamp that secures
the air filter element in place.
LEAD
RETURN
RECYCLE
Maintenance and care
164
Page 166 of 216
Changing the wiper blades
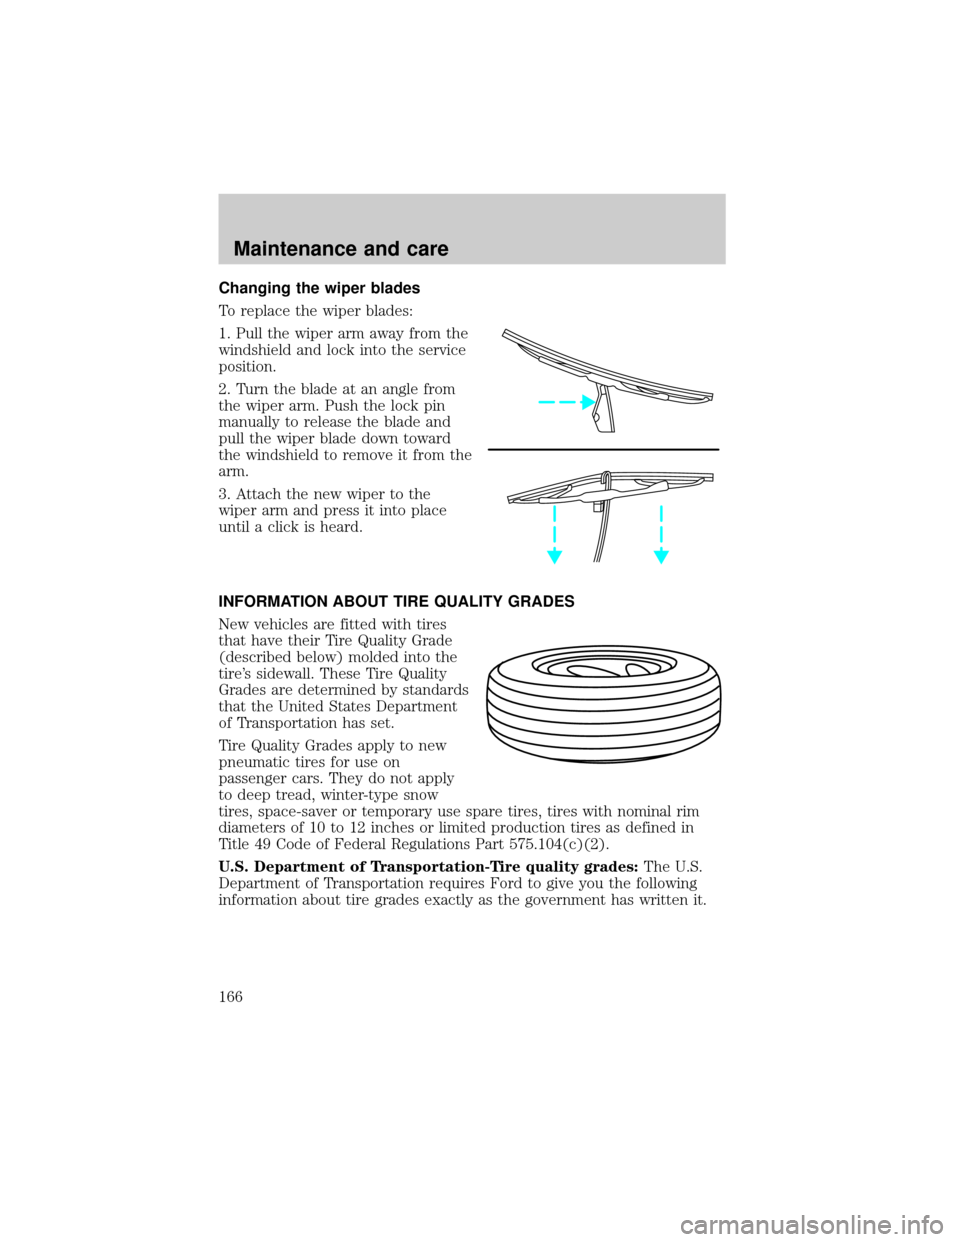
To replace the wiper blades:
1. Pull the wiper arm away from the
windshield and lock into the service
position.
2. Turn the blade at an angle from
the wiper arm. Push the lock pin
manually to release the blade and
pull the wiper blade down toward
the windshield to remove it from the
arm.
3. Attach the new wiper to the
wiper arm and press it into place
until a click is heard.
INFORMATION ABOUT TIRE QUALITY GRADES
New vehicles are fitted with tires
that have their Tire Quality Grade
(described below) molded into the
tire's sidewall. These Tire Quality
Grades are determined by standards
that the United States Department
of Transportation has set.
Tire Quality Grades apply to new
pneumatic tires for use on
passenger cars. They do not apply
to deep tread, winter-type snow
tires, space-saver or temporary use spare tires, tires with nominal rim
diameters of 10 to 12 inches or limited production tires as defined in
Title 49 Code of Federal Regulations Part 575.104(c)(2).
U.S. Department of Transportation-Tire quality grades:The U.S.
Department of Transportation requires Ford to give you the following
information about tire grades exactly as the government has written it.
Maintenance and care
166
Page 173 of 216
The American Automobile Manufacturers Association (AAMA) issued a
fuel specification to provide information on high quality fuels that
optimize the performance of your vehicle. We recommend the use of
fuels that meet the AAMA specification if they are available.
It should not be necessary to add any aftermarket products to your fuel
tank if you continue to use a high-quality fuel.
Cleaner air
Ford approves the use of gasolines to improve air quality, including
reformulated gasolines that contain oxygenates up to 10% ethanol or
15% MTBE.
Running out of fuel
Avoid running out fuel because this situation may have an adverse affect
on modern powertrain components.
If you have run out of fuel:
²You may need to crank the engine several times before the system
starts to pump fuel from the tank to the engine.
²Your ªService Engine Soonº light may come on. For more information
on the ªService Engine Soonº light, refer to theInstrumentation
chapter.
Fuel Filler Cap
Your fuel tank filler cap has an indexed design with a one-eighth turn
on/off feature.
When fueling your vehicle:
1. Turn the engine off.
2. Carefully turn the filler cap counterclockwise 1/8 of a turn until it
stops.
3. Pull to remove the cap from the fuel filler pipe.
4. To install the cap, align the tabs on the cap with the notches on the
filler pipe.
5. Turn the filler cap clockwise 1/8 of a turn until it stops.
If the ªService Engine Soon/Check Engineº indicator comes on and stays
on when you start the engine, the fuel filler cap may not be properly
installed. Turn off the engine, remove the fuel filler cap and reinstall it
being careful to align the cap properly.
Maintenance and care
173
Page 180 of 216
Do not remove lamp bulbs unless they can be replaced immediately with
new ones. If a bulb is removed for an extended period of time,
contaminants may enter the lamp housings and affect lamp performance.
Replacing headlamp bulbs
Handle a halogen headlamp bulb carefully and keep out of
children's reach. Grasp the bulb only by its plastic base and do
not touch the glass. The oil from your hand could cause the bulb to
break the next time the headlamps are operated.
1. Make sure that the headlamp control is in the OFF position.
2. Open the hood.
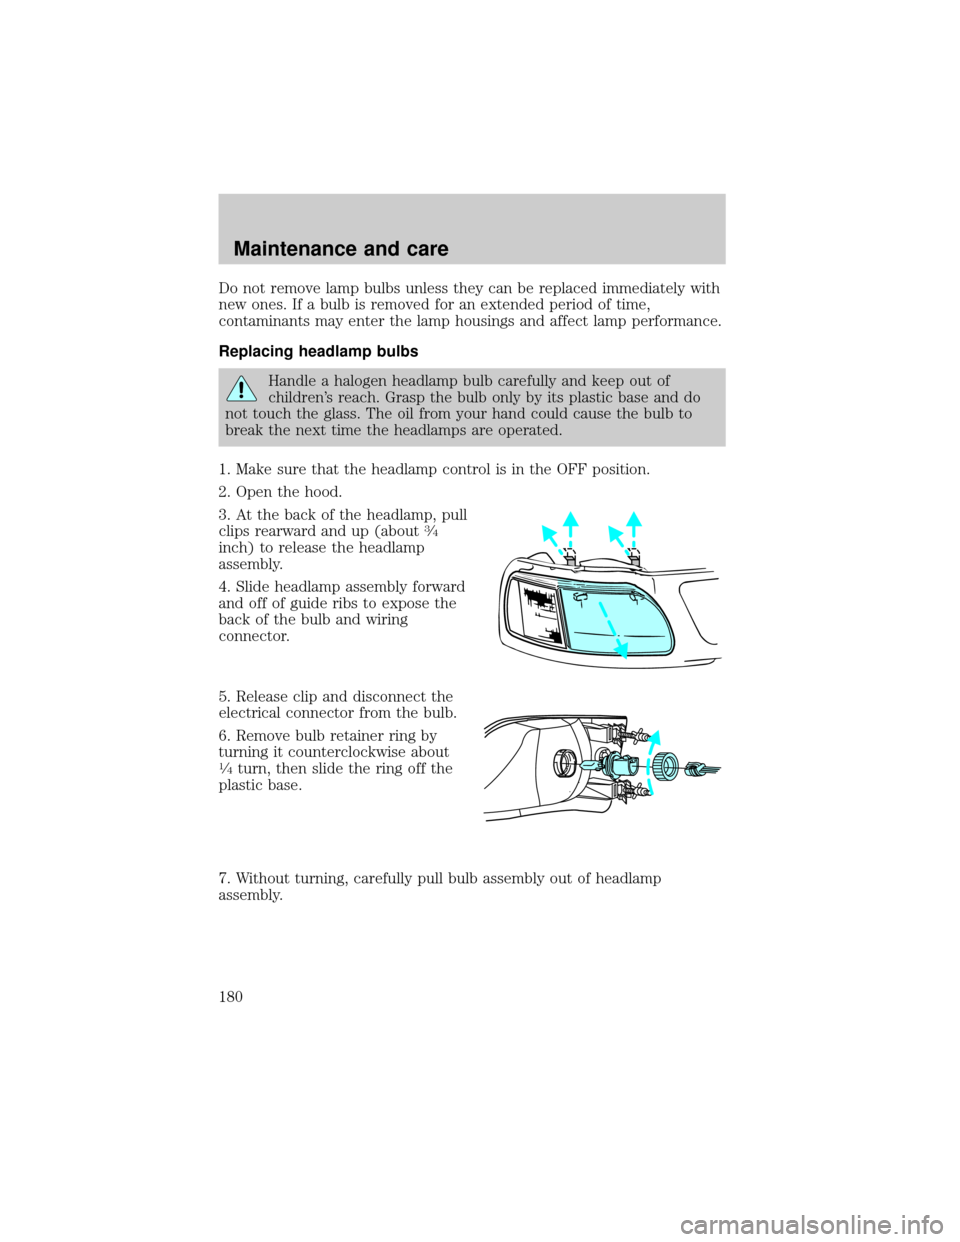
3. At the back of the headlamp, pull
clips rearward and up (about
3¤4
inch) to release the headlamp
assembly.
4. Slide headlamp assembly forward
and off of guide ribs to expose the
back of the bulb and wiring
connector.
5. Release clip and disconnect the
electrical connector from the bulb.
6. Remove bulb retainer ring by
turning it counterclockwise about
1¤4turn, then slide the ring off the
plastic base.
7. Without turning, carefully pull bulb assembly out of headlamp
assembly.
Maintenance and care
180
Page 181 of 216
8. Insert the glass end of the new bulb into the headlamp assembly.
When the grooves in the plastic base are aligned, push the bulb into the
lamp assembly until the plastic base contacts the rear of the lamp
assembly.
9. Install bulb retaining ring over the plastic base and lock the ring into
the socket by turning it clockwise until you feel a ªstop.º
10. Connect the electrical connector into the plastic base until it ªsnaps.º
11. Straighten alignment pins, making them parallel with the outer edges
of the attachment standoff.
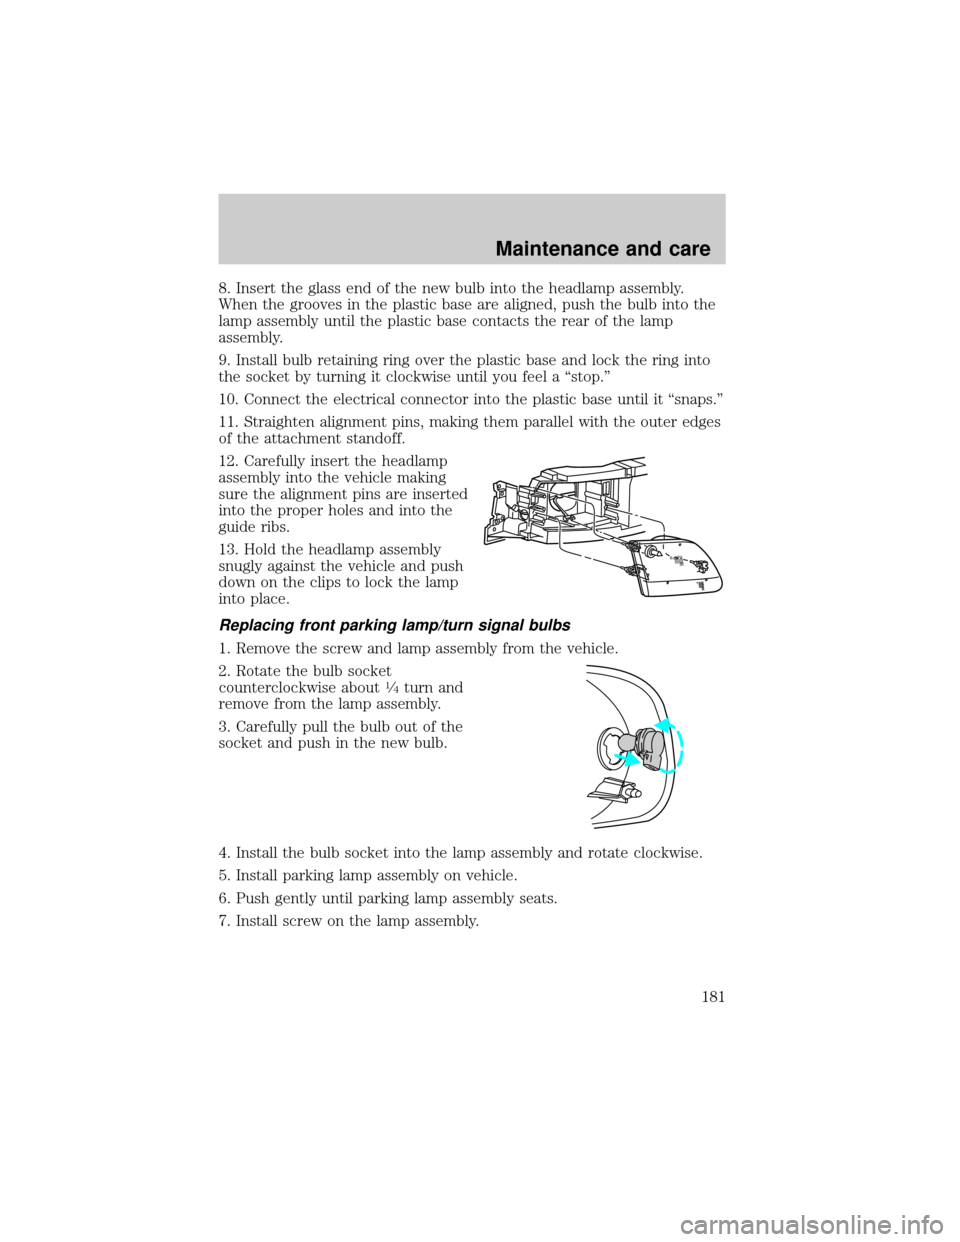
12. Carefully insert the headlamp
assembly into the vehicle making
sure the alignment pins are inserted
into the proper holes and into the
guide ribs.
13. Hold the headlamp assembly
snugly against the vehicle and push
down on the clips to lock the lamp
into place.
Replacing front parking lamp/turn signal bulbs
1. Remove the screw and lamp assembly from the vehicle.
2. Rotate the bulb socket
counterclockwise about
1¤4turn and
remove from the lamp assembly.
3. Carefully pull the bulb out of the
socket and push in the new bulb.
4. Install the bulb socket into the lamp assembly and rotate clockwise.
5. Install parking lamp assembly on vehicle.
6. Push gently until parking lamp assembly seats.
7. Install screw on the lamp assembly.
Maintenance and care
181
Page 182 of 216

Replacing tail lamp/backup lamp bulbs
The tail lamp/backup lamp bulbs are
located in the same portion of the
tail lamp assembly, one just below
the other. Follow the same steps to
replace either bulb:
1. Open the liftgate to expose the
lamp assemblies.
2. Remove the two screws from the
lamp assembly.
3. Carefully remove the lamp
assembly off and to the right (it may be necessary to use a screwdriver
to remove the lamp assembly).
4. Twist the bulb connector
1¤4turn counterclockwise and remove it from
the lamp assembly.
5. Pull the bulb straight out of the socket and push in the new bulb.
6. Install the bulb socket into the lamp assembly and rotate clockwise.
7. Carefully install the tail lamp assembly on the tailgate snapping the
three retaining tabs into place.
8. Secure the lamp assembly with two screws.
Replacing foglamp bulbs
1. Remove the bulb socket from the
foglamp by turning
counterclockwise.
2. Disconnect the electrical
connector from the foglamp bulb.
3. Connect the electrical connector to the new foglamp bulb.
4. Install the bulb socket in the foglamp turning clockwise.
Maintenance and care
182
Page 183 of 216
High-mount brakelamp
To change the high-mount
brakelamp bulbs:
1. Remove the four screws from the
high-mount brakelamp assembly.
2. Carefully pull the lamp assembly
away from the vehicle to access the
bulbs.
3. Remove the bulb socket by
turning counterclockwise and a
careful pull.
4. Pull the bulb straight out of the
sicket and push in the new bulb.
5. Replace the bulbs as needed and
install the high-mount brakelamp
assembly.
Replacing license plate lamp bulbs
The license plate bulbs are located
behind the rear bumper. To change
the license plate lamp bulbs:
1. Reach behind the rear bumper to
locate the bulb.
2. Twist the bulb socket
counterclockwise
1¤4turn and
carefully pull to remove it from the
lamp assembly.
3. Pull out the old bulb from the
socket and push in the new bulb.
4. Install the bulb socket in lamp assembly by turning it clockwise.
Maintenance and care
183
Page 187 of 216
Cleaning the engine
Engines are more efficient when they are clean because grease and dirt
buildup keep the engine warmer than normal. When washing:
²Take care when using a power washer to clean the engine. The high
pressure fluid could penetrate the sealed parts and cause damage.
²Do not spray with cold water to avoid cracking the engine block or
other engine components.
²Never apply anything to the drive belt (including belt dressing).
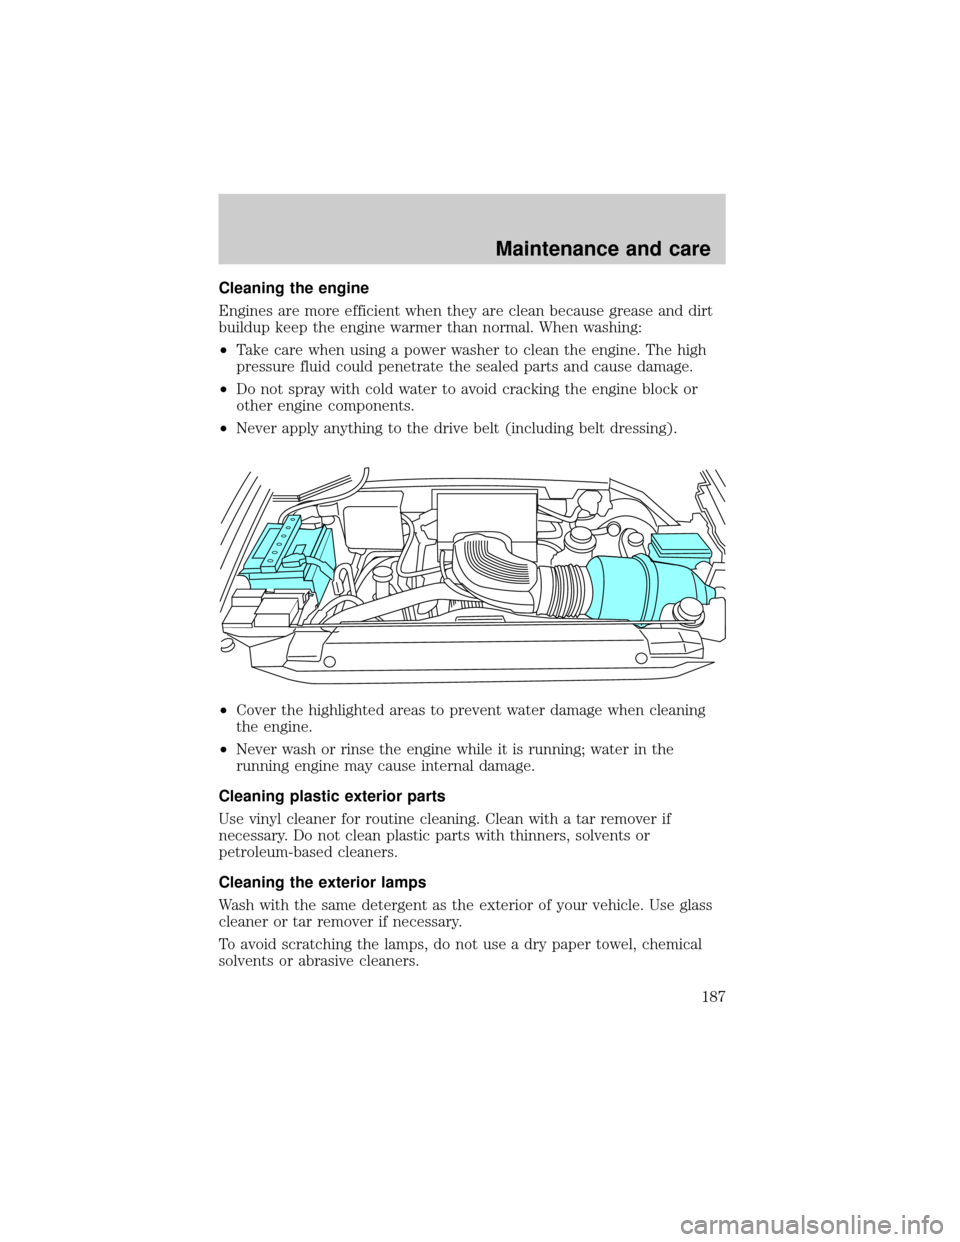
²Cover the highlighted areas to prevent water damage when cleaning
the engine.
²Never wash or rinse the engine while it is running; water in the
running engine may cause internal damage.
Cleaning plastic exterior parts
Use vinyl cleaner for routine cleaning. Clean with a tar remover if
necessary. Do not clean plastic parts with thinners, solvents or
petroleum-based cleaners.
Cleaning the exterior lamps
Wash with the same detergent as the exterior of your vehicle. Use glass
cleaner or tar remover if necessary.
To avoid scratching the lamps, do not use a dry paper towel, chemical
solvents or abrasive cleaners.
Maintenance and care
187