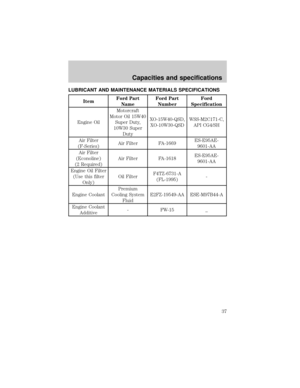
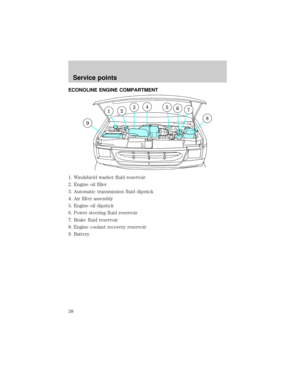
Page 9 of 39
, the use of the")
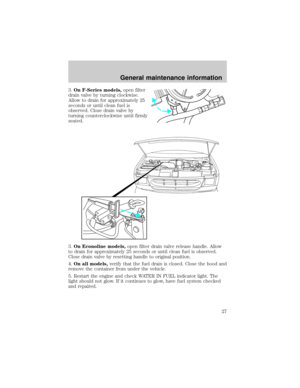
STARTING THE ENGINE
Read all starting instructions carefully before you start your vehicle.
Starting procedures are also shown on the vehicle visor. For
temperatures below 0ÉC (32ÉF), the use of the correct grade engine oil is
essential for proper operation.
If your vehicle is equipped with a manual transmission, make sure the
parking brake is set fully before you turn the key. Depress the clutch
pedal and place the gearshift in the neutral position. The clutch must be
fully depressed in order to operate the starter. Do not press the
accelerator during starting.
If your vehicle is equipped with an automatic transmission, ensure the
gearshift lever is in P (Park) and the parking brake is set before you turn
the key. Do not press the accelerator during starting.
COLD WEATHER STARTING
Do not crank the engine for more than 30 seconds at a time as starter
damage may occur. If the engine fails to start, turn the key to OFF and
wait 30 seconds before trying again.
Do not use starting fluid such as ether in the air intake system (see Air
Cleaner Decal). Such fluid could cause immediate explosive damage to
the engine and possible personal injury.
Do not add gasoline, gasohol or alcohol to diesel fuel. This practice
creates a serious fire hazard and causes engine performance problems.
1. Make sure all vehicle occupants have buckled their safety belts. For
more information on safety belts and their proper usage, refer toSeating
and safety restraintschapter in the owner guide.
2. Make sure the headlamps and vehicle accessories are off.
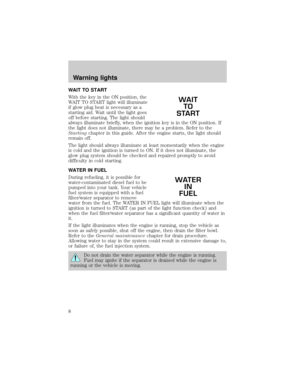
3. Turn the key to the ON position.
When the WAIT TO START light
goes off, turn the key to START.
(For Canadian vehicles, the daytime
running lamps will be on if the
parking brake is not applied and the key is turned to ON.)
4. When the engine starts, release the key. The glow plugs will continue
to be activated for up to two minutes. If the engine is not started before
the activation ceases, the glow plug system must be reset by turning the
ignition key to OFF.
WAIT
TO
START
Starting
9
Page 10 of 39

STOPPING THE ENGINE
Turn the ignition to OFF.")
5. After the engine starts, allow it to idle for about 15 seconds. (Do not
increase engine speed until the oil pressure gauge indicates normal
pressure.)
STOPPING THE ENGINE
Turn the ignition to OFF. To prolong engine life (after extended high
speed or maximum GVW operation), it is recommended that a hot engine
be allowed to operate at low idle for about 7±10 minutes which would
allow sufficient time for the turbocharged engine to cool down.
COLD WEATHER OPERATION
Changing to a lighter grade engine oil also makes starting easier under
these conditions.
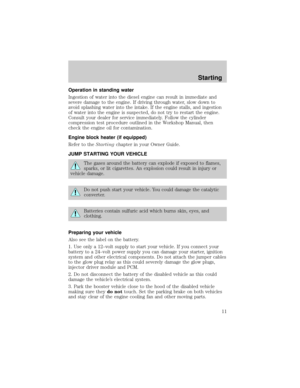
At temperatures below ±7ÉC (20ÉF), Number 2±D diesel fuel may thicken
enough to clog the fuel filter. Your engine is equipped with a fuel
filter/heater/water/separator to keep the wax melted which will help
prevent fuel filter clogging. However, if the engine starts but stalls after a
short time and will not restart, the fuel filter may be clogged. For best
results in cold weather, use Number 1±D diesel fuel or ªwinterizedº
Number 2±D diesel fuel which has an additive to minimize wax
formation.
Your vehicle is also equipped with a bypass relief valve, located on the
in-tank fuel sending unit, which provides fuel flow to the engine if the
fuel pickup should become plugged by ice or wax. To allow this bypass
valve to function and avoid engine fuel starvation, it is recommended
that, during cold weather operation 0ÉC (32ÉF) or below, the fuel level in
your tank should not be allowed to drop below 1/4 full. This will help
prevent air from entering the fuel system and stalling the engine.
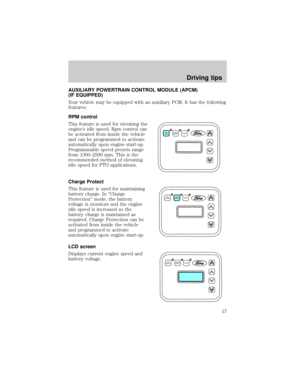
An auxiliary PCM can be purchased through your Ford dealer which, in
conjunction with your vehicle's control software, allows the engine to run
at an increased idle speed for improving cab heat.
Operation in snow
Vehicle operation in heavy snowfall or in dry loose snow that may swirl
around the front of the vehicle may feed excessive amounts of snow into
the air intake system. This could plug the air cleaner with snow and
cause the engine to stall.
Starting
10
Page 11 of 39

Operation in standing water
Ingestion of water into the diesel engine can result in immediate and
severe damage to the engine. If driving through water, slow down to
avoid splashing water into the intake. If the engine stalls, and ingestion
of water into the engine is suspected, do not try to restart the engine.
Consult your dealer for service immediately. Follow the cylinder
compression test procedure outlined in the Workshop Manual, then
check the engine oil for contamination.
Engine block heater (if equipped)
Refer to theStartingchapter in your Owner Guide.
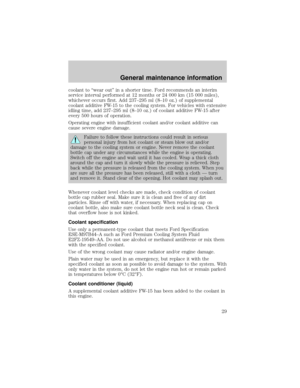
JUMP STARTING YOUR VEHICLE
The gases around the battery can explode if exposed to flames,
sparks, or lit cigarettes. An explosion could result in injury or
vehicle damage.
Do not push start your vehicle. You could damage the catalytic
converter.
Batteries contain sulfuric acid which burns skin, eyes, and
clothing.
Preparing your vehicle
Also see the label on the battery.
1. Use only a 12±volt supply to start your vehicle. If you connect your
battery to a 24±volt power supply you can damage your starter, ignition
system and other electrical components. Do not attach the jumper cables
to the glow plug relay as this could severely damage the glow plugs,
injector driver module and PCM.
2. Do not disconnect the battery of the disabled vehicle as this could
damage the vehicle's electrical system.
3. Park the booster vehicle close to the hood of the disabled vehicle
making sure theydo nottouch. Set the parking brake on both vehicles
and stay clear of the engine cooling fan and other moving parts.
Starting
11
Page 12 of 39

4. Check all battery terminals and remove any excessive corrosion before
you attach the battery cables.
5. Turn the heater fan on in both vehicles to protect any electrical
surges. Turn all other accessories off.
Connecting the jumper cables
1. Position the vehicles so that they
do not touch one another.
2. Switch off the engine. Switch off
any unnecessary electrical
equipment.
3. Connect the positive (+) terminal
of the discharged battery to the
positive (+) terminal of the booster
battery.Do notjump start the
driver's side or frame mounted
battery.
4. Connect one end of the second
lead to the negative (-) terminal of
the booster battery and the other
end to a metal part of the engine to be started, not to the negative (-)
terminal of the discharged battery.
5. Make sure that the jump leads are clear of moving parts of the engine.
Do not connect the end of the second cable to the negative (-)
terminal of the battery to be jumped. A spark may cause an
explosion of the gases that surround the battery.
Jump starting
1. Start the booster vehicle and run the engine at moderately increased
speed.
2. Start the engine of the vehicle with the discharged battery.
3. Once the engine has been started, run both vehicles for a further
three minutes before disconnecting the leads.
+–
+–
41
2
3
Starting
12
Page 13 of 39
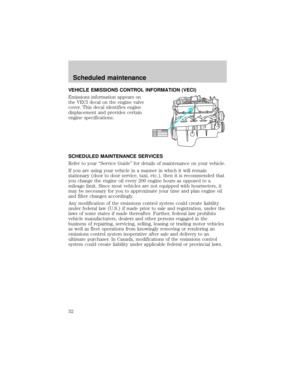
Removing the jumper cables
1. Remove the jumper cables in
reverse order. Take the cable off the
metallic surface first, followed by
the cable on the negative (-)
booster battery terminal.
2. Remove the cable from the
positive (+) terminal of the booster
battery and then the discharged
battery.
3. After the disabled vehicle has
been started, allow it to idle for a
while so the engine can ªrelearnº its
idle conditions.
+–
+–
14
3
2
Starting
13
Page 14 of 39

TRANSMISSION SHIFT SPEEDS
Do not overspeed the engine when going downhill or steep grades. Do
not allow engine speed to exceed the redline area of the tachometer.
Operating the engine beyond the governed speed can cause severe
engine damage.
Upshift and downshift according to the following shift speed charts:
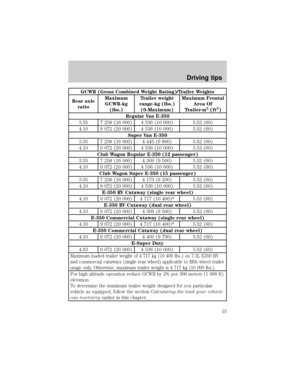
Upshifts when accelerating (recommended for best fuel economy)
6-speed transmission
Shift from: Transfer case position1(if equipped)
2H or 4H 4L
LO-1 8 km/h (5 mph) 3 km/h (2 mph)
1-2 16 km/h (10 mph) 6 km/h (4 mph)
2-3 32 km/h (20 mph) 13 km/h (8 mph)
3-4 48 km/h (30 mph) 19 km/h (12 mph)
4-
D(Overdrive) 64 km/h (40 mph) 24 km/h (15 mph)
Maximum downshift speeds1
6-speed transmission
Shift from: Transfer case position (if equipped)2
2H or 4H 4L
D(Overdrive) - 4 72 km/h (45 mph) 26 km/h (16 mph)
4-3 56 km/h (35 mph) 19 km/h (12 mph)
3-2 32 km/h (20 mph) 13 km/h (8 mph)
2-1 8 km/h (5 mph) 3 km/h (2 mph)
1-LO Only shift to LO when at a stop.
1Use 2H or 4H for 4WD equipped vehicles.2Downshift at lower speeds when driving on slippery surfaces.
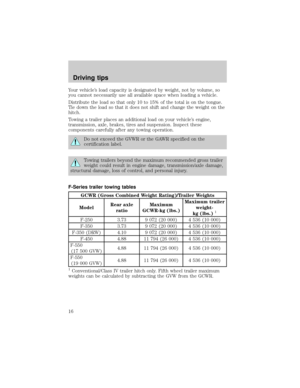
TRAILER TOWING
Refer to your ªOwner Guideº for full details on towing a trailer.
Econoline trailer towing tables
Your vehicle may tow a class I, II or III trailer provided the maximum
trailer weight is less than or equal to the maximum trailer weight listed
for your engine and rear axle ratio on the following charts.
Driving tips
14
Page 15 of 39
/Trailer Weights
Rear axle
ratioMaximum
GCWR-kg
(lbs.)Trailer weight
range-kg (lbs.)
(0-Maximum)Maximum Frontal
Area Of
Trailer-m
2(ft2)
Regular Van E-350
3.55 7 258")
GCWR (Gross Combined Weight Rating)/Trailer Weights
Rear axle
ratioMaximum
GCWR-kg
(lbs.)Trailer weight
range-kg (lbs.)
(0-Maximum)Maximum Frontal
Area Of
Trailer-m
2(ft2)
Regular Van E-350
3.55 7 258 (16 000) 4 536 (10 000) 5.52 (60)
4.10 9 072 (20 000) 4 536 (10 000) 5.52 (60)
Super Van E-350
3.55 7 258 (16 000) 4 445 (9 800) 5.52 (60)
4.10 9 072 (20 000) 4 536 (10 000) 5.52 (60)
Club Wagon Regular E-350 (12 passenger)
3.55 7 258 (16 000) 4 309 (9 500) 5.52 (60)
4.10 9 072 (20 000) 4 536 (10 000) 5.52 (60)
Club Wagon Super E-350 (15 passenger)
3.55 7 258 (16 000) 4 173 (9 200) 5.52 (60)
4.10 9 072 (20 000) 4 536 (10 000) 5.52 (60)
E-350 RV Cutaway (single rear wheel)
4.10 9 072 (20 000) 4 717 (10 400)* 5.52 (60)
E-350 RV Cutaway (dual rear wheel)
4.10 9 072 (20 000) 4 309 (9 500) 5.52 (60)
E-350 Commercial Cutaway (single rear wheel)
4.10 9 072 (20 000) 4 717 (10 400)* 5.52 (60)
E-350 Commercial Cutaway (dual rear wheel)
4.10 9 072 (20 000) 4 400 (9 700) 5.52 (60)
E-Super Duty
4.63 9 072 (20 000) 4 536 (10 000) 5.52 (60)
Maximum loaded trailer weight of 4 717 kg (10 400 lbs.) on 7.3L E350 RV
and commercial cutaways (single rear wheel) applicable to fifth wheel trailer
usage only. Otherwise, maximum trailer weight is 4 717 kg (10 000 lbs.).
For high altitude operation reduce GCWR by 2% per 300 meters (1 000 ft)
elevation.
To determine the maximum trailer weight designed for you particular
vehicle as equipped, follow the sectionCalculating the load your vehicle
can tow/carryearlier in this chapter.
Driving tips
15
Page 16 of 39

Your vehicle's load capacity is designated by weight, not by volume, so
you cannot necessarily use all available space when loading a vehicle.
Distribute the load so that only 10 to 15% of the total is on the tongue.
Tie down the load so that it does not shift and change the weight on the
hitch.
Towing a trailer places an additional load on your vehicle's engine,
transmission, axle, brakes, tires and suspension. Inspect these
components carefully after any towing operation.
Do not exceed the GVWR or the GAWR specified on the
certification label.
Towing trailers beyond the maximum recommended gross trailer
weight could result in engine damage, transmission/axle damage,
structural damage, loss of control, and personal injury.
F-Series trailer towing tables
GCWR (Gross Combined Weight Rating)/Trailer Weights
ModelRear axle
ratioMaximum
GCWR-kg (lbs.)Maximum trailer
weight-
kg (lbs.)
1
F-250 3.73 9 072 (20 000) 4 536 (10 000)
F-350 3.73 9 072 (20 000) 4 536 (10 000)
F-350 (DRW) 4.10 9 072 (20 000) 4 536 (10 000)
F-450 4.88 11 794 (26 000) 4 536 (10 000)
F-550
(17 500 GVW)4.88 11 794 (26 000) 4 536 (10 000)
F-550
(19 000 GVW)4.88 11 794 (26 000) 4 536 (10 000)
1Conventional/Class IV trailer hitch only. Fifth wheel trailer maximum
weights can be calculated by subtracting the GVW from the GCWR.
Driving tips
16


booster battery terminal.
2. Remove th")