Page 127 of 208
The fuses are coded as follows.
Fuse/Relay
LocationFuse Amp
RatingDescription
1 20A RABS/4WABS Module
2 15A Brake Warning Diode/Resistor, Instrument
Cluster, Warning Chime, 4WABS Relay,
Warning Indicators
3 15A Main Light Switch, RKE Module, Radio
4 15A Power Locks w/RKE, Illuminated Entry,
Warning Chime, Modified Vehicle, Power
Mirrors, Main Light Switch, Courtesy Lamps
5 20A RKE Module, Power Lock Switches,
Memory Lock, Power Locks with RKE
6 10A Shift Interlock, Speed Control, DRL Module
7 10A Multi-Function Switch, Turn Signals
1234
5
7
689101142
43
44 13 12 14
15 16 17
19 18
2021 22 23
25 24
26 27 28 29
31 30 32 33 3435
37
3638 3940
41
Roadside emergencies
127
ProCarManuals.com
Page 132 of 208

CHANGING THE TIRES
If you get a flat tire while driving, do not apply the brake heavily.
Instead, gradually decrease your speed. Hold the steering wheel firmly
and slowly move to a safe place on the side of the road.
Spare tire information
The spare tire for your vehicle is stowed under the rear of your vehicle
(except cutaway and stripped chassis models).
To remove the spare tire:
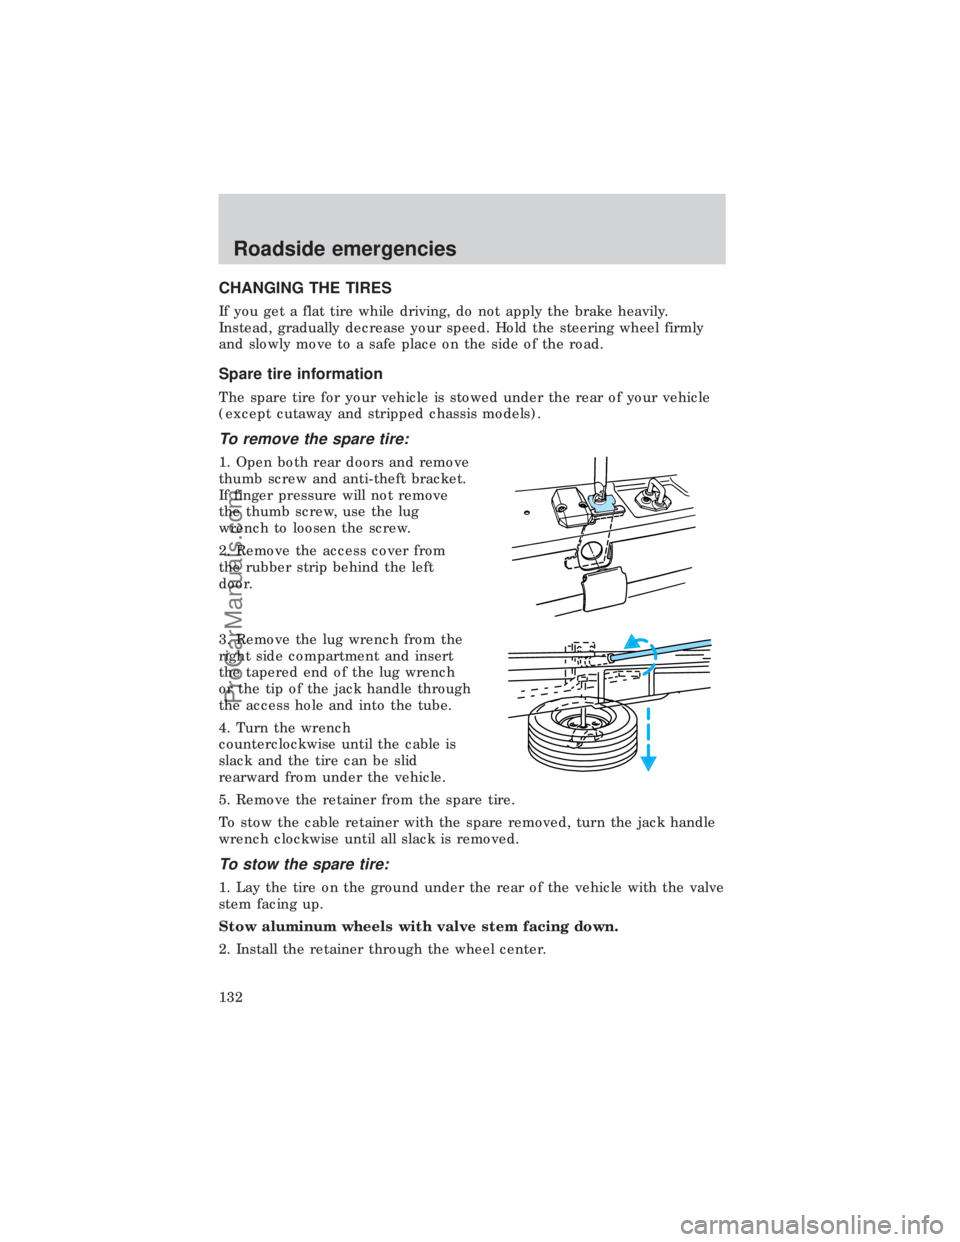
1. Open both rear doors and remove
thumb screw and anti-theft bracket.
If finger pressure will not remove
the thumb screw, use the lug
wrench to loosen the screw.
2. Remove the access cover from
the rubber strip behind the left
door.
3. Remove the lug wrench from the
right side compartment and insert
the tapered end of the lug wrench
or the tip of the jack handle through
the access hole and into the tube.
4. Turn the wrench
counterclockwise until the cable is
slack and the tire can be slid
rearward from under the vehicle.
5. Remove the retainer from the spare tire.
To stow the cable retainer with the spare removed, turn the jack handle
wrench clockwise until all slack is removed.
To stow the spare tire:
1. Lay the tire on the ground under the rear of the vehicle with the valve
stem facing up.
Stow aluminum wheels with valve stem facing down.
2. Install the retainer through the wheel center.
Roadside emergencies
132
ProCarManuals.com
Page 133 of 208
3. Raise the tire by turning the
wrench or handle clockwise.
Continue until the lift mechanism
ªclicks.º
4. Check that the tire is tightly
seated under the vehicle by pushing
against the tire. Retighten as
necessary.
5. Replace the access cover,
anti-theft bracket and thumb screw. Use finger pressure only to secure
the thumb screw.
Make sure the spare tire and jacking equipment are stowed and
secured in the proper storage location.
Never run the engine with one wheel off the ground.
Tire change procedure
Preparing to change the tire
To prevent the vehicle from moving when you change a tire, be
sure the parking brake is set, then block (in both directions) the
wheel that is diagonally opposite (other side and end of the vehicle) to
the tire being changed.
1. Park on a level surface.
2. Activate the warning flashers.
3. Place the gearshift in P (Park)(automatic transmission).
Roadside emergencies
133
ProCarManuals.com
Page 134 of 208
Type A
Type B
4. Apply the parking brake and turn
engine OFF.
5. Block the wheel that is diagonally
opposite the tire you are changing.
On E-Super Duty vehicles, the
parking brake is on the
transmission. Therefore, the vehicle
will not be prevented from moving
when a rear wheel is lifted, even if
the parking brake is applied. Be sure to block both directions of the
wheel that is diagonally opposite to the wheel that is being lifted.
If the vehicle slips off the jack, you or someone else could be
seriously injured.
HOOD
PUSH
ON
PUSH
OFF
Roadside emergencies
134
ProCarManuals.com
Page 135 of 208
6. Remove the spare tire and jack
from the storage location.
7. Use the tapered end of the lug
nut wrench to unscrew wheel
ornaments attached by retaining
screws. Remove any wheel trim.
Insert the tapered end of the lug
nut wrench behind wheel covers or
hubcaps and twist off.
8. Loosen the wheel nut by pulling
up on the handle of the lug nut
wrench about one-half turn
(counterclockwise). Do not remove
the wheel lug nuts until you raise
the tire off the ground.
Replacing the tire
1. Assemble the jack handle sections together and lock into jack. Use the
jack handle to slide the jack under the vehicle.
To lessen the risk of personal injury, do not put any part of your
body under the vehicle while changing a tire. Do not start the
engine when your vehicle is on the jack. The jack is only meant for
changing the tire.
2. Position the jack to raise the front or rear wheel.
Roadside emergencies
135
ProCarManuals.com
Page 137 of 208
Front axle jacking points:
²All models
Place the jack under the pin on the
front axle.
3. Turn the jack handle clockwise until the wheel is completely off the
ground.
4. Remove the lug nuts with the lug nut wrench.
5. Replace the flat tire with the spare tire.
If your vehicle has single rear wheels, thread the lug nuts on the studs
with the beveled face toward the wheel.
If your vehicle has dual rear wheels, thread the two element swiveling
lug nuts on the studs with the flange facing toward the wheel.
6. Use the lug nut wrench to screw the lug nut snugly against the wheel.
7. Lower the vehicle by turning the jack handle counterclockwise.
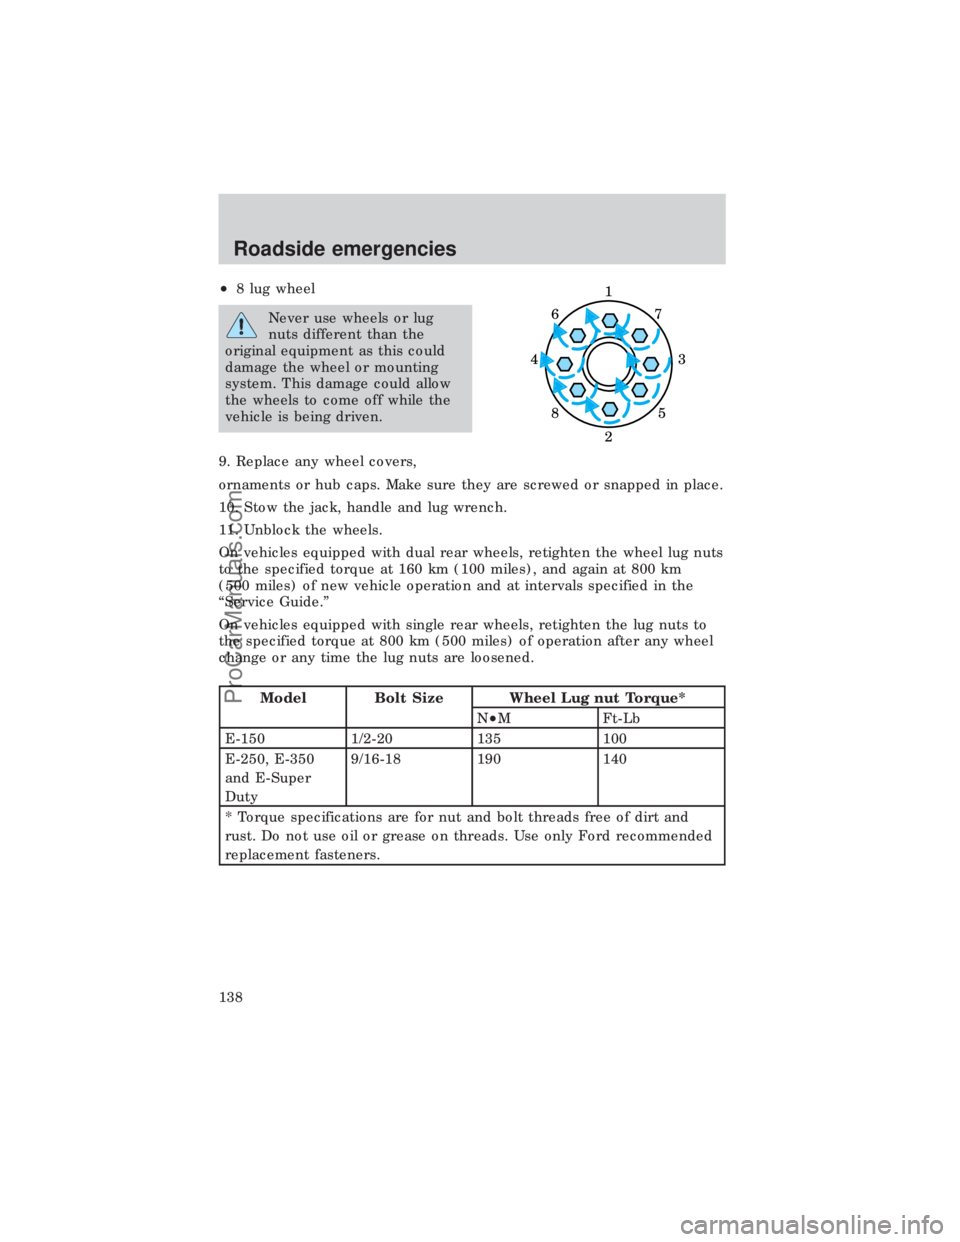
8. Remove the jack and fully tighten the lug nuts in the following
pattern:
²5 lug wheel
1
4 3
52
Roadside emergencies
137
ProCarManuals.com
Page 138 of 208

²8 lug wheel
Never use wheels or lug
nuts different than the
original equipment as this could
damage the wheel or mounting
system. This damage could allow
the wheels to come off while the
vehicle is being driven.
9. Replace any wheel covers,
ornaments or hub caps. Make sure they are screwed or snapped in place.
10. Stow the jack, handle and lug wrench.
11. Unblock the wheels.
On vehicles equipped with dual rear wheels, retighten the wheel lug nuts
to the specified torque at 160 km (100 miles), and again at 800 km
(500 miles) of new vehicle operation and at intervals specified in the
ªService Guide.º
On vehicles equipped with single rear wheels, retighten the lug nuts to
the specified torque at 800 km (500 miles) of operation after any wheel
change or any time the lug nuts are loosened.
Model Bolt Size Wheel Lug nut Torque*
N²M Ft-Lb
E-150 1/2-20 135 100
E-250, E-350
and E-Super
Duty9/16-18 190 140
* Torque specifications are for nut and bolt threads free of dirt and
rust. Do not use oil or grease on threads. Use only Ford recommended
replacement fasteners.
1
3 4
27 6
5 8
Roadside emergencies
138
ProCarManuals.com
Page 145 of 208

SERVICE RECOMMENDATIONS
To help you service your vehicle:
²We highlight do-it-yourself items in the engine compartment for easy
location.
²We provide a ªService Guideº which makes tracking routine service
easy.
If your vehicle requires professional service, your dealership can provide
necessary parts and service. Check your ªWarranty Guideº to find out
which parts and services are covered.
Use only recommended fuels, lubricants, fluids and service parts
conforming to specifications. Motorcraft parts are designed and built to
provide the best performance in your vehicle.
PRECAUTIONS WHEN SERVICING YOUR VEHICLE
Be especially careful when inspecting or servicing your vehicle.
²Do not work on a hot engine.
²When the engine is running, make sure that loose clothing, jewelry or
long hair does not get caught up in moving parts.
²Do not work on a vehicle with the engine running in an enclosed
space, unless you are sure you have enough ventilation.
²Keep all lit cigarettes, open flames and other lit material away from
the battery and all fuel related parts.
If you disconnect the battery, the engine must ªrelearnº its idle
conditions before your vehicle will drive properly, as explained inBattery
in this chapter.
Working with the engine off
1. Set the parking brake and ensure the gearshift is securely latched in P
(Park).
2. Turn off the engine and remove the key.
3. Block the wheels to prevent the vehicle from moving unexpectedly.
Working with the engine on
1. Set the parking brake and ensure the gearshift is securely latched in P
(Park).
2. Block the wheels to prevent the vehicle from moving unexpectedly.
Maintenance and care
145
ProCarManuals.com