1999 DODGE RAM fuel pump
[x] Cancel search: fuel pumpPage 898 of 1691

F1 - Not Used
F2 - 30 Amp (Lt. Green)
Blower Motor
CB1 - 30 Amp (Circuit Breaker)
Power Windows
CB2 - 30 Amp (Circuit Breaker)
Power Seats
1 - 20 Amp (Yellow)
Power Outlet
2 - Not Used
3 - Not Used
4 - Not Used
5 - 20 Amp (Yellow)
Cigar Lighter
6 - 20 Amp (Yellow)
Turn Signal Flasher
7 - 15 Amp (Lt. Blue)
Radio
8 - 20 Amp (Yellow)
Windshield Wipers
9 - 10 Amp (Red)
Fuel Pump Relay, A/C Compressor Clutch Relay
Automatic Shutdown Relay, Transmission Overdrive
Solenoid, EGR Solenoid, Powertrain Control Module (PCM)
Ignition Module
High Pressure Fuel Shut-Off Solenoid Relay (CNG Models Only)
EGR Solenoid (CNG Models Only)
10 - Not Used
Vehicle Speed Control
11 - 10 Amp (Red)
Buzzer, Overhead Console
12 - 15 Amp (Lt. Blue)
Airbag Diagnostic Module, Cluster, Message Center,
13 - 5 Amp (Tan)
Illumination
14 - 20 Amp (Yellow)
RWAL and ABS Module
15 - 15 Amp (Lt. Blue)
Automatic Day/Night Mirror, Back-up Lights,
Daytime Running Lamps
16 - 15 Amp (Lt. Blue)
Airbag Diagnostic Module
17 - 15 Amp (Lt. Blue)
Ignition Off Draw, Radio and Clock Memory
18 - 15 Amp (Lt. Blue)
Parking Lamps
19 - 20 Amp (Yellow)
Power Door Locks
20 - 15 Amp (Lt. Blue)
Stop Lamps
POWER DISTRIBUTION CENTER
Page 899 of 1691
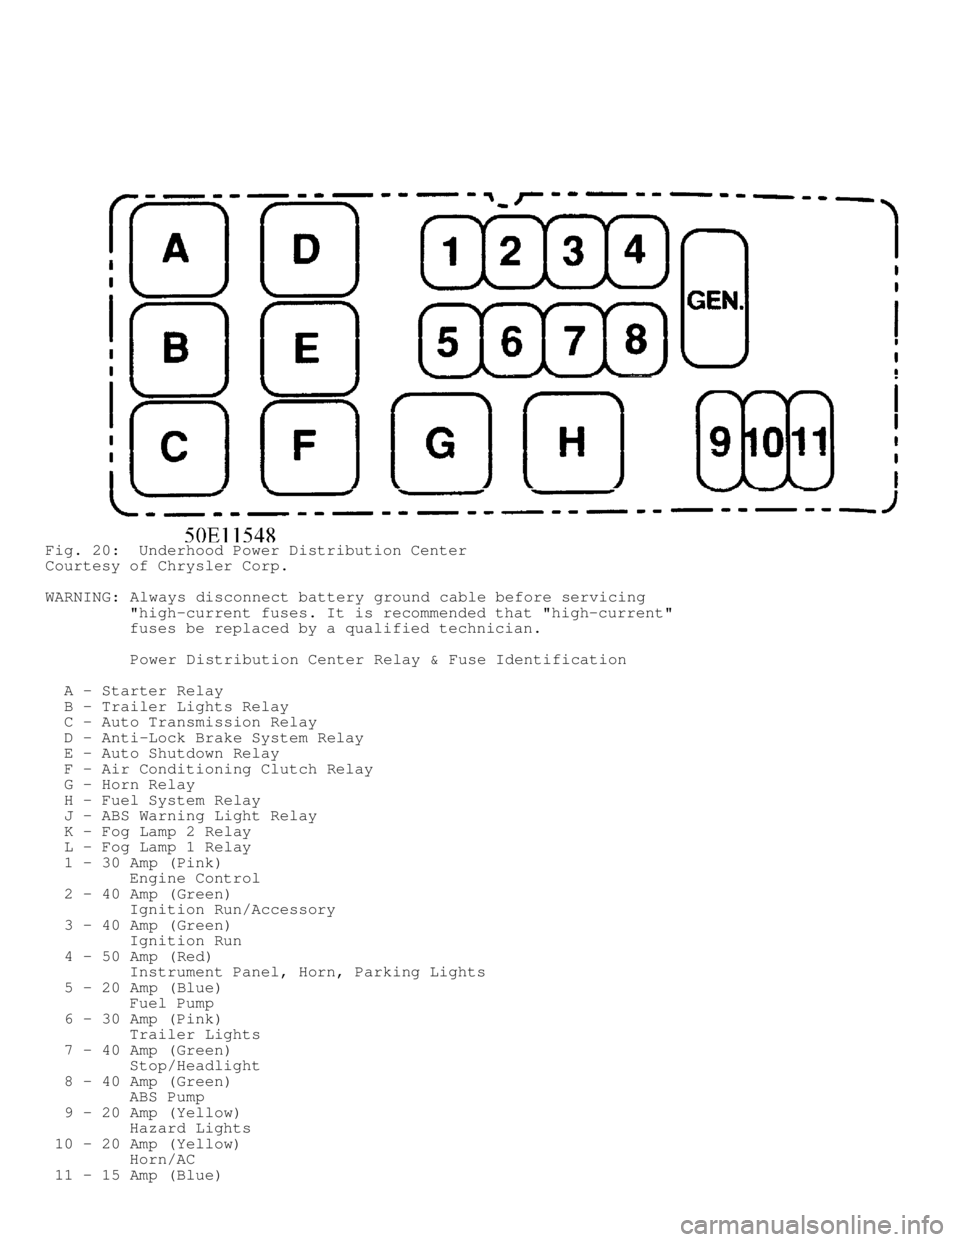
Fig. 20: Underhood Power Distribution Center
Courtesy of Chrysler Corp.
WARNING: Always disconnect battery ground cable before servicing
"high-current fuses. It is recommended that "high-current"
fuses be replaced by a qualified technician.
Power Distribution Center Relay & Fuse Identification
A - Starter Relay
B - Trailer Lights Relay
C - Auto Transmission Relay
D - Anti-Lock Brake System Relay
E - Auto Shutdown Relay
F - Air Conditioning Clutch Relay
G - Horn Relay
H - Fuel System Relay
J - ABS Warning Light Relay
K - Fog Lamp 2 Relay
L - Fog Lamp 1 Relay
1 - 30 Amp (Pink)
Engine Control
2 - 40 Amp (Green)
Ignition Run/Accessory
3 - 40 Amp (Green)
Ignition Run
4 - 50 Amp (Red)
Instrument Panel, Horn, Parking Lights
5 - 20 Amp (Blue)
Fuel Pump
6 - 30 Amp (Pink)
Trailer Lights
7 - 40 Amp (Green)
Stop/Headlight
8 - 40 Amp (Green)
ABS Pump
9 - 20 Amp (Yellow)
Hazard Lights
10 - 20 Amp (Yellow)
Horn/AC
11 - 15 Amp (Blue)
Page 930 of 1691

FUEL LINE BLEEDING
NOTE: Fuel line bleeding is necessary if fuel injection pump is
replaced, fuel filter/water separator is not filled with
diesel fuel before installing or vehicle ran out off fuel.
Bleed high-pressure fuel lines if connections are loosened or
replaced. If engine has not been operated for an extended
time, bleed fuel lines before next initial engine start-up.
WARNING: DO NOT bleed fuel lines on a hot engine, as high exhaust
temperatures may cause a fire. Carefully bleed fuel lines, as
fuel is under extremely high pressure and could penetrate
skin. Use safety goggles and protective clothing when
bleeding fuel lines.
1) Loosen banjo bolt holding low-pressure fuel supply line to
side of fuel injection pump. Wrap a towel around banjo fitting to
catch fuel. Crank engine quickly and release key before engine starts.
This will operate fuel transfer pump for about 25 seconds.
2) If fuel is not present at fuel supply line after 25
seconds, turn ignition off. Repeat engine crank procedure until fuel
is present at fuel supply line. Tighten banjo bolt at fuel supply line
to specification. See TORQUE SPECIFICATIONS.
CAUTION: Ensure parking brake is applied and transmission is in
Neutral before bleeding fuel injection pump or high-pressure
fuel lines. DO NOT operate starter for more than 30 seconds
when bleeding fuel injection pump or high-pressure fuel
lines. Allow 2-minute intervals between starter operations.
3) To bleed air from fuel injection pump, ensure parking
brake is applied and transmission is in Neutral, as engine may start
when operating starter to bleed air from fuel injection pump. Operate
starter for 30 seconds to bleed any trapped air in fuel injection
pump.
4) To bleed high-pressure fuel lines, ensure parking brake is
applied and transmission is in Neutral, as engine may start when
operating starter to bleed high-pressure fuel lines. Loosen high-
pressure fuel line nut at fuel injector.
5) Operate starter until steady fuel flow exists at high-
pressure fuel line. Tighten high-pressure fuel line nut to
specification. See TORQUE SPECIFICATIONS. Start engine. Repeat
procedure on each high-pressure fuel line until engine operates
smoothly.
FUEL FILTER/WATER SEPARATOR & WATER-IN-FUEL SENSOR
NOTE: Vehicle also contains an in-tank fuel filter located on
bottom of fuel tank module. For servicing procedure, see FUEL
TANK MODULE & IN-TANK FUEL FILTER under FUEL SYSTEM.
NOTE: When fuel filter/water separator is being replaced,
manufacturer recommends cleaning the pre-filter. See FUEL
HEATER under FUEL SYSTEM for servicing of pre-filter.
Removal
1) Ensure engine is off. Place drain pan below drain tube at
fuel filter/water separator. See Fig. 3. Rotate handle on drain valve
forward, toward front of vehicle to DRAIN position. Drain valve is
located near top of fuel filter/water separator. See Fig. 3. Once fuel
is drained from fuel filter/water separator, rotate handle on drain
valve back to CLOSE position.
Page 933 of 1691
Removal
1) Remove nameplate located above rocker lever covers. Remove
fuel injector drain line-to-fuel injector banjo bolt and seal washer
from each fuel injector. Plug all fuel openings.
2) Remove fuel injector drain line assembly retaining clamp
at rear of intake manifold. Remove fuel injector drain line bolt with
seal washers at filter mounting head. See Fig. 3. Remove fuel injector
drain line assembly.
Installation
To install, reverse removal procedure using NEW seal washers.
Tighten bolts to specification. See TORQUE SPECIFICATIONS.
FUEL HEATER
Removal & Installation
Fuel heater is located in FUEL FILTER/WATER SEPARATOR &
WATER-IN-FUEL SENSOR. See FUEL FILTER/WATER SEPARATOR & WATER-IN-FUEL
SENSOR.
FUEL INJECTOR
Removal
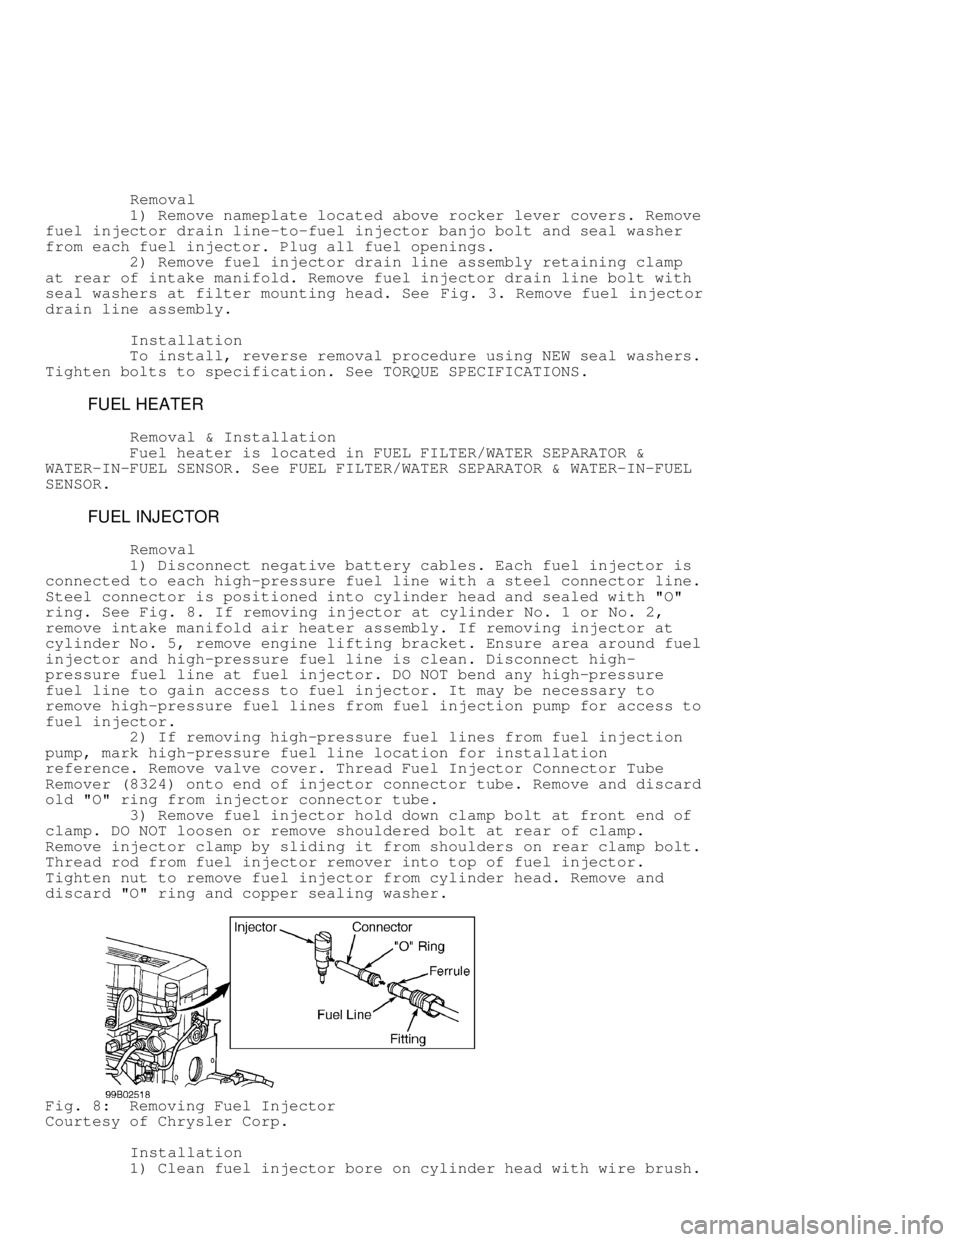
1) Disconnect negative battery cables. Each fuel injector is
connected to each high-pressure fuel line with a steel connector line.
Steel connector is positioned into cylinder head and sealed with "O"
ring. See Fig. 8. If removing injector at cylinder No. 1 or No. 2,
remove intake manifold air heater assembly. If removing injector at
cylinder No. 5, remove engine lifting bracket. Ensure area around fuel
injector and high-pressure fuel line is clean. Disconnect high-
pressure fuel line at fuel injector. DO NOT bend any high-pressure
fuel line to gain access to fuel injector. It may be necessary to
remove high-pressure fuel lines from fuel injection pump for access to
fuel injector.
2) If removing high-pressure fuel lines from fuel injection
pump, mark high-pressure fuel line location for installation
reference. Remove valve cover. Thread Fuel Injector Connector Tube
Remover (8324) onto end of injector connector tube. Remove and discard\
old "O" ring from injector connector tube.
3) Remove fuel injector hold down clamp bolt at front end of
clamp. DO NOT loosen or remove shouldered bolt at rear of clamp.
Remove injector clamp by sliding it from shoulders on rear clamp bolt.
Thread rod from fuel injector remover into top of fuel injector.
Tighten nut to remove fuel injector from cylinder head. Remove and
discard "O" ring and copper sealing washer.
Fig. 8: Removing Fuel Injector
Courtesy of Chrysler Corp.
Installation
1) Clean fuel injector bore on cylinder head with wire brush.
Page 934 of 1691

Apply light coat of engine oil on NEW .060" (1.5 mm) thick Copper
sealing washer. Install NEW Copper sealing washer on spray tip of fuel
injector. Engine oil is used to aid holding sealing washer in place.
Install new "O" ring on fuel injector. Apply small amount of engine
oil to "O" ring.
2) Ensure fuel inlet hole on side of fuel injector is
positioned toward injector connector tube. Install injector into
cylinder head bore using care not to allow injector tip to touch sides
of bore. Press fuel injector into cylinder head with finger pressure
only. Install fuel injector hold down clamp into shouldered bolt while
aligning slot in top of injector into groove in bottom of clamp.
Tighten opposite clamp bolt to specification. See TORQUE
SPECIFICATIONS.
3) Apply small amount of clean engine oil to NEW "O" ring.
Install "O" ring to fuel injector connector tube. Using finger
pressure only, press injector connector tube into cylinder head.
Connect and tighten high pressure fuel lines to specification. See
TORQUE SPECIFICATIONS.
NOTE: Fuel line fitting torque is important. Mating surfaces will
not seal if fuel line fitting is under or over-torqued.
4) To install remaining components, reverse removal
procedure. Tighten bolts to specification. See TORQUE SPECIFICATIONS.
Bleed high-pressure fuel lines. See FUEL LINE BLEEDING under FUEL
SYSTEM.
FUEL INJECTION PUMP
CAUTION: High-pressure fuel lines must be clamped securely and routed
so they do not contact each other or any other components. DO
NOT weld or substitute high-pressure fuel lines. High
-pressure lines are same length and proper high-pressure fuel
line must be installed in specified area for proper engine
operation.
Removal
1) Disconnect negative battery cables. Clean fuel lines at
cylinder head and injection pump. Clean fuel injection pump and fuel
lines at side of pump. Disconnect 9-pin electrical connector at Fuel
Pump Control Module (FPCM). Place a rag around overflow valve to catch\
excess fuel. Remove overflow valve and disconnect fuel return line.
Remove banjo bolts and fuel supply line at side of injection pump and
top of fuel filter housing.
2) Remove all high pressure fuel lines, intake air tube,
accelerator pedal position sensor, air intake housing, engine oil
dipstick tube, wiring clips, electrical connectors at intake heaters,
and engine lifting bracket. Unscrew plastic access cap at front gear
cover. Remove injection pump gear-to-injection pump shaft nut and
washer.
3) Engine may be rotated by removing dust plug from
transmission adapter plate and installing Engine Barring Tool (Snap-On
SP371) in transmission adapter plate. See Fig. 9. Rotate engine until
keyway is at 12 o'clock position.
Page 935 of 1691
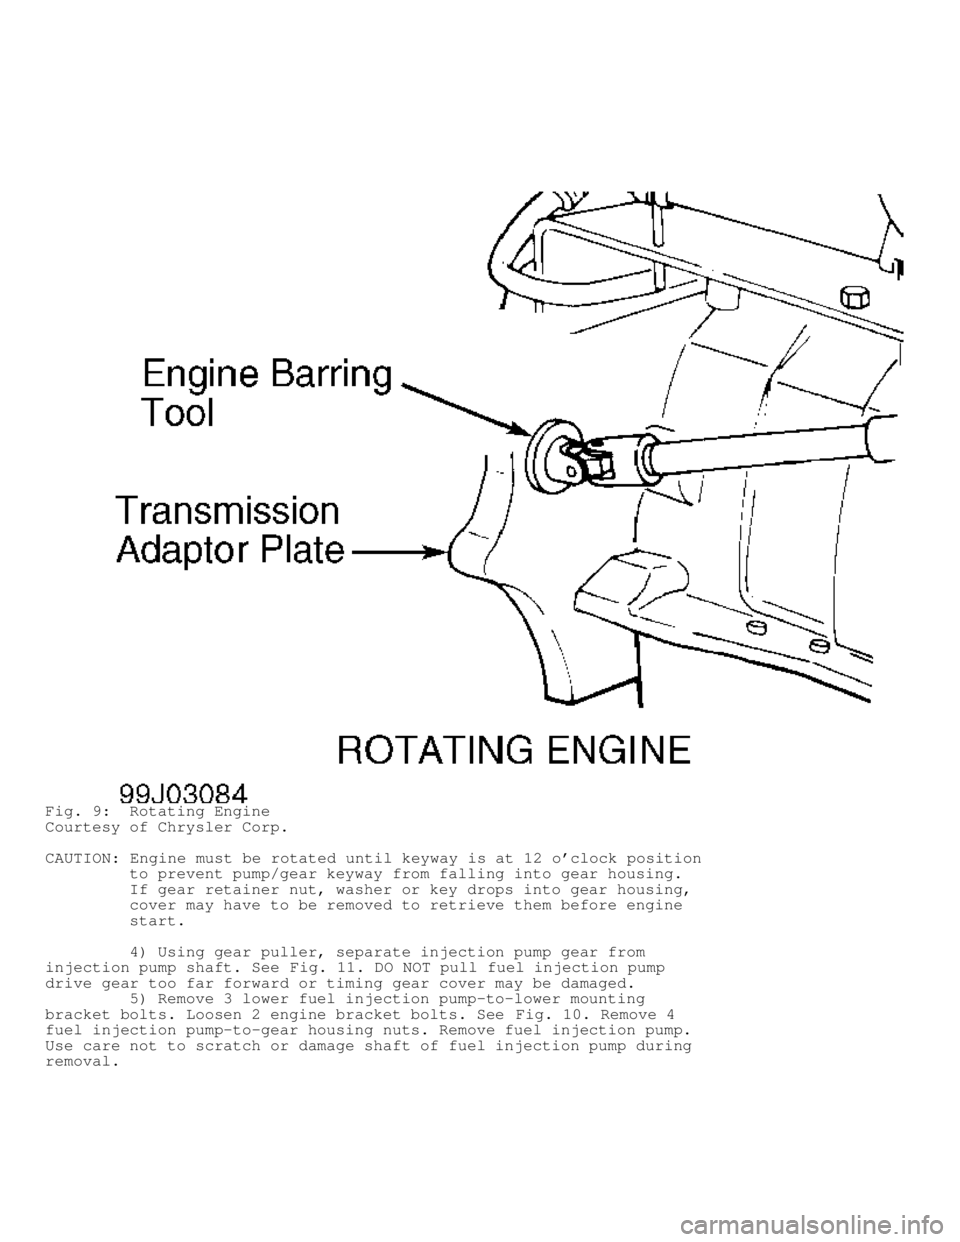
Fig. 9: Rotating Engine
Courtesy of Chrysler Corp.
CAUTION: Engine must be rotated until keyway is at 12 o'clock position
to prevent pump/gear keyway from falling into gear housing.
If gear retainer nut, washer or key drops into gear housing,
cover may have to be removed to retrieve them before engine
start.
4) Using gear puller, separate injection pump gear from
injection pump shaft. See Fig. 11. DO NOT pull fuel injection pump
drive gear too far forward or timing gear cover may be damaged.
5) Remove 3 lower fuel injection pump-to-lower mounting
bracket bolts. Loosen 2 engine bracket bolts. See Fig. 10. Remove 4
fuel injection pump-to-gear housing nuts. Remove fuel injection pump.
Use care not to scratch or damage shaft of fuel injection pump during
removal.
Page 936 of 1691
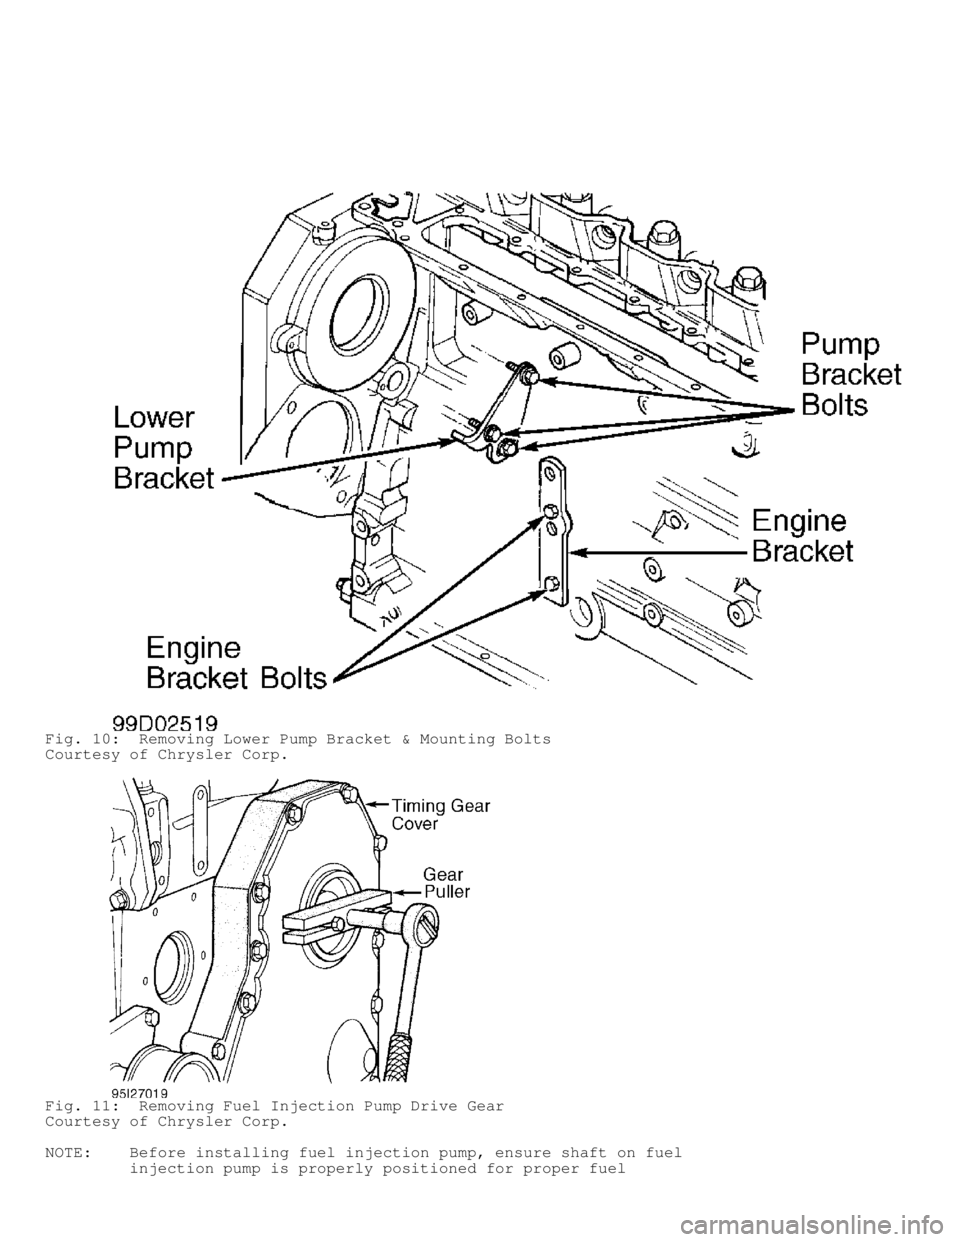
Fig. 10: Removing Lower Pump Bracket & Mounting Bolts
Courtesy of Chrysler Corp.
Fig. 11: Removing Fuel Injection Pump Drive Gear
Courtesy of Chrysler Corp.
NOTE: Before installing fuel injection pump, ensure shaft on fuel
injection pump is properly positioned for proper fuel
Page 937 of 1691
injection pump timing, cylinder No. 1 at TDC on compression
stroke and timing pin is engaged in machined hole on camshaft
gear.
Installation
1) Check pump mounting surfaces at pump and mounting flange
for nicks, cuts or damage. Check "O" ring surfaces for nicks, cuts or
damage. Clean injection pump mounting flange at gear housing. Clean
front of injection pump. Install new "O" ring on pump mounting area.
Apply clean engine oil to injection pump "O" ring only.
CAUTION: Ensure fuel injection pump drive gear-to-shaft mating
surfaces are clean and free of oil to provide proper seating
of fuel injection pump drive gear on shaft of fuel injection
pump.
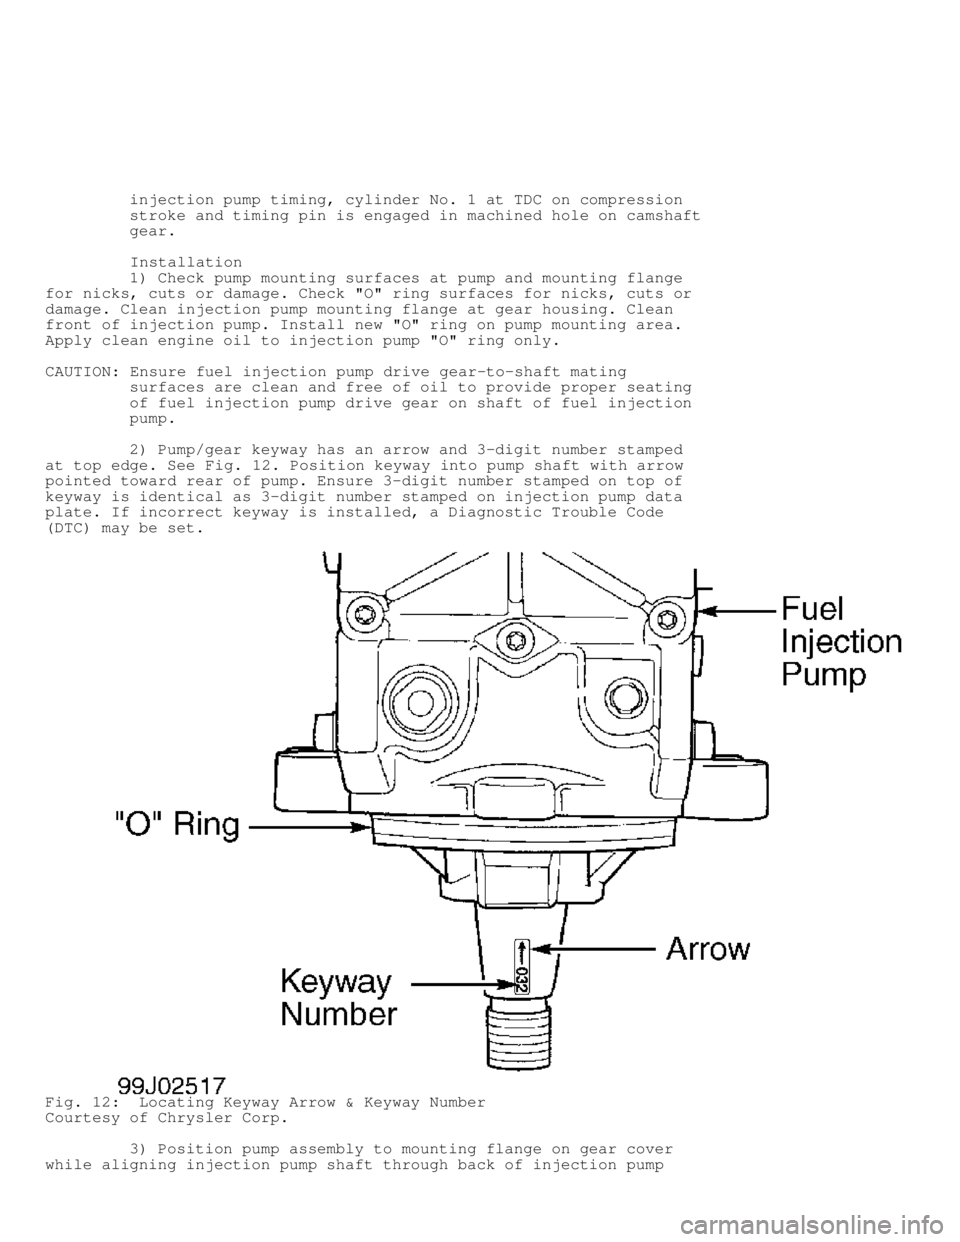
2) Pump/gear keyway has an arrow and 3-digit number stamped
at top edge. See Fig. 12. Position keyway into pump shaft with arrow
pointed toward rear of pump. Ensure 3-digit number stamped on top of
keyway is identical as 3-digit number stamped on injection pump data
plate. If incorrect keyway is installed, a Diagnostic Trouble Code
(DTC) may be set.
Fig. 12: Locating Keyway Arrow & Keyway Number
Courtesy of Chrysler Corp.
3) Position pump assembly to mounting flange on gear cover
while aligning injection pump shaft through back of injection pump