Page 101 of 424
yellowblue
2-31
Locking Rear Axle (If Equipped)
If you have this feature, your locking rear axle can give
you additional traction on snow, mud, ice, sand or
gravel. It works like a standard axle most of the time,
but when one of the rear wheels has no traction and the
other does, this feature will allow the wheel with
traction to move the vehicle.
Windows
Manual Windows
To open your manual windows, turn the hand crank on
each door to raise or lower your side door windows.
Power Windows (If Equipped)
2-Door Utility
Page 102 of 424

yellowblue
2-32
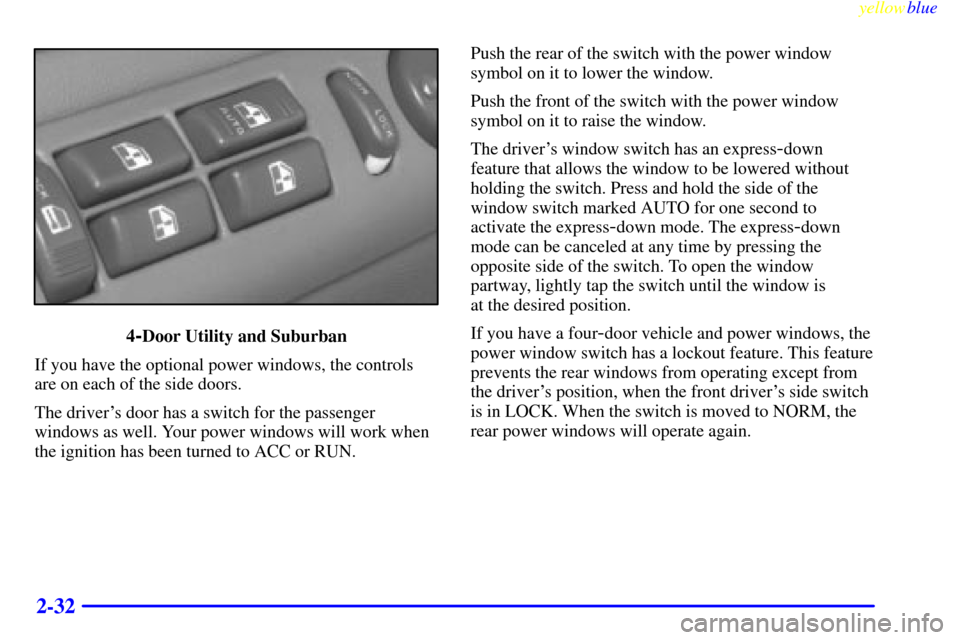
4-Door Utility and Suburban
If you have the optional power windows, the controls
are on each of the side doors.
The driver's door has a switch for the passenger
windows as well. Your power windows will work when
the ignition has been turned to ACC or RUN.Push the rear of the switch with the power window
symbol on it to lower the window.
Push the front of the switch with the power window
symbol on it to raise the window.
The driver's window switch has an express
-down
feature that allows the window to be lowered without
holding the switch. Press and hold the side of the
window switch marked AUTO for one second to
activate the express
-down mode. The express-down
mode can be canceled at any time by pressing the
opposite side of the switch. To open the window
partway, lightly tap the switch until the window is
at the desired position.
If you have a four
-door vehicle and power windows, the
power window switch has a lockout feature. This feature
prevents the rear windows from operating except from
the driver's position, when the front driver's side switch
is in LOCK. When the switch is moved to NORM, the
rear power windows will operate again.
Page 103 of 424

yellowblue
2-33 Electric Tailgate Glass Release
Before operating your electric tailgate glass release, see
the caution under ªYour Doors and How They Workº in
this section.
The electric hatch release
button lets you release the
tailgate glass. To release
the glass, press the top of
the button.
Then, lift the window up to open.
The shift lever must be in PARK (P) or NEUTRAL (N)
for the release to work.
There is also a power door lock switch at the rear of the
vehicle which will allow you to lock or unlock all of the
doors. See ªPower Doors Locksº in the Index.
Horn
Push on the center of the steering wheel to sound
the horn.
Tilt Wheel (If Equipped)
A tilt steering wheel allows
you to adjust the steering
wheel before you drive.
You can also raise it to the highest level to give your
legs more room when you enter and exit the vehicle.
To tilt the wheel, hold the steering wheel and pull the
lever. Move the steering wheel to a comfortable level,
then release the lever to lock the wheel in place.
Page 106 of 424
yellowblue
2-36 Windshield Washer
At the top of the lever,
there's a paddle with the
word PUSH on it. To spray
washer fluid on the
windshield, push the paddle.
CAUTION:
In freezing weather, don't use your washer until
the windshield is warmed. Otherwise the washer
fluid can form ice on the windshield, blocking
your vision.
Washer fluid will spray as long as you push the paddle.
When you let go of the paddle, the wipers will continue
to wipe for a few seconds and then either stop or return
to the preset speed.The use of hood
-mounted air deflectors may adversely
affect windshield wiper and washer performance.
Rear Window Wiper and Washer
The rear window wiper and
washer switch is on your
instrument panel, to the
right of the gage cluster.
To turn the wiper on, slide the switch all the way up.
For delay wiping, slide the switch even with DELAY in
the center position of the rear wiper control. The wiper
will cycle every nine seconds.
Page 110 of 424

yellowblue
2-40
Exterior Lamps
Your parking and headlamp knob is on the driver's side
of your instrument panel.
Rotate the knob clockwise, to the parking lamp symbol,
to turn on the following:
�Parking Lamps
�Sidemarker Lamps�Clearance Lamps (If Equipped)
�Taillamps
�License Plate Lamps
�Instrument Panel Lights
Rotate the knob clockwise again, to the master lighting
symbol, to turn on all the lamps listed as well as
the headlamps.
Rotate the knob counterclockwise, to OFF, to turn off
your lamps.
Rotate the thumbwheel next to the knob up to adjust
instrument panel lights. Rotate the thumbwheel up to the
first notch to return the radio display and gearshift
indicator LED display to full intensity when the
headlamps or parking lamps are on. To turn on the dome
lamps (with the vehicle doors closed) rotate the
thumbwheel up to the second notch position.
You can switch your headlamps from high to low beam
by pulling on the turn signal/high
-beam lever.
A circuit breaker protects your headlamps. If you have
an electrical overload, your headlamps will flicker on
and off. Have your headlamp wiring checked right away
if this happens.
Page 111 of 424

yellowblue
2-41 Headlamps-On Reminder
A buzzer will sound when your headlamps are turned on
and your ignition is in OFF, LOCK or ACCESSORY. If
you need to use your headlamps when the ignition
switch is in OFF, LOCK or ACCESSORY, the buzzer
can be turned off by turning the thumbwheel next to the
parking and headlamp switch all the way down.
Daytime Running Lamps
Daytime Running Lamps (DRL) can make it easier for
others to see the front of your vehicle during the day.
DRL can be helpful in many different driving
conditions, but they can be especially helpful in the
short periods after dawn and before sunset.
The DRL system will make your headlamps come on at
a reduced brightness when:
�the ignition is on,
�the headlamp switch is off and
�the parking brake is released.
When the DRL are on, only your headlamps will be on.
The taillamps, sidemarker and other lamps won't be on.
Your instrument panel won't be lit up either.When it begins to get dark, your DRL indicator light
is a reminder to turn your headlamp switch on. The
other lamps that come on with your headlamps will also
come on.
When you turn the headlamp switch off, the regular
lamps will go off, and your headlamps will change to
the reduced brightness of DRL.
To idle your vehicle with the DRL off, set the parking
brake. The DRL will stay off until you release the
parking brake.
As with any vehicle, you should turn on the regular
headlamp system when you need it.
Interior Lamps
Instrument Panel Intensity Control
The instrument panel intensity control is located next to
the parking/headlamp switch. Rotate the thumbwheel up to
adjust the instrument panel lights. Rotate the thumbwheel
up to the first notch to return the radio display and gear
shift indicator LED display to full intensity when the
headlamps or parking lamps are on. To turn on the dome
lamps (with the vehicle doors closed) rotate the
thumbwheel up to the second notch position.
Page 132 of 424

yellowblue
2-62
Be sure the cargo is properly loaded.
�If small heavy objects are placed on the roof, place
the load in the area over the rear wheels (behind the
rear side door on Suburbans). If you need to, cut a
piece of 3/8 inch plywood to fit inside the crossrails
and side rails to spread the load. If plywood is used,
tie it to the side rail supports.
�Tie the load to the crossrails or the side rail supports.
Use the crossrails only to keep the load from sliding.
�If you need to carry long items, move the crossrails
as far apart as they will go. Tie the load to the
crossrails and the side rails or side rail supports. Also
tie the load to the bumpers. Do not tie the load so
tightly that the crossrails or side rails are damaged.
�For the purpose of wind noise reduction, locate the
front crossrail approximately 18 to 24 inches
(46 cm to 58 cm) rearward of the front supports.
�After moving the crossrails, be sure to tighten all the
slider screws.
Your vehicle has a Center High
-Mounted Stoplamp
(CHMSL) located above the tailgate glass or above the
rear load doors.
If items are loaded on the roof of the vehicle, care should
be taken not to block or damage the CHMSL unit.
Ashtrays and Cigarette Lighter
Front Ashtray
The front ashtray is located at the bottom of the
instrument panel. Pull on the notch in the ashtray door to
open it.
NOTICE:
If you store paper or other things that burn in
your ashtrays, they could be set on fire by
cigarettes or other smoking materials. That could
cause a fire and possibly damage your vehicle. Do
not store papers and other things that burn in
your ashtrays.
To remove the front ashtray, press the retainer spring
and pivot the ashtray toward you. To replace the ashtray,
place the bottom part of the ashtray on the pivot bar at
the bottom of its mounting on the instrument panel.
Then rotate the ashtray back to its original position.
Page 134 of 424
yellowblue
2-64
Sun Visors
To block out glare, you can swing down the visors. You
can also swing them out to help block glare at the front
and side windows.
Your visor may have a strap to hold small items, such
as maps.
Some visors have an extender on the inside edge. When
the visor is down, pull the extender out for extra glare
coverage at the front or side.
Some visors have mirrors with lights. If the mirror has
lights, they will come on when you lift the mirror cover.
Universal Transmitter (If Equipped)
This transmitter allows you to consolidate the functions
of up to three individual hand
-held transmitters. It will
operate garage doors and gates, or with the accessory
package, other devices controlled by radio frequency
such as home/office lighting and security systems.