Page 111 of 424

yellowblue
2-41 Headlamps-On Reminder
A buzzer will sound when your headlamps are turned on
and your ignition is in OFF, LOCK or ACCESSORY. If
you need to use your headlamps when the ignition
switch is in OFF, LOCK or ACCESSORY, the buzzer
can be turned off by turning the thumbwheel next to the
parking and headlamp switch all the way down.
Daytime Running Lamps
Daytime Running Lamps (DRL) can make it easier for
others to see the front of your vehicle during the day.
DRL can be helpful in many different driving
conditions, but they can be especially helpful in the
short periods after dawn and before sunset.
The DRL system will make your headlamps come on at
a reduced brightness when:
�the ignition is on,
�the headlamp switch is off and
�the parking brake is released.
When the DRL are on, only your headlamps will be on.
The taillamps, sidemarker and other lamps won't be on.
Your instrument panel won't be lit up either.When it begins to get dark, your DRL indicator light
is a reminder to turn your headlamp switch on. The
other lamps that come on with your headlamps will also
come on.
When you turn the headlamp switch off, the regular
lamps will go off, and your headlamps will change to
the reduced brightness of DRL.
To idle your vehicle with the DRL off, set the parking
brake. The DRL will stay off until you release the
parking brake.
As with any vehicle, you should turn on the regular
headlamp system when you need it.
Interior Lamps
Instrument Panel Intensity Control
The instrument panel intensity control is located next to
the parking/headlamp switch. Rotate the thumbwheel up to
adjust the instrument panel lights. Rotate the thumbwheel
up to the first notch to return the radio display and gear
shift indicator LED display to full intensity when the
headlamps or parking lamps are on. To turn on the dome
lamps (with the vehicle doors closed) rotate the
thumbwheel up to the second notch position.
Page 113 of 424
yellowblue
2-43 Reading Lamps
If your vehicle has reading
lamps, press the button
next to the lamp to turn the
lamp on.
The lamps can be adjusted
to point in the direction
you want.
Press the button again to
turn the lamp off.
If your vehicle has an overhead console with reading
lamps, press the button next to the lamp to turn the
lamp on.
The lamps can be adjusted to point in the direction
you want.
Press the button again to turn the lamp off.
Mirrors
Inside Day/Night Rearview Mirror
Pull the tab under the mirror to reduce glare from
headlamps behind you after dark. Push the tab forward
for normal daytime operation.
Electrochromic Inside Rearview Mirror
with Compass (If Equipped)
Your vehicle may have an electrochromic inside
rearview mirror.
When on, an electrochromic mirror automatically dims
to the proper level to minimize glare from lights behind
you after dark.
Page 117 of 424
yellowblue
2-47 Electrochromic Inside Rearview Mirror
with Compass and Temperature Display
(If Equipped)
Your vehicle may have electrochromic inside and
outside rearview mirrors.
When on, an electrochromic mirror automatically dims
to the proper level to minimize glare from lights behind
you after dark.
The mirror also includes a display in the upper right
corner of the mirror face. This can be used as a compass
or to indicate outside air temperature.
Temperature Display
The temperature can be displayed by pressing the
TEMP side of the switch. Pressing the TEMP switch
once briefly, will toggle the temperature reading on and
off. To alternate the temperature reading between
Fahrenheit and Celsius, press and hold the TEMP button
for three seconds until the display blinks F� and C�.
Press and release the TEMP switch to toggle between
the Fahrenheit and Celsius readings. After five seconds
of inactivity, the display will return to a normal
temperature reading.
Page 118 of 424

yellowblue
2-48
Press and release the TEMP switch to toggle the
temperature display between Fahrenheit or Celsius.
If an abnormal reading is displayed, please consult
your dealer.
Electrochromic Mirror Operation
The right side of the switch, labeled TEMP, located at
the bottom of the mirror turns the electrochromic inside
and outside mirrors on and off. An indicator light,
located to the right of the TEMP switch, will come on
when the electrochromic mirrors are turned on. To turn
the mirrors on, press and hold the TEMP button for six
seconds. To turn the mirrors off, press and hold the
TEMP button for six seconds. The indicator light will
turn off.
Compass Operation
Press the COMP switch once briefly to turn the compass
on or off.
When the ignition and the compass feature are on, the
compass will show two character boxes for
approximately two seconds. After two seconds, the
mirror will display the compass heading.When cleaning the mirror, use a paper towel or similar
material dampened with glass cleaner. Do not spray
glass cleaner directly on the mirror as that may cause the
liquid cleaner to enter the mirror housing.
Compass Calibration
If, after two seconds, the display does not show a
compass heading (ªNº for North, for example), there
may be a strong magnetic field interfering with the
compass. Such interference may be caused by a
magnetic antenna mount, magnetic note pad holder
or a similar magnetic item. If the letter ªCº should ever
appear in the compass window, the mirror may
need calibration.
The mirror can be calibrated in one of two ways:
�Drive the vehicle in circles at five mph (8 km/h) or
less until the display reads a direction, or
�Drive the vehicle on your everyday routine and after
several turns the compass will become calibrated and
will display a direction.
Page 124 of 424
yellowblue
2-54
4. Add one peg at a
time until the PUSH
button on the closed
compartment door
operates the garage
door opener.5. Now, with the
compartment door
closed, push the
button marked PUSH
to make sure the
garage door opener
operates properly.
With the garage door opener positioned properly and
the right number of pegs in place, you should only
have to push the PUSH button slightly to operate
the opener.
6. Adjust the position of the garage door opener and
add or remove pegs, as needed, until the opener
operates properly.
Page 130 of 424

yellowblue
2-60
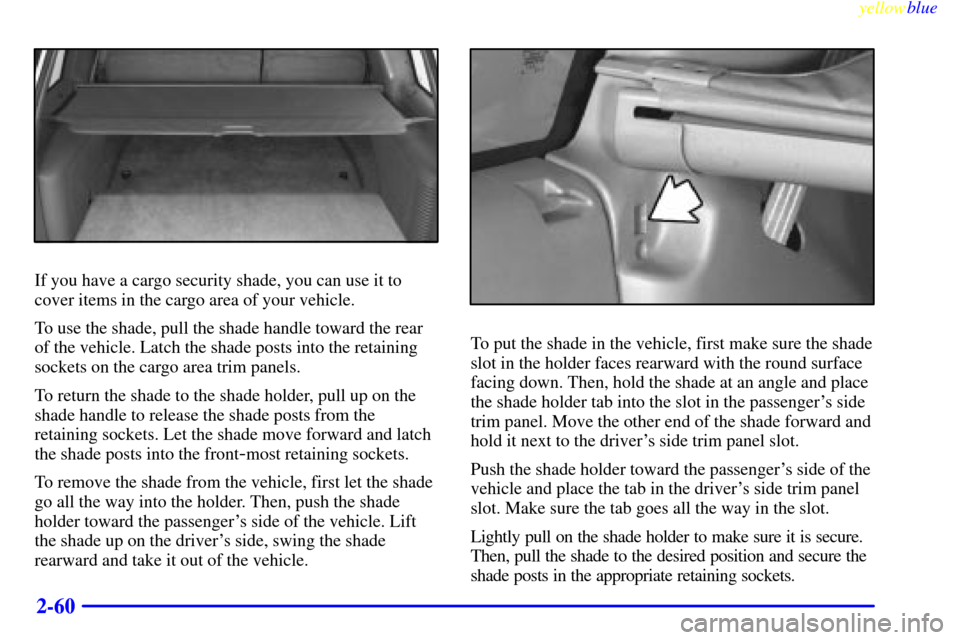
If you have a cargo security shade, you can use it to
cover items in the cargo area of your vehicle.
To use the shade, pull the shade handle toward the rear
of the vehicle. Latch the shade posts into the retaining
sockets on the cargo area trim panels.
To return the shade to the shade holder, pull up on the
shade handle to release the shade posts from the
retaining sockets. Let the shade move forward and latch
the shade posts into the front
-most retaining sockets.
To remove the shade from the vehicle, first let the shade
go all the way into the holder. Then, push the shade
holder toward the passenger's side of the vehicle. Lift
the shade up on the driver's side, swing the shade
rearward and take it out of the vehicle.
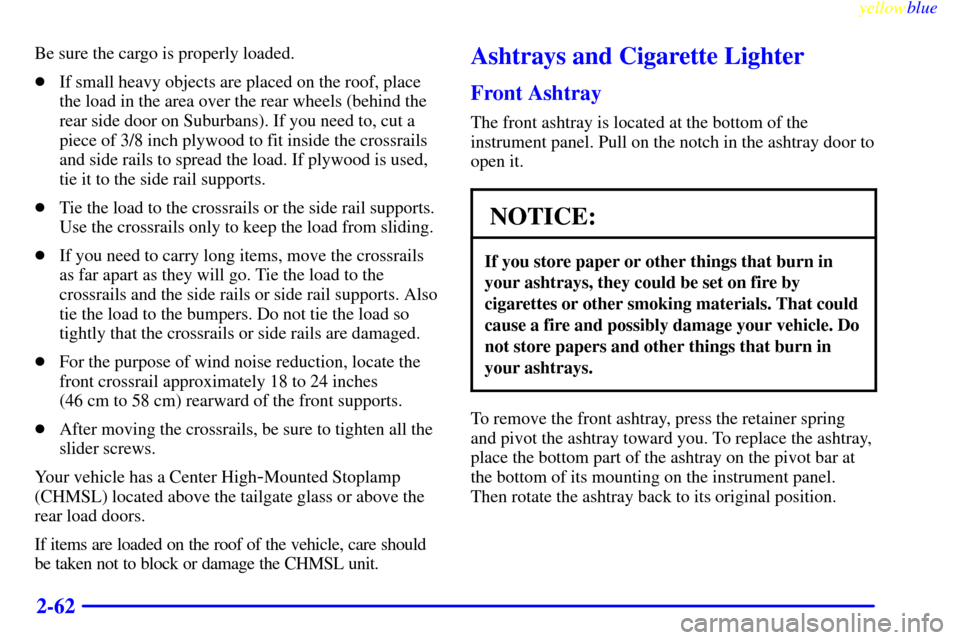
To put the shade in the vehicle, first make sure the shade
slot in the holder faces rearward with the round surface
facing down. Then, hold the shade at an angle and place
the shade holder tab into the slot in the passenger's side
trim panel. Move the other end of the shade forward and
hold it next to the driver's side trim panel slot.
Push the shade holder toward the passenger's side of the
vehicle and place the tab in the driver's side trim panel
slot. Make sure the tab goes all the way in the slot.
Lightly pull on the shade holder to make sure it is secure.
Then, pull the shade to the desired position and secure the
shade posts in the appropriate retaining sockets.
Page 132 of 424

yellowblue
2-62
Be sure the cargo is properly loaded.
�If small heavy objects are placed on the roof, place
the load in the area over the rear wheels (behind the
rear side door on Suburbans). If you need to, cut a
piece of 3/8 inch plywood to fit inside the crossrails
and side rails to spread the load. If plywood is used,
tie it to the side rail supports.
�Tie the load to the crossrails or the side rail supports.
Use the crossrails only to keep the load from sliding.
�If you need to carry long items, move the crossrails
as far apart as they will go. Tie the load to the
crossrails and the side rails or side rail supports. Also
tie the load to the bumpers. Do not tie the load so
tightly that the crossrails or side rails are damaged.
�For the purpose of wind noise reduction, locate the
front crossrail approximately 18 to 24 inches
(46 cm to 58 cm) rearward of the front supports.
�After moving the crossrails, be sure to tighten all the
slider screws.
Your vehicle has a Center High
-Mounted Stoplamp
(CHMSL) located above the tailgate glass or above the
rear load doors.
If items are loaded on the roof of the vehicle, care should
be taken not to block or damage the CHMSL unit.
Ashtrays and Cigarette Lighter
Front Ashtray
The front ashtray is located at the bottom of the
instrument panel. Pull on the notch in the ashtray door to
open it.
NOTICE:
If you store paper or other things that burn in
your ashtrays, they could be set on fire by
cigarettes or other smoking materials. That could
cause a fire and possibly damage your vehicle. Do
not store papers and other things that burn in
your ashtrays.
To remove the front ashtray, press the retainer spring
and pivot the ashtray toward you. To replace the ashtray,
place the bottom part of the ashtray on the pivot bar at
the bottom of its mounting on the instrument panel.
Then rotate the ashtray back to its original position.
Page 133 of 424
yellowblue
2-63 Rear Ashtray
To use a rear ashtray, if you have them, pull at the top of
the ashtray door to flip the door open.
To remove a rear ashtray, press down on the inside tabs
and open the door fully.
To use the cigarette lighter, push it in all the way, and let
go. When it's done heating, it will pop back by itself.
NOTICE:
Holding a cigarette lighter in with your hand
while it is heating can make it overload,
damaging the lighter and the heating element.
Just push the lighter all the way in and let go.
When it's done heating, it will pop back by itself.
Accessory Power Outlets
Two auxiliary power outlets are located near the
cigarette lighter. Use these outlets to power mobile
telephones or other devices designed to operate with
vehicle electrical systems.