Page 237 of 424

yellowblue
4-55 Parking on Hills
CAUTION:
You really should not park your vehicle, with a
trailer attached, on a hill. If something goes
wrong, your rig could start to move. People can
be injured, and both your vehicle and the trailer
can be damaged.
But if you ever have to park your rig on a hill, here's
how to do it:
1. Apply your regular brakes, but don't shift into
PARK (P) yet.
2. Have someone place chocks under the trailer wheels.
3. When the wheel chocks are in place, release the
regular brakes until the chocks absorb the load.
4. Reapply the regular brakes. Then apply your parking
brake, and then shift to PARK (P).5. If you have a four
-wheel-drive vehicle, be sure
the transfer case is in a drive gear
-- not in
NEUTRAL (N).
6. Release the regular brakes.
CAUTION:
It can be dangerous to get out of your vehicle if
the shift lever is not fully in PARK (P) with the
parking brake firmly set. Your vehicle can roll.
If you have left the engine running, the vehicle
can move suddenly. You or others could be
injured. To be sure your vehicle won't move, even
when you're on fairly level ground, use the steps
that follow.
If you have four-wheel drive and your transfer
case is in NEUTRAL (N), your vehicle will be free
to roll, even if your shift lever is in PARK (P). So,
be sure the transfer case is in a drive gear
-- not
in NEUTRAL (N).
Page 246 of 424

yellowblue
5-4
2. Get the vehicles close enough so the jumper cables
can reach, but be sure the vehicles aren't touching
each other. If they are, it could cause a ground
connection you don't want. You wouldn't be able to
start your vehicle, and the bad grounding could
damage the electrical systems.
To avoid the possibility of the vehicles rolling, set
the parking brake firmly on both vehicles involved in
the jump start procedure. Put an automatic
transmission in PARK (P) or a manual transmission
in NEUTRAL (N) before setting the parking brake.
If you have a four
-wheel-drive vehicle, be sure the
transfer case is not in NEUTRAL (N).
3. Turn off the ignition on both vehicles. Unplug
unnecessary accessories plugged into the cigarette
lighter or accessory power outlets. Turn off all lamps
that aren't needed as well as radios. This will avoid
sparks and help save both batteries. And it could
save your radio!
NOTICE:
If you leave your radio on, it could be badly
damaged. The repairs wouldn't be covered by
your warranty.
4. Open the hoods and locate the batteries. Find
the positive (+) and negative (
-) terminals on
each battery.
CAUTION:
If your vehicle has air conditioning, the auxiliary
electric fan under the hood can start up even
when the engine is not running and can injure
you. Keep hands, clothing and tools away from
any underhood electric fan.
Page 250 of 424

yellowblue
5-8
Towing Your Vehicle
CAUTION:
To help avoid serious personal injury to you
or others:
�Never let passengers ride in a vehicle that is
being towed.
�Never tow faster than safe or posted speeds.
�Never tow with damaged parts not
fully secured.
�Never get under your vehicle after it has
been lifted by the tow truck.
�Always secure the vehicle on each side with
separate safety chains when towing it.
�Use only the correct hooks.
NOTICE:
Use the proper towing equipment to avoid
damage to the bumper, fascia or fog lamp areas
of the vehicle.
With current trends in automotive styles and design, it is
essential that the correct towing equipment is used to
tow a vehicle. Your vehicle can be towed with
sling
-type equipment, wheel lift equipment or car carrier
equipment. Two
-Wheel-Drive vehicle towing limits for
sling
-type equipment and wheel lift equipment:
�Front Towing
-- 35 mph (55km/h) for
50 miles (80 km)
�Rear Towing
-- 55 mph (88km/h) or legal speed
limit and the distance is unlimited.
Four
-Wheel-Drive vehicles must have the transfer case
in NEUTRAL (N) and the towing limits for sling
-type
equipment and wheel lift equipment:
�Front Towing -- 55 mph (88 km/h) or legal speed
limit and distance is unlimited
�Rear Towing
-- 35 mph (55 km/h) for
50 miles (80 km).
Consult your dealer or a professional towing service if
you need to have your vehicle towed. See ªRoadside
Assistanceº in the Index.
Page 262 of 424

yellowblue
5-20
Changing a Flat Tire
If a tire goes flat, avoid further tire and wheel damage
by driving slowly to a level place. Turn on your hazard
warning flashers.
CAUTION:
Changing a tire can cause an injury. The vehicle
can slip off the jack and roll over you or other
people. You and they could be badly injured.
Find a level place to change your tire. To help
prevent the vehicle from moving:
1. Set the parking brake firmly.
2. Put the shift lever in PARK (P).
3. If you have a four
-wheel-drive vehicle,
be sure the transfer case is in a drive
gear
-- not in NEUTRAL (N).
4. Turn off the engine.
To be even more certain the vehicle won't move,
you can put blocks at the front and rear of the
tire farthest away from the one being changed.
That would be the tire on the other side of the
vehicle, at the opposite end.
The following steps will tell you how to use the jack and
change a tire.
Removing the Spare Tire and Tools
The equipment you'll need is located in the rear cargo
area. You'll also find your spare tire there.
On two
-door utility and Suburban models, the spare tire
is located at the rear of the vehicle. To remove the spare
tire, first open the tire cover, if you have one. Turn the
wing nut counterclockwise and take it, and the adapter,
off the bolt. Take the tire out of the vehicle and remove
the tire cover.
Page 279 of 424

yellowblue
5-37
NOTICE:
Spinning your wheels can destroy parts of your
vehicle as well as the tires. If you spin the wheels
too fast while shifting your transmission back
and forth, you can destroy your transmission.
For information about using tire chains on your vehicle,
see ªTire Chainsº in the Index.
Rocking Your Vehicle To Get It Out
First, turn your steering wheel left and right. That will
clear the area around your front wheels. If you have a
four
-wheel drive vehicle, shift into 4HI. Then shift back
and forth between REVERSE (R) and a forward gear,
spinning the wheels as little as possible. Release the
accelerator pedal while you shift, and press lightly on
the accelerator pedal when the transmission is in gear.
By slowly spinning your wheels in the forward and
reverse directions, you will cause a rocking motion that
may free your vehicle. If that doesn't get you out after a
few tries, you may need to be towed out. Or, you can use
your recovery hooks if your vehicle has them. If you do
need to be towed out, see ªTowing Your Vehicleº in the
Index.
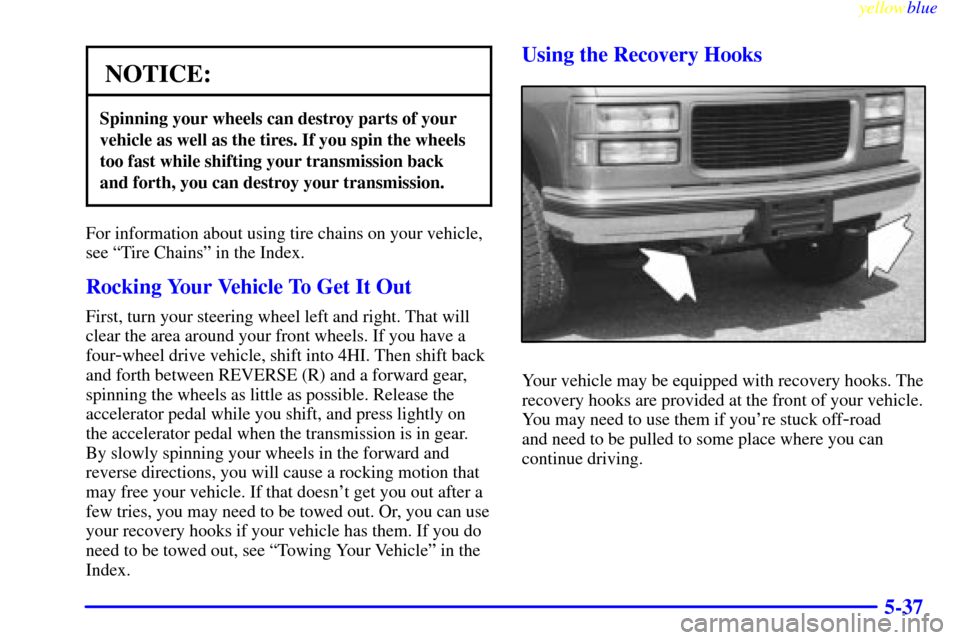
Using the Recovery Hooks
Your vehicle may be equipped with recovery hooks. The
recovery hooks are provided at the front of your vehicle.
You may need to use them if you're stuck off
-road
and need to be pulled to some place where you can
continue driving.
Page 281 of 424

6-
yellowblue
6-1
Section 6 Service and Appearance Care
Here you will find information about the care of your vehicle. This section begins with service and fuel information,
and then it shows how to check important fluid and lubricant levels. There is also technical information about your
vehicle, and a part devoted to its appearance care.
6
-2 Service
6
-3 Fuel (Gasoline Engine)
6
-5 Fuels in Foreign Countries (Gasoline Engines)
6
-5 Filling Your Tank (Gasoline Engine)
6
-8 Filling a Portable Fuel Container
6
-8 Checking Things Under the Hood
6
-12 Engine Oil (Gasoline Engine)
6
-16 Engine Air Cleaner/Filter (Gasoline Engines)
6
-19 Automatic Transmission Fluid
6
-22 Rear Axle
6
-22 Four-Wheel Drive
6
-24 Radiator Pressure Cap
6
-25 Thermostat
6
-25 Engine Coolant
6
-28 Power Steering Fluid
6
-29 Windshield Washer Fluid6
-30 Brakes
6
-34 Battery
6
-35 Bulb Replacement
6
-42 Windshield Wiper Blade Replacement
6
-43 Tires
6
-51 Appearance Care
6
-51 Cleaning the Inside of Your Vehicle
6
-54 Care of Safety Belts
6
-55 Cleaning the Outside of Your Vehicle
6
-58 GM Vehicle Care/Appearance Materials
6
-59 Vehicle Identification Number (VIN)
6
-60 Electrical System
6
-65 Replacement Bulbs
6
-67 Capacities and Specifications
6
-68 Air Conditioning Refrigerants
6
-69 Normal Replacement Parts--Gasoline Engines
Page 302 of 424
yellowblue
6-22
Rear Axle
When to Check and Change Lubricant
Refer to the Maintenance Schedule to determine how
often to check the lubricant and when to change it. See
ªScheduled Maintenance Servicesº in the Index.
How to Check Lubricant
If the level is below the bottom of the filler plug hole,
you'll need to add some lubricant. Add enough lubricant
to raise the level to the bottom of the filler plug hole.
What to Use
Refer to the Maintenance Schedule to determine what
kind of lubricant to use. See ªRecommended Fluids and
Lubricantsº in the Index.
Four-Wheel Drive
Most lubricant checks in this section also apply to
four
-wheel-drive vehicles. However, they have two
additional systems that need lubrication.
Transfer Case
When to Check Lubricant
Refer to the Maintenance Schedule to determine how
often to check the lubricant. See ªPeriodic Maintenance
Inspectionsº in the Index.
Page 346 of 424
yellowblue
6-66
LAMP OR BULB TRADE NO. QTY
INTERIOR
Dome Lamps
211
-22
Reading Lamps
211
-24
Roof Console Lamps* 168 2
Door Courtesy Lamp 194 2/4*
Four
-Wheel-Drive Indicator**194 1
Four
-Wheel-Drive Shift Lever**194 1
Instrument Panel Compartment Lamp 194 1
Ashtray Lamp 194 1
Sunshade Vanity Mirror 74 4
*Suburban Only
**Manual Transfer Case