Page 323 of 432
yellowblue
6-25
Rear Axle
When to Check Lubricant
Refer to the Maintenance Schedule to determine how
often to check the lubricant. See ªScheduled
Maintenance Servicesº in the Index.
How to Check Lubricant
1500 Series shown, 2500 Series similarThe proper level for the 1500 Series is from 5/8 inch
to 1 5/8 inch (15 mm to 40 mm) below the filler plug.
The proper level for the 2500 Series is from 0 to
3/8 inch (0 to 10 mm) below the filler plug. Add only
enough fluid to reach the proper level.
What to Use
Refer to the Maintenance Schedule to determine what
kind of lubricant to use. See ªRecommended Fluids and
Lubricantsº in the Index.
Four-Wheel Drive
Most lubricant checks in this section also apply to
four
-wheel-drive vehicles. However, they have two
additional systems that need lubrication.
Page 325 of 432
yellowblue
6-27 Front Axle
When to Check Lubricant
Refer to the Maintenance Schedule to determine how
often to check the lubricant. See ªScheduled
Maintenance Servicesº in the Index.
How to Check Lubricant
If the level is below the bottom of the filler plug hole,
you may need to add some lubricant.
When the differential is cold, add enough lubricant to
raise the level to 1/2 inch (12 mm) below the filler
plug hole.
When the differential is at operating temperature
(warm), add enough lubricant to raise the level to the
bottom of the filler plug hole.
What to Use
Refer to the Maintenance Schedule to determine what
kind of lubricant to use. See ªRecommended Fluids and
Lubricantsº in the Index.
Page 334 of 432
yellowblue
6-36
NOTICE:
�Using the wrong fluid can badly damage
brake system parts. For example, just a few
drops of mineral
-based oil, such as engine
oil, in your brake system can damage brake
system parts so badly that they'll have to be
replaced. Don't let someone put in the
wrong kind of fluid.
�If you spill brake fluid on your vehicle's
painted surfaces, the paint finish can be
damaged. Be careful not to spill brake fluid
on your vehicle. If you do, wash it off
immediately. See ªAppearance Careº in
the Index.
Brake Wear
Your vehicle has four-wheel disc brakes.
Disc brake pads have built
-in wear indicators that make a
high
-pitched warning sound when the brake pads are worn
and new pads are needed. The sound may come and go or
be heard all the time your vehicle is moving (except when
you are pushing on the brake pedal firmly).
CAUTION:
The brake wear warning sound means that soon
your brakes won't work well. That could lead to
an accident. When you hear the brake wear
warning sound, have your vehicle serviced.
NOTICE:
Continuing to drive with worn-out brake pads
could result in costly brake repair.
Page 336 of 432
yellowblue
6-38 Vehicle Storage
If you're not going to drive your vehicle for 25 days
or more, remove the black, negative (
-) cable from
the battery. This will help keep your battery from
running down.
CAUTION:
Batteries have acid that can burn you and gas
that can explode. You can be badly hurt if you
aren't careful. See ªJump Startingº in the Index
for tips on working around a battery without
getting hurt.
Contact your dealer to learn how to prepare your vehicle
for longer storage periods.
Also, for your audio system, see ªTheft
-Deterrent
Featureº in the Index.
Bulb Replacement
For any bulb changing procedure not listed in this
section, contact your GM dealership service department.
Before you replace any bulbs, be sure that all the lamps
are off and the engine isn't running. See ªReplacement
Bulbsº in the Index for the proper types of bulbs to use.
Halogen Bulbs
CAUTION:
Halogen bulbs have pressurized gas inside and
can burst if you drop or scratch the bulb. You or
others could be injured. Be sure to read and
follow the instructions on the bulb package.
Page 342 of 432
yellowblue
6-44 Taillamps (Chassis Cab Models)
A. Turn Signal Lamp
B. Stoplamp
C. Back
-up Lamp
1. Using your hands, peel the rubber seal away from
the lens.
2. Lift the lens off the lamp assembly.
3. Pull the bulb straight out from the socket.
4. Put a new bulb into the socket and press it in until it
is tight.
5. Replace the lens and the lens seal.
Windshield Wiper Blade Replacement
Windshield wiper blades should be inspected at least
twice a year for wear and cracking. See ªWiper Blade
Checkº in Section 7 of this manual under Part B ªOwner
Checks and Servicesº for more information.
Replacement blades come in different types and are
removed in different ways. For proper type and length,
see ªNormal Maintenance Replacement Partsº in the
Index. Here's how to remove the Shephard's Hook type.
Page 343 of 432
yellowblue
6-45
To replace the windshield wiper blade assembly:
1. Lift the wiper arm and rotate the blade until it is
facing away from the windshield.
2. Push the release lever and slide the wiper assembly
toward the driver's side of the vehicle.
3. Install a new blade by reversing Steps 1 and 2.
Tires
Your new vehicle comes with high-quality tires made by
a leading tire manufacturer. If you ever have questions
about your tire warranty and where to obtain service, see
your GM Warranty booklet for details.
CAUTION:
Poorly maintained and improperly used tires
are dangerous.
�Overloading your tires can cause
overheating as a result of too much friction.
You could have an air
-out and a serious
accident. See ªLoading Your Vehicleº in
the Index.
�Underinflated tires pose the same danger as
overloaded tires. The resulting accident
could cause serious injury. Check all tires
frequently to maintain the recommended
pressure. Tire pressure should be checked
when your tires are cold.
�Overinflated tires are more likely to be cut,
punctured or broken by a sudden impact
--
such as when you hit a pothole. Keep tires
at the recommended pressure.
�Worn, old tires can cause accidents. If your
tread is badly worn, or if your tires have
been damaged, replace them.
Page 345 of 432
yellowblue
6-47 Tire Inspection and Rotation
Tires should be rotated every 6,000 to 8,000 miles
(10 000 to 13 000 km). Any time you notice unusual
wear, rotate your tires as soon as possible and check
wheel alignment. Also check for damaged tires or
wheels. See ªWhen It's Time for New Tiresº and
ªWheel Replacementº later in this section for
more information.
The purpose of regular rotation is to achieve more
uniform wear for all tires on the vehicle. The first
rotation is the most important. See ªScheduled
Maintenance Servicesº in the Index for scheduled
rotation intervals.
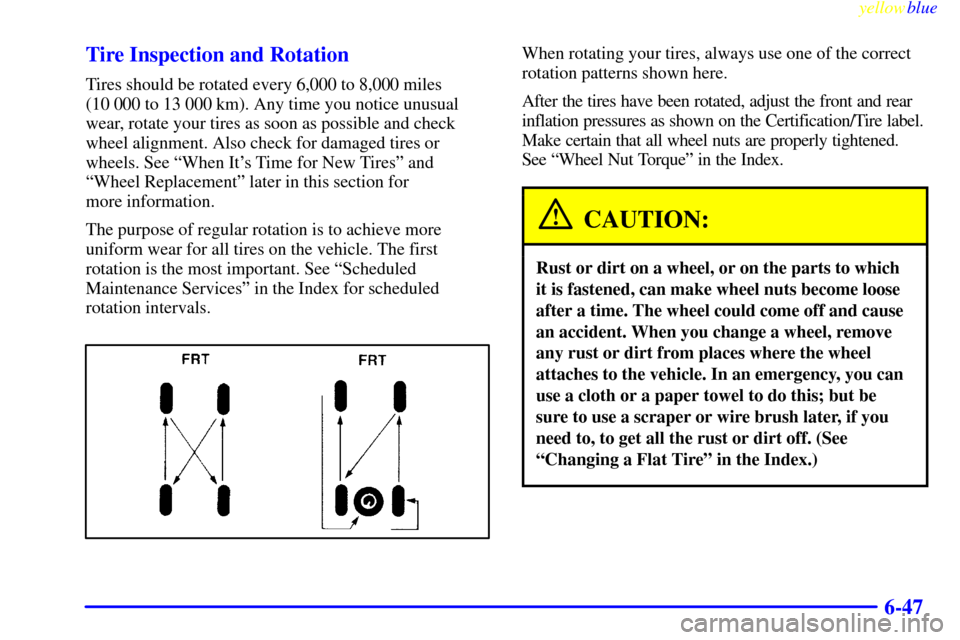
When rotating your tires, always use one of the correct
rotation patterns shown here.
After the tires have been rotated, adjust the front and rear
inflation pressures as shown on the Certification/Tire label.
Make certain that all wheel nuts are properly tightened.
See ªWheel Nut Torqueº in the Index.
CAUTION:
Rust or dirt on a wheel, or on the parts to which
it is fastened, can make wheel nuts become loose
after a time. The wheel could come off and cause
an accident. When you change a wheel, remove
any rust or dirt from places where the wheel
attaches to the vehicle. In an emergency, you can
use a cloth or a paper towel to do this; but be
sure to use a scraper or wire brush later, if you
need to, to get all the rust or dirt off. (See
ªChanging a Flat Tireº in the Index.)
Page 347 of 432
yellowblue
6-49 Buying New Tires
To find out what kind and size of tires you need, look at
the Certification/Tire label.
The tires installed on your vehicle when it was new had
a Tire Performance Criteria Specification (TPC Spec)
number on each tire's sidewall. When you get new tires,
get ones with that same TPC Spec number. That way
your vehicle will continue to have tires that are designed
to give proper endurance, handling, speed rating,
traction, ride and other things during normal service on
your vehicle. If your tires have an all
-season tread
design, the TPC number will be followed by an ªMSº
(for mud and snow).
If you ever replace your tires with those not having a
TPC Spec number, make sure they are the same size,
load range, speed rating and construction type (bias,
bias
-belted or radial) as your original tires.
CAUTION:
Mixing tires could cause you to lose control while
driving. If you mix tires of different sizes or types
(radial and bias
-belted tires), the vehicle may not
handle properly, and you could have a crash.
Using tires of different sizes may also cause
damage to your vehicle. Be sure to use the same
size and type tires on all wheels.
CAUTION:
If you use bias-ply tires on your vehicle, the
wheel rim flanges could develop cracks after
many miles of driving. A tire and/or wheel could
fail suddenly, causing a crash. Use only radial
-ply
tires with the wheels on your vehicle.