Page 248 of 384
yellowblue
6-10
When you lift the hood, you'll see these items on the ªVORTECº 4300 V6 engine:
A. Battery
B. Coolant Recovery Tank
C. Engine Oil DipstickD. Engine Oil Fill
E. Automatic Transmission Dipstick
F. Power Steering ReservoirG. Brake Master Cylinder
H. Engine Air Cleaner/Filter
I. Engine Compartment Fuse Block
J. Windshield Washer Fluid Reservoir
Page 253 of 384
 or 12 months
-- whichever
occurs first. Driving a")
yellowblue
6-15
If none of them is true, use the long trip/highway
maintenance schedule. Change the oil and filter every
7,500 miles (12 500 km) or 12 months
-- whichever
occurs first. Driving a vehicle with a fully warmed
engine under highway conditions causes engine oil to
break down slower.
Remote Oil Filter (Four
-Wheel Drive)
The access door for the
remote oil filter is in the
steering linkage shield
assembly located under
the radiator support.
Twist the screw to unlock
or lock the door. Make
sure if you open the door,
it is securely closed
when you are finished.
What to Do with Used Oil
Did you know that used engine oil contains certain
elements that may be unhealthy for your skin and could
even cause cancer? Don't let used oil stay on your skin
for very long. Clean your skin and nails with soap and
water, or a good hand cleaner. Wash or properly throw
away clothing or rags containing used engine oil. (See
the manufacturer's warnings about the use and disposal
of oil products.)
Used oil can be a real threat to the environment. If you
change your own oil, be sure to drain all free
-flowing oil
from the filter before disposal. Don't ever dispose of oil
by putting it in the trash, pouring it on the ground, into
sewers, or into streams or bodies of water. Instead,
recycle it by taking it to a place that collects used oil. If
you have a problem properly disposing of your used oil,
ask your dealer, a service station or a local recycling
center for help.
Page 257 of 384
yellowblue
6-19
�With your foot on the brake pedal, move the shift
lever through each gear range, pausing for about
three seconds in each range. Then, position the shift
lever in PARK (P).
�Let the engine run at idle for three minutes or more.
Then, without shutting off the engine, follow these steps:
1. The transmission
dipstick is located near
the center of the engine
compartment. Flip the
handle up and then pull
out the dipstick and
wipe it with a clean rag
or paper towel.
2. Push it back in all the way, wait three seconds and
then pull it back out again.
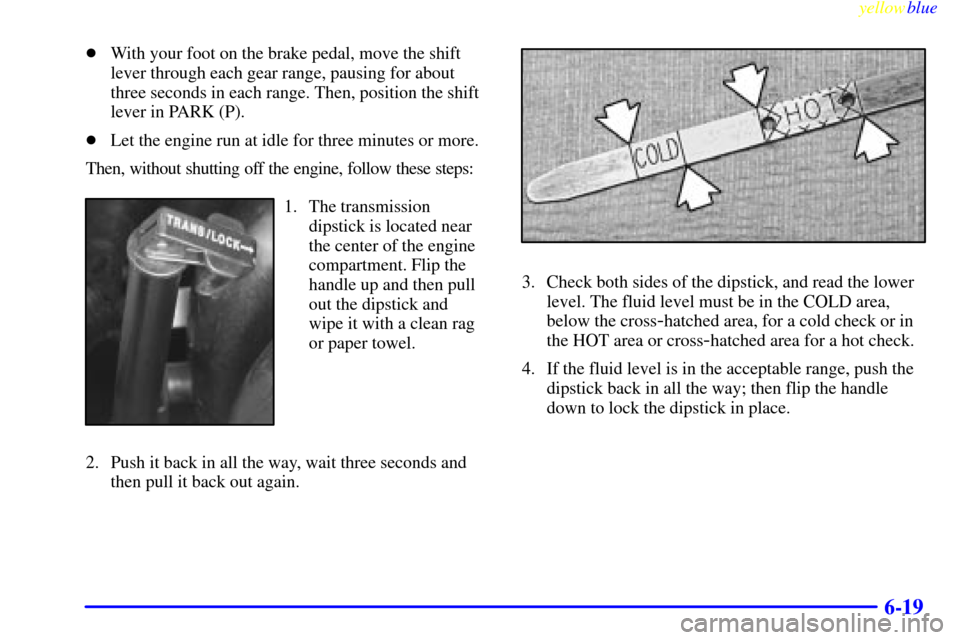
3. Check both sides of the dipstick, and read the lower
level. The fluid level must be in the COLD area,
below the cross
-hatched area, for a cold check or in
the HOT area or cross
-hatched area for a hot check.
4. If the fluid level is in the acceptable range, push the
dipstick back in all the way; then flip the handle
down to lock the dipstick in place.
Page 258 of 384

yellowblue
6-20 How to Add Fluid
Refer to the Maintenance Schedule to determine what
kind of transmission fluid to use. See ªRecommended
Fluids and Lubricantsº in the Index.
Add fluid only after checking the transmission fluid while it
is hot. (A cold check is used only as a reference.) If the fluid
level is low, add only enough of the proper fluid to bring the
level up to the HOT area for a hot check. It doesn't take much
fluid, generally less than one pint (0.5 L). Don't overfill.
NOTICE:
We recommend you use only fluid labeled
DEXRON�-III, because fluid with that label is
made especially for your automatic transmission.
Damage caused by fluid other than
DEXRON
�-III is not covered by your new
vehicle warranty.
�After adding fluid, recheck the fluid level as
described under ªHow to Check.º
�When the correct fluid level is obtained, push the
dipstick back in all the way; then flip the handle
down to lock the dipstick in place.
Manual Transmission Fluid
When to Check
A good time to have it checked is when the engine oil is
changed. However, the fluid in your manual
transmission doesn't require changing.
How to Check
Because this operation can be a little difficult, you
may choose to have this done at your GM dealership
Service Department.
If you do it yourself, be sure to follow all the
instructions here, or you could get a false reading.
NOTICE:
Too much or too little fluid can damage your
transmission. Too much can mean that some of
the fluid could come out and fall on hot engine
parts or exhaust system parts, starting a fire. Be
sure to get an accurate reading if you check your
transmission fluid.
Page 274 of 384
yellowblue
6-36 Headlamps
One-Piece Composite Headlamp System
1. Open the hood.
2. Remove the black retainer clips by lifting up.
3. Pull the headlamp assembly out.
4. Unplug the electrical connector.
5. Turn the bulb assembly counterclockwise to
remove it.
6. Put the new bulb assembly into the headlamp
assembly and turn it clockwise until it is tight.
7. Plug in the electrical connector.
8. Put the headlamp assembly back into the vehicle.
Install the two retaining clips.
Page 275 of 384
yellowblue
6-37
Tw o-Piece Composite Headlamp System
1. Open the hood.
2. Remove the black retainer clips by lifting up.
3. Pull the headlamp lens assembly out.
4. Unplug the electrical connector.
5. Turn the bulb assembly counterclockwise to
remove it.
6. Put the new bulb assembly into the headlamp
assembly and turn it clockwise until it is tight.
7. Plug in the electrical connector.
8. Put the headlamp lens assembly back into the
vehicle. Install the two retaining clips.
Page 276 of 384
yellowblue
6-38 One-Piece Front Turn Signal
Lamp Assembly
1. Remove the headlamp assembly as shown under
ªOne
-Piece Composite Headlamp Systemº earlier in
this section.
2. Twist the bulb socket
counterclockwise to
remove it from the
headlamp assembly.
3. Pull the bulb straight out to remove it from the socket.
4. Push the new bulb into the socket until it snaps
into place.
5. Put the bulb socket into the lamp assembly and twist
it clockwise until it is tight.
6. Put the headlamp assembly back into the vehicle.
Install the two retaining clips.
Two-Piece Front Turn Signal
Lamp Assembly
1. Remove the headlamp assembly as shown under
ªTwo
-Piece Composite Headlamp Systemº earlier in
this section.
2. Locate the locking tabs
on the assembly.
Squeeze the tabs
together and push that
end of the assembly out
while holding the tabs.
The assembly will
swing out.
3. Unplug the electrical connector.
Page 277 of 384
yellowblue
6-39
4. Turn the harness bulb socket counterclockwise to
remove it. Pull the bulb straight out to remove it
from the socket.
5. Push the new bulb into the socket until it snaps
into place.
6. Put the socket into the lamp assembly and turn it
clockwise until it is tight.
7. To replace the assembly, snap the outboard end of
the lamp assembly back into the vehicle. Then swing
the assembly in and snap it into place.8. Replace the headlamp assembly. Install the two
retaining clips.
Center High-Mounted Stoplamp
1. Remove the lens retaining screws.
2. Remove the lens.