Page 78 of 368

yellowblue
2-14
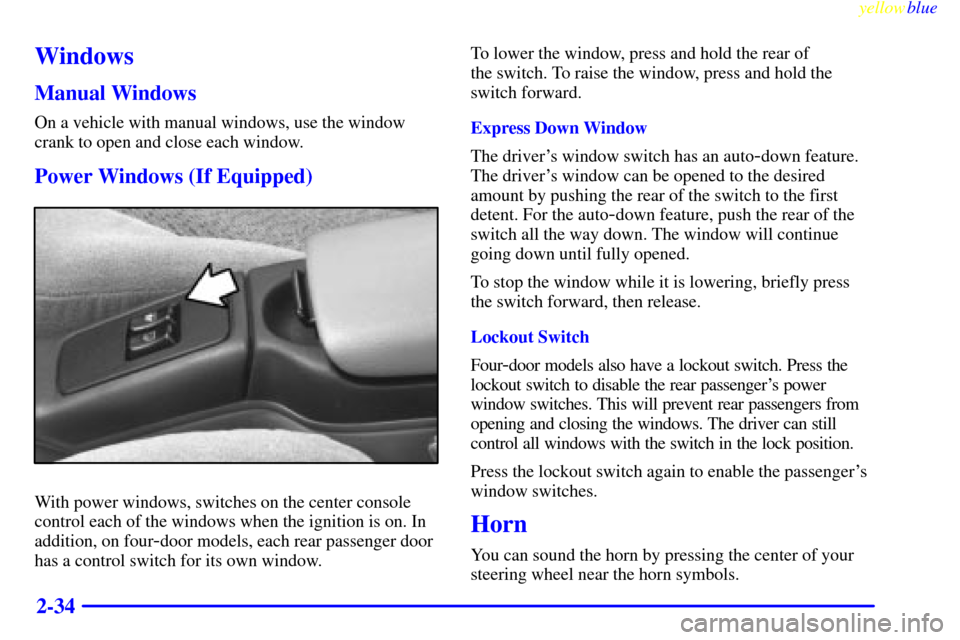
With the ignition key in the ignition switch, you can turn
the switch to five positions.
ACCESSORY (A): In this position, you can operate
your electrical power accessories. Press in the ignition
switch as you turn it toward you.LOCK (B): This is the only position in which you can
remove the key. This locks your steering wheel, ignition,
shift lever and transaxle.
OFF (C): This position unlocks the steering wheel,
ignition and transaxle, but does not send electrical
power to any accessories. The instrument cluster and the
automatic transaxle gear shift indicator have electrical
power while in OFF. Use this position if your vehicle
must be pushed or towed, but never try to push
-start
your vehicle. A warning chime will sound if you open
the driver's door when the ignition is off and the key is
in the ignition.
RUN (D): This is a position to which the switch returns
after you start your engine and release the switch. The
switch stays in RUN when the engine is running. But
even when the engine is not running, you can use RUN
to operate your electrical power accessories, and to
display some instrument panel warning lights.
START (E): This position starts the engine. When the
engine starts, release the key. The ignition switch will
return to RUN for normal driving.
Note that even if the engine is not running, the positions
ACCESSORY and RUN are on positions that allow you
to operate your electrical accessories, such as the radio.
Page 98 of 368

yellowblue
2-34
Windows
Manual Windows
On a vehicle with manual windows, use the window
crank to open and close each window.
Power Windows (If Equipped)
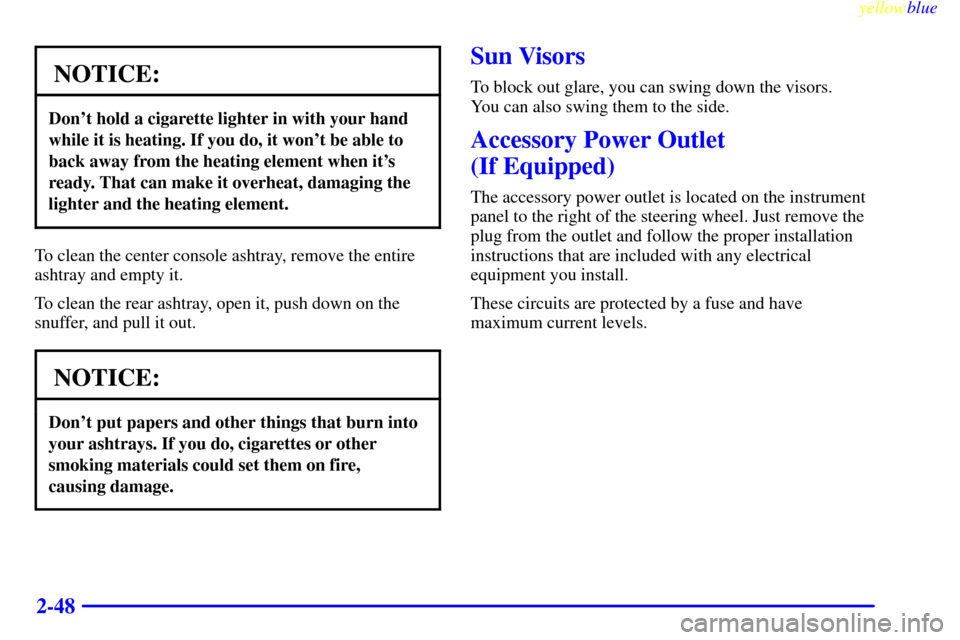
With power windows, switches on the center console
control each of the windows when the ignition is on. In
addition, on four
-door models, each rear passenger door
has a control switch for its own window.To lower the window, press and hold the rear of
the switch. To raise the window, press and hold the
switch forward.
Express Down Window
The driver's window switch has an auto
-down feature.
The driver's window can be opened to the desired
amount by pushing the rear of the switch to the first
detent. For the auto
-down feature, push the rear of the
switch all the way down. The window will continue
going down until fully opened.
To stop the window while it is lowering, briefly press
the switch forward, then release.
Lockout Switch
Four
-door models also have a lockout switch. Press the
lockout switch to disable the rear passenger's power
window switches. This will prevent rear passengers from
opening and closing the windows. The driver can still
control all windows with the switch in the lock position.
Press the lockout switch again to enable the passenger's
window switches.
Horn
You can sound the horn by pressing the center of your
steering wheel near the horn symbols.
Page 112 of 368

yellowblue
2-48
NOTICE:
Don't hold a cigarette lighter in with your hand
while it is heating. If you do, it won't be able to
back away from the heating element when it's
ready. That can make it overheat, damaging the
lighter and the heating element.
To clean the center console ashtray, remove the entire
ashtray and empty it.
To clean the rear ashtray, open it, push down on the
snuffer, and pull it out.
NOTICE:
Don't put papers and other things that burn into
your ashtrays. If you do, cigarettes or other
smoking materials could set them on fire,
causing damage.
Sun Visors
To block out glare, you can swing down the visors.
You can also swing them to the side.
Accessory Power Outlet
(If Equipped)
The accessory power outlet is located on the instrument
panel to the right of the steering wheel. Just remove the
plug from the outlet and follow the proper installation
instructions that are included with any electrical
equipment you install.
These circuits are protected by a fuse and have
maximum current levels.
Page 125 of 368
yellowblue
2-61
The main components of your instrument panel are:
A. Instrument Panel Intensity Control
B. Turn Signal/Multifunction Lever
C. Hazard Warning Flashers Switch
D. Ignition Switch
E. Windshield Wiper/Washer Controls
F. Cigarette Lighter/Accessory Power Outlet
G. Audio SystemH. Climate Controls and Rear Window Defogger
I. Shift Lever
J. Parking Brake Lever
K. Tilt Steering Wheel Lever (If Equipped)
L. Hood Release Lever
M. Fuse Panel
Page 174 of 368

yellowblue
4-10
When the transaxle shift
lever is in any position
other than FIRST (1) or
SECOND (2) and the
parking brake is fully
released, this warning light
will come on to let you
know if there's a problem
with the system.
See ªEnhanced Traction System Warning Lightº in the
Index. When this warning light is on, the system will not
limit wheel spin. Adjust your driving accordingly.
The Enhanced Traction System can operate when the
transaxle shift lever is in any position other than
FIRST (1) or SECOND (2). To limit wheel spin,
especially in slippery road conditions, you should use
the other shift lever positions only when necessary. See
ªAutomatic Transaxleº in the Index. (If your vehicle
ever gets stuck in sand, mud, ice or snow, see ªRocking
Your Vehicleº in the Index.)When you move the shift lever to FIRST (1) or
SECOND (2), the system will turn off. The Enhanced
Traction System warning light will come on and stay on.
If the Enhanced Traction System is limiting wheel spin
when you move the shift lever to another position, the
system won't turn off right away. It will wait until
there's no longer a current need to limit wheel spin.
You can turn the system back on at any time by moving
the shift lever to any position other than FIRST (1) or
SECOND (2). The Enhanced Traction System warning
light should go off.
Braking in Emergencies
With anti-lock, you can steer and brake at the same
time. In many emergencies, steering can help you more
than even the very best braking.
Steering
Power Steering
If you lose power steering assist because the engine
stops or the system is not functioning, you can steer but
it will take much more effort.
Page 239 of 368

6-
yellowblue
6-1
Section 6 Service and Appearance Care
Here you will find information about the care of your vehicle. This section begins with service and fuel information,
and then it shows how to check important fluid and lubricant levels. There is also technical information about your
vehicle, and a part devoted to its appearance care.
6
-2 Service
6
-3 Fuel
6
-5 Fuels in Foreign Countries
6
-5 Filling Your Tank
6
-7 Filling a Portable Fuel Container
6
-8 Checking Things Under the Hood
6
-12 Engine Oil
6
-17 Engine Air Cleaner/Filter
6
-18 Automatic Transaxle Fluid
(Three
-Speed Only)
6
-21 Automatic Transaxle Fluid (Four-Speed Only)
6
-22 Manual Transaxle Fluid
6
-24 Hydraulic Clutch
6
-25 Surge Tank Pressure Cap
6
-25 Thermostat
6
-25 Engine Coolant
6
-29 Power Steering Fluid6
-29 Windshield Washer Fluid
6
-31 Brakes
6
-34 Battery
6
-35 Bulb Replacement
6
-40 Tires
6
-48 Appearance Care
6
-49 Cleaning the Inside of Your Vehicle
6
-51 Care of Safety Belts
6
-52 Cleaning the Outside of Your Vehicle
6
-53 Cleaning Your Convertible Top
6
-57 Vehicle Identification Number (VIN)
6
-57 Electrical System
6
-62 Replacement Bulbs
6
-62 Capacities and Specifications
6
-63 Air Conditioning Refrigerants
6
-63 Normal Maintenance Replacement Parts
Page 248 of 368
yellowblue
6-10 2.2L L4 Engine (Code 4)
When you open the hood, you'll see:
A. Coolant Surge Tank
B. Power Steering Fluid Reservoir
C. Engine Oil Fill Cap/Dipstick
D. Brake Fluid ReservoirE. Hydraulic Clutch Fluid
Reservoir (If Equipped)
F. Automatic Transaxle Fluid
Dipstick (If Equipped)G. Engine Air Cleaner/Filter
H. Battery
I. Windshield Washer Fluid
Reservoir
Page 249 of 368
yellowblue
6-11 2.4L L4 Engine (Code T)
When you open the hood, you'll see:
A. Coolant Surge Tank
B. Engine Oil Fill Cap
C. Engine Oil Dipstick
D. Power Steering Fluid ReservoirE. Brake Fluid Reservoir
F. Hydraulic Clutch Fluid
Reservoir (If Equipped)
G. BatteryH. Engine Air Cleaner/Filter
I. Windshield Washer Fluid
Reservoir