Page 88 of 432
: This position gives you even more power
but lower fuel economy than SECOND (2). You can use
it on very steep hills, or in deep snow or mud. If the
selector lever is put")
yellowblue
2-24
FIRST (1): This position gives you even more power
but lower fuel economy than SECOND (2). You can use
it on very steep hills, or in deep snow or mud. If the
selector lever is put in FIRST (1) while the vehicle is
moving forward, the transmission won't shift into
FIRST (1) until the vehicle is going slowly enough.
NOTICE:
If your rear wheels can't rotate, don't try to
drive. This might happen if you were stuck in
very deep sand or mud or were up against a solid
object. You could damage your transmission.
Also, if you stop when going uphill, don't hold
your vehicle there with only the accelerator
pedal. This could overheat and damage the
transmission. Use your brakes or shift into
PARK (P) to hold your vehicle in position on
a hill.
Tow/Haul Selector Switch (If Equipped)
Your vehicle may be equipped with a tow/haul selector
switch. This switch will be located on the floor console.If your vehicle is equipped with the tow/haul selector
switch, you can use this feature to more efficiently tow
or haul a heavy load.
To select the tow/haul mode, press in on the switch.
The Tow/Haul light on the instrument panel cluster will
come on. To go back to normal operation, press the
switch again. The indicator light on the instrument panel
will go out. See ªTow/Haul Modeº in the Index for
more information.
Manual Transmission Operation
5-Speed
This is your shift pattern.
Page 93 of 432

yellowblue
2-29
On automatic transmission equipped vehicles, if your
transfer case does not shift into 4HI, your transmission
indicator switch may require adjustment. With your
transmission in NEUTRAL (N), press and release the
4HI switch. While the 4HI indicator light is flashing,
shift your transmission into PARK (P). Wait until the
4HI indicator light remains illuminated before shifting
your transmission into gear. This will get you into 4HI,
but you should take your vehicle in for service to restore
normal operation.
Automatic Transfer Case (If Equipped)
The transfer case switches
are to the right of the
steering wheel on the
instrument panel. Use these
switches to shift into and
out of four
-wheel drive.
You can choose among four
driving settings:
2HI: This setting is used for driving in most street
and highway situations. Your front axle is not engaged
in two
-wheel drive. This setting also provides the best
fuel economy.
AUTO 4WD: This setting is ideal for use when road
conditions are variable. When driving your vehicle in
AUTO 4WD, the front axle is engaged, but the vehicle's
power is sent only to the rear wheels. When the vehicle
senses a loss of traction, the system will automatically
engage four
-wheel drive. Driving in this mode results in
slightly lower fuel economy than 2HI.
Page 97 of 432
yellowblue
2-33
Parking Brake
To set the parking brake, hold the regular brake pedal
down with your right foot. Push down the parking brake
pedal with your left foot. If the ignition is on, the brake
system warning light will come on.
To release the parking brake, hold the regular brake
pedal down.
Pull the BRAKE RELEASE lever fully. It is located on
the bottom of the driver's side of the instrument panel.
NOTICE:
Driving with the parking brake on can cause
your rear brakes to overheat. You may have to
replace them, and you could also damage other
parts of your vehicle.
If you are towing a trailer and you must park on a hill,
see ªTowing a Trailerº in the Index. That section shows
what to do first to keep the trailer from moving.
Page 106 of 432
yellowblue
2-42
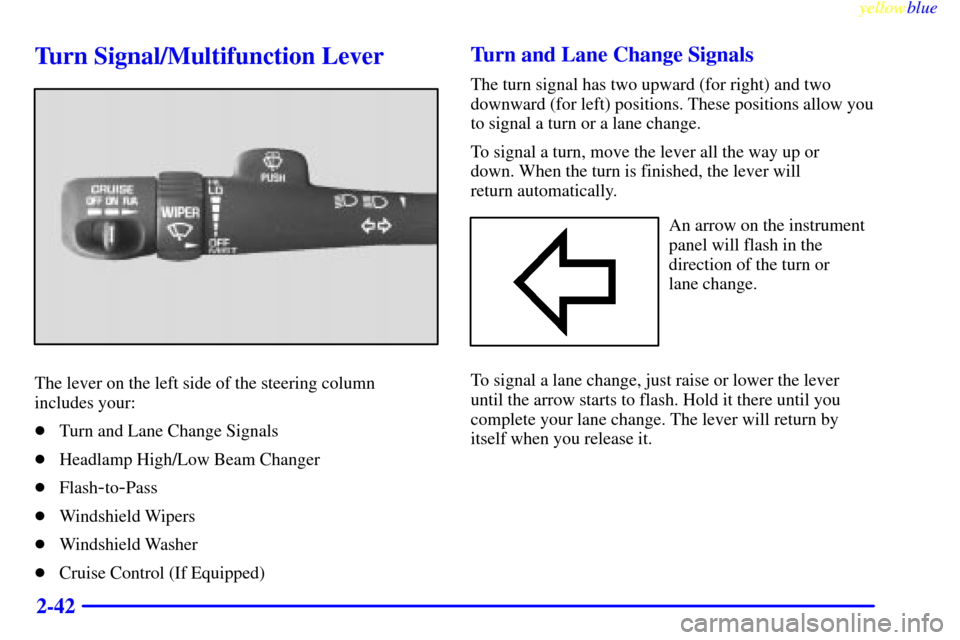
Turn Signal/Multifunction Lever
The lever on the left side of the steering column
includes your:
�Turn and Lane Change Signals
�Headlamp High/Low Beam Changer
�Flash
-to-Pass
�Windshield Wipers
�Windshield Washer
�Cruise Control (If Equipped)
Turn and Lane Change Signals
The turn signal has two upward (for right) and two
downward (for left) positions. These positions allow you
to signal a turn or a lane change.
To signal a turn, move the lever all the way up or
down. When the turn is finished, the lever will
return automatically.
An arrow on the instrument
panel will flash in the
direction of the turn or
lane change.
To signal a lane change, just raise or lower the lever
until the arrow starts to flash. Hold it there until you
complete your lane change. The lever will return by
itself when you release it.
Page 107 of 432

yellowblue
2-43
As you signal a turn or a lane change, if the arrows don't
flash but just stay on, a signal bulb may be burned out
and other drivers won't see your turn signal.
If a bulb is burned out, replace it to help avoid an
accident. If the arrows don't go on at all when you
signal a turn, check the fuse (see ªFuses and Circuit
Breakersº in the Index) and for burned
-out bulbs.
If you have a trailer towing option with added wiring for
the trailer lamps, a different turn signal flasher is used.
With this flasher installed, the signal indicator will flash
even if a turn signal bulb is burned out. Check the front
and rear turn signal lamps regularly to make sure they
are working.
Turn Signal On Chime
If your turn signal is left on for more than 3/4 of a mile
(1.2 km), a chime will sound at each flash of the turn
signal. To turn off the chime, move the turn signal lever
to the off position.
Headlamp High/Low Beam Changer
To change the headlamps from low beam to high or high
to low, pull the multifunction lever all the way toward
you. Then release it.
When the high beams are
on, this indicator light on
the instrument panel will
also be on.
Flash-to-Pass
This feature lets you use your high-beam headlamps
to signal a driver in front of you that you want to pass.
It works even if your headlamps are in the
automatic position.
To use it, pull the turn signal lever toward you, but not
so far that you hear a click.
If your headlamps are in the automatic position or on
low beam, your high
-beam headlamps will turn on.
They'll stay on as long as you hold the lever toward you
and the high
-beam indicator on the dash will come on.
Release the lever to return to normal operation.
Page 109 of 432

yellowblue
2-45
Rear Window Washer/Wiper
This switch is located on the
instrument panel.
To turn the rear wiper on, slide the switch to either LO
or HI. For delayed wiping, slide the switch to LO. For
steady wiping, slide the switch to HI. To turn the wiper
off, slide the switch to OFF.
To wash the window, press the wash button located on
the switch. The switch must be in either LO or HI.
The rear window washer uses the same fluid bottle as
the windshield washer. However, the rear window
washer will run out of fluid before the windshield
washer. If you can wash your windshield but not your
rear window, check your fluid level.
Cruise Control (If Equipped)
With cruise control, you can
maintain a speed of about
25 mph (40 km/h) or more
without keeping your foot
on the accelerator. This can
really help on long trips.
Cruise control does not
work at speeds below about
25 mph (40 km/h).
If you have an automatic transmission and you apply
your brakes, the cruise control will shut off.
If you have a manual transmission and you apply your
brakes or push the clutch pedal, the cruise control will
shut off.
Page 112 of 432

yellowblue
2-48
Passing Another Vehicle While Using Cruise Control
Use the accelerator pedal to increase your speed. When
you take your foot off the pedal, your vehicle will slow
down to the cruise control speed you set earlier.
Using Cruise Control on Hills
How well your cruise control will work on hills depends
upon your speed, load and the steepness of the hills.
When going up steep hills, you may want to step on the
accelerator pedal to maintain your speed. When going
downhill, you may have to brake or shift to a lower gear
to keep your speed down. Of course, applying the brake
takes you out of cruise control. Many drivers find this to
be too much trouble and don't use cruise control on
steep hills.
Ending Cruise Control
There are two ways to turn off the cruise control:
�Step lightly on the brake pedal or push the clutch
pedal, if you have a manual transmission.
�Move the cruise switch to OFF.
Erasing Speed Memory
When you turn off the cruise control or the ignition,
your cruise control set speed memory is erased.Exterior Lamps
Your parking lamp and headlamp switch is on the
driver's side of your instrument panel.
Turn the knob clockwise to the parking lamps symbol to
manually turn on:
�Parking Lamps
�Sidemarker Lamps
�Taillamps
�License Plate Lamps
�Instrument Panel Lights
Page 113 of 432

yellowblue
2-49
Turn the knob clockwise to the master lamps symbol to
turn on all the lamps listed as well as the headlamps.
Turn the knob all the way counterclockwise to turn off
your lamps and put the system in auto headlamp mode.
Automatic Headlamp System
When it is dark enough outside, your automatic
headlamp system will turn on your headlamps at the
normal brightness along with other lamps such as the
taillamps, sidemarker, parking lamps and the instrument
panel lights. The radio lights will also be dim.
Your vehicle is equipped with a light sensor on the top
of the instrument panel under the radio speaker grill. Be
sure it is not covered or the system will be on whenever
the ignition is on.
The system may also turn on your headlamps when
driving through a parking garage, heavy overcast
weather or a tunnel. This is normal.
There is a delay in the transition between the daytime and
nighttime operation of the Daytime Running Lamps
(DRL) and the automatic headlamp systems so that driving
under bridges or bright overhead street lights does not
affect the system. The DRL and automatic headlamp
system will only be affected when the light sensor sees a
change in lighting lasting longer than the delay.To idle your vehicle with the automatic headlamp
system off, set the parking brake while the ignition is
off. Then start your vehicle. The automatic headlamp
system will stay off until you release the parking brake.
As with any vehicle, you should turn on the regular
headlamp system when you need it.Lamps On Reminder
A reminder chime will sound when your headlamps or
parking lamps are manually turned on and your ignition
is in OFF, LOCK or ACCESSORY. To turn the chime
off, turn the knob all the way to the left or turn the
instrument panel dimmer down to the fully dimmed
position. In the automatic mode, the headlamps turn off
once the ignition key is in OFF.
Daytime Running Lamps (If Equipped)
Daytime Running Lamps (DRL) can make it easier for
others to see the front of your vehicle during the day.
DRL can be helpful in many different driving
conditions, but they can be especially helpful in the
short periods after dawn and before sunset.