Page 252 of 328

yellowblue
6-14 Engine Oil Additives
Don't add anything to your oil. Your dealer is ready to
advise if you think something should be added.
When to Change Engine Oil
If any one of these is true for you, use the short trip/city
maintenance schedule:
�Most trips are less than 5 to 10 miles (8 to 16 km).
This is particularly important when outside
temperatures are below freezing.
�Most trips include extensive idling (such as frequent
driving in stop
-and-go traffic).
�Most trips are through dusty areas.
�You frequently tow a trailer or use a carrier on top of
your Catera.
�The vehicle is used for delivery service, police, taxi
or other commercial application.
Driving under these conditions causes engine oil to
break down sooner. If any one of these is true for your
vehicle, then you need to change your oil and filter
every 5,000 miles (8 000 km) or 3 months
-- whichever
occurs first.If none of them is true, use the long trip/highway
maintenance schedule. Change the oil and filter at the
first 5,000 miles (8 000 km) or 3 months
-- whichever
occurs first. Then, change the oil and filter every
10,000 miles (16 000 km) or 12 months
-- whichever
occurs first. Driving a vehicle with a fully warmed
engine under highway conditions causes engine oil to
break down slower.
What to Do with Used Oil
Did you know that used engine oil contains certain
elements that may be unhealthy for your skin and could
even cause cancer? Don't let used oil stay on your skin
for very long. Clean your skin and nails with soap and
water, or a good hand cleaner. Wash or properly throw
away clothing or rags containing used engine oil. (See
the manufacturer's warnings about the use and disposal
of oil products.)
Used oil can be a real threat to the environment. If you
change your own oil, be sure to drain all free
-flowing oil
from the filter before disposal. Don't ever dispose of oil
by putting it in the trash, pouring it on the ground, into
sewers, or into streams or bodies of water. Instead,
recycle it by taking it to a place that collects used oil. If
you have a problem properly disposing of your used oil,
ask your dealer, a service station or a local recycling
center for help.
Page 254 of 328

yellowblue
6-16
4. Lift the lid, take out the air filter and remove any
loose debris that may be found lying in the air
cleaner base.
5. Install a new air filter element. See ªNormal
Maintenance Replacement Partsº in the Index.
To reinstall the air cleaner assembly, place the air filter
in the air cleaner lid, then insert the lid and filter
together into the housing. Reattach the five clips, replace
the air intake tube and tighten the clamp. Return the
coolant surge tank hose to its proper position.
Refer to the Maintenance Schedule to determine when to
replace the air filter.See ªScheduled Maintenance Servicesº in the
Maintenance Schedule booklet.
CAUTION:
Operating the engine with the air cleaner/filter
off can cause you or others to be burned. The air
cleaner not only cleans the air, it stops flame if
the engine backfires. If it isn't there, and the
engine backfires, you could be burned. Don't
drive with it off, and be careful working on the
engine with the air cleaner/filter off.
NOTICE:
If the air cleaner/filter is off, a backfire can cause
a damaging engine fire. And, dirt can easily get
into your engine, which will damage it. Always
have the air cleaner/filter in place when
you're driving.
Page 255 of 328
yellowblue
6-17 Passenger Compartment
Air Filter Replacement
The passenger compartment air filter traps most of the
pollen from the air entering your vehicle. Like your
vehicle's air cleaner filter, it may need to be changed
periodically. For how often to change the passenger
compartment air filter, see your Maintenance
Schedule booklet.
The access panel for the passenger compartment air
filter is below the grille, at the base of the windshield on
the passenger's side of the engine compartment.
1. Open the hood of your vehicle.
2. Lift the engine compartment rear seal (see the arrow
in the illustration) and pull it back far enough to be
able to lift open the grille flap.
3. Unhook both retaining clips that secure the filter
in place.
4. Slide the filter toward the front of the car and then
pull the filter straight out.
Page 256 of 328

yellowblue
6-18
5. Replace the filter by sliding it back in, reattaching
both retaining clips and closing the grille flap.
6. Replace the engine compartment rear seal.
7. Close the engine hood.
For the type of filter to use, see ªNormal Maintenance
Replacement Partsº in the Index.
Automatic Transmission Fluid
It is not necessary to check the transmission fluid level.
A transmission fluid leak is the only reason for fluid
loss. If a leak occurs, take your vehicle to the dealership
service department and have it repaired as soon as
possible. You may also have your fluid level checked by
your dealer or service center when you have your
oil changed.
Change both the fluid and filter every 50,000 miles
(83 000 km) if the vehicle is mainly driven under one or
more of these conditions:
�In heavy city traffic where the outside temperature
regularly reaches 90�F (32�C) or higher.
�In hilly or mountainous terrain.
�When doing frequent trailer towing.
�Uses such as found in taxi, police or delivery service.
If you do not use your vehicle under any of these
conditions, the fluid and filter do not require changing.
Page 257 of 328
yellowblue
6-19
NOTICE:
We recommend you use only fluid labeled
DEXRON�-III, because fluid with that label is
made especially for your automatic transmission.
Damage caused by fluid other than
DEXRON
�-III is not covered by your new
vehicle warranty.
Rear Axle
When to Check Lubricant
Refer to the Maintenance Schedule to determine how
often to check the lubricant. See ªPeriodic Maintenance
Inspectionsº and ªScheduled Maintenance Servicesº in
the Maintenance Schedule booklet.
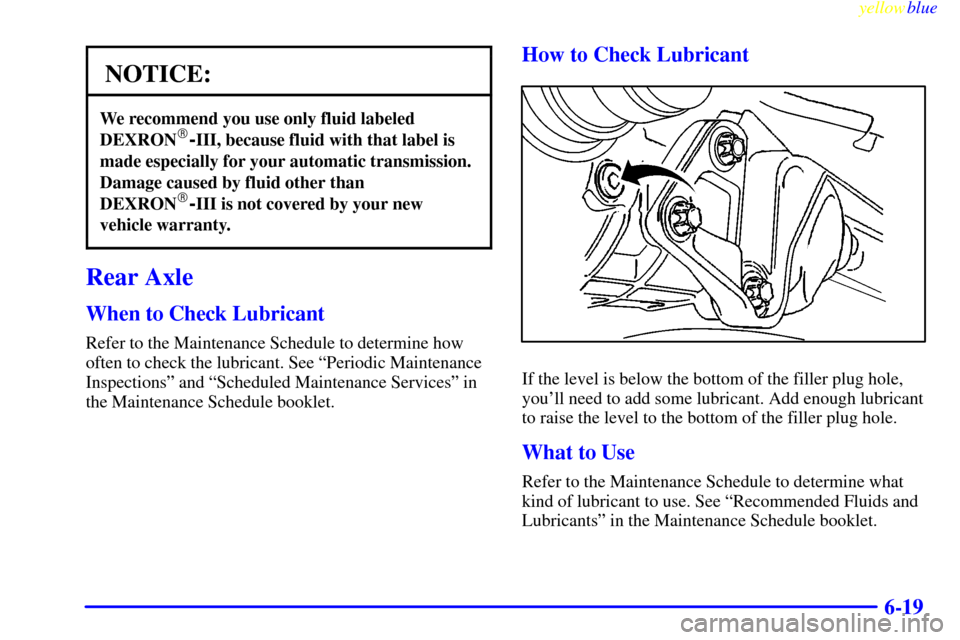
How to Check Lubricant
If the level is below the bottom of the filler plug hole,
you'll need to add some lubricant. Add enough lubricant
to raise the level to the bottom of the filler plug hole.
What to Use
Refer to the Maintenance Schedule to determine what
kind of lubricant to use. See ªRecommended Fluids and
Lubricantsº in the Maintenance Schedule booklet.
Page 262 of 328

yellowblue
6-24
Power Steering Fluid
The power steering fluid reservoir is located between
the battery and the brake master cylinder on the driver's
side of the engine.
When to Check Power Steering Fluid
It is not necessary to regularly check power steering
fluid unless you suspect there is a leak in the system or
you hear an unusual noise. A fluid loss in this system
could indicate a problem. Have the system inspected
and repaired.
How to Check Power Steering Fluid
When the engine compartment is cool, wipe the cap and
the top of the reservoir clean, then unscrew the cap and
wipe the dipstick with a clean rag. Replace the cap and
completely tighten it. Then remove the cap again and
look at the fluid level on the dipstick.
The level should be at the full mark. There are two lines
on the dipstick. The top line is the ªfullº mark and the
bottom line is the ªaddº line (which means that fluid
should be added). If necessary, add only enough fluid to
bring the level up to the full mark.
What to Use
To determine what kind of fluid to use, see
ªRecommended Fluids and Lubricantsº in the
Maintenance Schedule booklet. Always use the proper
fluid. Failure to use the proper fluid can cause leaks and
damage hoses and seals.
Page 265 of 328

yellowblue
6-27
When your brake fluid falls to a low level, your brake
warning light will come on. See ªBrake System Warning
Lightº in the Index.
What to Add
When you do need brake fluid, use only DOT
-3 brake
fluid. Use new brake fluid from a sealed container only.
Refer to ªRecommended Fluids and Lubricantsº in the
Maintenance Schedule booklet.
Always clean the brake fluid reservoir cap and the area
around the cap before removing it. This will help keep
dirt from entering the reservoir.
CAUTION:
With the wrong kind of fluid in your brake
system, your brakes may not work well, or they
may not even work at all. This could cause a
crash. Always use the proper brake fluid.
NOTICE:
�Using the wrong fluid can badly damage
brake system parts. For example, just a few
drops of mineral
-based oil, such as engine
oil, in your brake system can damage brake
system parts so badly that they'll have to be
replaced. Don't let someone put in the
wrong kind of fluid.
�If you spill brake fluid on your vehicle's
painted surfaces, the paint finish can be
damaged. Be careful not to spill brake fluid
on your vehicle. If you do, wash it off
immediately. See ªAppearance Careº in
the Index.
Brake Wear
Your vehicle has four-wheel disc brakes.
Your vehicle has electronic wear sensors that let you
know when the front brake pads are significantly worn
and new pads are needed. The brake pad wear indicator
light will come on and stay on when the brake pads are
worn and need to be replaced. (See ªBrake Pad Wear
Indicator Lightº in the Index.)
Page 266 of 328

yellowblue
6-28
CAUTION:
The brake pad wear indicator light means that
soon your brakes won't work well. That could
lead to an accident. When the brake pad wear
indicator light comes on and stays on, have your
vehicle serviced.
NOTICE:
Continuing to drive with worn-out brake pads
could result in costly brake repair.
Some driving conditions or climates may cause a brake
squeal when the brakes are first applied or lightly
applied. This does not mean something is wrong with
your brakes.Properly torqued wheel bolts are necessary to help
prevent brake pulsation. When tires are rotated, inspect
brake pads for wear and evenly torque wheel bolts in the
proper sequence to GM specifications.
Brake linings should always be replaced as complete
axle sets.
See ªBrake System Inspectionº in the Maintenance
Schedule booklet under Part C ªPeriodic
Maintenance Inspections.º
Brake Pedal Travel
See your dealer if the brake pedal does not return to
normal height, or if there is a rapid increase in pedal
travel. This could be a sign of brake trouble.
Brake Adjustment
Every time you apply the brakes, with or without the
vehicle moving, your brakes adjust for wear.