Page 216 of 400

yellowblue
4-28
Your anti-lock brakes improve your vehicle's stability
when you make a hard stop on a slippery road. Even
though you have the anti
-lock braking system, you'll
want to begin stopping sooner than you would on dry
pavement. See ªAnti
-Lockº in the Index.
�Allow greater following distance on any
slippery road.
�Watch for slippery spots. The road might be fine
until you hit a spot that's covered with ice. On an
otherwise clear road, ice patches may appear in
shaded areas where the sun can't reach: around
clumps of trees, behind buildings or under bridges.
Sometimes the surface of a curve or an overpass may
remain icy when the surrounding roads are clear. If
you see a patch of ice ahead of you, brake before you
are on it. Try not to brake while you're actually on
the ice, and avoid sudden steering maneuvers.
If You're Caught in a Blizzard
If you are stopped by heavy snow, you could be in a
serious situation. You should probably stay with your
vehicle unless you know for sure that you are near help
and you can hike through the snow. Here are some
things to do to summon help and keep yourself and your
passengers safe:
�Turn on your hazard flashers.
ProCarManuals.com
Page 218 of 400
yellowblue
4-30
Run your engine only as long as you must. This saves
fuel. When you run the engine, make it go a little faster
than just idle. That is, push the accelerator slightly. This
uses less fuel for the heat that you get and it keeps the
battery charged. You will need a well
-charged battery to
restart the vehicle, and possibly for signaling later on
with your headlamps. Let the heater run for a while.
Then, shut the engine off and close the window almost
all the way to preserve the heat. Start the engine again
and repeat this only when you feel really uncomfortable
from the cold. But do it as little as possible. Preserve the
fuel as long as you can. To help keep warm, you can get
out of the vehicle and do some fairly vigorous exercises
every half hour or so until help comes.
Recreational Vehicle Towing
You can tow your vehicle behind another vehicle for use
at your destination. Be sure to use the proper towing
equipment designed for recreational towing. Follow the
instructions for the towing equipment.
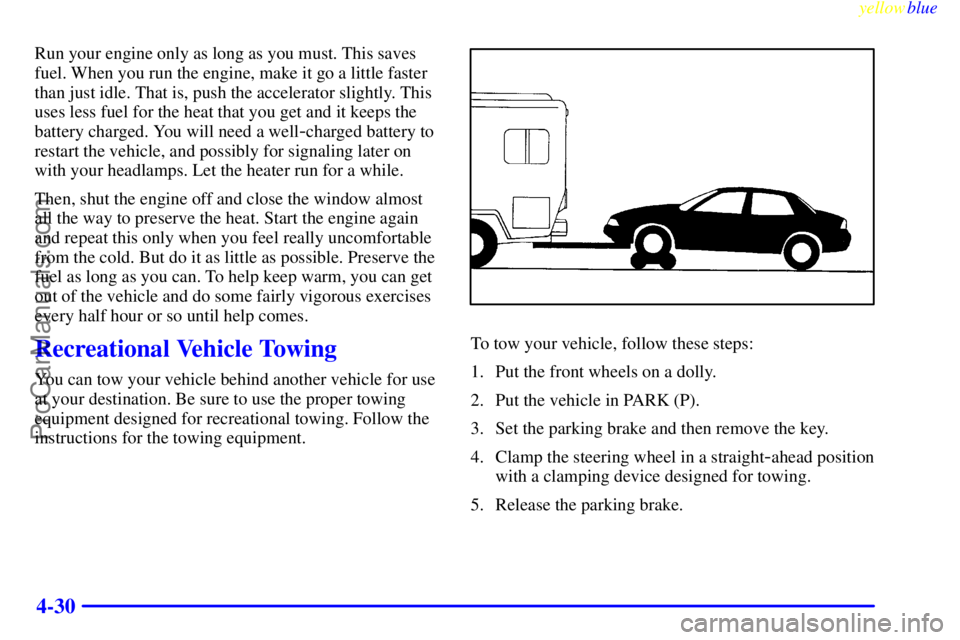
To tow your vehicle, follow these steps:
1. Put the front wheels on a dolly.
2. Put the vehicle in PARK (P).
3. Set the parking brake and then remove the key.
4. Clamp the steering wheel in a straight
-ahead position
with a clamping device designed for towing.
5. Release the parking brake.
ProCarManuals.com
Page 225 of 400
yellowblue
4-37 Driving with a Trailer
Towing a trailer requires a certain amount of experience.
Before setting out for the open road, you'll want to get
to know your rig. Acquaint yourself with the feel of
handling and braking with the added weight of the
trailer. And always keep in mind that the vehicle you are
driving is now a good deal longer and not nearly as
responsive as your vehicle is by itself.
Before you start, check the trailer hitch and platform
(and attachments), safety chains, electrical connector,
lamps, tires and mirror adjustment. If the trailer has
electric brakes, start your vehicle and trailer moving and
then apply the trailer brake controller by hand to be sure
the brakes are working. This lets you check your
electrical connection at the same time.
During your trip, check occasionally to be sure that the
load is secure, and that the lamps and any trailer brakes
are still working.
Following Distance
Stay at least twice as far behind the vehicle ahead as you
would when driving your vehicle without a trailer. This
can help you avoid situations that require heavy braking
and sudden turns.
Passing
You'll need more passing distance up ahead when
you're towing a trailer. And, because you're a good deal
longer, you'll need to go much farther beyond the
passed vehicle before you can return to your lane.
Backing Up
Hold the bottom of the steering wheel with one hand.
Then, to move the trailer to the left, just move that hand
to the left. To move the trailer to the right, move your
hand to the right. Always back up slowly and, if
possible, have someone guide you.
ProCarManuals.com
Page 245 of 400
yellowblue
5-17
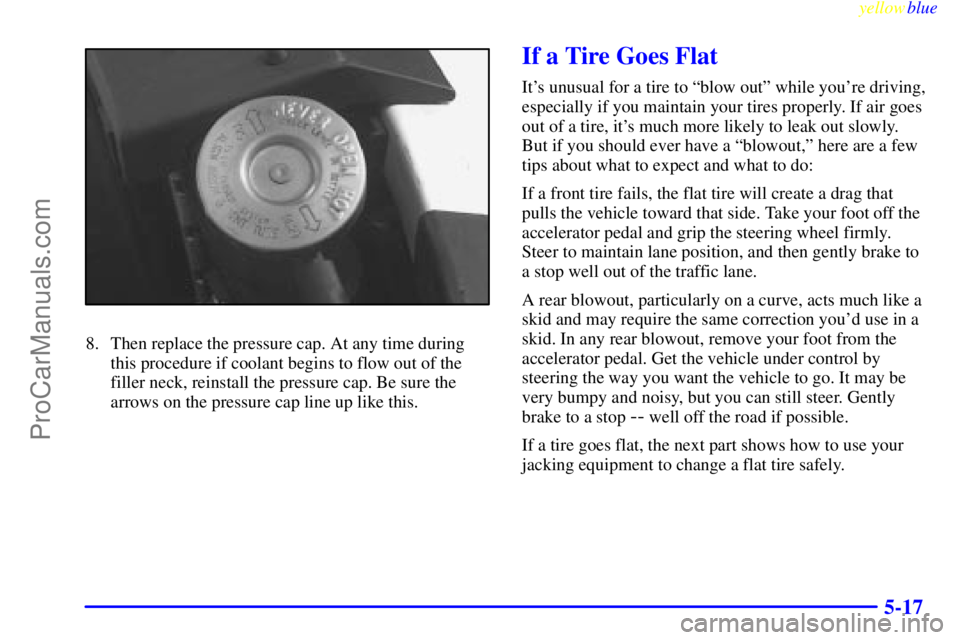
8. Then replace the pressure cap. At any time during
this procedure if coolant begins to flow out of the
filler neck, reinstall the pressure cap. Be sure the
arrows on the pressure cap line up like this.
If a Tire Goes Flat
It's unusual for a tire to ªblow outº while you're driving,
especially if you maintain your tires properly. If air goes
out of a tire, it's much more likely to leak out slowly.
But if you should ever have a ªblowout,º here are a few
tips about what to expect and what to do:
If a front tire fails, the flat tire will create a drag that
pulls the vehicle toward that side. Take your foot off the
accelerator pedal and grip the steering wheel firmly.
Steer to maintain lane position, and then gently brake to
a stop well out of the traffic lane.
A rear blowout, particularly on a curve, acts much like a
skid and may require the same correction you'd use in a
skid. In any rear blowout, remove your foot from the
accelerator pedal. Get the vehicle under control by
steering the way you want the vehicle to go. It may be
very bumpy and noisy, but you can still steer. Gently
brake to a stop
-- well off the road if possible.
If a tire goes flat, the next part shows how to use your
jacking equipment to change a flat tire safely.
ProCarManuals.com
Page 256 of 400
yellowblue
5-28
If You're Stuck: In Sand, Mud,
Ice or Snow
In order to free your vehicle when it is stuck, you will
need to spin the wheels, but you don't want to spin
your wheels too fast. The method known as ªrockingº
can help you get out when you're stuck, but you must
use caution.
CAUTION:
If you let your tires spin at high speed, they can
explode, and you or others could be injured. And,
the transaxle or other parts of the vehicle can
overheat. That could cause an engine
compartment fire or other damage. When you're
stuck, spin the wheels as little as possible. Don't
spin the wheels above 35 mph (55 km/h) as shown
on the speedometer.
NOTICE:
Spinning your wheels can destroy parts of your
vehicle as well as the tires. If you spin the wheels
too fast while shifting your transaxle back and
forth, you can destroy your transaxle.
For information about using tire chains on your vehicle,
see ªTire Chainsº in the Index.
Rocking Your Vehicle To Get It Out
First, turn your steering wheel left and right. That will
clear the area around your front wheels. If your vehicle
has traction control, you should turn the system off. (See
ªTraction Control Systemº in the Index.) Then shift back
and forth between REVERSE (R) and a forward gear,
spinning the wheels as little as possible. Release the
accelerator pedal while you shift, and press lightly on the
accelerator pedal when the transaxle is in gear. By slowly
spinning your wheels in the forward and reverse
directions, you will cause a rocking motion that may free
your vehicle. If that doesn't get you out after a few tries,
you may need to be towed out. If you do need to be
towed out, see ªTowing Your Vehicleº in the Index.
ProCarManuals.com
Page 264 of 400
yellowblue
6-6
Filling Your Tank
CAUTION:
Gasoline vapor is highly flammable. It burns
violently, and that can cause very bad injuries.
Don't smoke if you're near gasoline or refueling
your vehicle. Keep sparks, flames and smoking
materials away from gasoline.
The cap is behind a hinged door on the driver's side of
your vehicle.
The release button for the
fuel door is to the left of the
steering column.
There is also a manual fuel
door release. This
mechanism is located in the
top of the trunk
compartment, on the
driver's side of the vehicle.
Pull the tab to release the
fuel door.
ProCarManuals.com
Page 286 of 400
yellowblue
6-28
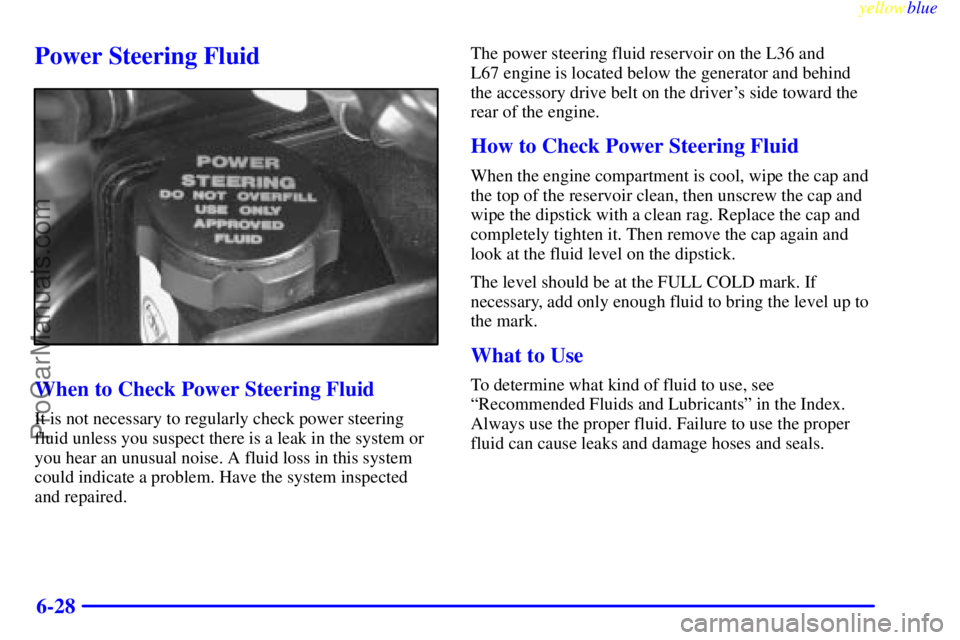
Power Steering Fluid
When to Check Power Steering Fluid
It is not necessary to regularly check power steering
fluid unless you suspect there is a leak in the system or
you hear an unusual noise. A fluid loss in this system
could indicate a problem. Have the system inspected
and repaired.The power steering fluid reservoir on the L36 and
L67 engine is located below the generator and behind
the accessory drive belt on the driver's side toward the
rear of the engine.
How to Check Power Steering Fluid
When the engine compartment is cool, wipe the cap and
the top of the reservoir clean, then unscrew the cap and
wipe the dipstick with a clean rag. Replace the cap and
completely tighten it. Then remove the cap again and
look at the fluid level on the dipstick.
The level should be at the FULL COLD mark. If
necessary, add only enough fluid to bring the level up to
the mark.
What to Use
To determine what kind of fluid to use, see
ªRecommended Fluids and Lubricantsº in the Index.
Always use the proper fluid. Failure to use the proper
fluid can cause leaks and damage hoses and seals.
ProCarManuals.com
Page 333 of 400

yellowblue
6-75
Capacities and Specifications
The following approximate capacities are given in English and metric conversions. Please refer to ªRecommended
Fluids and Lubricantsº in the Index for more information.
Automatic Transaxle AT (Overdrive)
Pan Removal and Replacement 6.0 quarts (5.6 L). . . . . . . . . . . . . . . . . . . . . . . . . . . . . . . . . . . . . . . . . . . . . . . . .
After Complete Overhaul 11.0 quarts (10.4 L). . . . . . . . . . . . . . . . . . . . . . . . . . . . . . . . . . . . . . . . . . . . . . . . . . . . .
After performing either transaxle procedure, check fluid level when done. More fluid may be needed
.
Belt Tensions
Automatically controlled by a Self±Tension idler pulley. Tension adjustment should never be necessary.
Cooling System13.0 quarts (12.3 L) . . . . . . . . . . . . . . . . . . . . . . . . . . . . . . . . . . . . . . . . . . . . . . . . . . . . . . . . . . .
Engine Crankcase
Oil change with filter change 4.5 quarts (4.3 L). . . . . . . . . . . . . . . . . . . . . . . . . . . . . . . . . . . . . . . . . . . . . . . . . . .
Fuel Tank18.5 gallons (70.0 L) . . . . . . . . . . . . . . . . . . . . . . . . . . . . . . . . . . . . . . . . . . . . . . . . . . . . . . . . . . . . . . .
Power Steering
Pump Only1.0 pint (0.5 L) . . . . . . . . . . . . . . . . . . . . . . . . . . . . . . . . . . . . . . . . . . . . . . . . . . . . . . . . . . . . . . . . . . .
Complete System 1 1/2 pints (0.7 L). . . . . . . . . . . . . . . . . . . . . . . . . . . . . . . . . . . . . . . . . . . . . . . . . . . . . . . . . . . .
Wheel Nut Torque100 lb
-ft (140 N´m) . . . . . . . . . . . . . . . . . . . . . . . . . . . . . . . . . . . . . . . . . . . . . . . . . . . . . . . .
Tire Pressure
See Tire±Loading Information label on the rear edge of the driver's door.
R
-134a Air Conditioning
See refrigerant charge label under the hood.
NOTE: All capacities are approximate. When adding, be sure to fill to the appropriate level as recommended in
this manual.
ProCarManuals.com