Page 87 of 400
yellowblue
2-29
Shifting Into PARK (P)
CAUTION:
It can be dangerous to get out of your vehicle if
the shift lever is not fully in PARK (P) with the
parking brake firmly set. Your vehicle can roll. If
you have left the engine running, the vehicle can
move suddenly. You or others could be injured.
To be sure your vehicle won't move, even when
you're on fairly level ground, use the steps that
follow. If you're pulling a trailer, see ªTowing a
Trailerº in the Index.
Steering Column Shift Lever
1. Hold the brake pedal down with your right foot and
set the parking brake.2. Move the shift lever into PARK (P) as follows:
�Pull the lever toward you.
ProCarManuals.com
Page 93 of 400

yellowblue
2-35
Express-Down Window
The switch for the driver's window has an express
-down
feature. Pull the switch back all the way, release it and the
window will lower automatically. To stop the window
from lowering, pull the switch again. To partially open the
window, pull the switch back half way. When the switch is
released, the window will stop moving. To raise the
window, press and hold the switch forward.
Window Lock
Press the window lock switch on the driver's armrest to
disable all passenger window switches, or just the rear
passenger switches. The middle of the switch will light
to indicate the window lockout is active.
The driver's window controls will still be operable. This is
a useful feature when you have children as passengers.
Press the window lock switch a second time to allow
passengers to use their window controls again. The light
in the center of the switch will go off to indicate that the
feature is disabled.
Vehicles are delivered programmed to lock out all
passenger windows. If you have the optional DIC, you can
choose to lock out only the rear windows. See ªPersonal
Choice Featuresº or ªDriver Information Centerº in the
Index for programming instructions. If you do not have theDIC feature, see your dealer if you choose to have this
setting changed to lock out only the rear windows.
Horn
Nearly the entire surface of the center pad of the
steering wheel is an active horn switch. Press on the pad
near the horn symbols to sound the horn.
Tilt Wheel
A tilt steering wheel allows
you to adjust the steering
wheel before you drive.
You can also raise it to the highest level to give your
legs more room when you exit and enter the vehicle.
To tilt the wheel, hold the steering wheel and pull
the lever toward you. Move the steering wheel to a
comfortable position, then release the lever to lock the
wheel in place.
ProCarManuals.com
Page 94 of 400
yellowblue
2-36
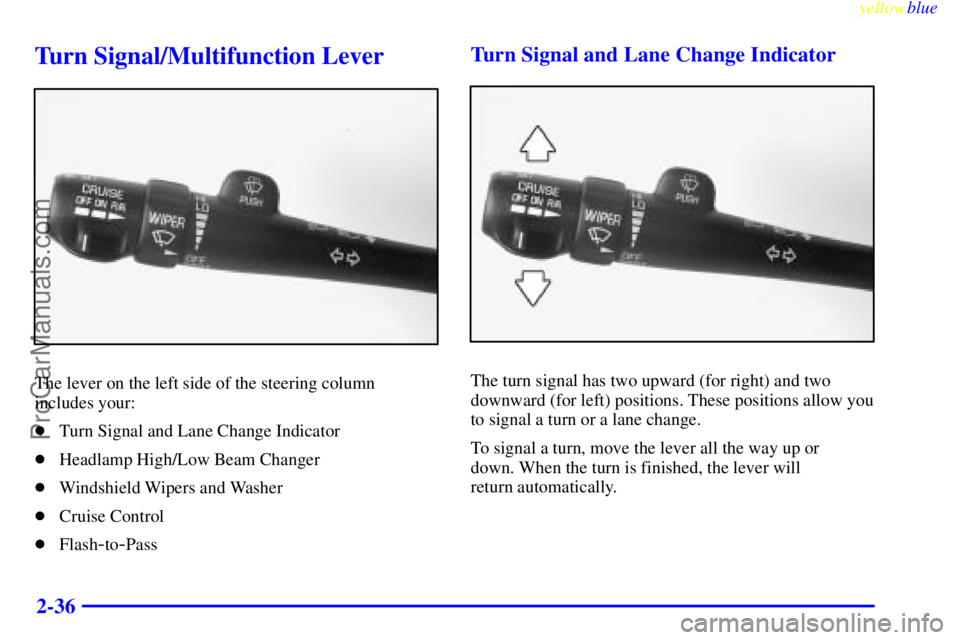
Turn Signal/Multifunction Lever
The lever on the left side of the steering column
includes your:
�Turn Signal and Lane Change Indicator
�Headlamp High/Low Beam Changer
�Windshield Wipers and Washer
�Cruise Control
�Flash
-to-Pass
Turn Signal and Lane Change Indicator
The turn signal has two upward (for right) and two
downward (for left) positions. These positions allow you
to signal a turn or a lane change.
To signal a turn, move the lever all the way up or
down. When the turn is finished, the lever will
return automatically.
ProCarManuals.com
Page 127 of 400
yellowblue
2-69
The main components of your instrument panel are:
A. Air Outlet
B. Headlamps/Parking Lamps Switch
C. Turn Signal/Multifunction Lever
D. Instrument Cluster/Gages
E. Hazard Warning Flasher Switch
F. Climate Control System and Audio Steering Wheel
Controls
G. Gearshift Lever
H. Audio System
I. Air OutletJ. Fuel Button
K. Trunk Release and Lockout Button
L. Hood Release
M. Audio System Steering Wheel Controls
N. Ignition Switch
O. Traction Control Switch
P. Ashtray and Cigarette Lighter
Q. Climate Control System
R. Glove Box
S. Passenger Climate Control
ProCarManuals.com
Page 141 of 400

yellowblue
2-83
NOTICE:
Although the HUD image appears to be near the
front of the vehicle, do not use it as a parking aid.
The HUD was not designed for that purpose. If
you try to use the display as a marker for the
front of your vehicle, such as in a parking lot, you
may misjudge distance and hit an obstacle or
another vehicle.
The HUD controls
are located in the
overhead console.1. Start your engine and slide the HUD dimmer control
all the way up.
The brightness of the HUD image is determined by
whether the headlamps are on or off, and where you
have the HUD dimmer control set.
2. Adjust the seat to your driving position. Slide the
image height adjuster control all the way up, raising
the image as far as possible.
3. Now slide the image height adjuster control down so
the image is as low as possible but still in full view.
4. Slide the dimmer control downward until the HUD
image is no brighter than necessary.
To turn the HUD display off, slide the dimmer control
all the way down.
If the sun comes out, the sky becomes cloudy, or if you
turn your headlamps on, you may need to adjust the
HUD brightness using the dimmer control. Polarized
sunglasses could make the HUD image harder to see.
To change the display from English to metric units,
push the ENG/MET button located to the left of the
steering column.
ProCarManuals.com
Page 142 of 400

yellowblue
2-84 Care of the HUD
Clean the inside of the windshield as necessary to
remove any dirt or film that reduces the sharpness or
clarity of the HUD image.
To clean the HUD lens, spray household glass cleaner
on a soft, clean cloth. Gently wipe and dry the HUD
lens. Do not spray cleaner directly on the lens to avoid
cleaner leaking inside the unit.
If You Can't See The HUD Image When the
Ignition is On
If the ignition is on and you can't see the HUD image,
check to see if:
�The headlamps are on.
�Something is covering the HUD unit.
�The HUD dimmer control is adjusted properly.
�The HUD image is adjusted to the proper height.
�A fuse is blown. See ªFuses and Circuit Breakersº in
the Index.
Keep in mind that your windshield is part of the HUD
system. If you ever have to have your windshield
replaced, be sure to get one that is designed for HUD or
your HUD image may look blurred or out of focus.
Driver Information Center (DIC)
(If Equipped)
Your vehicle may be equipped with a Driver Information
Center (DIC). The DIC will display information about
how your vehicle is functioning, as well as warning
messages if a system problem is detected.
The following buttons are
on the DIC control panel
which is located to the left
of the steering column:
�ODO/TRIP: Use this button to display your total and
trip miles.
�FUEL INFO: Press this button to display fuel
information such as fuel used, fuel range and
fuel economy.
ProCarManuals.com
Page 153 of 400

3-
yellowblue
3-1
Section 3 Comfort Controls and Audio Systems
In this section, you'll find out how to operate the comfort control and audio systems offered with your vehicle. Be
sure to read about the particular systems supplied with your vehicle.
3
-2 Comfort Controls
3
-2 Personal Choice Comfort Controls
(If Equipped)
3
-2 Dual Automatic ComforTemp Climate Control
3
-5 Air Conditioning
3
-6 Heating
3
-6 Defogging and Defrosting
3
-6 Rear Window Defogger
3
-7 Passenger Climate Control
3
-7 Ventilation System
3
-9 Passenger Compartment Air Filter
3
-10 Steering Wheel Controls for Climate Control
(If Equipped)
3
-10 Setting the Clock
3
-10 AM-FM Stereo with Cassette Tape Player
(If Equipped)3
-14 AM-FM Stereo with Cassette Tape Player and
Automatic Tone Control (If Equipped)
3
-17 AM-FM Stereo with Compact Disc Player and
Automatic Tone Control (If Equipped)
3
-21 AM-FM Stereo with Cassette Tape and
Compact Disc Player with Automatic Tone
Control (If Equipped)
3
-26 Trunk-Mounted CD Changer (If Equipped)
3
-29 Personal Choice Radio Controls (If Equipped)
3
-29 Theft-Deterrent Feature
3
-31 Audio Steering Wheel Controls (If Equipped)
3
-32 Understanding Radio Reception
3
-32 Tips About Your Audio System
3
-33 Care of Your Cassette Tape Player
3
-34 Care of Your Compact Discs
3
-35 Care of Your Compact Disc Player
3
-35 Heated Backlite Antenna
ProCarManuals.com
Page 162 of 400

If your vehicle has this
feature, you can control the
temperature function by
using the button on your
steering wheel. Pr")
yellowblue
3-10 Steering Wheel Controls for Climate
Control (If Equipped)
If your vehicle has this
feature, you can control the
temperature function by
using the button on your
steering wheel. Press the
TEMP up arrow to increase
the temperature and the
TEMP down arrow to
decrease the temperature.
Audio Systems
Your Delco Electronics audio system has been designed
to operate easily and give years of listening pleasure.
You will get the most enjoyment out of it if you acquaint
yourself with it first. Find out what your Delco
Electronics system can do and how to operate all its
controls, to be sure you're getting the most out of the
advanced engineering that went into it.
Setting the Clock
Press and hold HRS until the correct hour appears. Press
and hold MIN until the correct minute appears.
You may set the clock with the ignition off if you
press RECALL first and follow the same procedure
described above.
AM-FM Stereo with Cassette Tape Player
(If Equipped)
ProCarManuals.com

CAUTION:
It can be dangerous to get out of your vehicle if
the shift lever is not fully in PARK (P) with the
parking brake firmly set. Your vehicle can roll")