Page 572 of 1002

Downloaded from www.Manualslib.com manuals search engine
Manual Transmission Selector shaft seal, replacing
(transmission installed)
- Put transmission into second gear.
- Raise and safely support vehicle.
WARNING-
Make sure the car is stable and well supported at all times.
Use a professional automotive lift
orjack stands designed for
the purpose.
A floorjack is not adequate support
- 6-speed transmission: Remove rear engine splash shield
- Remove exhaust system and heat shields. See 180 Exhaust
System.
- Support transmission with transmission jack.
- Disconnect driveshaft at transmission and tie to side. See
260 Driveshaft.
4 Remove transmission crossmember:
Where applicable, release electrical harnesses from
transmission crossmember.
. Remove transmission mounting bolts (A).
Remove transmission crossmember bolts (B).
Where applicable, remove bolts
(C).
NOTE-
5-speed transmission shown in illustration. 6-speed trans-
mission is similar.
- Tilt down rear of transmission.
CAUTION-
Jilting the engine to lower the transmission can lead to
damaae to various components due to lack of clearance.
-
4 Pry sprlng locking rlng (A) out of groove and press pin
of
sh~fl rod.
Detach
sh~ft rod from selector shafl and tie as~de.
(B) out
Page 574 of 1002

Downloaded from www.Manualslib.com manuals search engine
230-1 0
I Manual Transmission
Output shaft seal, replacing (5-speed
transmission) (transmission installed)
- Raise and safely support vehicle.
WARNING -
Make sure the car is stable and well supported at all times.
Use a professional automotive
lilt orjack stands designed
for the purpose.
A floorjack is not adequate support.
- Remove exhaust system and heat shields. See 180 Exhaust
System
Support transmission with transmission jack.
Disconnect driveshafi at transmission output flange, and
hang driveshaft to side. See
260 Driveshaft.
Remove transmission crossmember:
If applicable, release electrical harnesses from transmis-
sion crossmember.
Remove transmission mounting bolts
(A).
Remove transmission crossmember bolts (6).
Where applicable, remove bolts (C).
- Tilt down rear of transmission.
CAUTIOI\C
Tilting the engine to lower the transmission can lead to
damage to various components due to lack of clearance.
4 Remove collar nut with BMW special tool (see table below) or
suitable thin-walled deep
socltet. Use BMW special tool
23 0 020 or equivalent to counterhold output flange.
Collar nut sockets
Transmission
BMW special tool
Getrag S5D 250G 23 1 21 0 (27 mm)
ZF S5D 3202 23 2 320 (36 mm)
Use puller (BMW special tool 33 1 150 or equivalent) to
remove output flange.
Use BMW special tool
00 5 010 or other suitable seal puller
to remove seal from transmission housing.
Page 576 of 1002

Downloaded from www.Manualslib.com manuals search engine
230-12
/ Manual Transmission
Output shaft seal, replacing (6-speed
transmission) (transmission installed)
- Raise and safely support vehicle.
WARNING-
Make sure the car is stable and well supported at all times.
Use a professional automotive lift
orjack stands designed for
the purpose.
A floorjack is not adequate support.
- Remove exhaust system and heat shields. See 180 Exhaust
System.
- Support transmission with transmission jack
- Disconnect driveshaft at transmission output flange, and
hang driveshaft to side. See
260 Driveshaft.
Remove transmission crassmember:
If applicable, release electrical harnesses from transmis-
sion crossmember.
Remove transmission and crossmember mounting bolts
(arrows).
5022305201 - Tilt down rear of transmission
CAUTION-
Tlting the engine to lower the transmission can lead to dam-
age to various components due to lack of clearance.
Use screwdriver to pry out output flange collar nut retaining
plate.
Remove collar nut with BMW special tool
23 2 320 or equiv-
alent thin-walled deep socltet
(36 mm). Use BMW special
tool
23 0 020 or equivalent to counterhold output flange.
Page 580 of 1002

Downloaded from www.Manualslib.com manuals search engine
Manual Transmission
- Thoroughly clean guide sleeve mounting bolts, sealing sur-
faces, and threads. Apply
Loctite8243 or equivalent thread
locking compound to guide sleeve bolts. Reinstall guide
sleeve and
spacer(s).
Tightening torques
Guide sleeve to transmission case
M6 10 Nm (89 in-lb)
* M8 x 22 18 Nm (13 ft-lb)
- Max30 25 Nm (18 ft-lb)
- Reinstall transmission.
TRANSMISSION REMOVAL AND
~NSTALLATION
Removal and installation of the transmission is best accorn-
plished on a lifl using a transmission jack.The engine must be
supported using appropriate support equipment. This allows
the engine to pivot on its mounts to access the upper
Torx-
head bolts at the bellhousing.
WARNING-
Male sure the car is stable and well supported at all times.
Use a professional aulomorive lift or jack slanos des~gned
lor the purpose. A floor jack is nor adequare supporr.
The removal of the transmission may upset the balance
of the vehicle on a
lifl.
Transmission, removing and installing
- Disconnect negative (-) cable from battery.
CAUTION-
Prior to disconnecting the battery, read the battery discon-
nection cautions given
in 001 Warnings and Cautions.
V-8 engine: Remove plastic engine cover.
Early models: pry out protective caps (arrows), then re-
move nuts securing cover. Lift off cover.
Later models: depress four studs to release, then
lift off
cover.
- Raise and safely support vehicle
- Remove engine splash shield from underside of vehicle
- Remove exhaust system and heat shields. See 180 Exhaust
System.
Page 595 of 1002

Downloaded from www.Manualslib.com manuals search engine
Automatic ~ransmissionl
II I
4 Install engine support across engine bay. Raise and safely
support vehicle.
Make sure the car is stable and
we1 supported at all times.
Use a professional automotive lift
orjaclc stands designed for
CAUTIOI\C
Removal of transmission will cause engine to tip unless en-
gine support is used.
- Remove splash shields from underside of vehicle.
- &cylinder models: Detach front stabilizer bar from stabilizer
bar
links. Swivel stabilizer bar upward.
- Drain ATF from transmission as described earlier.
- Remove exhaust system and exhaust heat shield. See 180
Exhaust System.
- Disconnect driveshaft from transmission and hang to one
side. See
260 Driveshaft.
4 With selector lever in park:
Hold
linkage clamping bolt (A) stationary when loosening
selector lever cable clamping nut
(6).
- Loosen cable clamping nut and remove cable from bracket
(ASS
3252 transmission shown).
- Where applicable, disconnect vehicle speed sensor harness
connector.
4 Disconnect main electrical harness connector(s) from trans-
mission by turning bayonet lock
ring(s) (arrows) counter-
clocltwise.
A4S
310R transmission: Harness connector at right rear of
transmission.
ASS
360R / ASS 390R transmission: Harness connector
(arrow) at right rear of transmission.
ASS 3252 transmission: Two connectors (arrows) on left
side of transmission.
ASS 5602 transmission: Harness connector at right rear of
transmission.
- ASS 4402 transmission: Harness connector at top left rear
of transmission.
- Remove wiring harness from transmission housing
Page 600 of 1002

Downloaded from www.Manualslib.com manuals search engine
250-2
I Gearshift Linkage
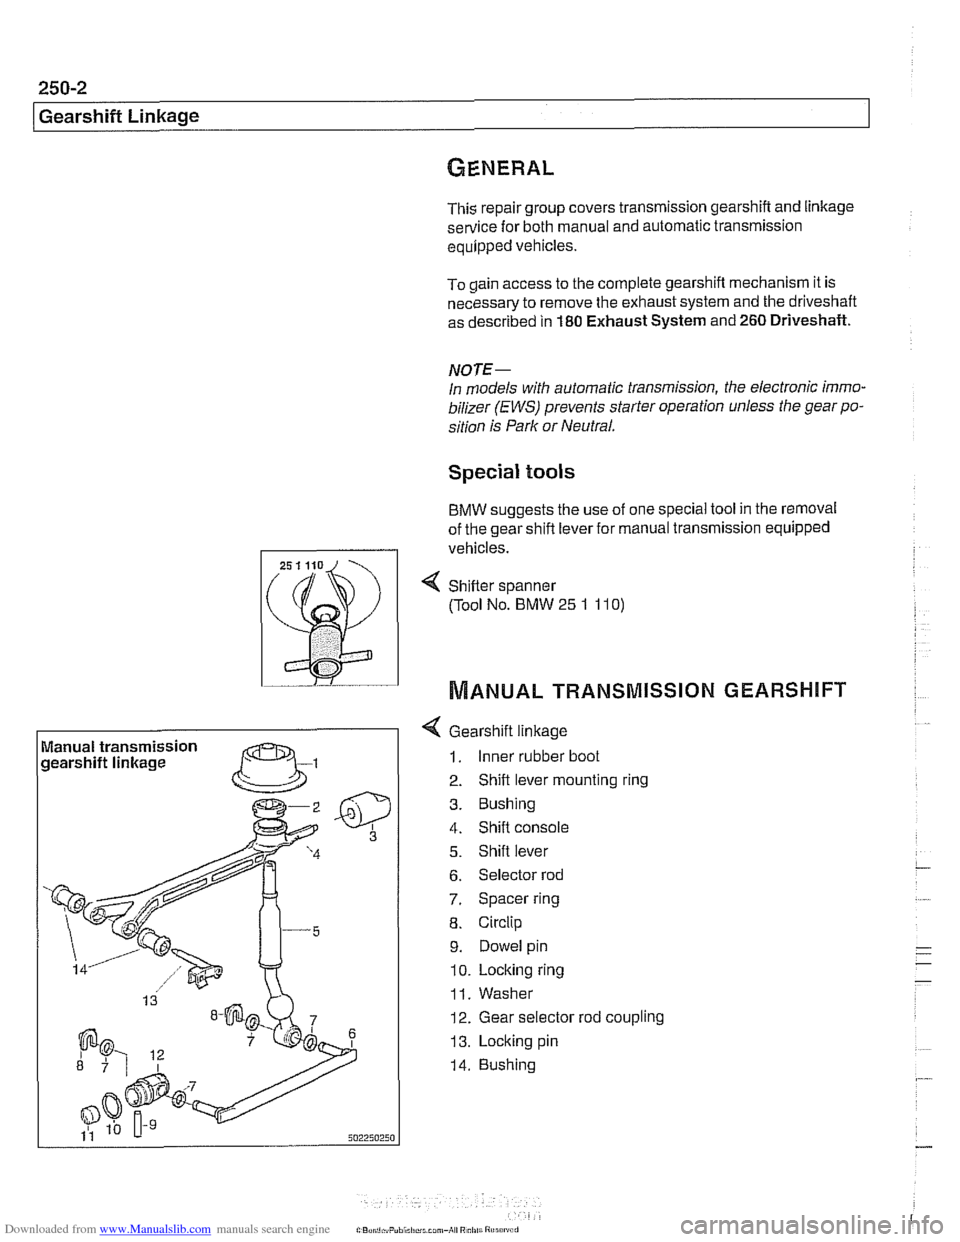
This repair group covers transmission gearshift and linkage service for both manual and automatic transmission
equipped vehicles.
To gain access to the complete gearshift mechanism it is
necessary to remove the exhaust system and the driveshaft
as described in
180 Exhaust System and 260 Driveshaft.
NOTE-
In models with automatic transmission, the electronic immo-
bilizer
(EWS) prevents starter operation unless the gear po-
sition is Park or Neutral.
Special tools
BMW suggests the use of one special tool in the removal
of the gear shift lever for manual transmission equipped
I I vehicles.
Manual transmission
gearshift linkage
--
4 Gearshift linkage
1. Inner rubber boot
2. Shift lever mounting ring
3. Bushing
4. Shift console
5. Shift lever
6. Selector rod
7. Spacer ring
8. Circlip
9. Dowel pin
10. Locking ring
11. Washer
12. Gear selector rod coupling
13. Locking pin
14. Bushing
4 Sh~fter spanner
(Tool No. BMW
25 1 11 0)
MANUAL TRANSMISSION GEARSHIFT
Page 601 of 1002

Downloaded from www.Manualslib.com manuals search engine
Gearshift ~inkaael
Gearshift lever, removing
(manual transmission)
Use the accompanying illustration as a guide when removing
and installing the gearshift linkage.
- Remove shift knob by pulling knob straight off shift lever.
NOTE-
Pull up on the shift knob with about 90 lbs. of force. Do not
twist
knob or locating key can be damaged.
- Squeeze sides of shift boot to unclip from center console.
Pull boot up and off shift lever.
- Remove sound insulation at base of shift lever.
- Raise vehicle to gain access to underside of vehicle.
- --
WARNING-
Male sure the car is stable and well supported at all tfmes.
Use a professional automotwe hft orjaclc stands designed for
the purpose.
A floorjaclc 1s not adequate support.
- Remove complete exhaust system. See 180 Exhaust
System.
- Remove driveshaft. See 260 Driveshaft.
- Support transmission with transmission jack. Remove
crossmember from rear of transmission.
- Lower rear of transmission to access gearshift linkage.
CA UTIOI\C
Tilting the engine to lower the transmission can lead to
damage to various components due to lack of clearance.
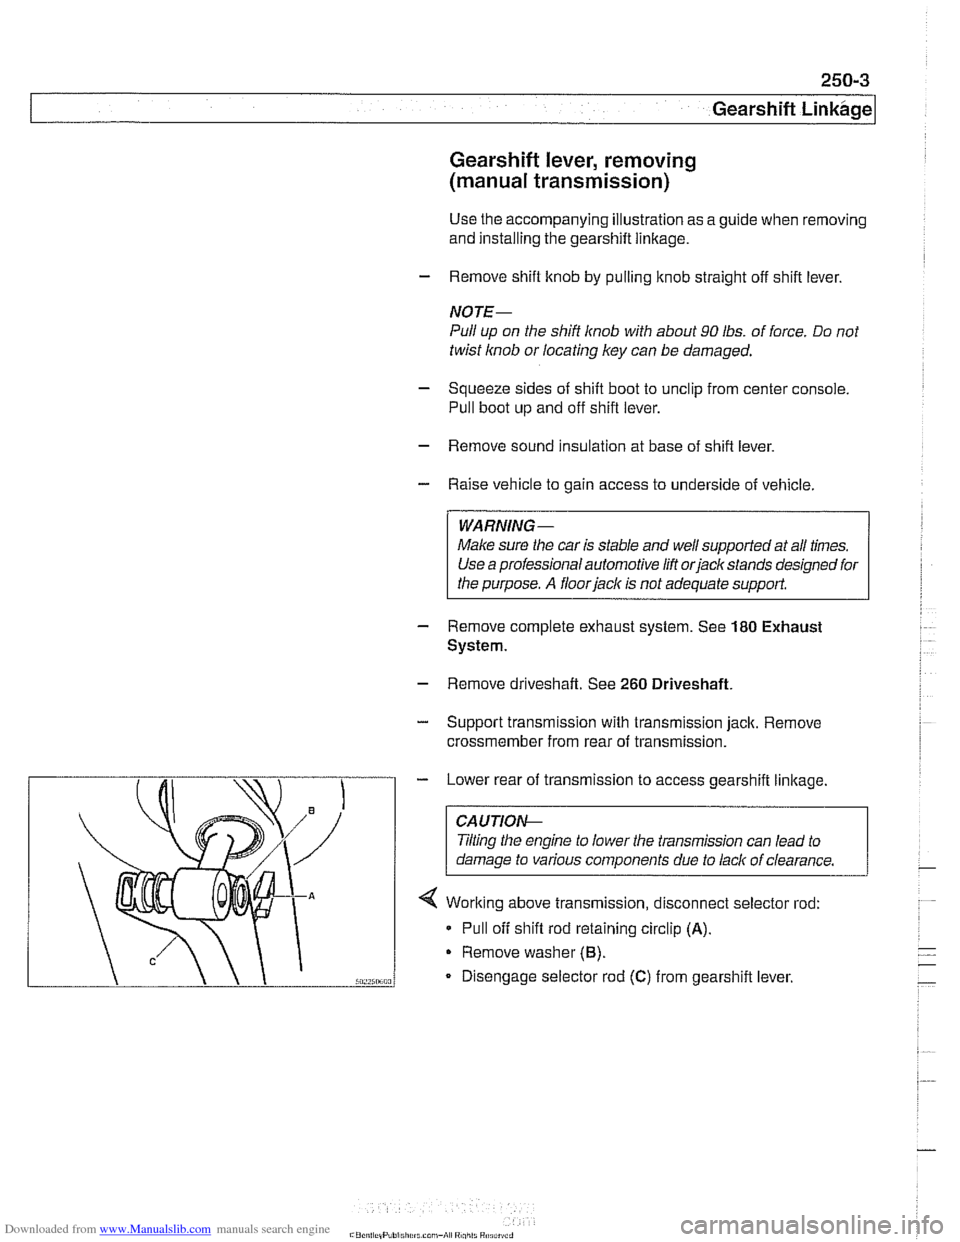
4 Working above transmission, disconnect selector rod:
* Pull off shift rod retaining circlip (A).
Remove washer (6).
Disengage selector rod (C) from gearshift lever.
Page 603 of 1002
Downloaded from www.Manualslib.com manuals search engine
Gearshift Linkage
- Connect selector rod to shift lever. Lift transmission, install
crossmember and tighten crossmember bolts.
Install driveshaft and heat shield. See
260 Driveshaft.
Reinstall exhaust system. See 180 Exhaust System.
. Lower vehicle. Install shift boot. Push shift ltnob on lever.
Tightening torque
Driveshaft
CV joint to final drive flange
. MI0 (Tom bolt)
70 Nm (51 ft-lb)
. M8 (compression nut) 32 Nm (24 ft-lb) - Driveshaft clamping sleeve
- MI0 ribbed nuts
80 Nm (59 ft-lb)
MI0 compressed nuts 64 Nm (47 ft-lb)
Flex-disc to driveshaft or transmission flange
MlO (8.8 grade) 48
Nm (35 ft-lb)
. MI0 (10.9 grade) 60
Nm (44 ft-lb)
- MI2 (10.9 grade) 100 Nm (74 ft-ib)
MI4 140 Nm (103 fi-lb)
Transmission crossmember
. to transmission 21 Nm (15 ft-lb)
. to chassis 42 Nm (30 ft-lb)