Page 5 of 29

27-5
Installing
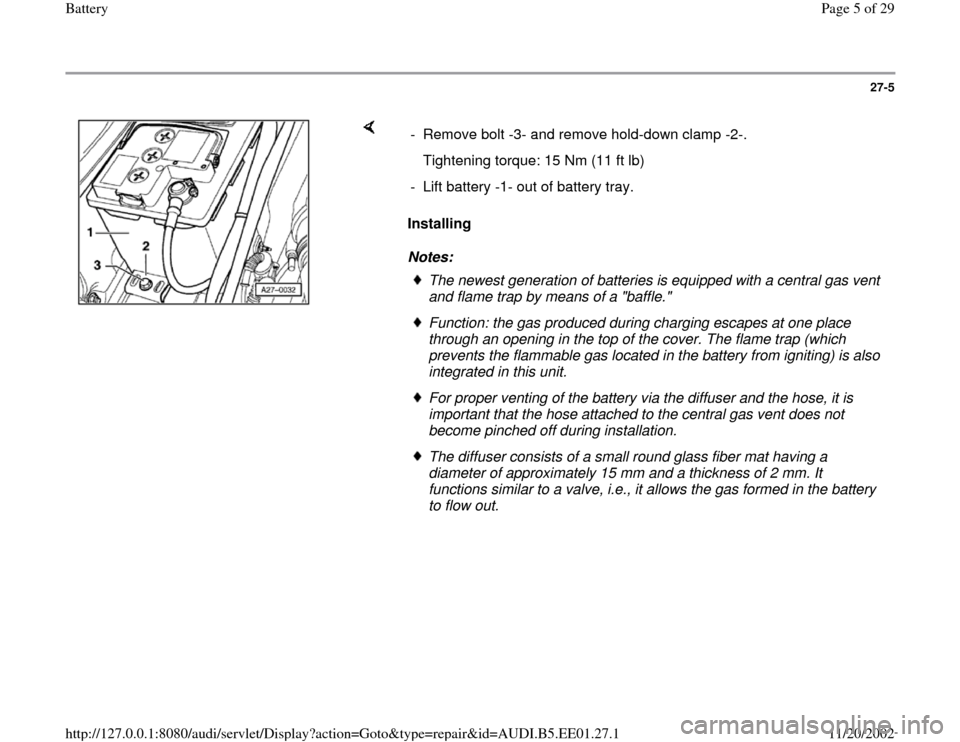
Notes: - Remove bolt -3- and remove hold-down clamp -2-.
Tightening torque: 15 Nm (11 ft lb)
- Lift battery -1- out of battery tray.
The newest generation of batteries is equipped with a central gas vent
and flame trap by means of a "baffle." Function: the gas produced during charging escapes at one place
through an opening in the top of the cover. The flame trap (which
prevents the flammable gas located in the battery from igniting) is also
integrated in this unit. For proper venting of the battery via the diffuser and the hose, it is
important that the hose attached to the central gas vent does not
become pinched off during installation. The diffuser consists of a small round glass fiber mat having a
diameter of approximately 15 mm and a thickness of 2 mm. It
functions similar to a valve, i.e., it allows the gas formed in the battery
to flow out.
Pa
ge 5 of 29 Batter
y
11/20/2002 htt
p://127.0.0.1:8080/audi/servlet/Dis
play?action=Goto&t
yp
e=re
pair&id=AUDI.B5.EE01.27.1
Page 7 of 29
27-7
Visual inspection
WARNING!
When charging, measuring the voltage or
load testing a battery, the cell caps must
always be screwed in tightly.
Before performing tests such as no-load voltage,
specific gravity or the battery load tests, a visual
check should be made of the battery.
The purpose of this check is to determine
If the case of the battery has been damaged.
Damage to the case can cause acid to leak.
If the terminals have been damaged. Damaged
terminals make it impossible to assure a good
contact at the terminal. This can lead to a cable
fire and damage to the electrical system.
Pa
ge 7 of 29 Batter
y
11/20/2002 htt
p://127.0.0.1:8080/audi/servlet/Dis
play?action=Goto&t
yp
e=re
pair&id=AUDI.B5.EE01.27.1
Page 13 of 29
27-12
No-load voltage, checking
CAUTION!
Battery cell caps must be screwed in tightly
when charging, measuring voltage or
performing load tests.
Always comply with the following
instructions otherwise a correct
measurement cannot be assured.
Special tools, test equipment and auxiliary
items
VAG1715 multimeter or
VAG1362 minitester or
Multimeter (Fluke 83 or equivalent)
Notes:
When testing the no-load voltage of a battery
installed in a vehicle, make sure the battery
Ground (GND) strap is disconnected.
The battery must not have been under a load
Pa
ge 13 of 29 Batter
y
11/20/2002 htt
p://127.0.0.1:8080/audi/servlet/Dis
play?action=Goto&t
yp
e=re
pair&id=AUDI.B5.EE01.27.1
Page 16 of 29
27-14
Specific gravity, checking
Special tools, test equipment and auxiliary
items
CAUTION!
Notes:
The specific gravity can be tested immediately after charging the battery.
Commercially available hydrometerShop towelWhen working with battery acid, make sure to follow all "Warnings
and safety precautions for lead-acid batteries." Wear suitable
protective clothing and eye protection. When disposing of batteries, always comply with applicable
Federal, State and local laws regarding the disposal of batteries
and sulfuric acid. In order to better determine the overall condition of a battery, always
perform a specific gravity test in conjunction with the load test. The temperature of the electrolyte must be at least 10 C (50 F).
Pa
ge 16 of 29 Batter
y
11/20/2002 htt
p://127.0.0.1:8080/audi/servlet/Dis
play?action=Goto&t
yp
e=re
pair&id=AUDI.B5.EE01.27.1
Page 18 of 29
27-16
State of charge in normal
climate zones Specific gravity in
kg/dm
3
Discharged 1.12
Half charged 1.20
Good charge 1.28
In normal climate zones, the specific gravity must
be at least 1.24 kg/dm
3.
- If specific gravity is too low: charge battery.
- After charging battery, repeat specific gravity
test.
Note:
The measured values for the specific gravity of
the individual battery cells must not vary by more
than 0.03 kg/dm
3.
Pa
ge 18 of 29 Batter
y
11/20/2002 htt
p://127.0.0.1:8080/audi/servlet/Dis
play?action=Goto&t
yp
e=re
pair&id=AUDI.B5.EE01.27.1
Page 24 of 29
27-21
Battery, charging
CAUTION!
Battery cell caps must be screwed in tightly
when charging, measuring voltage or
performing load tests.
Do not enter the room in which batteries are
being charged with unenclosed light bulbs or
when smoking. The reason for this is that an
explosive gas is formed in the battery by the
charging process.
Special tools, test equipment and auxiliary
items
Battery charger
Batteries should be charged using a VAG
battery charger such as VAG1471, VAG1648 or
VAS1974.
Notes:
The temperature of the battery must not be less
than 10 C (50 F).
Batteries should not be fast-charged; fast-
Pa
ge 24 of 29 Batter
y
11/20/2002 htt
p://127.0.0.1:8080/audi/servlet/Dis
play?action=Goto&t
yp
e=re
pair&id=AUDI.B5.EE01.27.1
Page 25 of 29
charging damages batteries.
If totally discharged batteries are fast-charged,
either they will not accept any charging current
or they will appear to be fully charged too early
due to a "surface charge" and will only appear
to be OK.
Pa
ge 25 of 29 Batter
y
11/20/2002 htt
p://127.0.0.1:8080/audi/servlet/Dis
play?action=Goto&t
yp
e=re
pair&id=AUDI.B5.EE01.27.1
Page 26 of 29
27-22
Battery charging procedure
- Switch off battery charger.
- Switch ignition off.
- First disconnect battery Ground (GND) strap;
then disconnect positive cable from battery.
- Connect positive cable of battery charger to
positive terminal of battery.
- Connect negative cable of battery charger to
negative terminal of battery.
- Adjust charging current on battery charger to
battery capacity. It should be equivalent to
approximately 10% of battery capacity or about
6 A for 60 Ah battery.
- Switch on battery charger.
Pa
ge 26 of 29 Batter
y
11/20/2002 htt
p://127.0.0.1:8080/audi/servlet/Dis
play?action=Goto&t
yp
e=re
pair&id=AUDI.B5.EE01.27.1