1998 VOLVO V90 lock
[x] Cancel search: lockPage 91 of 175

1998 Volvo S90
Chapter 6 - (cont.)
Replacing bulbs
pg. 81
Replacing bulbs
The method for replacement of bulbs in
the various lighting units is shown on the
following pages. Make sure when
installing bulbs, that the guide pin on the
socket fits into its corresponding recess.
When installing Halogen bulbs, do not
touch the glass with your fingers because
grease, oil or any other impurities can be
carbonized onto the bulb and damage the
reflector.
Use bulbs of correct type and voltage.
Failure to do so could cause the bulb
failure warning light to activate.
NOTE: Turn the ignition and light
switch off before replacing any bulbs.
Headlights (high/low beams)
1. Press the protruding tabs on the plastic
cover and pull out towards the fender.
2. Turn the bulb and connector 1/4 turn
counterclockwise and remove.
3. Remove the connector from the bulb.
4. Press a new bulb into the connector
without touching the bulb itself.
5. Reinsert the bulb into the headlight
housing and turn 1/4 turn clockwise until
the unit seats properly.
6. Reinstall the plastic cover.
Bulb Power US Bulb No.
High beam 70W HB3/9005
Low beam 60W HB4/9006
Headlight adjustment
The height of the headlight beams can be
adjusted according to vehicle load. The
headlights should be re-aimed if heavy
loads are carried in the trunk/cargo area or
rear seat, or when towing a trailer.
To adjust the headlights:
Park the car on a level surface and open
the hood.
The headlights are equipped with a level
which can be seen by looking through the
clear "window" on the top of the headlight
lens.
Turn the height adjustment knob (A) until
the bubble in the level aligns with within
the marking lines on the level.
Lateral headlight adjustment (B) should
only be carried out by an authorized
Volvo retailer. This setting should be
preset to "0".
Replacing bulbs pg. 82
file:///K|/ownersdocs/1998/1998_SV90/98S90_081.htm (1 of 6)12/30/2006 \
1:52:45 PM
Page 92 of 175

1998 Volvo S90
Turn signal/parking light/side marker light
1 To remove, turn the lamp holder 1/4 turn counterclockwise.
2 Remove the bulb from the holder by pressing it down in the
holder and turning it 1/4 turn counterclockwise.
3 Insert a new bulb into the holder and reinstall the unit in the
reverse order.
Power CP(W) Socket US Bulb No.
2412.2(21/5) BAY 15d 1157 NA
NOTE: It may be necessary to remove the washer fluid reservoir
fill tube in order to gain access to the bulb holder.
Cover (seen from under car)
Fog lights
1. Release the cover with a Phillips screwdriver.
2. Remove the spring clips
3. Withdraw the bulb and connecting wire (one unit).
4. Connect the wire from the new bulb.
5. Insert the new bulb in the holder and press the spring clips
into place.
6. Screw the cover into place.
Bulb Power US Bulb No.
H3 55W
Replacing bulbs, Sedans pg. 83
1,4:/ 5W/4cp BA
15s
2 / 21 W BAU 15s
3,5,6:/ 21 W/32 cp BA 15 s
file:///K|/ownersdocs/1998/1998_SV90/98S90_081.htm (2 of 6)12/30/2006 \
1:52:45 PM
Page 93 of 175

1998 Volvo S90
Replacing tail light bulbs (sedan
models)
All tail lamp bulbs are replaced from inside of
trunk. To avoid confusion, replace the bulbs one
at a time.
l Switch off the lights and ignition.
l Outboard lights: Unscrew screw A and turn
down the cover panel.
l Trunk lid: Lift the catch and fold down the
cover panel.
l Remove the bulb holder.
l Remove bulb by pressing and turning 1/4
turn counterclockwise.
l Insert a new bulb and fit the bulb holder in
the tail light cluster. One of the plugs on the
bulb holder is slightly wider than the other two.
l Turn the bulb holder clockwise to secure it.
Check that the bulb lights and refit the cover. Bulbs / Power CP(W) / Socket / US Bulb No
1,4 Tail light / 4(5) / BA 15s / 67
2 Rear turn signal / (21) / BAU 15s / –
3 Brake light / 32 / (21) / BA 15s / 1156
5 Back-up light / 32 (21) / BA 15s / 1156
6 Rear foglamp* 32 (21) / BA 15s / 1156
*Left (driver's) side only
Replacing bulbs, Sedans pg. 84
Light / Power CP(W) / Socket / US Bulb
No.
1 Fog light* / 32(21) / BA 15s / 1156
2 Back-up lights / 32(21) / BA 15 s / 1156
3 Turn signals / (21) / BAU 15 s / -
4 Brake light and tail light / 32/3(21/5) /
BAZ 15 d / 1157
*One light only, on driver's side
21 W 21 W 21/5 W
BA 15 s BAU 15 s BAY 15 d
Replacing tail light bulbs
(wagon models)
l Turn off the lights.
l Remove the cover with a screw driver.
l Rotate the bulb holder about 1/4" (0.6
cm) counterclockwise and remove the
holder from the tail light cluster.
l Gently press the bulb into the holder,
then rotate the bulb counterclockwise in
order to release it.
l Install a new bulb in the holder and
replace the bulb holder in the tail light
cluster. One of the guide lugs on the bulb holder
is slightly wider than the other two and,
thus, this lug fits into the widest recess
only.
l Turn the bulb holder clockwise
l Check that the bulb lights
l Re-install cluster cover
Two types of bulbs are in use
The guide lugs on the twin-pole bulb are
at different heights, and it is only possible
to fit these bulbs in one way. Try at first to
turn the bulb gently. Do not use force. If
this does not work, take out the bulb and
turn it half a turn and try again.
Replacing bulbs (cont.) pg. 85
file:///K|/ownersdocs/1998/1998_SV90/98S90_081.htm (3 of 6)12/30/2006 \
1:52:45 PM
Page 94 of 175

1998 Volvo S90
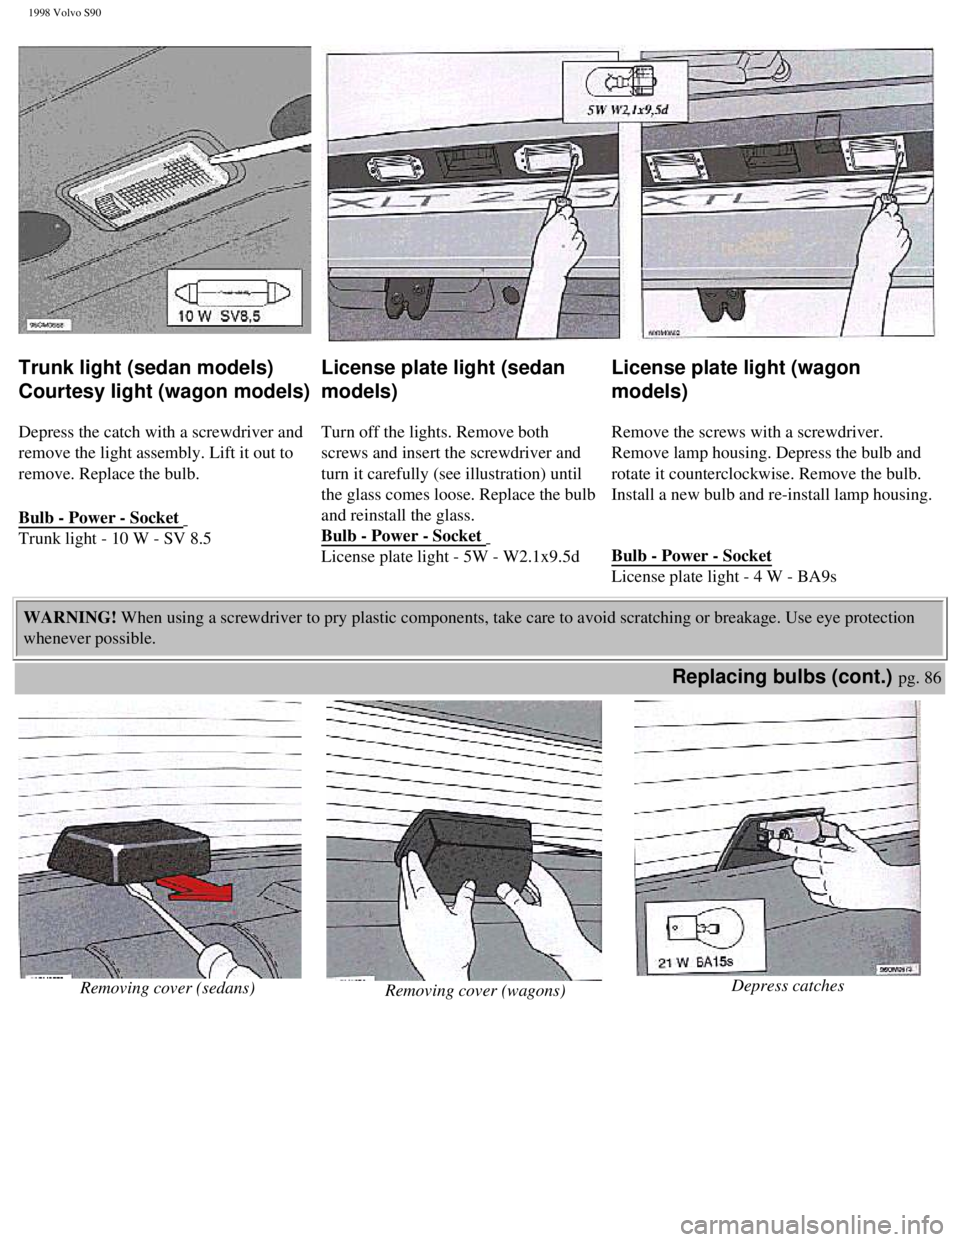
Trunk light (sedan models)
Courtesy light (wagon models)
Depress the catch with a screwdriver and
remove the light assembly. Lift it out to
remove. Replace the bulb.
Bulb - Power - Socket
Trunk light - 10 W - SV 8.5
License plate light (sedan
models)
Turn off the lights. Remove both
screws and insert the screwdriver and
turn it carefully (see illustration) until
the glass comes loose. Replace the bulb
and reinstall the glass.
Bulb - Power - Socket
License plate light - 5W - W2.1x9.5d
License plate light (wagon
models)
Remove the screws with a screwdriver.
Remove lamp housing. Depress the bulb and
rotate it counterclockwise. Remove the bulb.
Install a new bulb and re-install lamp housing.
Bulb - Power - Socket
License plate light - 4 W - BA9s
WARNING! When using a screwdriver to pry plastic components, take care to avoid \
scratching or breakage. Use eye protection
whenever possible.
Replacing bulbs (cont.) pg. 86
Removing cover (sedans)
Removing cover (wagons) Depress catches
file:///K|/ownersdocs/1998/1998_SV90/98S90_081.htm (4 of 6)12/30/2006 \
1:52:45 PM
Page 98 of 175

1998 Volvo S90
in the engine
compartment.
The fuse box
in the
passenger
compartment
(C) contains
the fuses
which protect
the various
functions in
the interior of
the car.
Fuse replacement
If an electrical component fails to function, it is likely that a fuse h\
as blown due to an
overloaded circuit. Pull out the fuse and look at it from the side to se\
e if there is a break
in the curved wire. If there is, install a new fuse of the same amperage\
and color.
Anumber of spare fuses are located in the fuse box in the passenger comp\
artment. There
is also a fuse removal tool to help with the removal and replacement of \
fuses.
Fuses pg. 90
Main fuse box (Box A)
Fuses in the main fuse box protect the entire
electrical system. If one of the fuses blows,
there is a serious electrical fault. Do not
change any of these fuses. Contact your
nearest Volvo workshop for a closer analysis.
When checking whether a fuse has blown, you
should first try to locate the blown fuse in the
fuse box in the passenger compartment or in
the relay/fuse box in the engine compartment.
Location* Amperage
1 Heated rear window, Central locking system, Power
Supply Relay "B"
Ignition switch 50
file:///K|/ownersdocs/1998/1998_SV90/98S90_089.htm (2 of 9)12/30/2006 \
1:52:46 PM
Page 101 of 175

1998 Volvo S90
Location ** Amperage
1 Heated rear window 25
2 Central locking 20
3 Brake light, Light switch 15
4 Ignition switch, SRS 10
5 Spare
6 Windshield wiper/washer, Headlight wiper, horn relay 25
7 Climate unit 20
8 Power pass. seat, Power side-view mirrors, Tailgate wiper/washer (wag\
ons)
Instrument lighting, Ambient temp. sensor 15
9 Audio system 15
10 Cigarette lighter/accessory socket 15
11 Transmission mode selector, Gear selector light 5
12 ABS 5
13 Clock, Interior/glove compartment lighting, Door open warning lights,\
Cargo space lighting, Vanity mirror 10
14 Horn 10
Location ** Amperage
15 Power antenna, Headlight flasher, Trailer 20
16 Accessories 20
17 Hazard warning flasher, Direction indicator, Alarm hazard indication \
20
18 Audio/amplifier, CD changer 15
file:///K|/ownersdocs/1998/1998_SV90/98S90_089.htm (5 of 9)12/30/2006 \
1:52:46 PM
Page 105 of 175

1998 Volvo S90
Cleaning the
outside of the
windshield and
wiper blades
If the windshield/tailgate is
not clear after using the
wiper(s) or if the blade
chatters when running, wax
or other material may be on
the blade or on the surface
of the glass.
Clean the glass with a
suitable cleaning agent.
The glass is clean if beads
do not form when you rinse
it with water.
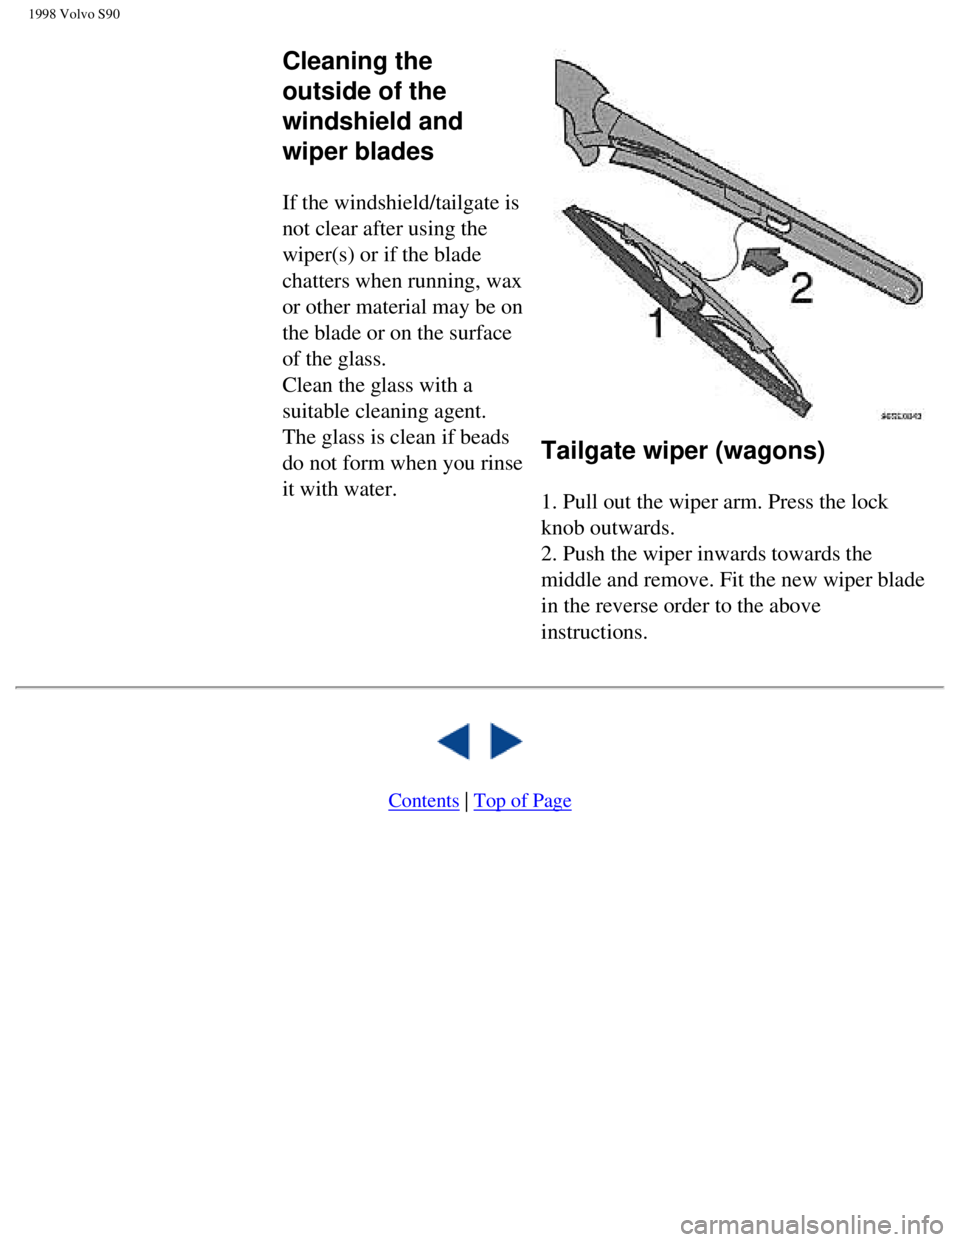
Tailgate wiper (wagons)
1. Pull out the wiper arm. Press the lock
knob outwards.
2. Push the wiper inwards towards the
middle and remove. Fit the new wiper blade
in the reverse order to the above
instructions.
Contents | Top of Page
file:///K|/ownersdocs/1998/1998_SV90/98S90_089.htm (9 of 9)12/30/2006 \
1:52:46 PM
Page 109 of 175

1998 Volvo S90
plenty of water, to avoid scratching.
l Bird droppings: Remove from
paintwork as soon as possible.
Otherwise the finish may be
permanently damaged.
l A detergent can be used to
facilitate the softening of dirt and
oil.
l A water-soluble grease solvent
may be used in cases of sticky dirt.
However, use a washplace equipped
with a drainage separator.
l Dry the car with a clean chamois
and remember to clean the drain
holes in the doors and rocker panels
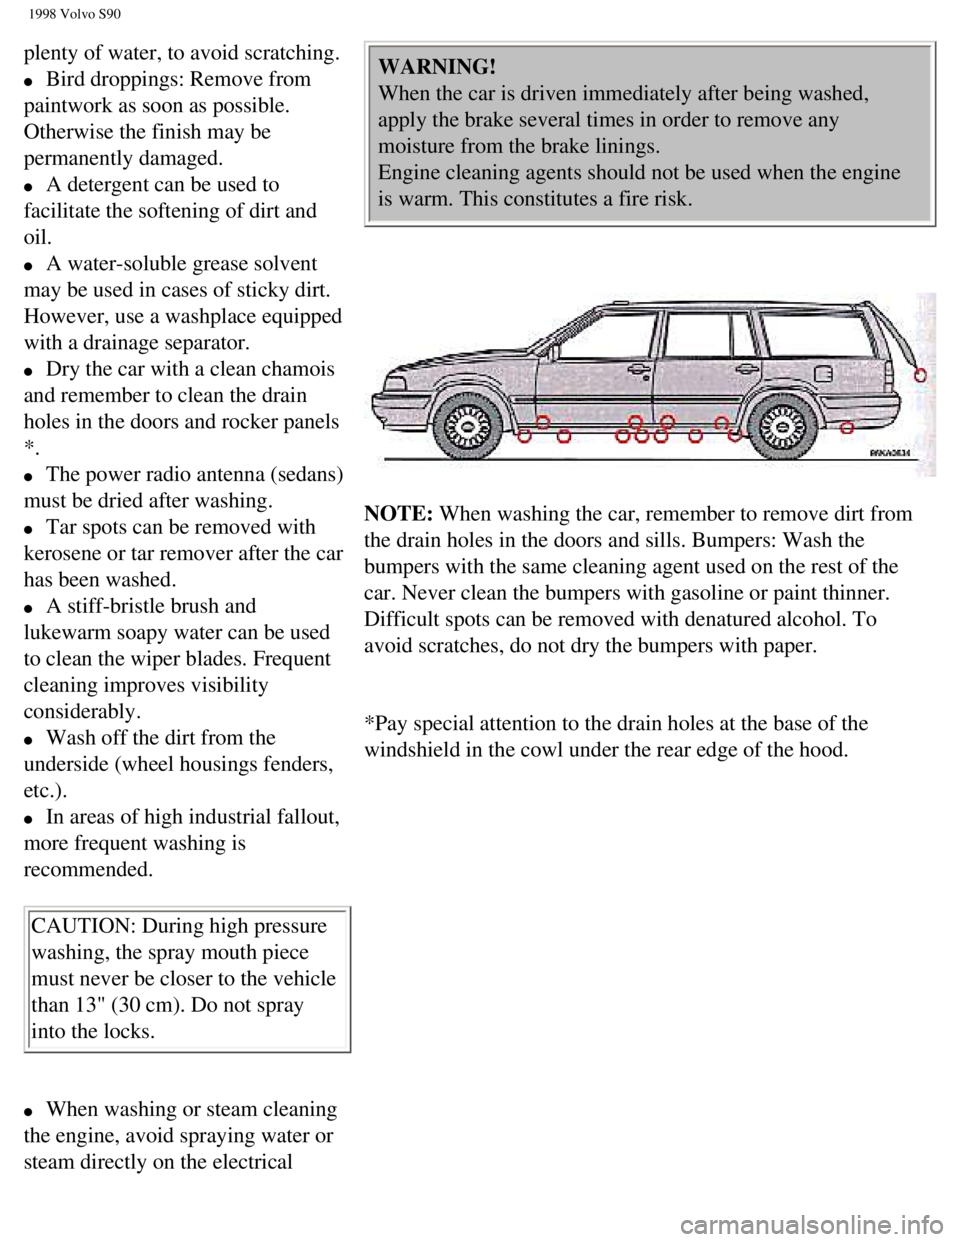
*.
l The power radio antenna (sedans)
must be dried after washing.
l Tar spots can be removed with
kerosene or tar remover after the car
has been washed.
l A stiff-bristle brush and
lukewarm soapy water can be used
to clean the wiper blades. Frequent
cleaning improves visibility
considerably.
l Wash off the dirt from the
underside (wheel housings fenders,
etc.).
l In areas of high industrial fallout,
more frequent washing is
recommended.
CAUTION: During high pressure
washing, the spray mouth piece
must never be closer to the vehicle
than 13" (30 cm). Do not spray
into the locks.
l When washing or steam cleaning
the engine, avoid spraying water or
steam directly on the electrical
WARNING!
When the car is driven immediately after being washed,
apply the brake several times in order to remove any
moisture from the brake linings.
Engine cleaning agents should not be used when the engine
is warm. This constitutes a fire risk.
NOTE: When washing the car, remember to remove dirt from
the drain holes in the doors and sills. Bumpers: Wash the
bumpers with the same cleaning agent used on the rest of the
car. Never clean the bumpers with gasoline or paint thinner.
Difficult spots can be removed with denatured alcohol. To
avoid scratches, do not dry the bumpers with paper.
*Pay special attention to the drain holes at the base of the
windshield in the cowl under the rear edge of the hood.
file:///K|/ownersdocs/1998/1998_SV90/98S90_097.htm (4 of 6)12/30/2006 \
1:52:47 PM