Page 93 of 175

1998 Volvo S90
Replacing tail light bulbs (sedan
models)
All tail lamp bulbs are replaced from inside of
trunk. To avoid confusion, replace the bulbs one
at a time.
l Switch off the lights and ignition.
l Outboard lights: Unscrew screw A and turn
down the cover panel.
l Trunk lid: Lift the catch and fold down the
cover panel.
l Remove the bulb holder.
l Remove bulb by pressing and turning 1/4
turn counterclockwise.
l Insert a new bulb and fit the bulb holder in
the tail light cluster. One of the plugs on the
bulb holder is slightly wider than the other two.
l Turn the bulb holder clockwise to secure it.
Check that the bulb lights and refit the cover. Bulbs / Power CP(W) / Socket / US Bulb No
1,4 Tail light / 4(5) / BA 15s / 67
2 Rear turn signal / (21) / BAU 15s / –
3 Brake light / 32 / (21) / BA 15s / 1156
5 Back-up light / 32 (21) / BA 15s / 1156
6 Rear foglamp* 32 (21) / BA 15s / 1156
*Left (driver's) side only
Replacing bulbs, Sedans pg. 84
Light / Power CP(W) / Socket / US Bulb
No.
1 Fog light* / 32(21) / BA 15s / 1156
2 Back-up lights / 32(21) / BA 15 s / 1156
3 Turn signals / (21) / BAU 15 s / -
4 Brake light and tail light / 32/3(21/5) /
BAZ 15 d / 1157
*One light only, on driver's side
21 W 21 W 21/5 W
BA 15 s BAU 15 s BAY 15 d
Replacing tail light bulbs
(wagon models)
l Turn off the lights.
l Remove the cover with a screw driver.
l Rotate the bulb holder about 1/4" (0.6
cm) counterclockwise and remove the
holder from the tail light cluster.
l Gently press the bulb into the holder,
then rotate the bulb counterclockwise in
order to release it.
l Install a new bulb in the holder and
replace the bulb holder in the tail light
cluster. One of the guide lugs on the bulb holder
is slightly wider than the other two and,
thus, this lug fits into the widest recess
only.
l Turn the bulb holder clockwise
l Check that the bulb lights
l Re-install cluster cover
Two types of bulbs are in use
The guide lugs on the twin-pole bulb are
at different heights, and it is only possible
to fit these bulbs in one way. Try at first to
turn the bulb gently. Do not use force. If
this does not work, take out the bulb and
turn it half a turn and try again.
Replacing bulbs (cont.) pg. 85
file:///K|/ownersdocs/1998/1998_SV90/98S90_081.htm (3 of 6)12/30/2006 \
1:52:45 PM
Page 94 of 175

1998 Volvo S90
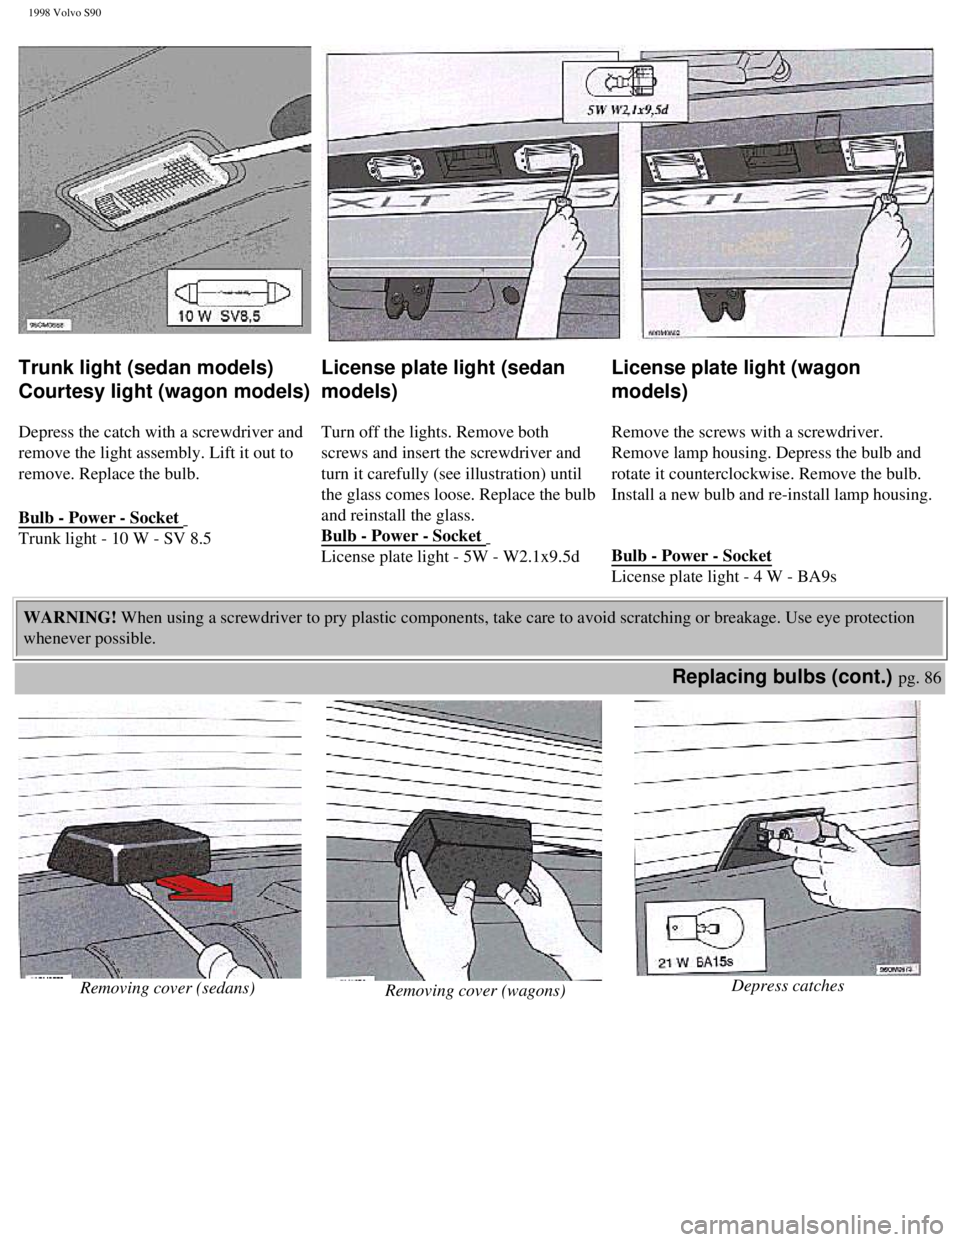
Trunk light (sedan models)
Courtesy light (wagon models)
Depress the catch with a screwdriver and
remove the light assembly. Lift it out to
remove. Replace the bulb.
Bulb - Power - Socket
Trunk light - 10 W - SV 8.5
License plate light (sedan
models)
Turn off the lights. Remove both
screws and insert the screwdriver and
turn it carefully (see illustration) until
the glass comes loose. Replace the bulb
and reinstall the glass.
Bulb - Power - Socket
License plate light - 5W - W2.1x9.5d
License plate light (wagon
models)
Remove the screws with a screwdriver.
Remove lamp housing. Depress the bulb and
rotate it counterclockwise. Remove the bulb.
Install a new bulb and re-install lamp housing.
Bulb - Power - Socket
License plate light - 4 W - BA9s
WARNING! When using a screwdriver to pry plastic components, take care to avoid \
scratching or breakage. Use eye protection
whenever possible.
Replacing bulbs (cont.) pg. 86
Removing cover (sedans)
Removing cover (wagons) Depress catches
file:///K|/ownersdocs/1998/1998_SV90/98S90_081.htm (4 of 6)12/30/2006 \
1:52:45 PM
Page 95 of 175

1998 Volvo S90
High-mounted brake light
To remove: (Sedans)
Turn off ignition.
Depress catch with a screwdriver. Pull
cover upward to remove it.
To remove: (Wagons)
Turn off ignition.
Grasp the cover with both hands and pull
it towards you.
Bulb Power CP(W) Socket US Bulb No.
High-mounted brake light 32(21) BA15s
1156 Depress catches and fit new bulb.
To fit:
Fit the reflector and check that the light
works.
4-door models
Press the cover into position, noting the
position of the alignment pin at the top.
Wagons
Align the catches and press the cover into
position.
Replacing bulbs pg. 87
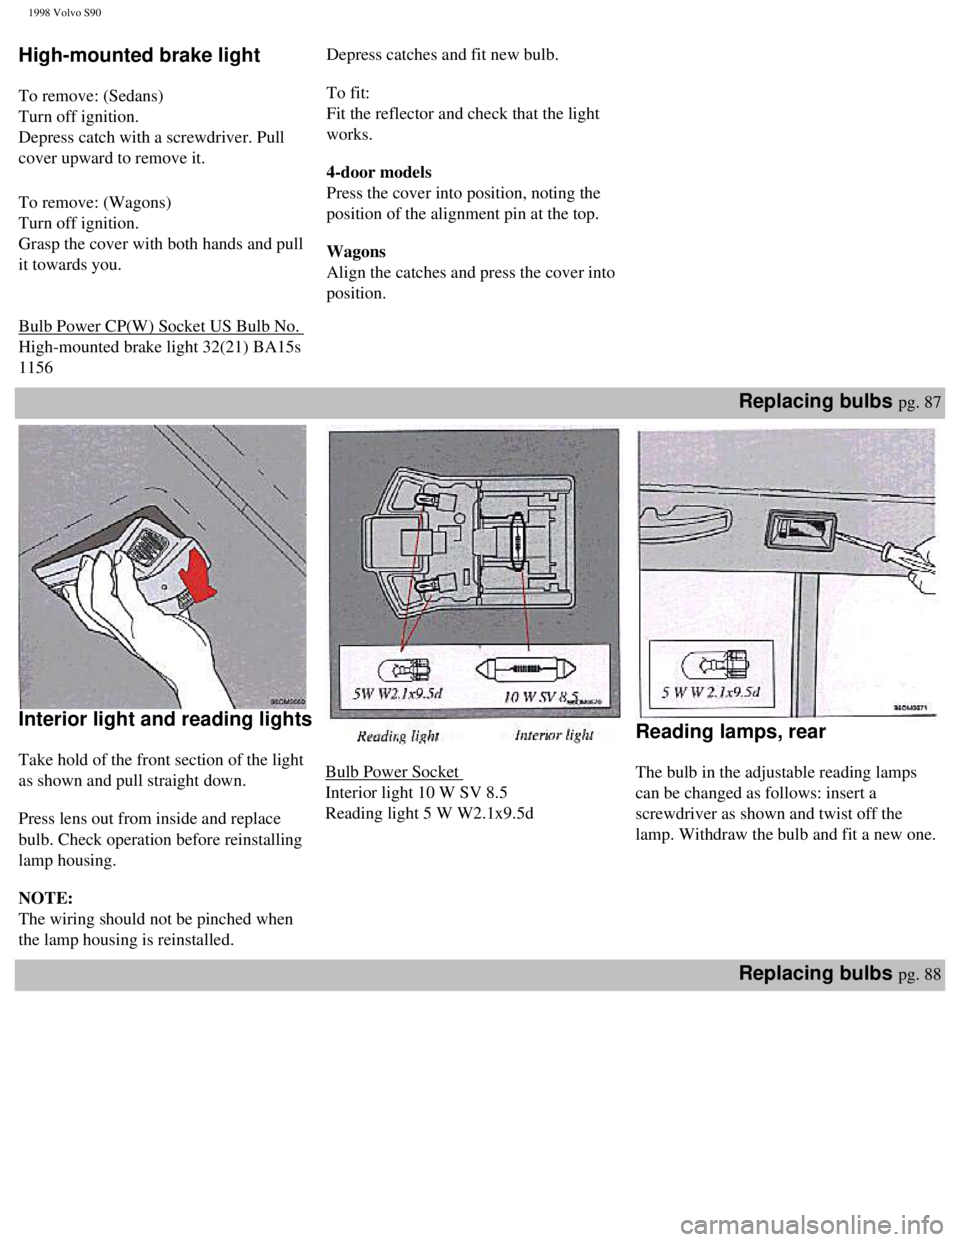
Interior light and reading lights
Take hold of the front section of the light
as shown and pull straight down.
Press lens out from inside and replace
bulb. Check operation before reinstalling
lamp housing.
NOTE:
The wiring should not be pinched when
the lamp housing is reinstalled.
Bulb Power Socket
Interior light 10 W SV 8.5
Reading light 5 W W2.1x9.5d
Reading lamps, rear
The bulb in the adjustable reading lamps
can be changed as follows: insert a
screwdriver as shown and twist off the
lamp. Withdraw the bulb and fit a new one.
Replacing bulbs pg. 88
file:///K|/ownersdocs/1998/1998_SV90/98S90_081.htm (5 of 6)12/30/2006 \
1:52:45 PM
Page 96 of 175
1998 Volvo S90
Door warning lamps
All doors are equipped with red warning
lamps. To replace a bulb, insert a
screwdriver as shown in picture and gently
turn it to remove the lens. Withdraw the
bulb, replace it and re-insert the lens.
Insert screwdriver and turn
Vanity mirror
Insert a screwdriver and turn it to remove
the lens. Replace the bulb and press the
lens back into place.
Door step courtesy lights
l Insert a screwdriver and turn carefully
to loosen the glass lens.
l Withdraw the lamp unit, bend back the
tabs and remove the plate.
l Replace the bulb.
l Reinstall the plate.
l Press the lamp unit back into place.
Contents | Top of Page
file:///K|/ownersdocs/1998/1998_SV90/98S90_081.htm (6 of 6)12/30/2006 \
1:52:45 PM
Page 130 of 175
1998 Volvo S90
Chapter 9 - Specifications
pg. 121
Specifications
This chapter contains facts and figures pertaining to the technical spec\
ifications of
your car.
Oil/Fluids specifications pg. 122
Engine specifications pg. 123
Cooling system pg. 124
Fuel system pg. 124
Distributor ignition system pg. 124
Transmission pg. 125
Suspension pg. 125
Electrical system/bulbs pg. 126
Capacities pg. 127
Service manuals, Road assistance pg. 128
Dimensions and weights pg. 129
Oil/Fluids Specifications
pg. 122
file:///K|/ownersdocs/1998/1998_SV90/98S90_121.htm (1 of 4)12/30/2006 \
1:52:50 PM
Page 135 of 175
1998 Volvo S90
Electrical system
12 V, negative ground.
Voltage-controlled generator. Single-wire system
with chassis and engine used as conductors.
Battery
Voltage 12 V
Capacity 600 A/125 min
The battery contains corrosive and poisonous acids.
It is of the utmost importance that old batteries are
disposed of correctly. Your Volvo retailer can assist
you in this matter.
Generator
Rated output 1400 W (certain models: 1680 W)
max. current 120 Amp (certain models: 120 Amp)
Bulbs
Bulb Trade
No. Power
Socket No.
of
bulb
Headlights HBI/9004 65/45 W – 2
Parking
lights,
turn
signals,
front 1157 N.
A.
21/5
W/24/2.2 cp BAY
15
2
turn
signals,
rear 1156
21W/32cp BA
15s 2
Tail lights 2x67 5W/4cp BA
15s 2
Brake
light 1156
21 W/32cp BA
15s 2*
file:///K|/ownersdocs/1998/1998_SV90/98S90_125.htm (2 of 7)12/30/2006 \
1:52:51 PM
Page 136 of 175
1998 Volvo S90
Tail light/
Brake
light 1157
21/5W/32/3cp BA
15d 2**
High-
mounted
brake
light 1156
21 W/32cp BA
15s 1
Back-up
lights 1156
21 W/32cp BA
15s 2
Rear fog
light 1156
21 W/32cp BA
15s 1
Front fog
lights GE881
27 W – 2
*Sedan
** Wagon
The following bulbs may be obtained from your
nearest Volvo retailer:
Bulbs Power Socket No. of
bulbs
License plate
light (wagon) 4W
BA 9s 2
(sedan) 5W W2.1x9.5d 2
Door warning
lights 3W
W2.1x9.5d 4
Interior light 10 W SV8.5 1
Reading lights,
front 5W
W2.1x9.5d 2
rear 5W W2.1x9.5d 2
Trunk light 10 W SV8.5 1
Glove box light 2W BA9 s 1
Instrument
lighting 3W
W2.1x9.5d 3
file:///K|/ownersdocs/1998/1998_SV90/98S90_125.htm (3 of 7)12/30/2006 \
1:52:51 PM
Page 174 of 175

1998 Volvo S90
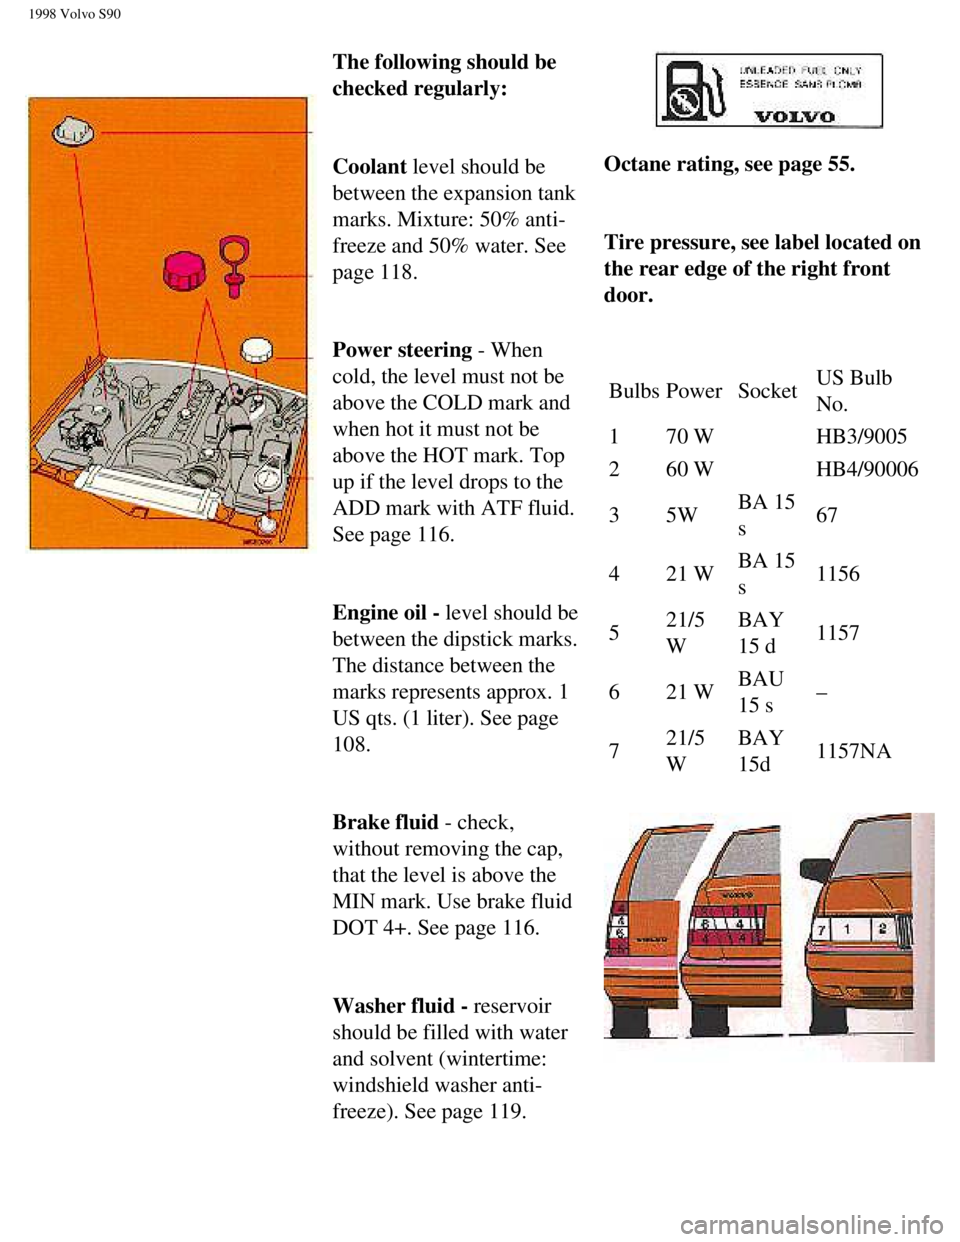
The following should be
checked regularly:
Coolant level should be
between the expansion tank
marks. Mixture: 50% anti-
freeze and 50% water. See
page 118.
Power steering - When
cold, the level must not be
above the COLD mark and
when hot it must not be
above the HOT mark. Top
up if the level drops to the
ADD mark with ATF fluid.
See page 116.
Engine oil - level should be
between the dipstick marks.
The distance between the
marks represents approx. 1
US qts. (1 liter). See page
108.
Brake fluid - check,
without removing the cap,
that the level is above the
MIN mark. Use brake fluid
DOT 4+. See page 116.
Washer fluid - reservoir
should be filled with water
and solvent (wintertime:
windshield washer anti-
freeze). See page 119.
Octane rating, see page 55.
Tire pressure, see label located on
the rear edge of the right front
door.
Bulbs Power Socket US Bulb
No.
1 70 W HB3/9005
2 60 W HB4/90006
3 5W BA 15
s 67
4 21 W BA 15
s 1156
5 21/5
W BAY
15 d
1157
6 21 W BAU
15 s –
7 21/5
W BAY
15d
1157NA
file:///K|/ownersdocs/1998/1998_SV90/98S90_161.htm (6 of 7)12/30/2006 \
1:52:56 PM