1998 VOLVO V90 bulb
[x] Cancel search: bulbPage 25 of 175

1998 Volvo S90
Chapter 2 - Instruments, switches and controls (cont.)Indicator and warning lights
pg. 17
1 Turn signal, left
2 Turn signal, right
3 Malfunction indicator
lamp
4 Direction indicator,
trailer
5 Service reminder
indicator
6 Low washer fluid level
If the lamp glows continuously
when the engine is running,
there is only about 1/2 - 1 US
qts. remaining in the washer
fluid reservoir.
7 Rear fog light
8 Bulb failure
9 Generator not charging
10 Low engine oil pressure
11 High beams
12 Brake failure
13 Parking brake applied
14 ABS-system
15 Low coolant level
16 (Not in use)
17 "Winter" mode engaged/
transmission fault
18 Fasten seat belts
19 SRS
20 (Not in use)
21 (Not in use)
Warning lights
pg. 18
file:///K|/ownersdocs/1998/1998_SV90/98S90_017.htm (1 of 7)12/30/2006 \
1:52:36 PM
Page 26 of 175

1998 Volvo S90
The warning lights described on pages 18 and 19 should never stay on whe\
n driving
When the ignition key is turned on, and before the engine starts, all of\
the warning lights should be on
to test the function of the bulbs. Should a light not go off after the e\
ngine has started, the system
indicated should be inspected. However, the parking brake reminder light\
will not go off until the
parking brake is fully released.
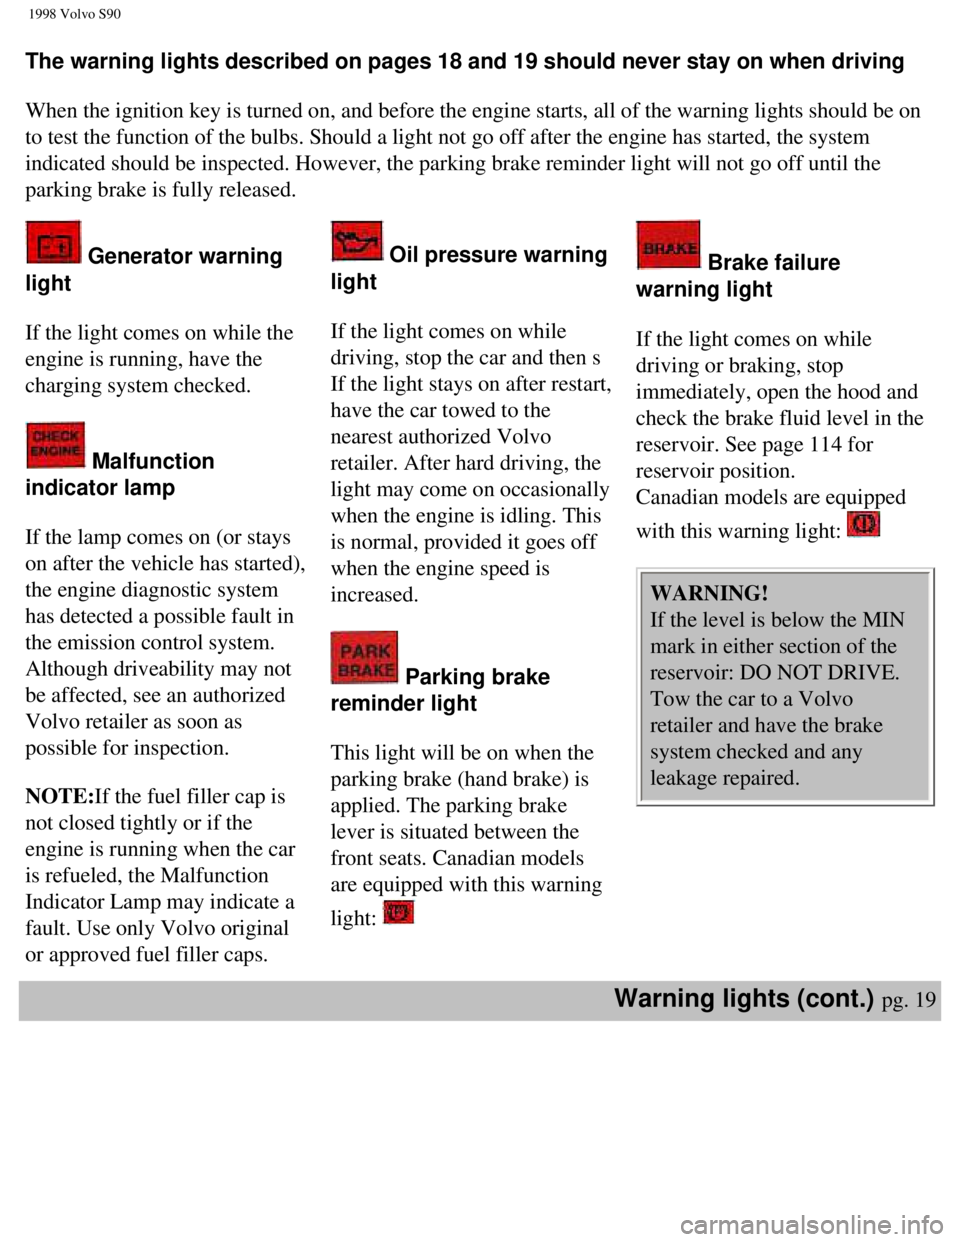
Generator warning
light
If the light comes on while the
engine is running, have the
charging system checked.
Malfunction
indicator lamp
If the lamp comes on (or stays
on after the vehicle has started),
the engine diagnostic system
has detected a possible fault in
the emission control system.
Although driveability may not
be affected, see an authorized
Volvo retailer as soon as
possible for inspection.
NOTE:If the fuel filler cap is
not closed tightly or if the
engine is running when the car
is refueled, the Malfunction
Indicator Lamp may indicate a
fault. Use only Volvo original
or approved fuel filler caps.
Oil pressure warning
light
If the light comes on while
driving, stop the car and then s
If the light stays on after restart,
have the car towed to the
nearest authorized Volvo
retailer. After hard driving, the
light may come on occasionally
when the engine is idling. This
is normal, provided it goes off
when the engine speed is
increased.
Parking brake
reminder light
This light will be on when the
parking brake (hand brake) is
applied. The parking brake
lever is situated between the
front seats. Canadian models
are equipped with this warning
light:
Brake failure
warning light
If the light comes on while
driving or braking, stop
immediately, open the hood and
check the brake fluid level in the
reservoir. See page 114 for
reservoir position.
Canadian models are equipped
with this warning light:
WARNING!
If the level is below the MIN
mark in either section of the
reservoir: DO NOT DRIVE.
Tow the car to a Volvo
retailer and have the brake
system checked and any
leakage repaired.
Warning lights (cont.) pg. 19
file:///K|/ownersdocs/1998/1998_SV90/98S90_017.htm (2 of 7)12/30/2006 \
1:52:36 PM
Page 27 of 175

1998 Volvo S90
Anti-lock Brake
System (ABS)
If the warning lamp lights up
there is a malfunction of the
ABS system (the standard
braking system will however
function). The vehicle should be
driven to a Volvo retailer for
inspection.
See page 67 for additional
information.
Canadian models are equipped
with this warning light:
Mode "W" engaged
The lamp will light up when the
Winter/Wet mode is engaged.
If the warning lamp begins to
flash,this means that there is a
fault in the automatic gearbox.
Contact your Volvo retailer.
Supplemental
Restraint System
If the light comes on (or stays
on after the vehicle has started),
the SRS diagnostic system has
detected a fault. Drive to an
authorized Volvo retailer for an
inspection of the system. See
the SRS section for more
information.
Service reminder
indicator
This light will come on at
10,000 mile (16,000 km)
intervals. It is a reminder to the
driver that the 10,000 mile
(16,000 km) service interval has
been exceeded. The light will
stay on 2 minutes after start
until reset by the servicing
retailer.
Coolant level sensor
If the light comes on while
driving, the coolant level is low.
The coolant level in the
expansion tank should be
checked immediately and
topped off if necessary. The
cooling system should be
inspected by an authorized
Volvo retailer.
Turn signal indicators-
trailer (certain models)
When towing a trailer, this light
will flash simultaneously with
the turn signals on the trailer. If
the light does not flash when
signaling, neither the trailer's turn
signals nor the car's turn signals
are functioning.
Bulb failure warning
light
The light will come on if any of
the following bulbs are defective:
one of the low beam headlights
one of the tail lights
one of the brake lights when the
brake pedal is depressed.
Check the fuse and bulb.
See sections titled "Replacing
bulbs" and "Fuses".
Lighting, Turn signals pg. 20
file:///K|/ownersdocs/1998/1998_SV90/98S90_017.htm (3 of 7)12/30/2006 \
1:52:36 PM
Page 28 of 175

1998 Volvo S90
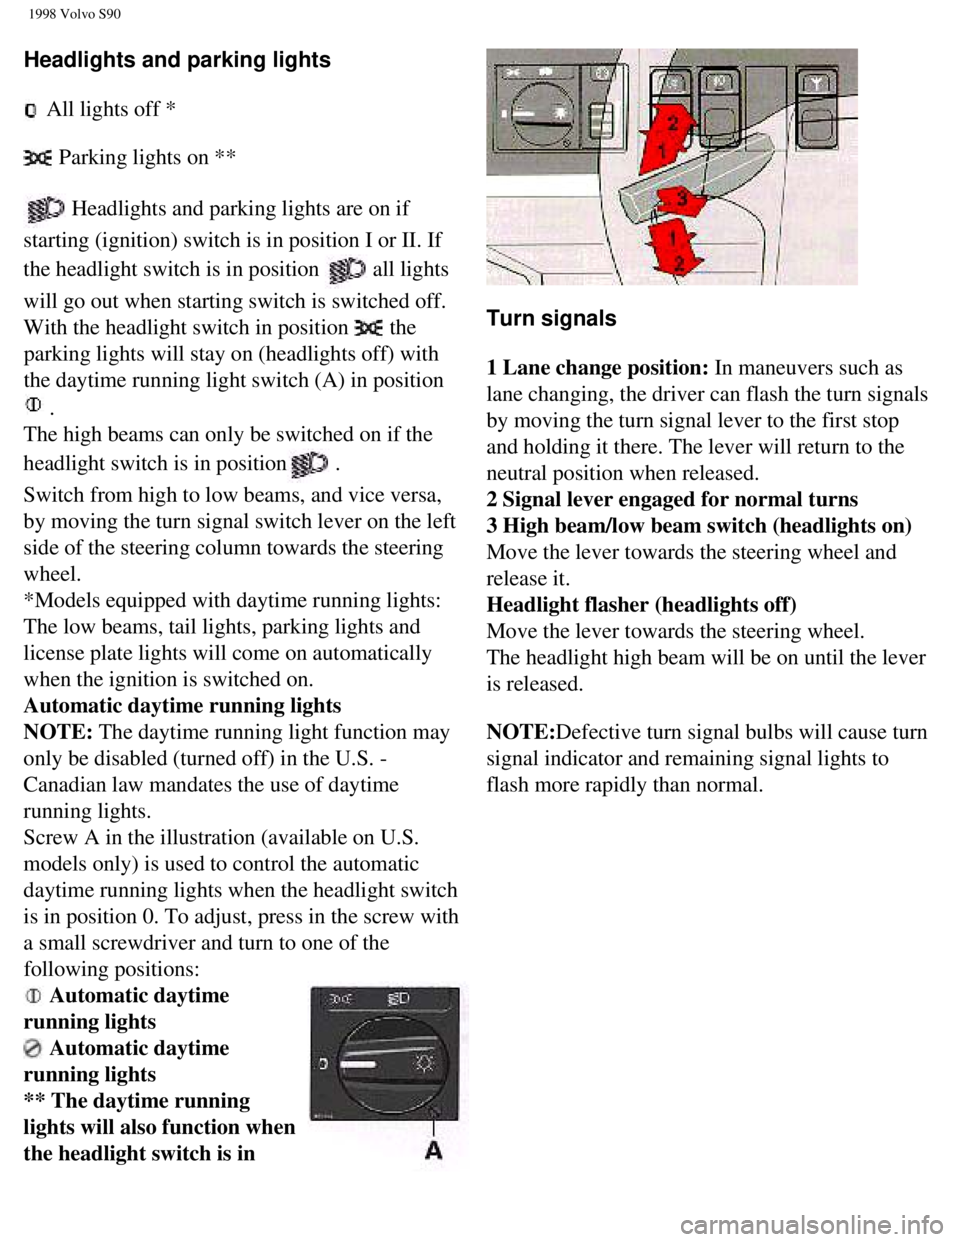
Headlights and parking lights
All lights off *
Parking lights on **
Headlights and parking lights are on if
starting (ignition) switch is in position I or II. If
the headlight switch is in position
all lights
will go out when starting switch is switched off.
With the headlight switch in position
the
parking lights will stay on (headlights off) with
the daytime running light switch (A) in position
.
The high beams can only be switched on if the
headlight switch is in position
.
Switch from high to low beams, and vice versa,
by moving the turn signal switch lever on the left
side of the steering column towards the steering
wheel.
*Models equipped with daytime running lights:
The low beams, tail lights, parking lights and
license plate lights will come on automatically
when the ignition is switched on.
Automatic daytime running lights
NOTE: The daytime running light function may
only be disabled (turned off) in the U.S. -
Canadian law mandates the use of daytime
running lights.
Screw A in the illustration (available on U.S.
models only) is used to control the automatic
daytime running lights when the headlight switch
is in position 0. To adjust, press in the screw with
a small screwdriver and turn to one of the
following positions:
Automatic daytime
running lights
Automatic daytime
running lights
** The daytime running
lights will also function when
the headlight switch is in
Turn signals
1 Lane change position: In maneuvers such as
lane changing, the driver can flash the turn signals
by moving the turn signal lever to the first stop
and holding it there. The lever will return to the
neutral position when released.
2 Signal lever engaged for normal turns
3 High beam/low beam switch (headlights on)
Move the lever towards the steering wheel and
release it.
Headlight flasher (headlights off)
Move the lever towards the steering wheel.
The headlight high beam will be on until the lever
is released.
NOTE:Defective turn signal bulbs will cause turn
signal indicator and remaining signal lights to
flash more rapidly than normal.
file:///K|/ownersdocs/1998/1998_SV90/98S90_017.htm (4 of 7)12/30/2006 \
1:52:36 PM
Page 80 of 175

1998 Volvo S90
cold-weather oil for hard driving or in warm
weather. See section "Engine oil" for more
information.
l The load placed on the battery is greater during
the winter since the heater, windshield wipers,
lighting etc. are used more often. Moreover, the
capacity of the battery decreases as the
temperature drops. In very cold weather, a poorly
charged battery can freeze and be damaged. It is
therefore advisable to check the state of charge
more frequently and spray an anti-rust oil on the
battery posts.
l Volvo recommends the use of snow tires on all
four wheels for winter driving - see section
"Wheels and tires".
l To prevent the washer reservoir from freezing,
add washer solvents containing antifreeze. This is
important since dirt is often splashed on the
windshield during winter driving, thus requiring
frequent use of the washers and wipers.
functions when the transmission is in reverse.
Also see "Winter/Wet" mode on page 59.
Winter/Wet mode
Enhanced Vehicle Traction
This mode may be selected for starting/moving
off on slippery roads or to lower downshift speeds
if the transmission is in "L".
Mode W
*In position D, the gearbox starts in third gear and
changes up to fourth gear.
*In position 3, second gear is locked and there is
no change up to third gear. In position L, first gear
is locked.
*These positions always offer the kick-down
feature.
Long distance trip pg. 70
Before a long distance trip
It is always worthwhile to have your car checked at a Volvo retailer
before driving long distances. Your retailer will also be able to supply\
you with bulbs, fuses, spark plugs and wiper blades for your use in the \
event that problems occur.
If you prefer to check the car yourself, please note the following:
l Check that the engine runs smoothly and that fuel consumption is
normal.
l Check engine oil, coolant levels, and for possible fuel leakage.
l Check transmission oil level and rear axle for leakage.
l Check condition of drive belts.
l Check state of charge of battery.
l Examine tires carefully (the spare tire as well), and replace those
that are worn. Check tire pressures.
l The brakes, front wheel alignment, and steering gear should be
checked by your Volvo retailer only.
l Check all lights, including high beams.
file:///K|/ownersdocs/1998/1998_SV90/98S90_067.htm (4 of 5)12/30/2006 \
1:52:43 PM
Page 87 of 175

1998 Volvo S90
Chapter 6 - In case of an emergency
pg. 77
In case of an emergency
Even if you maintain your car in good running condition, there is always\
the possibility that something might go wrong and prevent you from
driving, such as a punctured tire, blown fuse or bulb, etc. For addition\
al information, see section "ON CALL Road Assistance".
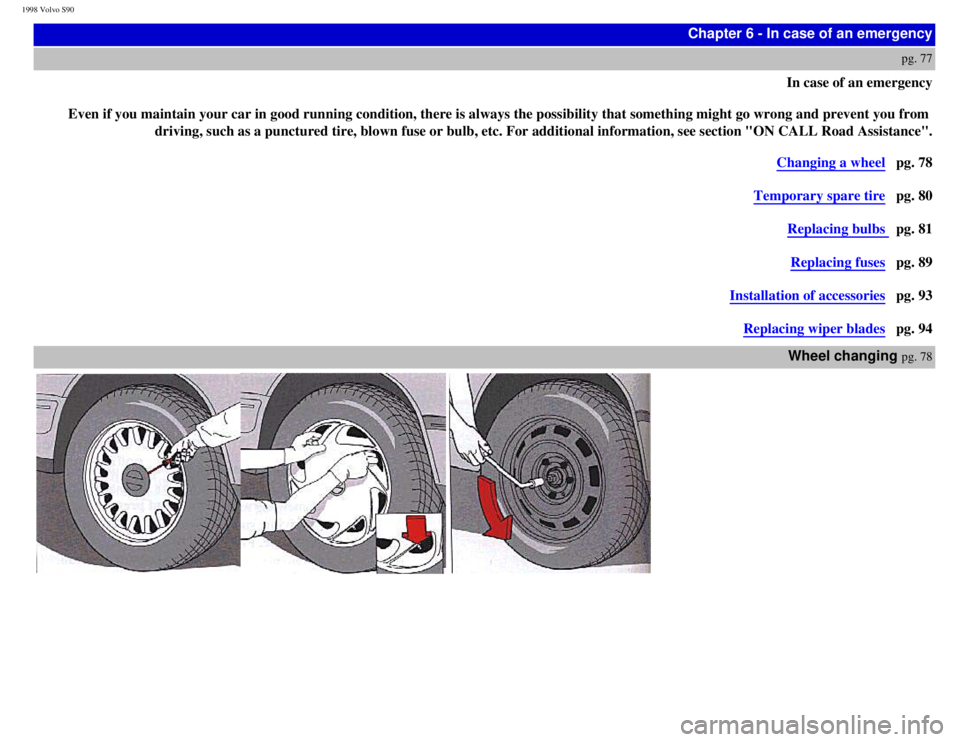
Changing a wheel pg. 78
Temporary spare tire pg. 80
Replacing bulbs pg. 81
Replacing fuses pg. 89
Installation of accessories pg. 93
Replacing wiper blades pg. 94
Wheel changing
pg. 78
file:///K|/ownersdocs/1998/1998_SV90/98S90_077.htm (1 of 4)12/30/2006 \
1:52:45 PM
Page 91 of 175

1998 Volvo S90
Chapter 6 - (cont.)
Replacing bulbs
pg. 81
Replacing bulbs
The method for replacement of bulbs in
the various lighting units is shown on the
following pages. Make sure when
installing bulbs, that the guide pin on the
socket fits into its corresponding recess.
When installing Halogen bulbs, do not
touch the glass with your fingers because
grease, oil or any other impurities can be
carbonized onto the bulb and damage the
reflector.
Use bulbs of correct type and voltage.
Failure to do so could cause the bulb
failure warning light to activate.
NOTE: Turn the ignition and light
switch off before replacing any bulbs.
Headlights (high/low beams)
1. Press the protruding tabs on the plastic
cover and pull out towards the fender.
2. Turn the bulb and connector 1/4 turn
counterclockwise and remove.
3. Remove the connector from the bulb.
4. Press a new bulb into the connector
without touching the bulb itself.
5. Reinsert the bulb into the headlight
housing and turn 1/4 turn clockwise until
the unit seats properly.
6. Reinstall the plastic cover.
Bulb Power US Bulb No.
High beam 70W HB3/9005
Low beam 60W HB4/9006
Headlight adjustment
The height of the headlight beams can be
adjusted according to vehicle load. The
headlights should be re-aimed if heavy
loads are carried in the trunk/cargo area or
rear seat, or when towing a trailer.
To adjust the headlights:
Park the car on a level surface and open
the hood.
The headlights are equipped with a level
which can be seen by looking through the
clear "window" on the top of the headlight
lens.
Turn the height adjustment knob (A) until
the bubble in the level aligns with within
the marking lines on the level.
Lateral headlight adjustment (B) should
only be carried out by an authorized
Volvo retailer. This setting should be
preset to "0".
Replacing bulbs pg. 82
file:///K|/ownersdocs/1998/1998_SV90/98S90_081.htm (1 of 6)12/30/2006 \
1:52:45 PM
Page 92 of 175

1998 Volvo S90
Turn signal/parking light/side marker light
1 To remove, turn the lamp holder 1/4 turn counterclockwise.
2 Remove the bulb from the holder by pressing it down in the
holder and turning it 1/4 turn counterclockwise.
3 Insert a new bulb into the holder and reinstall the unit in the
reverse order.
Power CP(W) Socket US Bulb No.
2412.2(21/5) BAY 15d 1157 NA
NOTE: It may be necessary to remove the washer fluid reservoir
fill tube in order to gain access to the bulb holder.
Cover (seen from under car)
Fog lights
1. Release the cover with a Phillips screwdriver.
2. Remove the spring clips
3. Withdraw the bulb and connecting wire (one unit).
4. Connect the wire from the new bulb.
5. Insert the new bulb in the holder and press the spring clips
into place.
6. Screw the cover into place.
Bulb Power US Bulb No.
H3 55W
Replacing bulbs, Sedans pg. 83
1,4:/ 5W/4cp BA
15s
2 / 21 W BAU 15s
3,5,6:/ 21 W/32 cp BA 15 s
file:///K|/ownersdocs/1998/1998_SV90/98S90_081.htm (2 of 6)12/30/2006 \
1:52:45 PM