Page 4 of 261
name. SIENNA (U)
4
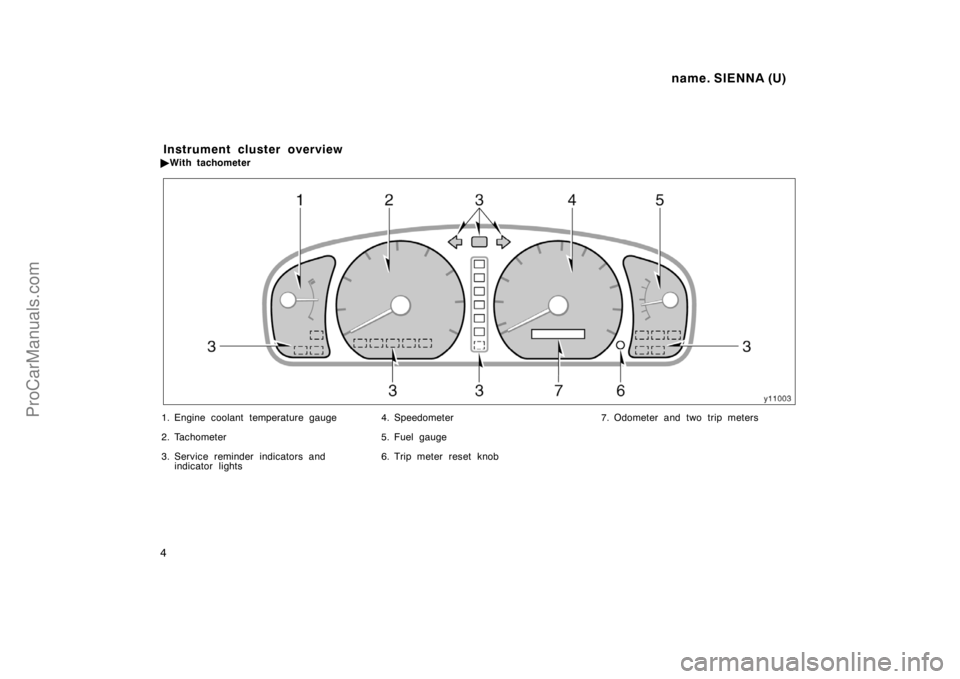
�With tachometer
1. Engine coolant temperature gauge
2. Tachometer
3. Service reminder indicators and
indicator lights4. Speedometer
5. Fuel gauge
6. Trip meter reset knob7. Odometer and two trip meters
Instrument cluster overview
ProCarManuals.com
Page 5 of 261
name. SIENNA (U)
5
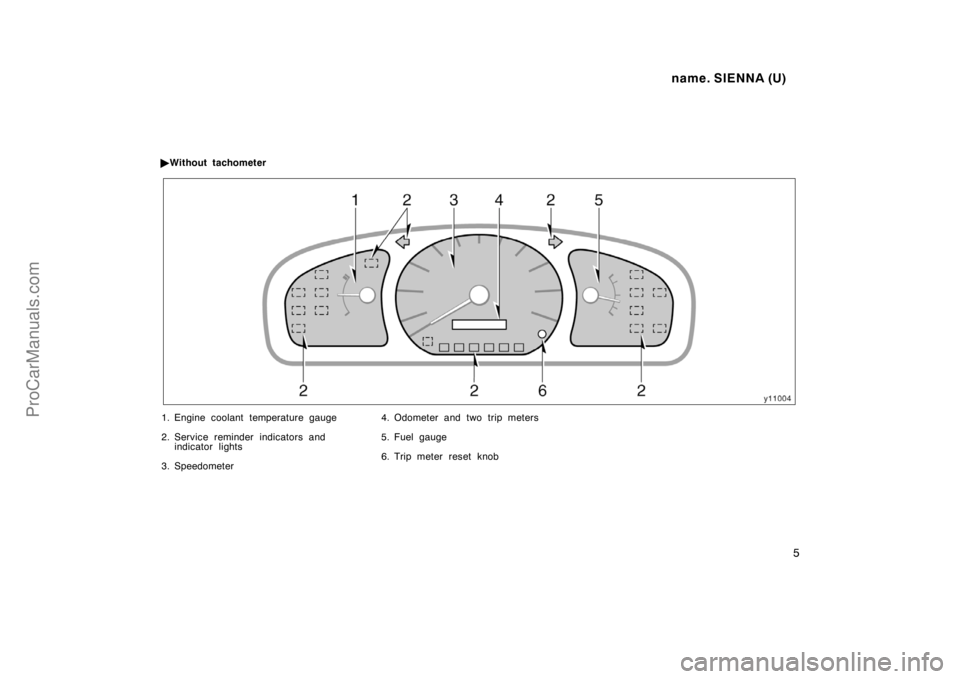
�Without tachometer
1. Engine coolant temperature gauge
2. Service reminder indicators and
indicator lights
3. Speedometer4. Odometer and two trip meters
5. Fuel gauge
6. Trip meter reset knob
ProCarManuals.com
Page 20 of 261

20
“POWER DOOR” SWITCH (on some
models)
This switch of the transmitter is used
to open and close the power sliding
door. Push the switch slowly and se-
curely.
To open: Push the")
name. SIENNA (U)
20
“POWER DOOR” SWITCH (on some
models)
This switch of the transmitter is used
to open and close the power sliding
door. Push the switch slowly and se-
curely.
To open: Push the switch. The sliding
door opens completely.
To close: Push the switch again. The slid-
ing door closes completely.Opening and closing can be performed by
the “POWER DOOR” switch under the fol-
lowing conditions only:
�The sliding door is unlocked.
�The power sliding door system is on.
(The “PWR DOOR OFF” switch is
pushed out.)
�To open the power sliding door when
the ignition key is in the “ON” position,
the transmission selector lever must be
in “P”. (To close the sliding door from
the fully−opened or half−opened posi-
tion, the transmission selector lever is
not required to be in “P”.)
”PANIC” SWITCH (on some models)
Pushing the ”PANIC” switch blows the
horn intermittently and flashes the
headlights, tail lights and other exterior
lights. The engine cannot be started be-
cause the starter circuit will be cut.
The ”PANIC” switch is used to deter ve-
hicle theft when you witness anyone at-
tempting to break into or damage your
vehicle.
The alarm will last for one minute. To stop
alarm midway, push the ”PANIC” switch
once again. The starter circuit cut will be
kept on until the ”PANIC” mode is can-
celled.
ProCarManuals.com
Page 26 of 261

26
2. In front of the vehicle, pull up the
auxiliary catch lever and lift the
hood.3. Hold the hood open by inserting the
support rod into the slot.
Before closing the hood, check to")
name. SIENNA (U)
26
2. In front of the vehicle, pull up the
auxiliary catch lever and lift the
hood.3. Hold the hood open by inserting the
support rod into the slot.
Before closing the hood, check to see that
you have not forgotten any tools, rags,
etc. and return the support rod to its clip−
this prevents rattles. Then lower the hood
make sure it locks into place. If neces-
sary, press down gently on the front edge
to lock it.
CAUTION
After inserting the support rod into
the slot, make sure the rod supports
the hood securely from falling down
on to your head or body.
Theft deterrent system—
To deter the vehicle theft, the system
is designed to give an alarm and keep
the engine from being started if any of
the front, sliding or back doors or hood
is forcibly unlocked or the battery ter-
minal is disconnected and then recon-
nected when the vehicle is locked.
The alarm blows the horn intermittently
and flashes the headlights, tail lights and
other exterior lights. The engine cannot be
started because the starter circuit will be
cut.
ProCarManuals.com
Page 28 of 261

28
Stopping the alarm
Turn the ignition key from the ”LOCK” to
”ACC” position. The alarm will be stopped
with the starter circuit cut kept on. Stop-
ping the alarm in this man")
name. SIENNA (U)
28
Stopping the alarm
Turn the ignition key from the ”LOCK” to
”ACC” position. The alarm will be stopped
with the starter circuit cut kept on. Stop-
ping the alarm in this manner will keep
the alarm from being reactivated when any
of the front, sliding or back doors or hood
is opened.
CANCELLING THE SYSTEM
Unlock either front door or back door with
the key or wireless remote control trans-
mitter. This cancels the system completely
and the starter circuit cut will be cancelled
at once.
INDICATOR LIGHT
The indicator light gives the following
three indications.
FLASHING—The system is set. You need
the key or wireless remote control trans-
mitter to open the front, sliding and back
doors and hood.
ON—The system will automatically be set
when the time comes. The front, sliding
and back doors and hood may be opened
without a key or wireless remote control
transmitter.
OFF—The system is inactive. You may
open any door and hood.TESTING THE SYSTEM
1. Open all the windows.
2. Set the system as described above.
The doors should be locked with the
key or wireless remote control transmit-
ter. Be sure to wait until the indicator
light starts flashing.
3. Unlock any door from the inside. The
system should activate the alarm.
4. Cancel the system by unlocking either
front door or back door with the key or
wireless remote control transmitter.
5. Repeat this operation for the other
doors and hood. When testing on the
hood, also check that the system is
activated when the battery terminal is
disconnected and then reconnected.
If the system does not work properly,
have it checked by your Toyota dealer.
Fuel tank cap
1. To open the fuel filler door, pull the
lever up.
When refueling, turn off the engine.
CAUTION
�Do not smoke, cause sparks or al-
low open flames when refueling.
The fumes are flammable.
�When opening the cap, do not re-
move the cap quickly. In hot weath-
er, fuel under pressure could cause
injury by spraying out of the filler
neck if the cap is suddenly re-
moved.
ProCarManuals.com
Page 92 of 261

92
The lights automatically turn off when the
driver ’s door is opened with the ignition
key in the ”ACC” or ”LOCK” position. To
turn them on again, turn the key to the
”")
name. SIENNA (U)
92
The lights automatically turn off when the
driver ’s door is opened with the ignition
key in the ”ACC” or ”LOCK” position. To
turn them on again, turn the key to the
”ON” position or actuate the headlight
switch. If you are going to park for over
one week, make sure the headlight switch
is off.
NOTICE
To prevent the battery from being dis-
charged, do not leave the lights on
for a long period when the engine is
not running.
Daytime running light system (Canada
only)
The headlights turn on at reduced intensi-
ty when the parking brake is released with
the engine started, even with the light
switch in the ”OFF” position. They will not
go off until the ignition switch is turned
off.
To turn on the other exterior lights and
instrument panel lights, twist the knob to
the position 1.
Twist the knob to the position 2 to turn
the headlights to full intensity for driving
at night.
High−Low beams—For high beams, turn
the headlights on and push the lever away
from you (position 1). Pull the lever to-
ward you (position 2) for low beams.
The headlight high beam indicator light
(blue light) on the instrument panel will
tell you that the high beams are on.
Flashing the high beam headlights
(position 3)—Pull the lever all the way
back. The high beam headlights turn off
when you release the lever.
You can flash the high beam headlights
with the knob turned to ”OFF”.TURN SIGNALS
To signal a turn, push the headlight/
turn signal lever up or down to position
1.
The key must be in the ”ON” position.
The lever automatically returns after you
make a turn, but you may have to return
it by hand after you change lanes.
To signal a lane change, move the lever
up or down to the pressure point (position
2) and hold it.
If the turn signal indicator lights (green
lights) on the instrument panel flash faster
than normal, a front or rear turn signal
bulb is burned out.
ProCarManuals.com
Page 93 of 261

93
HEADLIGHTS
To turn on the following lights: Twist
the headlight/turn signal lever knob.
Position 1—Parking, tail, license plate,
side marker and instrument panel lights
Position")
name. SIENNA (U)
93
HEADLIGHTS
To turn on the following lights: Twist
the headlight/turn signal lever knob.
Position 1—Parking, tail, license plate,
side marker and instrument panel lights
Position 2—Headlights and all of the
above
The lights automatically turn off when the
driver ’s door is opened with the ignition
turned off. To turn them on again, turn the
key to the ”ON” position or actuate the
headlight switch. If you are going to park
for over one week, make sure the head-
light switch is off.
NOTICE
To prevent the battery from being dis-
charged, do not leave the lights on
for a long period when the engine is
not running.
Daytime running light system (Canada
only)
The headlights turn on at reduced intensi-
ty when the parking brake is released with
the engine started, even with the light
switch in the ”OFF” position. They will not
go off until the ignition switch is turned
off.
To turn on the other exterior lights and
instrument panel lights, twist the knob to
the position 1.
Twist the knob to the position 2 to turn
the headlights to full intensity for driving
at night.
High−Low beams—For high beams, turn
the headlights on and push the lever away
from you (position 1). Pull the lever to-
ward you (position 2) for low beams.
The headlight high beam indicator light
(blue light) on the instrument panel will
tell you that the high beams are on.
Flashing the high beam headlights
(position 3)—Pull the lever all the way
back. The high beam headlights turn off
when you release the lever.
You can flash the high beam headlights
with the knob turned to ”OFF”.
Headlights and turn signals
(without automatic light
control system)
ProCarManuals.com
Page 103 of 261

103
Part 1
OPERATION OF
INSTRUMENTS
AND CONTROLS—
Chapter 1−5
Gauges, Meters and
Service reminder
indicators
�Fuel gauge
�Engine coolant temperature
gauge
�Tachometer
�Odometer an")
name. SIENNA (U)
103
Part 1
OPERATION OF
INSTRUMENTS
AND CONTROLS—
Chapter 1−5
Gauges, Meters and
Service reminder
indicators
�Fuel gauge
�Engine coolant temperature
gauge
�Tachometer
�Odometer and two trip meters
�Service reminder indicators and
warning buzzers
Fuel gauge
With tachometer
Low fuel level
warning light
Without tachometer
The gauge works when the ignition
switch is on and indicates the approxi-
mate quantity of fuel remaining in the
tank.
Nearly full—Needle at ”F”
Nearly empty—Needle at ”E”
It is a good idea to keep the tank over
1/4 full.
This fuel gauge has a non−return type
needle which remains at the last indicated
position when the ignition switch is turned
off.
If the fuel level approaches ”E” or the low
fuel level warning light comes on, fill the
fuel tank as soon as possible.
On inclines or curves, due to the move-
ment of fuel in the tank, the fuel gauge
needle may fluctuate or the low fuel level
warning light may come on earlier than
usual.
If the fuel tank is completely empty, the
malfunction indicator lamp comes on. Fill
the fuel tank immediately.
The indicator lamp goes off after driving
several times. If the indicator lamp does
not go off, contact your Toyota dealer as
soon as possible.
ProCarManuals.com