1998 TOYOTA SIENNA ECU
[x] Cancel search: ECUPage 196 of 261
name. SIENNA (U)
196
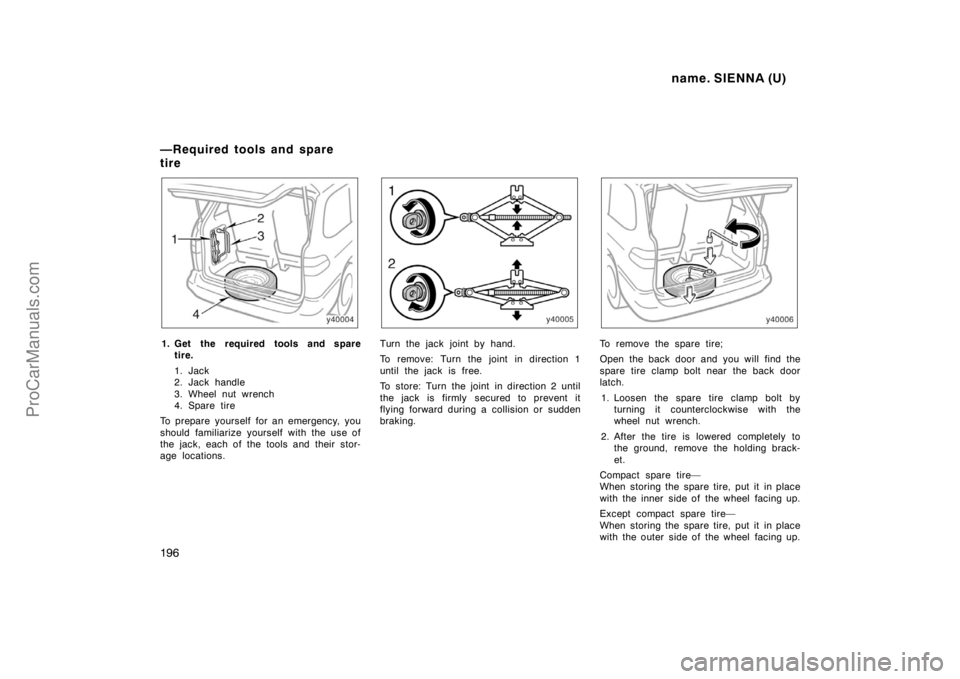
1. Get the required tools and spare
tire.
1. Jack
2. Jack handle
3. Wheel nut wrench
4. Spare tire
To prepare yourself for an emergency, you
should familiarize yourself with the use of
the jack, each of the tools and their stor-
age locations.Turn the jack joint by hand.
To remove: Turn the joint in direction 1
until the jack is free.
To store: Turn the joint in direction 2 until
the jack is firmly secured to prevent it
flying forward during a collision or sudden
braking.To remove the spare tire;
Open the back door and you will find the
spare tire clamp bolt near the back door
latch.
1. Loosen the spare tire clamp bolt by
turning it counterclockwise with the
wheel nut wrench.
2. After the tire is lowered completely to
the ground, remove the holding brack-
et.
Compact spare tire—
When storing the spare tire, put it in place
with the inner side of the wheel facing up.
Except compact spare tire—
When storing the spare tire, put it in place
with the outer side of the wheel facing up.
—Required tools and spare
tire
ProCarManuals.com
Page 197 of 261
name. SIENNA (U)
197
Then secure the tire by repeating the
above removal steps in reverse order to
prevent it from flying forward during a
collision or sudden braking.
Make sure to pull the tire straight up with-
out catching on any other part.
Do not overtighten the bolt. Stop turning
it when you begin to feel resistance on
your hand.
After storing the tire, make sure it is se-
curely locked by pushing it forward and
rearward.
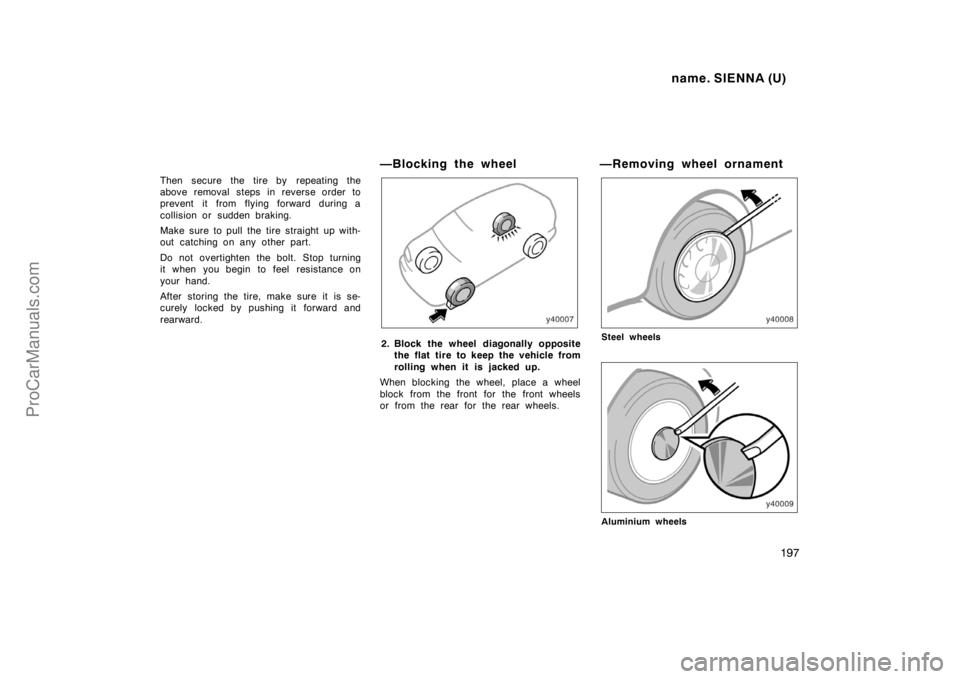
—Blocking the wheel
2. Block the wheel diagonally opposite
the flat tire to keep the vehicle from
rolling when it is jacked up.
When blocking the wheel, place a wheel
block from the front for the front wheels
or from the rear for the rear wheels.
—Removing wheel ornament
Steel wheels
Aluminium wheels
ProCarManuals.com
Page 200 of 261
name. SIENNA (U)
200
Before putting on wheels, remove any cor-
rosion on the mounting surfaces with a
wire brush or such. Installation of wheels
without good metal−to−metal contact at the
mounting surface can cause wheel nuts to
loosen and eventually cause a wheel to
come off while driving. Therefore after the
first 1600 km (1000 miles), check to see
that the wheel nuts are tight.
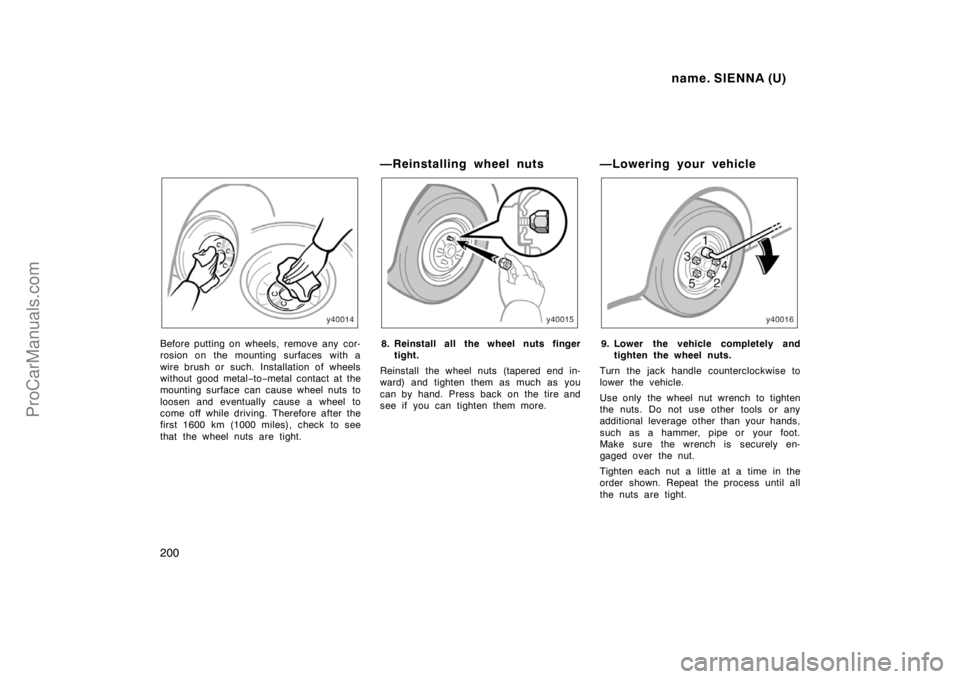
—Reinstalling wheel nuts
8. Reinstall all the wheel nuts finger
tight.
Reinstall the wheel nuts (tapered end in-
ward) and tighten them as much as you
can by hand. Press back on the tire and
see if you can tighten them more.
—Lowering your vehicle
9. Lower the vehicle completely and
tighten the wheel nuts.
Turn the jack handle counterclockwise to
lower the vehicle.
Use only the wheel nut wrench to tighten
the nuts. Do not use other tools or any
additional leverage other than your hands,
such as a hammer, pipe or your foot.
Make sure the wrench is securely en-
gaged over the nut.
Tighten each nut a little at a time in the
order shown. Repeat the process until all
the nuts are tight.
ProCarManuals.com
Page 202 of 261
name. SIENNA (U)
202
—After changing wheels
11. Check the air pressure of the re-
placed tire.
Adjust the air pressure to the specification
designed in Part 8. If the pressure is low-
er, drive slowly to the nearest service sta-
tion and fill to the correct pressure.
Do not forget to reinstall the tire inflation
valve cap as dirt and moisture could get
into the valve core and possibly cause air
leakage. If the cap is missing, have a new
one put on as soon as possible.
12. Restow all the tools, jack and flat
tire securely.
As soon after changing wheels as pos-
sible, tighten the wheel nuts to the torque
specified in Part 8 with a torque wrench
and have a technician repair the flat tire.
Vehicles with a spare tire of the same
size as the installed tires—
13. Push the tire pressure warning sys-
tem reset switch.
Initial adjustment of the tire pressure
warning system is necessary after you
have replaced your tires or wheels. See
”Tire pressure warning system” in Chapter
1−8.CAUTION
Before driving, make sure all the
tools, jack and flat tire are securely
in place in their storage location to
reduce the possibility of personal in-
jury during a collision or sudden
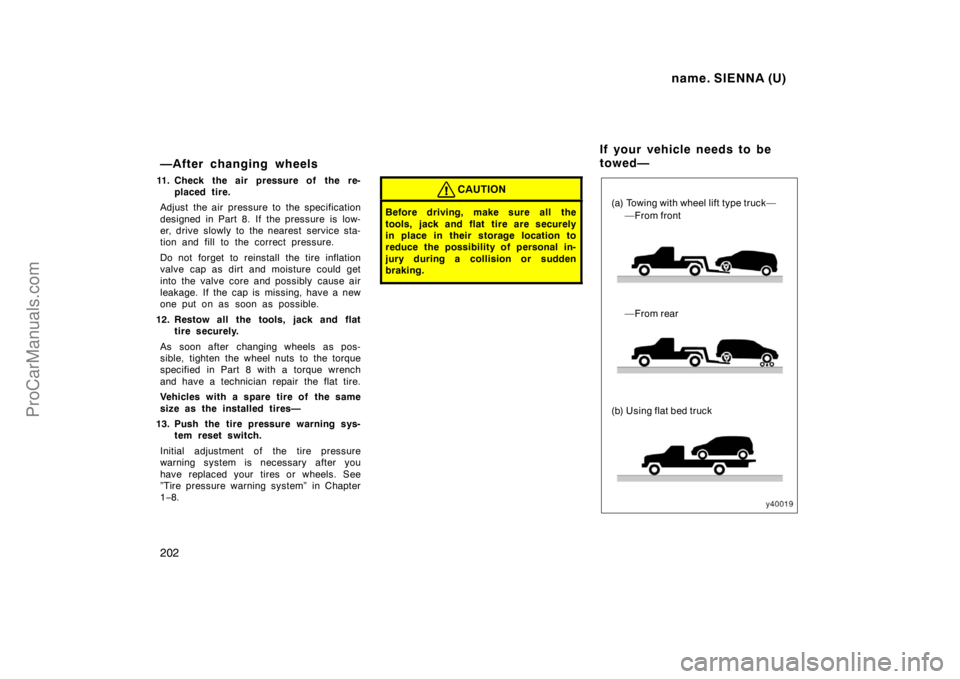
braking.(a) Towing with wheel lift type truck—
—From front
—From rear
(b) Using flat bed truck
If your vehicle needs to be
towed—
ProCarManuals.com
Page 204 of 261
name. SIENNA (U)
204
—Emergency towing
Front
Rear
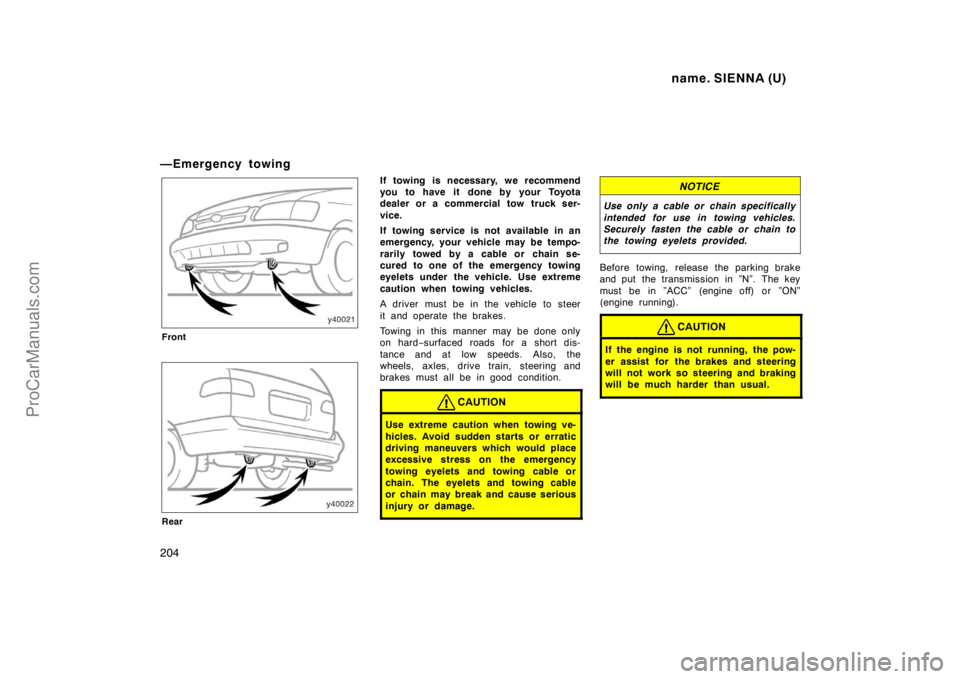
If towing is necessary, we recommend
you to have it done by your Toyota
dealer or a commercial tow truck ser-
vice.
If towing service is not available in an
emergency, your vehicle may be tempo-
rarily towed by a cable or chain se-
cured to one of the emergency towing
eyelets under the vehicle. Use extreme
caution when towing vehicles.
A driver must be in the vehicle to steer
it and operate the brakes.
Towing in this manner may be done only
on hard−surfaced roads for a short dis-
tance and at low speeds. Also, the
wheels, axles, drive train, steering and
brakes must all be in good condition.
CAUTION
Use extreme caution when towing ve-
hicles. Avoid sudden starts or erratic
driving maneuvers which would place
excessive stress on the emergency
towing eyelets and towing cable or
chain. The eyelets and towing cable
or chain may break and cause serious
injury or damage.
NOTICE
Use only a cable or chain specifically
intended for use in towing vehicles.
Securely fasten the cable or chain to
the towing eyelets provided.
Before towing, release the parking brake
and put the transmission in ”N”. The key
must be in ”ACC” (engine off) or ”ON”
(engine running).
CAUTION
If the engine is not running, the pow-
er assist for the brakes and steering
will not work so steering and braking
will be much harder than usual.
ProCarManuals.com
Page 215 of 261

name. SIENNA (U)
215
Tire surface and wheel nuts
Check the tires carefully for cuts, damage
or excessive wear. See Chapter 7−2 for
additional information. When checking the
tires, make sure no nuts are missing, and
check the nuts for looseness. Tighten
them if necessary.
Tire rotation
Rotate the tires every 12000 km (7500
miles). See Chapter 7−2 for additional in-
formation.
Fluid leaks
Check underneath for leaking fuel, oil, wa-
ter or other fluid after the vehicle has
been parked for a while. If you smell fuel
fumes or notice any leak, have the cause
found and corrected immediately.
Doors and engine hood
Check that all doors including trunk lid
operate smoothly and all latches lock se-
curely. Make sure the engine hood sec-
ondary latch secures the hood from open-
ing when the primary latch is released.
INSIDE THE VEHICLE
Items listed below should be checked
regularly, e.g. while performing periodic
services, cleaning the vehicle, etc.Lights
Make sure the headlights, stop lights, tail
lights, turn signal lights, and other lights
are all working. Check headlight aim.
Service reminder indicators and warning
buzzers
Check that all service reminder indicators
and warning buzzers function properly.
Steering wheel
Be alert for changes in steering condition,
such as hard steering or strange noise.
Seats
Check that all seat controls such as seat
adjusters, seatback recliner, etc. operate
smoothly and that all latches lock securely
in any position. Check that the head re-
straints move up and down smoothly and
that the locks hold securely in any latched
position. For folding−down rear seatbacks
and detachable rear seats, check that the
latches lock securely.
Seat belts
Check that the seat belt system such as
buckles, retractors and anchors operate
properly and smoothly. Make sure the belt
webbing is not cut, frayed, worn or dam-
aged.Accelerator pedal
Check the pedal for smooth operation and
uneven pedal effort or catching.
Brake pedal
Check the pedal for smooth operation and
that the pedal has the proper clearance.
Check the brake booster function.
Brakes
At a safe place, check that the brakes do
not pull to one side when applied.
Parking brake
Check that the pedal has the proper travel
and that, on a safe incline, your vehicle
is held securely with only the parking
brake applied.
Automatic transmission ”Park” mecha-
nism
On a safe incline, check that your vehicle
is held securely with the selector lever in
”P” position and all brakes released.
ProCarManuals.com
Page 250 of 261
name. SIENNA (U)
250
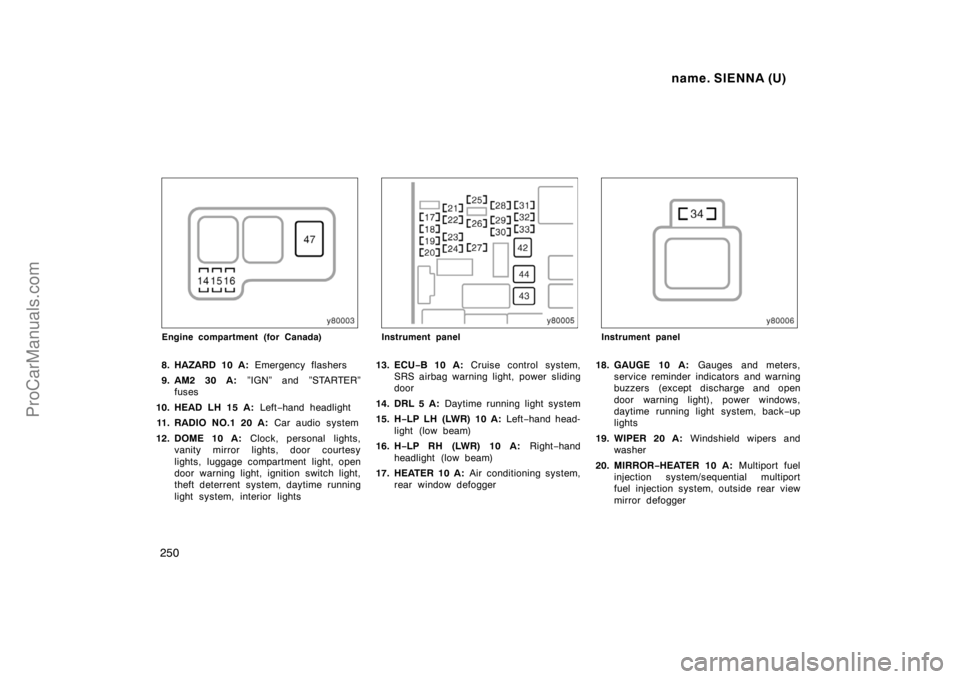
Engine compartment (for Canada)
8. HAZARD 10 A: Emergency flashers
9. AM2 30 A: ”IGN” and ”STARTER”
fuses
10. HEAD LH 15 A: Left−hand headlight
11. RADIO NO.1 20 A: Car audio system
12. DOME 10 A: Clock, personal lights,
vanity mirror lights, door courtesy
lights, luggage compartment light, open
door warning light, ignition switch light,
theft deterrent system, daytime running
light system, interior lights
Instrument panel
13. ECU−B 10 A: Cruise control system,
SRS airbag warning light, power sliding
door
14. DRL 5 A: Daytime running light system
15. H−LP LH (LWR) 10 A: Left−hand head-
light (low beam)
16. H−LP RH (LWR) 10 A: Right−hand
headlight (low beam)
17. HEATER 10 A: Air conditioning system,
rear window defogger
Instrument panel
18. GAUGE 10 A: Gauges and meters,
service reminder indicators and warning
buzzers (except discharge and open
door warning light), power windows,
daytime running light system, back−up
lights
19. WIPER 20 A: Windshield wipers and
washer
20. MIRROR−HEATER 10 A: Multiport fuel
injection system/sequential multiport
fuel injection system, outside rear view
mirror defogger
ProCarManuals.com
Page 251 of 261

name. SIENNA (U)
251
21. ECU−IG 15 A: Cruise control system,
anti−lock brake system, locking with
wireless remote control system, theft
deterrent system
22. IGN 5 A: Gauges and meters, charg-
ing system, SRS airbag system, seat
belt pretensioners, multiport fuel injec-
tion system/sequential multiport fuel in-
jection system
23. STOP 15 A: Stop lights, cruise control
system, high−mounted stoplight, tail
lights
24. TAIL 10 A: Parking lights, front side
marker lights, license plate lights, tail
lights
25. PWR−VENT 15 A: Power rear quarter
windows
26. OBD 7.5 A: On−board diagnosis sys-
tem
27. PWR−OUTLET 15 A: Power outlet
28. STARTER 5 A: Gauges and meters,
SRS airbag system, seat belt preten-
sioners, multiport fuel injection system/
sequential multiport fuel injection sys-
tem
29. DOOR 20 A: Power door lock system,
theft deterrent system30. PANEL 7.5 A: Gauge and meter, car
audio system, clock, air conditioning
system, instrument panel light control,
rear window defogger, electronically
controlled automatic transmission sys-
tem, emergency flashers, parking lights
31. TURN 7.5 A: Turn signal lights, emer-
gency flashers
32. RADIO NO.2 7.5 A: Car audio system
33. CIG 15 A: Cigarette lighter, clock, pow-
er rear view mirror controls, SRS air-
bag system, seat belt pretensioners,
back−up lights, theft deterrent system
34. A/C 5 A: Air conditioning system
Fuses (type B)
35. CDS 40 A: Electric cooling fans
36. RDI 40 A: Electric cooling fans
37. CDS 30 A: Electric cooling fans
38. RDI 30 A: Electric cooling fans
39. MAIN 40 A: ”DRL”, ”HEAD RH” and
”HEAD LH” fuses
40. R/R A/C 40 A: Rear air conditioning
system
41. HTR 50 A: Air conditioning system
42. DEF 30 A: Rear window defogger,
“MIRROR−HEATER” fuse43. AM1 40 A: “INP” fuse
44. PWR 30 A: Power windows, electric
moon roof, power seat, power sliding
door, “PWR−VENT” fuse
Fuses (type C)
45. ALT 140 A: Charging system, “FL
ABS”, “INP”, “HTR” and “R/R A/C”
fuses
46. INP 100 A: “AM1” and “DEF” fuses
47. FL ABS 60 A: Anti−lock brake system
ProCarManuals.com