Page 14 of 204

CELICA U
14
Fuel tank cap
1. To open the fuel filler door, pull thelever up.
When refueling, turn off the engine.
CAUTION
�Do not smoke, cause sparks or al-
low open flames when refueling.
The fumes are flammable.
�When opening the cap, do not re-
move the cap quickly. In hot weath-
er, fuel under pressure could cause
injury by spraying out of the filler
neck if the cap is suddenly re-
moved.
2. To remove the fuel tank cap, turnthe cap slowly counterclockwise,
then pause slightly before removing
it. After removing the cap, hang it
on the cap hanger.
It is not unusual to hear a slight swoosh
when the cap is opened. When installing,
turn the cap clockwise till you hear a
click.
If the cap is not tightened securely, the
malfunction indicator lamp comes on.
Make sure the cap is tightened securely.
The indicator lamp goes off after driving
several times. If the indicator lamp does
not go off, contact your Toyota dealer as
soon as possible.
CAUTION
�Make sure the cap is tightened se-
curely to prevent fuel spillage in
case of an accident.
�Use only a genuine Toyota fuel tank
cap for replacement. It has a built −
in check valve to reduce fuel tank
vacuum.
ProCarManuals.com
Page 15 of 204

CELICA U
15
Electric moon roof
Sliding operation
Tilting operation
To operate the moon roof, use the
switches beside the interior light.
The moon roof works when the ignition
switch is in the ”ON” position. However,
if both side doors are closed, it works for
60 seconds even after the ignition switch
is turned off. It stops working when either
side door is opened.
Sun shade operation—
The sun shade can be opened or closed
by hand.
Sliding operation—
To open: Push the switch on the ”SLIDE”
side.
The sun shade will be opened together
with the roof.
To close: Push the switch on the opposite
side of the ”SLIDE” side.
As a precaution when closing, the roof
stops at the half closed position before
fully closing. Therefore, release the switch
and then push it again to close it com-
pletely.
Tilting operation—
To tilt up: Push the switch on the ”UP”
side.
To lower: Push the switch on the opposite
side of the ”UP” side.You may stop the moon roof at any de-
sired position. The roof will move while
the switch is being pushed and stop when
released.
CAUTION
To avoid serious personal injury, you
must do the following.
�While the vehicle is moving, always
keep the head, hands and other
parts of the body of all occupants
away from the roof opening. Other-
wise, you could be seriously injured
if the vehicle stops suddenly or if
the vehicle is involved in an acci-
dent.
�Always make sure nobody places
his/her head, hands and other parts
of the body in the roof opening be-
fore you close the roof. If some-
one’s neck, head or hands gets
caught in the closing roof, it could
result in a serious injury. When
anyone closes the roof, first make
sure it is safe to do so.
ProCarManuals.com
Page 22 of 204
CELICA U
22
�While adjusting the seat, do not put
your hands under the seat or near
the moving parts. You may jam
your hands or fingers.
—Adjusting front seats
1.SEAT POSITION ADJUSTING LEVER
Pull the lever up. Then slide the seat
to the desired position with slight body
pressure and release the lever.2.
SEATBACK ANGLE ADJUSTING
LEVER
Lean forward and pull the lever up.
Then lean back to the desired angle
and release the lever.
CAUTION
To reduce the risk of sliding under
the lap belt during a collision, avoid
reclining the seatback any more than
needed. The seat belts provide maxi-
mum protection in a frontal or rear
collision when the driver and the pas-
senger are sitting up straight and
well back in the seats. If you are
reclined, the lap belt may slide past
your hips and apply restraint forces
directly to the abdomen. Therefore, in
the event of a frontal collision, the
risk of personal injury may increase
with increasing recline of the seat-
back.
ProCarManuals.com
Page 27 of 204

CELICA U
27
If the seat belt cannot be pulled out of the
retractor, firmly pull the belt and release
it. You will then be able to smoothly pull
the belt out of the retractor.
When a passenger ’s shoulder belt is com-
pletely extended and is then retracted
even slightly, the belt is locked in that
position and cannot be extended. This fea-
ture is used to hold the child restraint
system securely. (For details, see ”Child
restraint” in this chapter.) To free the belt
again, fully retract the belt and then pull
the belt out once more.
CAUTION
�After inserting the tab, make sure
the tab and buckle are locked and
that the belt is not twisted.
�Do not insert coins, clips, etc. in
the buckle as this may prevent you
from properly latching the tab and
buckle.
�If the seat belt does not function
normally, immediately contact your
Toyota dealer. Do not use the seat
until the seat belt is fixed. It cannot
protect an adult occupant or your
child from injury.
Too high
Take up slack
Keep as low on hips as possible
Adjust the position of the lap and
shoulder belts.
Position the lap belt as low as possible
on your hips—not on your waist, then ad-
just it to a snug fit by pulling the shoulder
portion upward through the latch plate.
CAUTION
�High−positioned lap belts and
loose −fitting belts both could cause
serious injuries due to sliding un-
der the lap belt during a collision
or other unintended result. Keep
the lap belt positioned as low on
hips as possible.
�For your safety, do not place the
shoulder belt under your arm.
ProCarManuals.com
Page 30 of 204

CELICA U
30
CAUTION
A driver or front passenger too close
to the steering wheel or dashboard
during airbag deployment can be
killed or seriously injured. Toyota
strongly recommends that:
�The driver sit as far back as pos-
sible from the steering wheel while
still maintaining control of the ve-
hicle.
�The front passenger sit as far back
as possible from the dashboard.
�All vehicle occupants be properly
restrained using the available seat
belts.This indicator comes on when the igni-
tion key is turned to the ”ACC” or
”ON” position. It goes off after about
6 seconds. This means the SRS airbags
are operating properly.
The SRS airbag warning light system
monitors the airbag sensor assembly, in-
flators, warning light, interconnecting wir-
ing and power sources. (For details, see
”Service remainder indicators and warning
buzzers” in chapter 1−5.)The SRS airbag system is designed to
activate in response to a severe frontal
impact within the shaded area between
the arrows in the illustration.
There may be the case that the SRS air-
bags will not activate with such an impact
in which the occupant wearing the seat
belt correctly would not get serious injury.
The SRS airbags will deploy if the severi-
ty of the impact is above the designed
threshold level, comparable to an approxi-
mate 20 km/h (14 mph) collision when
impacting straight into a fixed barrier that
does not move or deform.
If the severity of the impact is below the
above threshold level, the SRS airbags
may not deploy.
ProCarManuals.com
Page 31 of 204

CELICA U
31
However, this threshold velocity will be
considerably higher if the vehicle strikes
an object, such as a parked vehicle or
sign pole, which can move or deform on
impact, or if it is involved in an underride
collision (e.g. a collision in which the nose
of the vehicle ”underrides”, or goes under,
the bed of a truck).
It is possible with collision severity at the
marginal level of airbag sensor detection
and activation that only one of your ve-
hicle’s two airbags will deploy.
For the safety of all occupants, be sure
to always wear seat belts.
Collision from the rear
Vehicle roll −over
Collision from the side
The SRS airbags are not designed to
inflate if the vehicle is subjected to a
side or rear impact, if it rolls over, or
if it is involved in a low
−speed frontal
collision.The SRS airbag system mainly consists of
the following components and their loca-
tions are shown in the illustration.
1. Front airbag sensors
2. Center airbag sensor assembly
3. Airbag module for driver (airbag andinflator)
4. Airbag module for passenger (airbag and inflator)
5. SRS airbag warning light
The center airbag sensor assembly con-
sists of a safing sensor and center airbag
sensor.
ProCarManuals.com
Page 35 of 204

CELICA U
35
�Do not modify or remove any wir-
ing. Do not modify, remove, strike
or open any components such as
the steering wheel column cover,
front passenger airbag cover, front
passenger airbag, airbag sensor as-
sembly. Doing any of these may
cause sudden SRS airbag inflation
or disable the system, which could
result in death or serious injury.
Failure to follow these instructions
can result in death or serious inju-
ries.NOTICE
Do not perform any of the following
changes without consulting your
Toyota dealer. Such changes can in-
terfere with proper operation of the
SRS airbag system in some cases.
� Installation of electronic items such
as a mobile two −way radio, cassette
tape player or compact disc player
� Modification of the suspension sys-
tem
� Modification of the front end struc-
ture
� Attachment of a grille guard (bull
bar, kangaroo bar, etc.), snowplow,
winches or any other equipment to
the front end
� Repairs made on or near the front
fenders, front end structure, con-
sole, steering column, steering
wheel or dashboard near the front
passenger airbag
This SRS airbag system has a service
reminder indicator to inform the driver of
operating problems. If either of the follow-
ing conditions occurs, this indicates a mal-
function of the airbags. Contact your
Toyota dealer as soon as possible to ser-
vice the vehicle.
�The light does not come on when the
ignition key is turned to the ”ACC” or
”ON” position, or remains on.
�The light comes on while driving.
ProCarManuals.com
Page 41 of 204
CELICA U
41
CAUTION
�After inserting the tab, make sure
the tab and buckle are locked and
that the lap and shoulder portions
of the belt is not twisted.
�Do not insert coins, clips, etc. in
the buckle as this can prevent you
from properly latching the tab and
buckle.
�If the seat belt does not function
normally, it cannot protect your
child from injury. Contact your
Toyota dealer immediately. Do not
use the seat until the seat belt is
fixed.
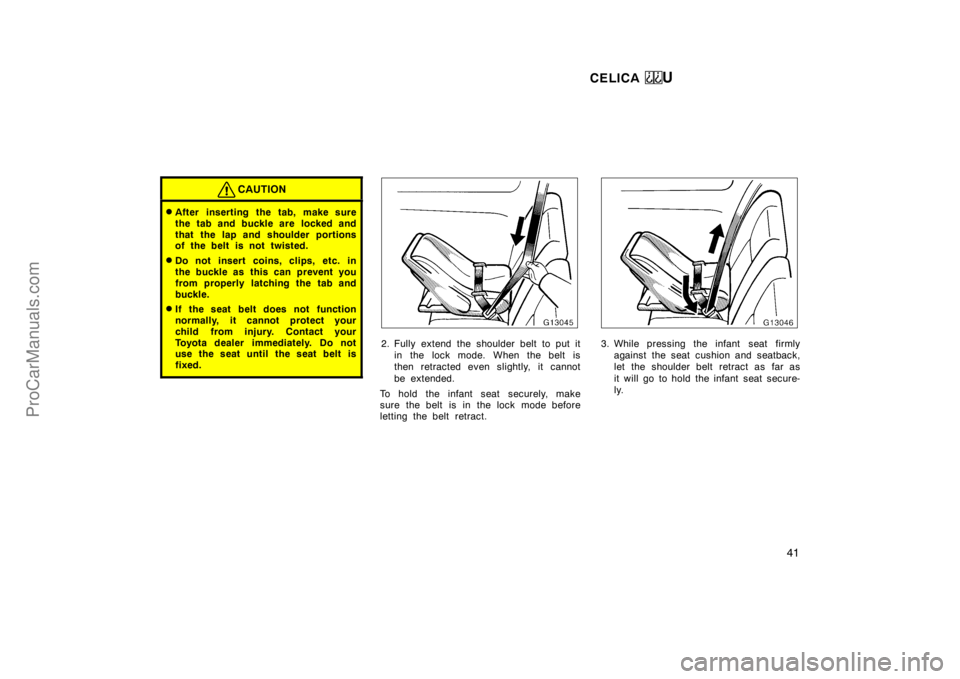
2. Fully extend the shoulder belt to put itin the lock mode. When the belt is
then retracted even slightly, it cannot
be extended.
To hold the infant seat securely, make
sure the belt is in the lock mode before
letting the belt retract.3. While pressing the infant seat firmly against the seat cushion and seatback,
let the shoulder belt retract as far as
it will go to hold the infant seat secure-
ly.
ProCarManuals.com