1998 PONTIAC GRAND PRIX inflate
[x] Cancel search: inflatePage 68 of 402

A child in a child restraint in the center front seat
can be badly injured or killed by the right front
passenger air bag if it inflates, even though your
vehicle has reduced-force frontal air bags. Never
secure a child restraint in the center front seat.
It’s always better to secure a child restraint in the
rear seat.
You may secure a forward-facing child
restraint in the right front passenger seat, but
before you do, always move the front passenger
seat as far back as it will go. It’s better to secure
the child restraint in a rear seat.
I I
See the earlier part about the top strap if the child
restraint has one. 1. Make the belt as long as possible by tilting the latch
plate and pulling it along the belt.
2. Put the restraint on the seat.
3. Run the vehicle’s safety belt through or around the
restraint. The child restraint instructions will
show
you how.
1-61
Page 70 of 402

A child in a rearfacing child restraint can be
seriously injured or killed if the right front
passenger’s
air bag inflates, even though your
vehicle has reducedlforce frontal air bags. This is
because the back
of the rearfacing child
restraint would be very close to the inflating air
bag. Always secure a rearfacing child restraint
in the rear seat.
You’ll be using the lap-shoulder belt. See the earlier part
about the top strap if the child restraint has one. Be sure
to follow the instructions that came with the child
restraint. Secure the child in the child restraint when and
as the instructions say.
1. Because your vehicle has a right front passenger air
bag, always move the seat as
far back as it will go
before securing a forward-facing child restraint.
(See “Seats” in the Index.)
2. Put the restraint on the seat.
3. Pick up the latch plate, and run the lap and shoulder
portions of the vehicle’s safety belt through
or
around the restraint. The child restraint instructions
will show you how.
If the shoulder belt goes in front of the child’s face or \
neck, put it behind the child restraint.
4. Buckle the belt. Make sure the release button is
positioned so you would be able to unbuckle the
safety belt quickly if you ever had to.
1-63
Page 75 of 402

But if a safety belt isn’t long enough to fasten, your
dealer will order you
an extender. It’s free. When you go
in to order it, take the heaviest coat you will wear, so the
extender will be long enough for you. The extender will
be just for you, and just for the seat in your vehicle that
you choose. Don’t let someone else use it, and use it
only for
the seat it is made to fit. To wear it, just attach it
to the regular safety belt.
Checking Your Restraint Systems
Now and then, make sure the safety belt reminder light
and all your belts, buckles, latch plates, retractors
and
anchorages are working properly. If your vehicle has a
built-in child restraint, also periodically make sure the
harness straps, latch plates, buckle, clip, retractors and
anchorages are working properly. Look for
any other
loose or damaged safety belt and built-in child restraint
system parts. If you see anything that might keep a
safety belt
or built-in child restraint system from doing
its job, have it repaired.
Torn or frayed safety belts may not protect you in a
crash. They can rip apart under impact forces. If
a belt is
torn or frayed, get a new one right away.
If your vehicle has the built-in child restraint, torn or
frayed harness straps can rip apart under impact forces
just like tom or frayed safety belts can. They may not protect
a child in a crash. If a harness
strap is tom or
frayed, get a new harness right away.
Also look
for any opened or broken air bag covers, and
have them repaired
or replaced. (The air bag system
does not need regular maintenance.)
Replacing Restraint System Parts
After
a Crash
If you’ve had a crash, do you need new safety belts or
built-in child restraint parts?
After
a very minor collision, nothing may be necessary.
But if the safety belts or built-in child restraint harness
straps were stretched,
as they would be if worn during a
more severe crash, then
you need new safety belts or
harness straps.
If safety belts or built-in child restraint harness straps
are cut or damaged, replace them. Collision damage also
may mean you will need to have safety belt, built-in
child restraint or seat
parts repaired or replaced. New
parts and repairs may be necessary even if the safety belt
or built-in child
restraint wasn’t being used at the time
of the collision.
If an air bag inflates, you’ll need to replace air bag
system
parts. See the part on the air bag system earlier
in this section.
1-68
Page 217 of 402

The exit speed is usually posted.
Reduce your speed according
to your speedometer, not
to your sense
of motion. After driving for any distance
at higher speeds, you may tend to think you are going
slower than you actually
are.
Before Leaving on a Long Trip
Make sure you’re ready. Try to be well rested. If you
must
start when you’re not fresh -- such as after a day’s
work
-- don’t plan to make too many miles that first part
of the journey. Wear comfortable clothing and shoes you
can easily
drive in.
Is your vehicle ready for a long trip? If you keep it
serviced
and maintained, it’s ready to go. If it needs
service, have it done before starting out.
Of course,
you’ll find experienced
and able service experts in
Pontiac dealerships all across North America. They’ll be
ready and willing to help if you need it. Here are some things you can check before a trip:
0
0
0
0
0
0
0
Windshield Washer Fluid: Is the reservoir
full? Are
all windows clean inside and outside?
Wiper Blades: Are they in good shape?
Fuel, Engine Oil, Other Fluids: Have you checked
all levels?
Lamps: Are they all working? Are the lenses clean?
Tires: They are vitally important to a safe,
trouble-free trip.
Is the tread good enough for
long-distance driving? Are the tires all inflated to the
recommended pressure?
Weather Forecasts: What’s the weather outlook
along
your route? Should you delay your trip a short
time to avoid
a major storm system?
Maps: Do you have up-to-date maps?
4-24
Page 229 of 402

After you’ve loaded your trailer, weigh the trailer and
then the tongue, separately, to see
if the weights are
proper.
If they aren’t, you may be able to get them right
simply by moving some items around in the trailer.
Total Weight on Your Vehicle’s Tires
Be sure your vehicle’s tires are inflated to the upper
limit for cold tires. You’ll find these numbers on the
Tire-Loading Information label, found on the inside
of the
trunk lid, or see “Loading Your Vehicle” in the
Index. Then be sure
you don’t go over the GVW
limit for your vehicle, including the weight of the
trailer tongue.
Hitches
It’s important to have the correct hitch equipment.
Crosswinds, large trucks going by and rough roads are
a few reasons why you’ll need the right hitch. Here are
some rules to follow:
0 Your vehicle may have nonmetallic, composite
bumpers. The bumpers on
your vehicle are not
intended for hitches. Do not attach rental hitches or
other bumper-type hitches to them. Use only a
frame-mounted hitch that does not attach to
the bumper.
Will you have to make any holes in the body of your
vehicle when you install a trailer hitch?
If you do,
then be sure
to seal the holes later when you remove
the hitch. If you don’t seal them, deadly carbon
monoxide
(CO) from your exhaust can get into your
vehicle (see “Carbon Monoxide” in the Index). Dirt
and water can, too.
Safety Chains
You should always attach chains between your vehicle
and your trailer. Cross the safety chains under the tongue
of the trailer
so that the tongue will not drop to the road
if it becomes separated from the hitch. Instructions
about safety chains may
be provided by the hitch
manufacturer or by
the trailer manufacturer. Follow the
manufacturer’s recommendation for attaching safety
chains and do not attach them to the bumper. Always
leave just enough slack
so you can turn with your rig.
And, never allow safety chains to drag on the ground.
4-36
Page 272 of 402

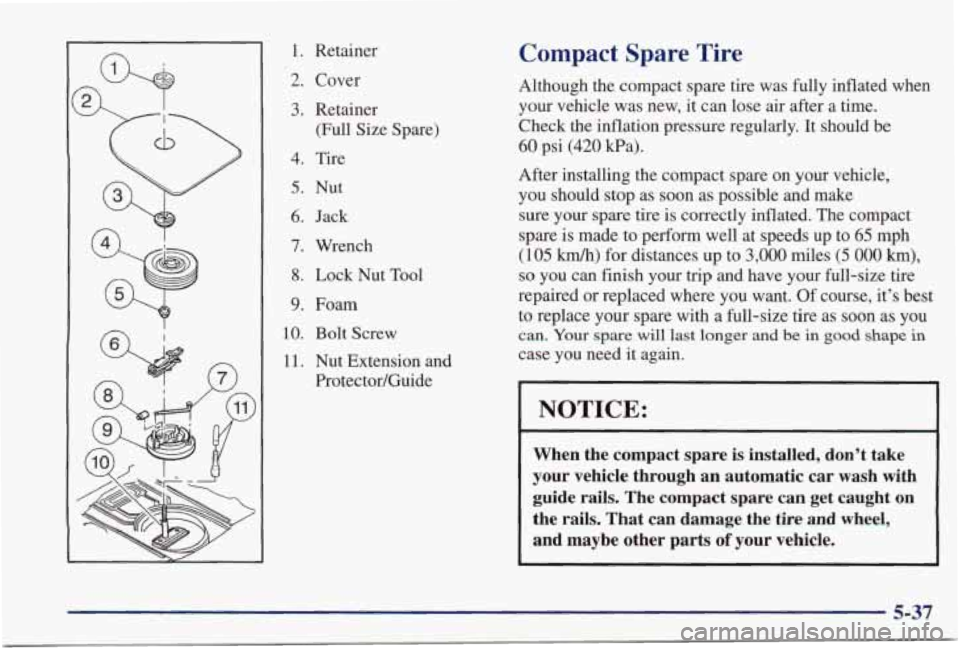
1. Retainer
2. Cover
3. Retainer (Full Size Spare)
4. Tire
5. Nut
6. Jack
7. Wrench
8. Lock Nut Tool
9. Foam
10. Bolt Screw
11. Nut Extension and
Protector/Guide
Compact Spare Tire
Although the compact spare tire was fully inflated when
your vehicle was new,
it can lose air after a time.
Check
the inflation pressure regularly. It should be
60 psi (420 Pa).
After installing the compact spare on your vehicle, you should stop as soon as possible and make
sure your spare
tire is correctly inflated. The compact
spare is made to perform well at speeds up to
65 mph
(105 km/h) for distances up to 3,000 miles (5 000 km),
so you can finish your trip and have your full-size tire
repaired or replaced where you want. Of course, it’s best
to replace your spare with a full-size tire as soon as you
can. Your spare will last longer and be in good shape in
case you need it again.
I I
NOTICE:
When the compact spare is installed, don’t take
your vehicle through an automatic car wash with guide rails. The compact spare can get caught on
the rails. That can damage the tire and wheel,
and maybe other parts
of your vehicle.
5-37
Page 320 of 402

CAUTION: (Continued)
Underinflated tires pose the same danger
as overloaded tires. The resulting accident
could cause serious injury. Check all tires
frequently to maintain the recommended pressure. Tire pressure should be checked
when your tires are cold.
cut, punctured or broken by a sudden
impact
-- such as when you hit a pothole.
Keep
tires at the recommended pressure.
Worn, old tires can cause accidents. If your
tread
is badly worn, or if your tires have
been damaged, replace them.
Overinflated tires are more likely to be
Inflation -- Tire Pressure
The Tire-Loading Information label, which is on the
inside of the
trunk lid, shows the correct inflation
pressures for your tires when they’re cold. “Cold”
means your vehicle has been sitting for at least three
hours or driven no more than 1 mile (1.6 km).
NOTICE:
Don’t let anyone tell you that underinflation or
overinflation
is all right. It’s not. If your tires
don’t have enough air (underinflation), you can
get the following:
0 Too much flexing
Too much heat
Tire overloading
Bad wear
Bad handling
Bad fuel economy.
If your tires have too much air (overinfla
you can get the following:
Unusual wear
Bad handling
Rough ride
Needless damage from road hazards. .tion),
6-45
Page 321 of 402

When to Check
Check your tires once a month or more.
Don’t forget your compact spare
tire. It should be at
60 psi (420 Pa).
How to Check
Use a good quality pocket-type gage to check tire
pressure. You can’t tell
if your tires are properly inflated
simply by looking at them. Radial tires
may look
properly inflated even when they’re underinflated.
Be sure to put the valve caps back on the valve stems. They help prevent leaks
by keeping out dirt
and moisture.
Tire Inspection and Rotation
Tires should be rotated every 6,000 to 8,000 miles
(10 000 to 13 000 km). Any time you notice unusual
wear, rotate your tires as soon as possible and check
wheel alignment.
Also check for damaged tires or
wheels. See “When It’s Time for New Tires” and
“Wheel Replacement” later
in this section for
more information. The purpose
of regular rotation
is to achieve more
uniform wear for
all tires on the vehicle. The first
rotation is the most important. See “Scheduled
Maintenance Services”
in the Index for scheduled
rotation intervals.
I I
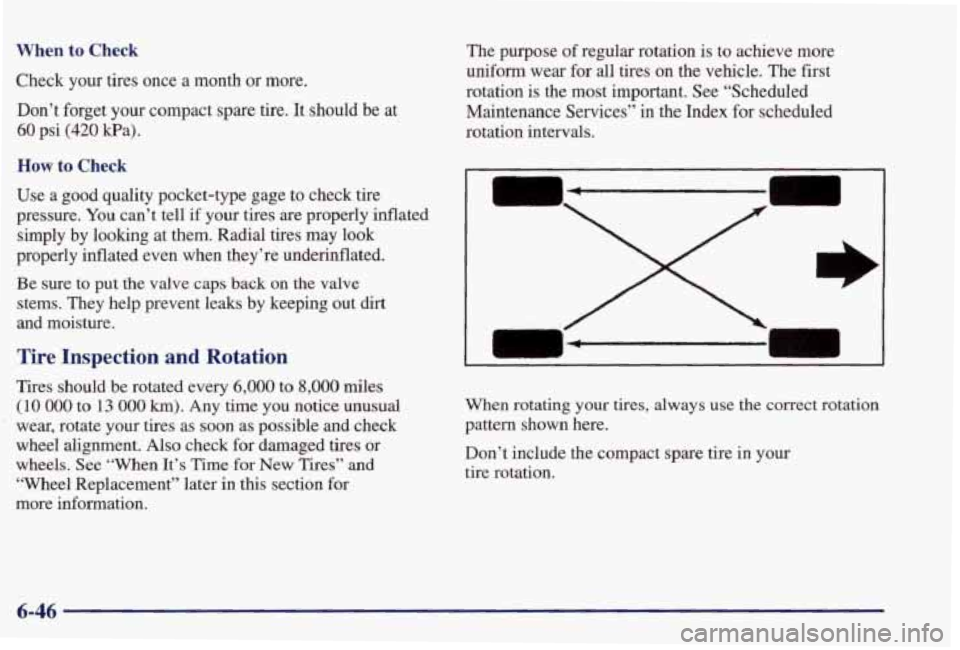
I When rotating your tires, always use the correct rotation
pattern shown here.
Don’t include the compact spare tire
in your
tire rotation.
6-46