1998 OPEL FRONTERA battery
[x] Cancel search: batteryPage 1463 of 6000
6E–346
ENGINE DRIVEABILITY AND EMISSIONS
Crankshaft position (58X reference).
Camshaft position (CMP) sensor.
Engine coolant temperature (ECT) sensor.
Throttle position (TP) sensor.
Knock signal (knock sensor).
Park/Neutral position (PRNDL input).
Vehicle speed (vehicle speed sensor).
PCM and ignition system supply voltage.
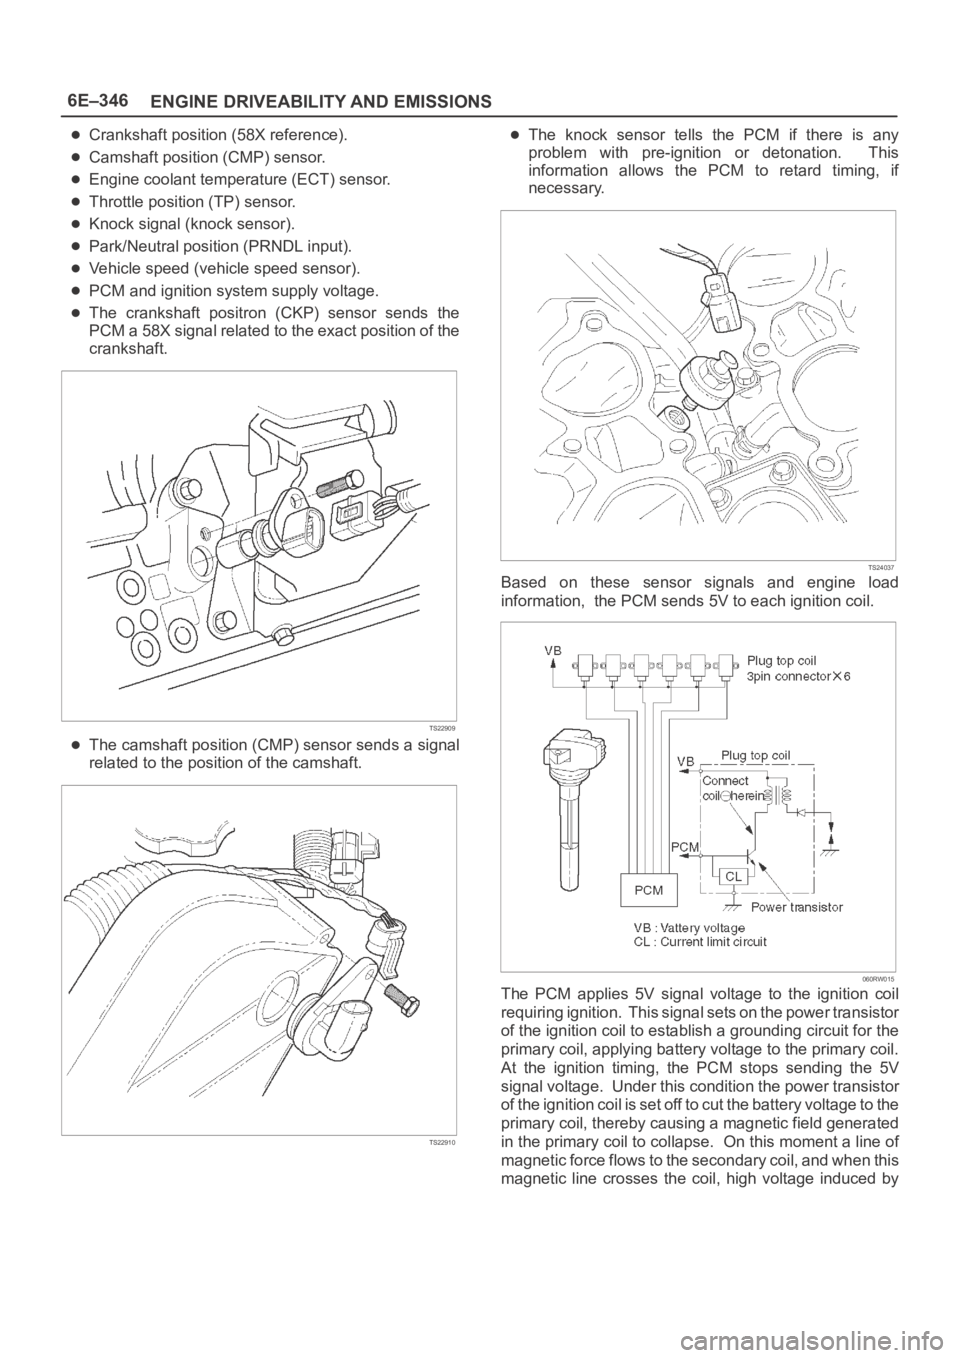
The crankshaft positron (CKP) sensor sends the
PCM a 58X signal related to the exact position of the
crankshaft.
TS22909
The camshaft position (CMP) sensor sends a signal
related to the position of the camshaft.
TS22910
The knock sensor tells the PCM if there is any
problem with pre-ignition or detonation. This
information allows the PCM to retard timing, if
necessary.
TS24037
Based on these sensor signals and engine load
information, the PCM sends 5V to each ignition coil.
060RW015
The PCM applies 5V signal voltage to the ignition coil
requiring ignition. This signal sets on the power transistor
of the ignition coil to establish a grounding circuit for the
primary coil, applying battery voltage to the primary coil.
At the ignition timing, the PCM stops sending the 5V
signal voltage. Under this condition the power transistor
of the ignition coil is set off to cut the battery voltage to the
primary coil, thereby causing a magnetic field generated
in the primary coil to collapse. On this moment a line of
magnetic force flows to the secondary coil, and when this
magnetic line crosses the coil, high voltage induced by
Page 1466 of 6000
6E–349 ENGINE DRIVEABILITY AND EMISSIONS
Damage during re-gapping can happen if the gapping
tool is pushed against the center electrode or the
insulator around it, causing the insulator to crack.
When re-gapping a spark plug, make the adjustment
by bending only the ground side terminal, keeping the
tool clear of other parts.
”Heat shock” breakage in the lower insulator tip
generally occurs during several engine operating
conditions (high speeds or heavy loading) and may be
caused by over-advanced timing or low grade fuels.
Heat shock refers to a rapid increase in the tip
temperature that causes the insulator material to
crack.
Spark plugs with less than the recommended amount of
service can sometimes be cleaned and re-gapped , then
returned to service. However, if there is any doubt about
the serviceability of a spark plug, replace it. Spark plugs
with cracked or broken insulators should always be
replaced.
A/C Clutch Diagnosis
A/C Clutch Circuit Operation
A 12-volt signal is supplied to the A/C request input of the
PCM when the A/C is selected through the A/C control
switch.
The A/C compressor clutch relay is controlled through the
PCM. This allows the PCM to modify the idle air control
position prior to the A/C clutch engagement for better idle
quality. If the engine operating conditions are within their
specified calibrated acceptable ranges, the PCM will
enable the A/C compressor relay. This is done by
providing a ground path for the A/C relay coil within the
PCM. When the A/C compressor relay is enabled,
battery voltage is supplied to the compressor clutch coil.
The PCM will enable the A/C compressor clutch
whenever the engine is running and the A/C has been
requested. The PCM will not enable the A/C compressor
clutch if any of the following conditions are met:
The throttle is greater than 90%.
The engine speed is greater than 6315 RPM.
The ECT is greater than 119C (246F).
The IAT is less than 5C (41F).
The throttle is more than 80% open.
A/C Clutch Circuit Purpose
The A/C compressor operation is controlled by the
powertrain control module (PCM) for the following
reasons:
It improvises idle quality during compressor clutch
engagement.
It improvises wide open throttle (WOT) performance.
It provides A/C compressor protection from operation
with incorrect refrigerant pressures.
The A/C electrical system consists of the following
components:
The A/C control head.
The A/C refrigerant pressure switches.
The A/C compressor clutch.
The A/C compressor clutch relay.
The PCM.
A/C Request Signal
This signal tells the PCM when the A/C mode is selected
at the A/C control head. The PCM uses this to adjust the
idle speed before turning on the A/C clutch. The A/C
compressor will be inoperative if this signal is not
available to the PCM.
Refer to
A/C Clutch Circuit Diagnosis for A/C wiring
diagrams and diagnosis for A/C electrical system.
General Description (Exhaust Gas
Recirculation (EGR) System)
EGR Purpose
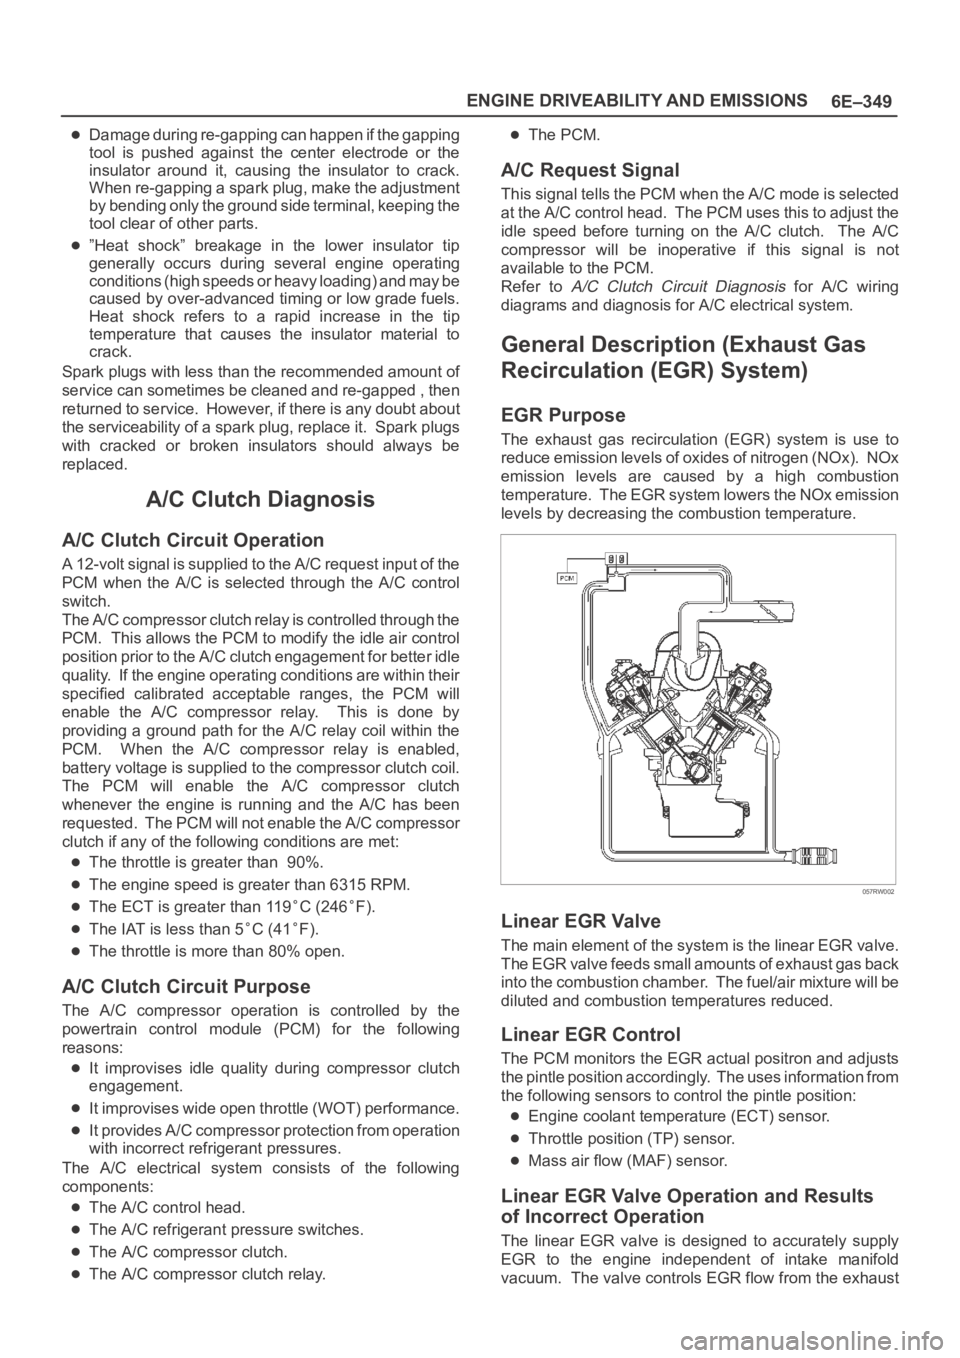
The exhaust gas recirculation (EGR) system is use to
reduce emission levels of oxides of nitrogen (NOx). NOx
emission levels are caused by a high combustion
temperature. The EGR system lowers the NOx emission
levels by decreasing the combustion temperature.
057RW002
Linear EGR Valve
The main element of the system is the linear EGR valve.
The EGR valve feeds small amounts of exhaust gas back
into the combustion chamber. The fuel/air mixture will be
diluted and combustion temperatures reduced.
Linear EGR Control
The PCM monitors the EGR actual positron and adjusts
the pintle position accordingly. The uses information from
the following sensors to control the pintle position:
Engine coolant temperature (ECT) sensor.
Throttle position (TP) sensor.
Mass air flow (MAF) sensor.
Linear EGR Valve Operation and Results
of Incorrect Operation
The linear EGR valve is designed to accurately supply
EGR to the engine independent of intake manifold
vacuum. The valve controls EGR flow from the exhaust
Page 1471 of 6000
6E–354
ENGINE DRIVEABILITY AND EMISSIONS
ILLUSTRATIONTOOL NO.
TOOL NAME
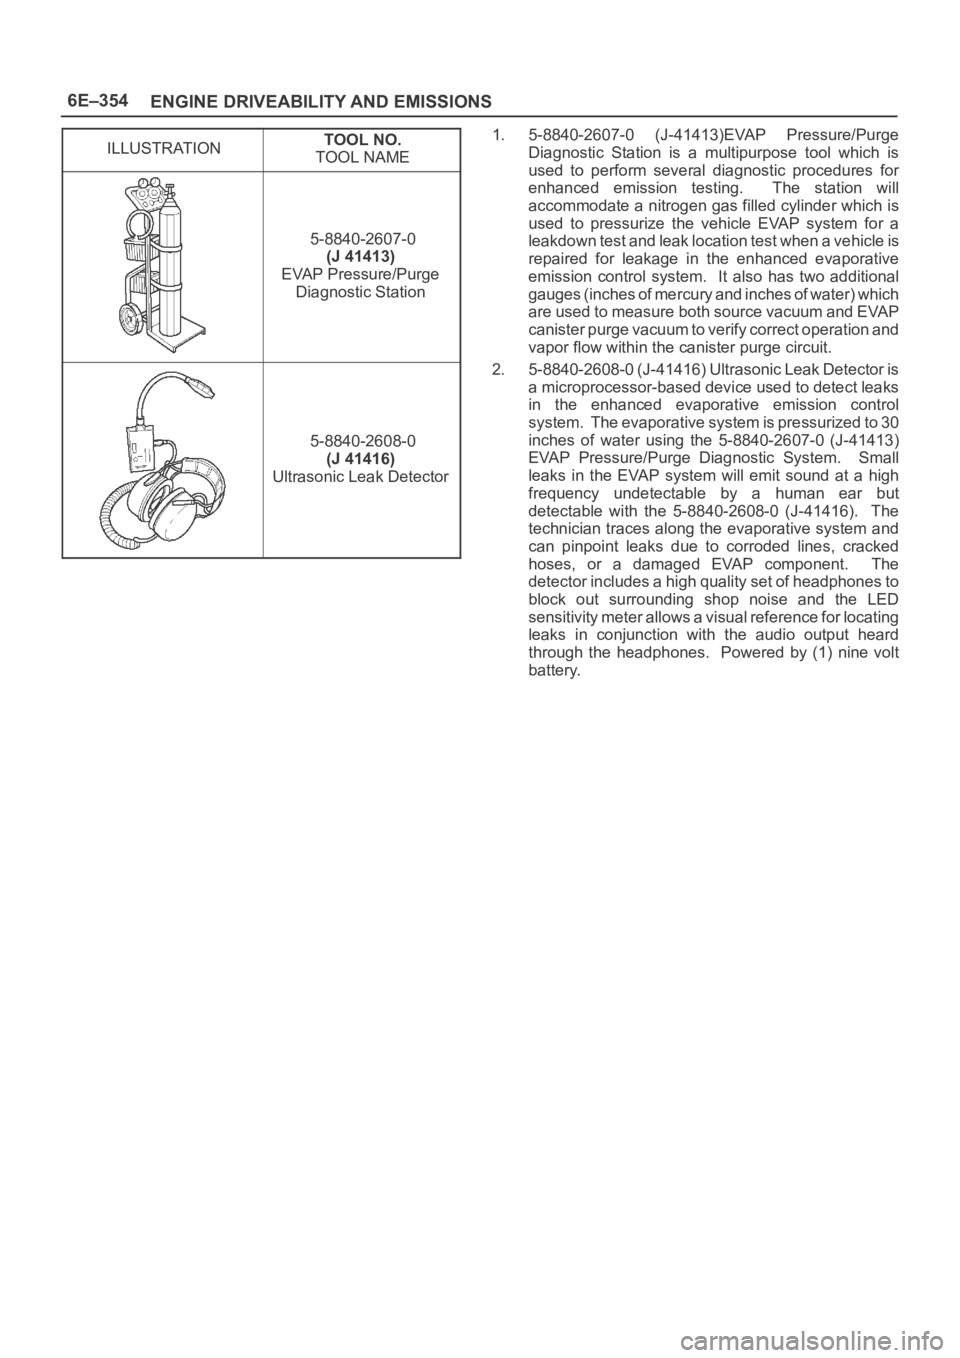
5-8840-2607-0
(J 41413)
EVAP Pressure/Purge
Diagnostic Station
5-8840-2608-0
(J 41416)
Ultrasonic Leak Detector
1. 5-8840-2607-0 (J-41413)EVAP Pressure/Purge
Diagnostic Station is a multipurpose tool which is
used to perform several diagnostic procedures for
enhanced emission testing. The station will
accommodate a nitrogen gas filled cylinder which is
used to pressurize the vehicle EVAP system for a
leakdown test and leak location test when a vehicle is
repaired for leakage in the enhanced evaporative
emission control system. It also has two additional
gauges (inches of mercury and inches of water) which
are used to measure both source vacuum and EVAP
canister purge vacuum to verify correct operation and
vapor flow within the canister purge circuit.
2. 5-8840-2608-0 (J-41416) Ultrasonic Leak Detector is
a microprocessor-based device used to detect leaks
in the enhanced evaporative emission control
system. The evaporative system is pressurized to 30
inches of water using the 5-8840-2607-0 (J-41413)
EVAP Pressure/Purge Diagnostic System. Small
leaks in the EVAP system will emit sound at a high
frequency undetectable by a human ear but
detectable with the 5-8840-2608-0 (J-41416). The
technician traces along the evaporative system and
can pinpoint leaks due to corroded lines, cracked
hoses, or a damaged EVAP component. The
detector includes a high quality set of headphones to
block out surrounding shop noise and the LED
sensitivity meter allows a visual reference for locating
leaks in conjunction with the audio output heard
through the headphones. Powered by (1) nine volt
battery.
Page 1475 of 6000
6F–4ENGINE EXHAUST
Front Exhaust Pipe
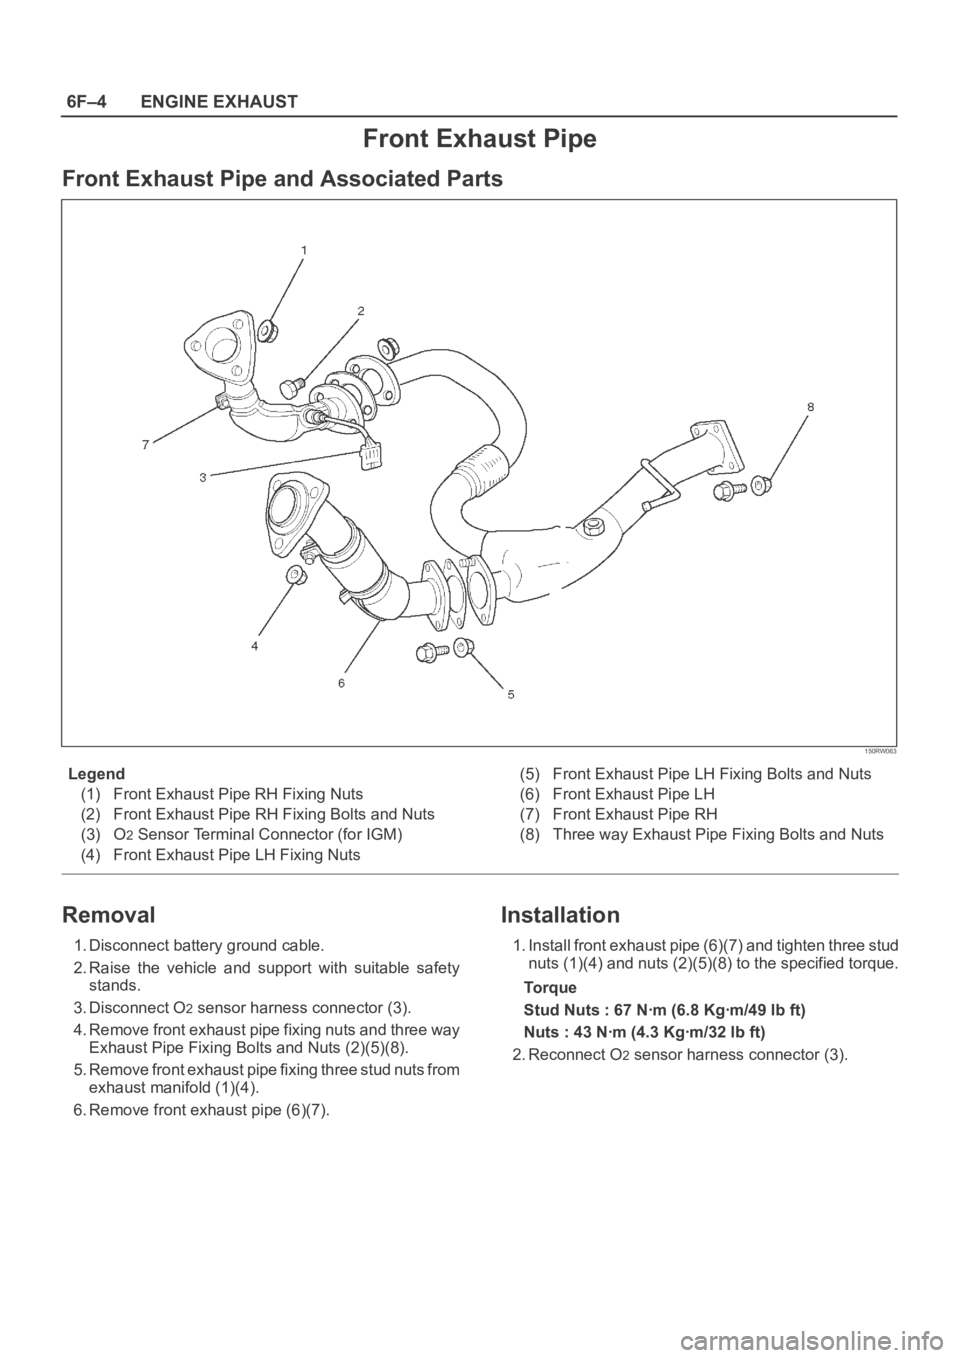
Front Exhaust Pipe and Associated Parts
150RW063
Legend
(1) Front Exhaust Pipe RH Fixing Nuts
(2) Front Exhaust Pipe RH Fixing Bolts and Nuts
(3) O
2 Sensor Terminal Connector (for IGM)
(4) Front Exhaust Pipe LH Fixing Nuts(5) Front Exhaust Pipe LH Fixing Bolts and Nuts
(6) Front Exhaust Pipe LH
(7) Front Exhaust Pipe RH
(8) Three way Exhaust Pipe Fixing Bolts and Nuts
Removal
1. Disconnect battery ground cable.
2. Raise the vehicle and support with suitable safety
stands.
3. Disconnect O
2 sensor harness connector (3).
4. Remove front exhaust pipe fixing nuts and three way
Exhaust Pipe Fixing Bolts and Nuts (2)(5)(8).
5. Remove front exhaust pipe fixing three stud nuts from
exhaust manifold (1)(4).
6. Remove front exhaust pipe (6)(7).
Installation
1. Install front exhaust pipe (6)(7) and tighten three stud
nuts (1)(4) and nuts (2)(5)(8) to the specified torque.
To r q u e
Stud Nuts : 67 Nꞏm (6.8 Kgꞏm/49 lb ft)
Nuts : 43 Nꞏm (4.3 Kgꞏm/32 lb ft)
2. Reconnect O
2 sensor harness connector (3).
Page 1476 of 6000
6F–5 ENGINE EXHAUST
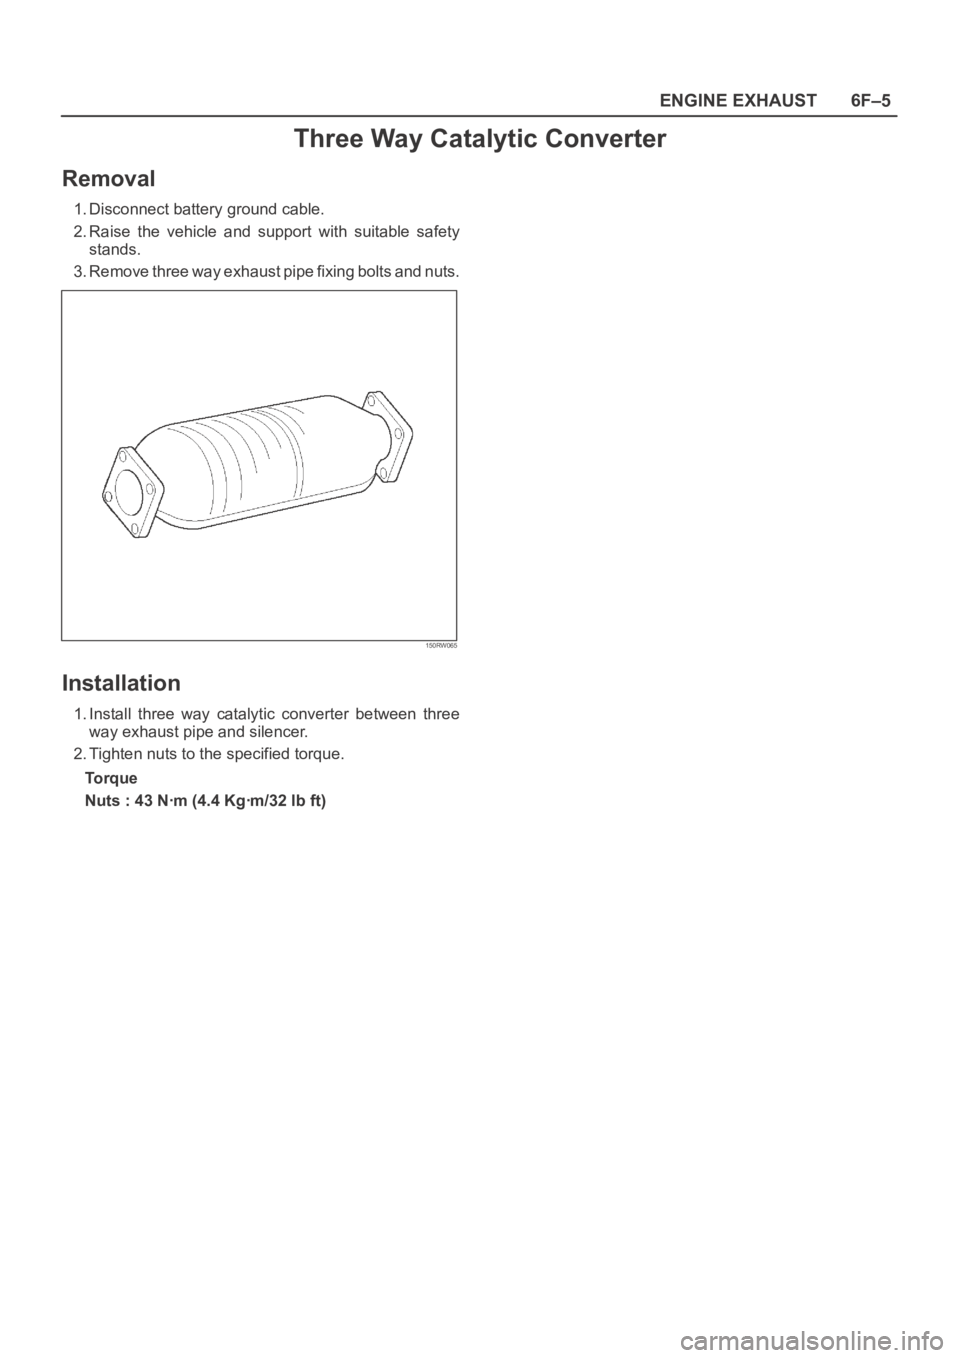
Three Way Catalytic Converter
Removal
1. Disconnect battery ground cable.
2. Raise the vehicle and support with suitable safety
stands.
3. Remove three way exhaust pipe fixing bolts and nuts.
150RW065
Installation
1. Install three way catalytic converter between three
way exhaust pipe and silencer.
2. Tighten nuts to the specified torque.
Torque
Nuts : 43 Nꞏm (4.4 Kgꞏm/32 lb ft)
Page 1477 of 6000
6F–6ENGINE EXHAUST
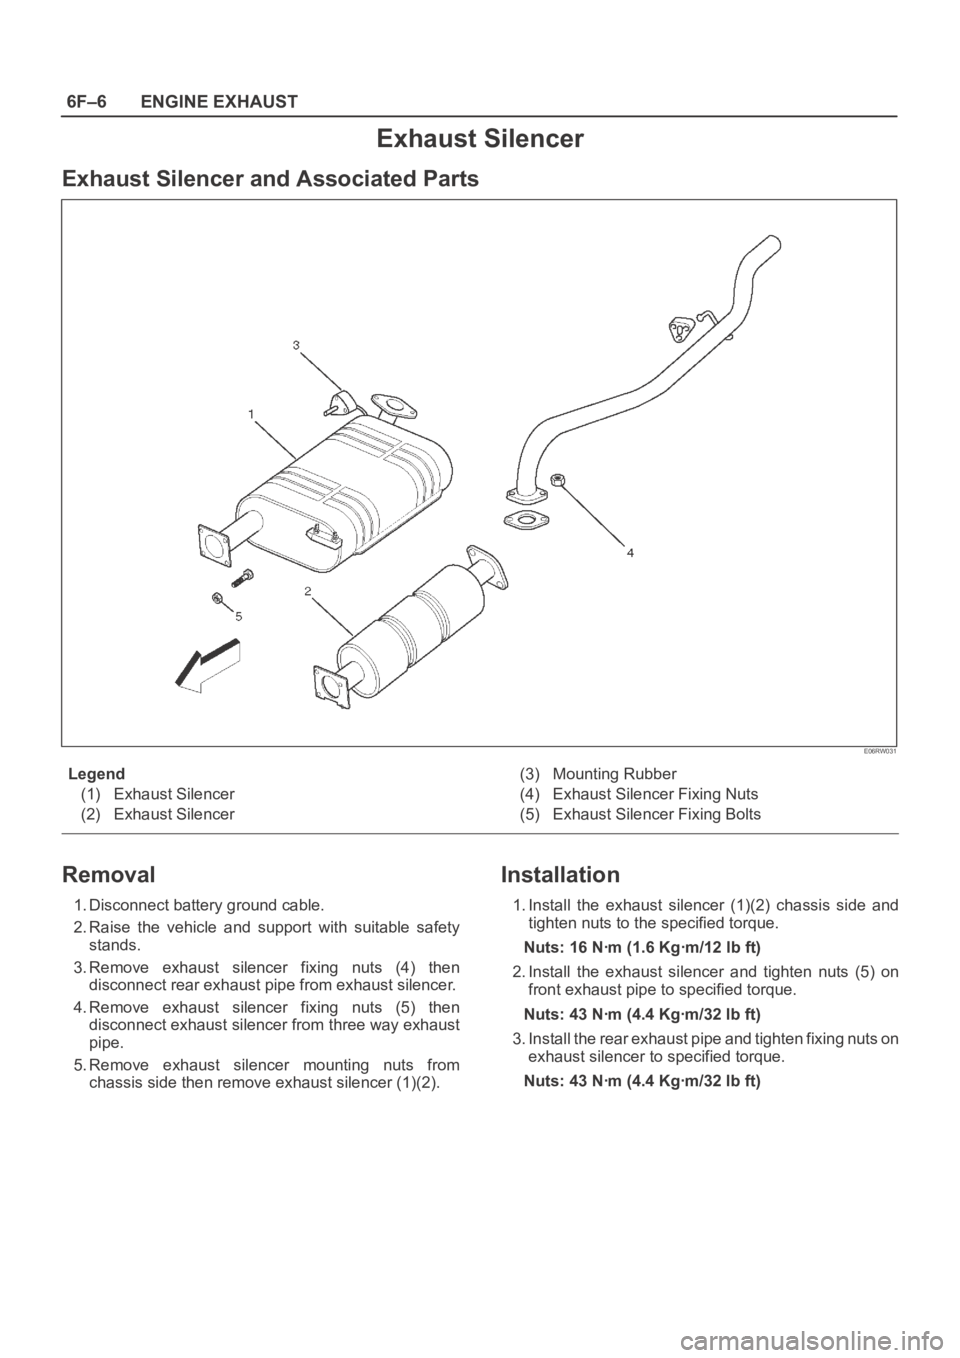
Exhaust Silencer
Exhaust Silencer and Associated Parts
E06RW031
Legend
(1) Exhaust Silencer
(2) Exhaust Silencer(3) Mounting Rubber
(4) Exhaust Silencer Fixing Nuts
(5) Exhaust Silencer Fixing Bolts
Removal
1. Disconnect battery ground cable.
2. Raise the vehicle and support with suitable safety
stands.
3. Remove exhaust silencer fixing nuts (4) then
disconnect rear exhaust pipe from exhaust silencer.
4. Remove exhaust silencer fixing nuts (5) then
disconnect exhaust silencer from three way exhaust
pipe.
5. Remove exhaust silencer mounting nuts from
chassis side then remove exhaust silencer (1)(2).
Installation
1. Install the exhaust silencer (1)(2) chassis side and
tighten nuts to the specified torque.
Nuts: 16 Nꞏm (1.6 Kgꞏm/12 lb ft)
2. Install the exhaust silencer and tighten nuts (5) on
front exhaust pipe to specified torque.
Nuts: 43 Nꞏm (4.4 Kgꞏm/32 lb ft)
3. Install the rear exhaust pipe and tighten fixing nuts on
exhaust silencer to specified torque.
Nuts: 43 Nꞏm (4.4 Kgꞏm/32 lb ft)
Page 1478 of 6000
6F–7 ENGINE EXHAUST
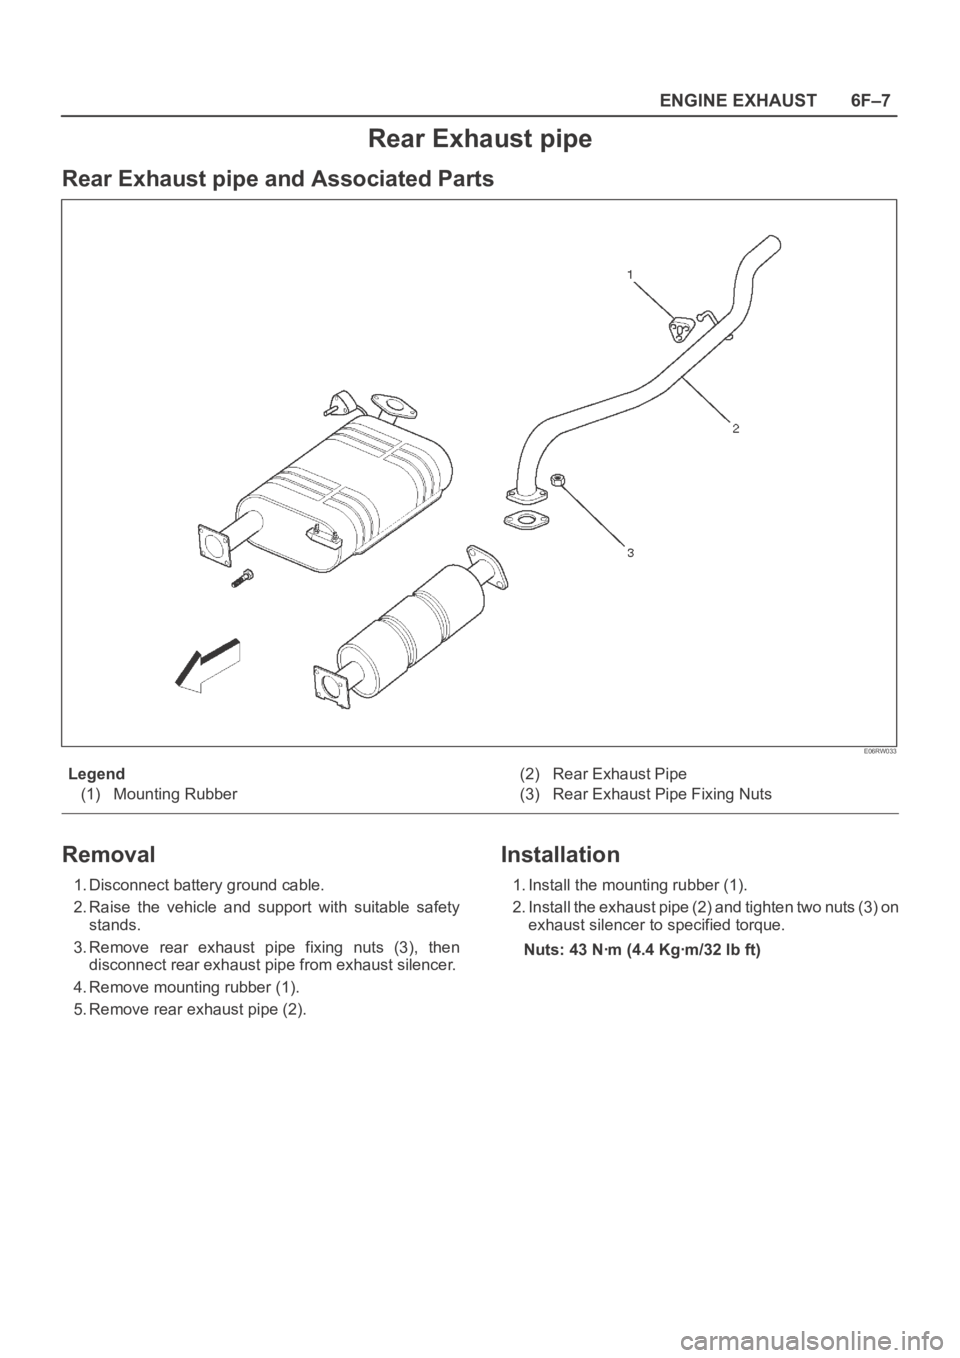
Rear Exhaust pipe
Rear Exhaust pipe and Associated Parts
E06RW033
Legend
(1) Mounting Rubber(2) Rear Exhaust Pipe
(3) Rear Exhaust Pipe Fixing Nuts
Removal
1. Disconnect battery ground cable.
2. Raise the vehicle and support with suitable safety
stands.
3. Remove rear exhaust pipe fixing nuts (3), then
disconnect rear exhaust pipe from exhaust silencer.
4. Remove mounting rubber (1).
5. Remove rear exhaust pipe (2).
Installation
1. Install the mounting rubber (1).
2. Install the exhaust pipe (2) and tighten two nuts (3) on
exhaust silencer to specified torque.
Nuts: 43 Nꞏm (4.4 Kgꞏm/32 lb ft)
Page 1486 of 6000
6G–7 ENGINE LUBRICATION
Oil Pan and Crankcase
Removal
1. Disconnect battery ground cable.
2. Drain engine oil.
3. Lift vehicle by supporting the frame.
4. Remove front wheels.
5. Remove oil level dipstick from level gauge tube.
6. Remove stone guard.
7. Remove radiator under fan shroud.
8. Remove suspension cross member fixing bolts, 2 pcs
each per side and remove suspension cross member.
9. Remove pitman arm and relay lever assembly, using
the 5–8840–2005–0 remover, remove pitman arm
from the steering unit and remove four fixing bolts for
relay lever assembly.
10. Remove axle housing assembly four fixing bolts from
housing isolator side and mounting bolts from wheel
side. At this time support the axle with a garage jack
and remove axle housing assembly.
11. Remove oil pan fixing bolts.
12. Remove oil pan, using 5–8840–2153–0 sealer cutter,
remove oil pan.
013RS003
13. Remove crankcase fixing bolts.
14. Remove crankcase, using 5–8840–2153–0 sealer
cutter, remove crankcase.
NOTE: Do not deform or damage the flange of oil pan and
crankcase.
Replace the oil pan and/or crankcase if deformed or dam-
aged.
013RS003
Installation
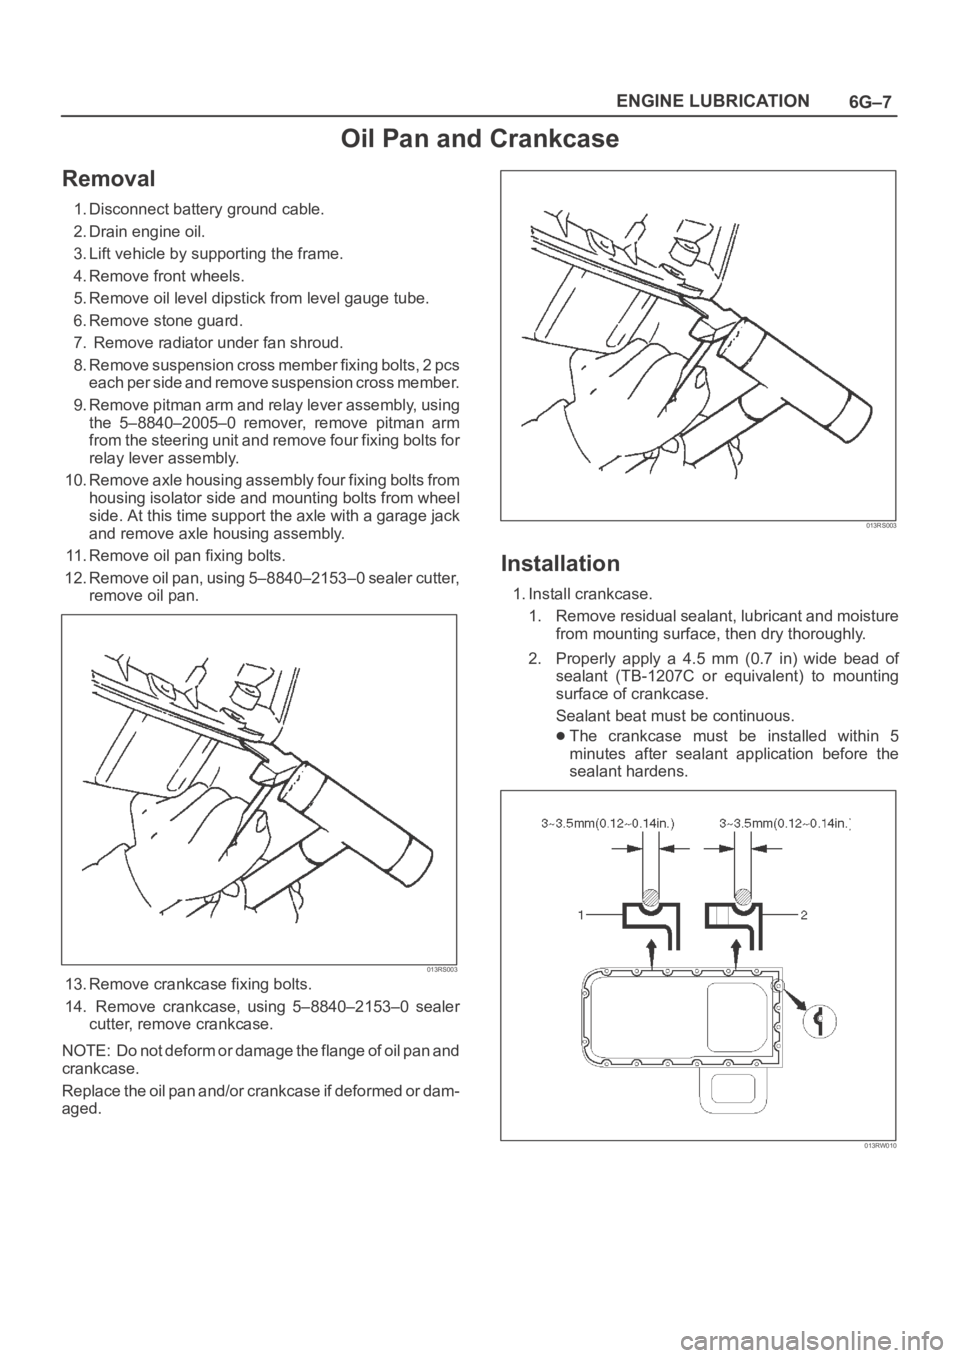
1. Install crankcase.
1. Remove residual sealant, lubricant and moisture
from mounting surface, then dry thoroughly.
2. Properly apply a 4.5 mm (0.7 in) wide bead of
sealant (TB-1207C or equivalent) to mounting
surface of crankcase.
Sealant beat must be continuous.
The crankcase must be installed within 5
minutes after sealant application before the
sealant hardens.
013RW010