Page 4357 of 6000
5A–7 BRAKE CONTROL SYSTEM
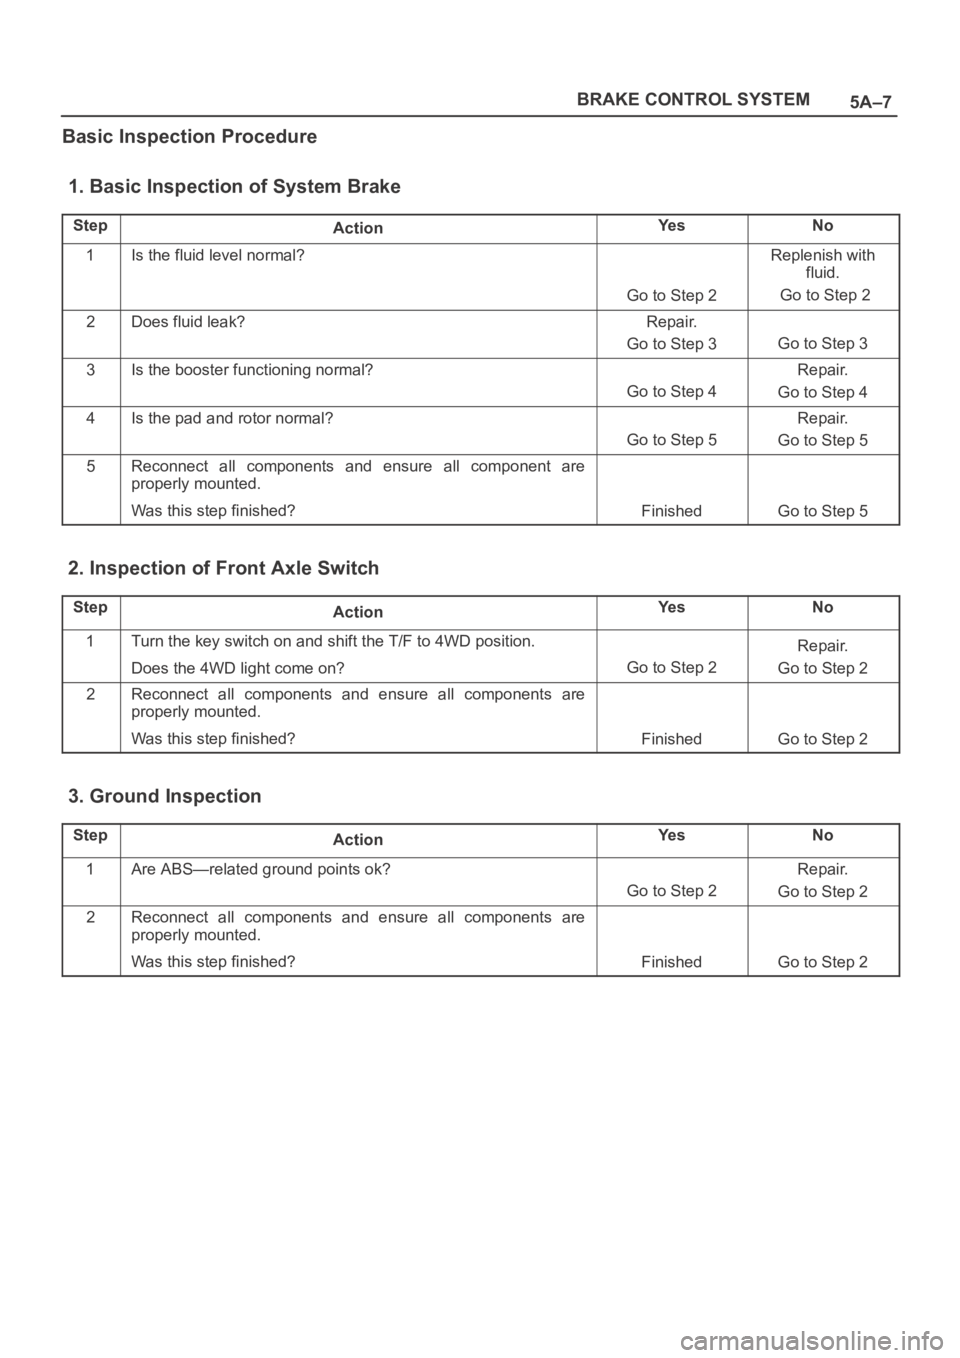
Basic Inspection Procedure
1. Basic Inspection of System Brake
StepActionYe sNo
1Is the fluid level normal?
Go to Step 2
Replenish with
fluid.
Go to Step 2
2Does fluid leak?Repair.
Go to Step 3
Go to Step 3
3Is the booster functioning normal?
Go to Step 4
Repair.
Go to Step 4
4Is the pad and rotor normal?
Go to Step 5
Repair.
Go to Step 5
5Reconnect all components and ensure all component are
properly mounted.
Was this step finished?
FinishedGo to Step 5
2. Inspection of Front Axle Switch
StepActionYe sNo
1Turn the key switch on and shift the T/F to 4WD position.
Does the 4WD light come on?
Go to Step 2
Repair.
Go to Step 2
2Reconnect all components and ensure all components are
properly mounted.
Was this step finished?
FinishedGo to Step 2
3. Ground Inspection
StepActionYe sNo
1Are ABS—related ground points ok?
Go to Step 2
Repair.
Go to Step 2
2Reconnect all components and ensure all components are
properly mounted.
Was this step finished?
FinishedGo to Step 2
Page 4402 of 6000
5A–52
BRAKE CONTROL SYSTEM
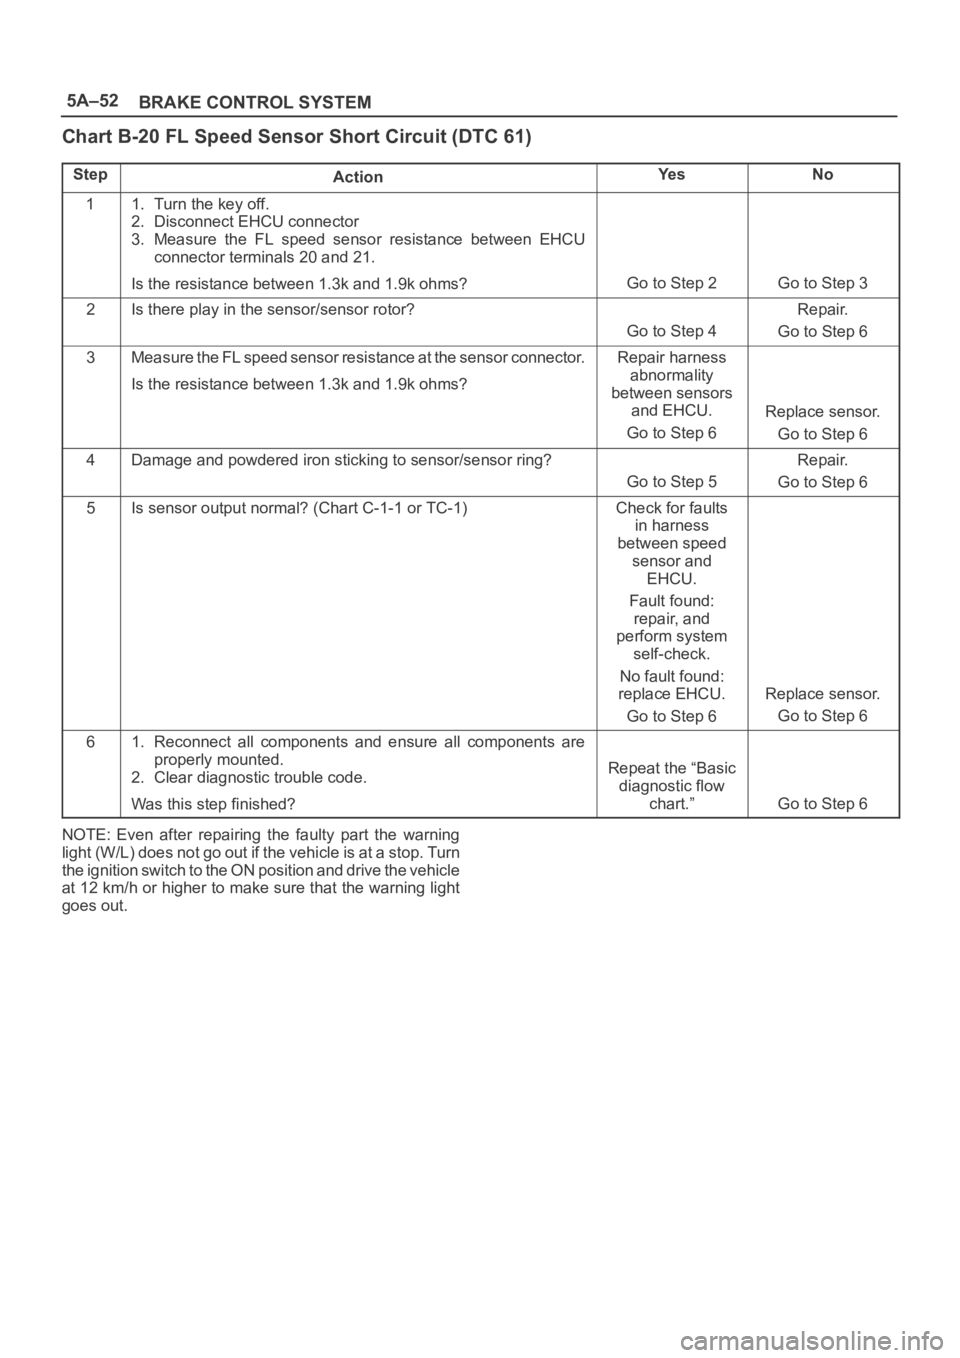
Chart B-20 FL Speed Sensor Short Circuit (DTC 61)
StepActionYe sNo
11. Turn the key off.
2. Disconnect EHCU connector
3. Measure the FL speed sensor resistance between EHCU
connector terminals 20 and 21.
Is the resistance between 1.3k and 1.9k ohms?
Go to Step 2Go to Step 3
2Is there play in the sensor/sensor rotor?
Go to Step 4
Repair.
Go to Step 6
3Measure the FL speed sensor resistance at the sensor connector.
Is the resistance between 1.3k and 1.9k ohms?Repair harness
abnormality
between sensors
and EHCU.
Go to Step 6
Replace sensor.
Go to Step 6
4Damage and powdered iron sticking to sensor/sensor ring?
Go to Step 5
Repair.
Go to Step 6
5Is sensor output normal? (Chart C-1-1 or TC-1)Check for faults
in harness
between speed
sensor and
EHCU.
Fault found:
repair, and
perform system
self-check.
No fault found:
replace EHCU.
Go to Step 6
Replace sensor.
Go to Step 6
61. Reconnect all components and ensure all components are
properly mounted.
2. Clear diagnostic trouble code.
Was this step finished?
Repeat the “Basic
diagnostic flow
chart.”
Go to Step 6
NOTE: Even after repairing the faulty part the warning
light (W/L) does not go out if the vehicle is at a stop. Turn
the ignition switch to the ON position and drive the vehicle
at 12 km/h or higher to make sure that the warning light
goes out.
Page 4403 of 6000
5A–53 BRAKE CONTROL SYSTEM
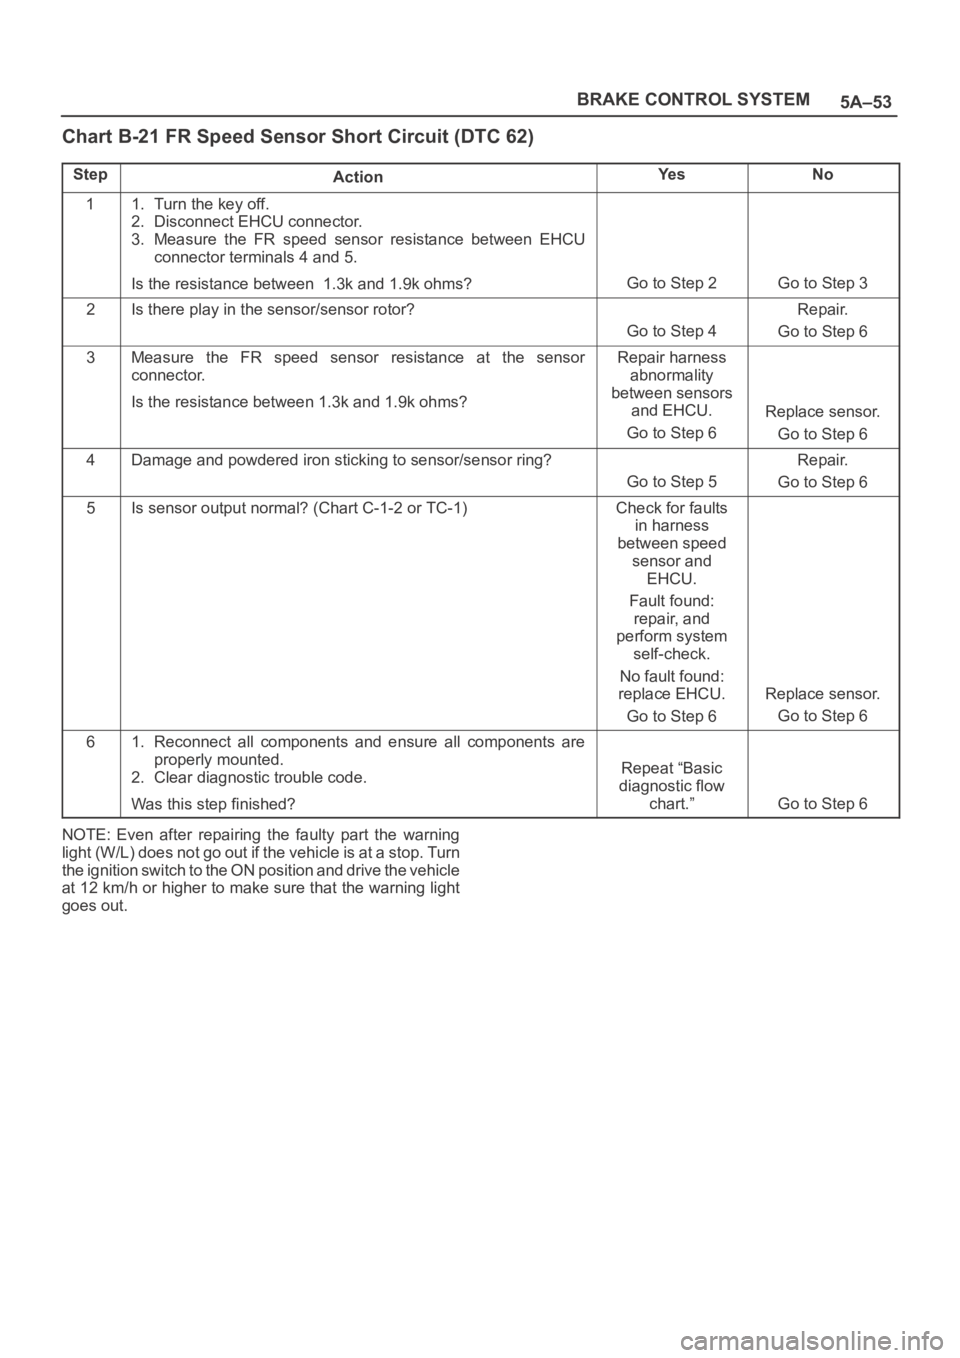
Chart B-21 FR Speed Sensor Short Circuit (DTC 62)
StepActionYe sNo
11. Turn the key off.
2. Disconnect EHCU connector.
3. Measure the FR speed sensor resistance between EHCU
connector terminals 4 and 5.
Is the resistance between 1.3k and 1.9k ohms?
Go to Step 2Go to Step 3
2Is there play in the sensor/sensor rotor?
Go to Step 4
Repair.
Go to Step 6
3Measure the FR speed sensor resistance at the sensor
connector.
Is the resistance between 1.3k and 1.9k ohms?Repair harness
abnormality
between sensors
and EHCU.
Go to Step 6
Replace sensor.
Go to Step 6
4Damage and powdered iron sticking to sensor/sensor ring?
Go to Step 5
Repair.
Go to Step 6
5Is sensor output normal? (Chart C-1-2 or TC-1)Check for faults
in harness
between speed
sensor and
EHCU.
Fault found:
repair, and
perform system
self-check.
No fault found:
replace EHCU.
Go to Step 6
Replace sensor.
Go to Step 6
61. Reconnect all components and ensure all components are
properly mounted.
2. Clear diagnostic trouble code.
Was this step finished?
Repeat “Basic
diagnostic flow
chart.”
Go to Step 6
NOTE: Even after repairing the faulty part the warning
light (W/L) does not go out if the vehicle is at a stop. Turn
the ignition switch to the ON position and drive the vehicle
at 12 km/h or higher to make sure that the warning light
goes out.
Page 4404 of 6000
5A–54
BRAKE CONTROL SYSTEM
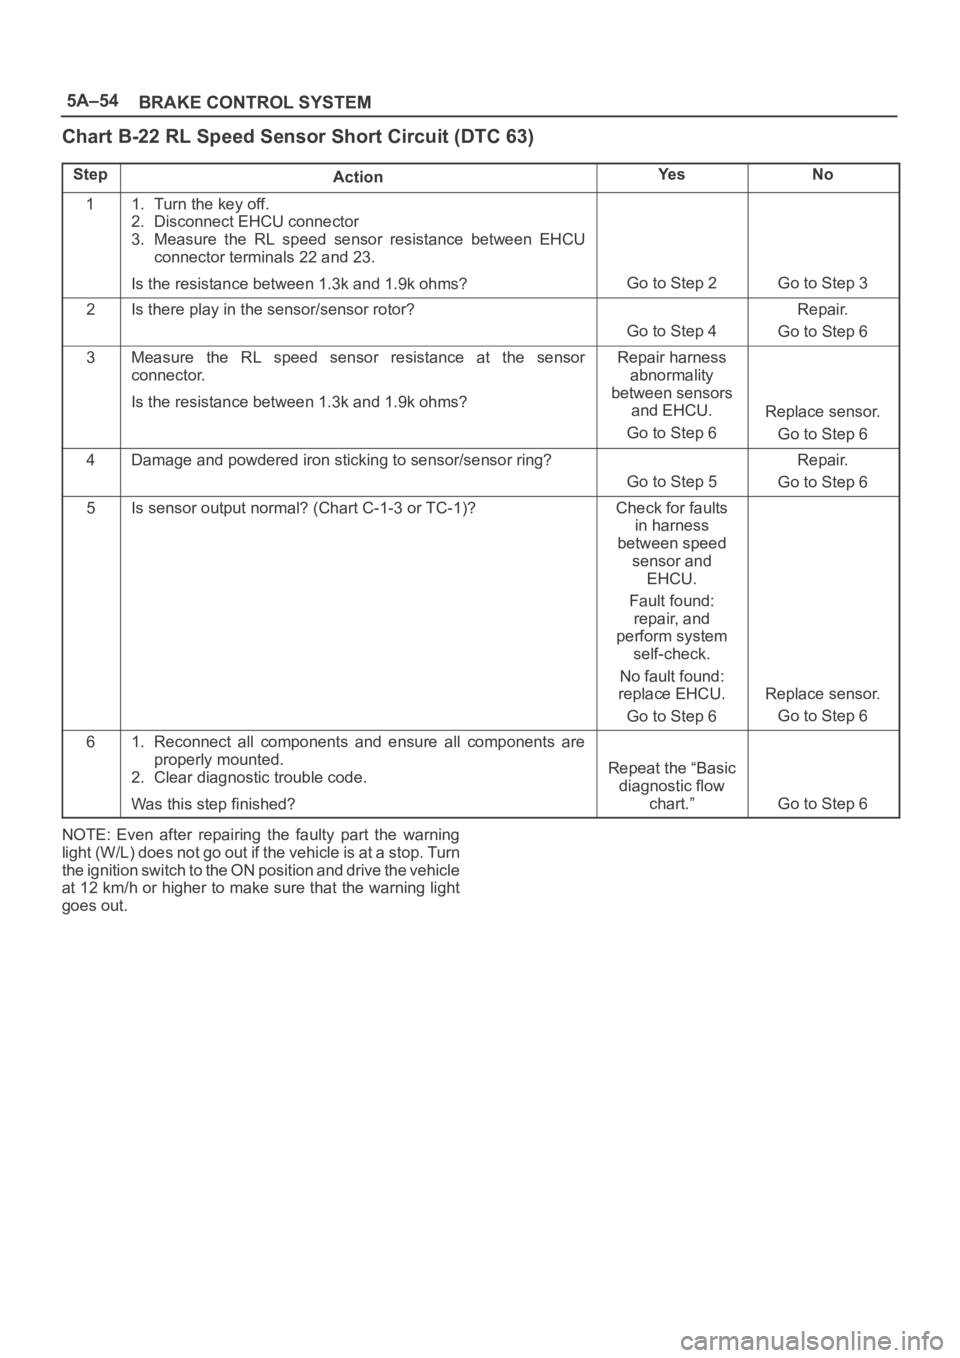
Chart B-22 RL Speed Sensor Short Circuit (DTC 63)
StepActionYe sNo
11. Turn the key off.
2. Disconnect EHCU connector
3. Measure the RL speed sensor resistance between EHCU
connector terminals 22 and 23.
Is the resistance between 1.3k and 1.9k ohms?
Go to Step 2Go to Step 3
2Is there play in the sensor/sensor rotor?
Go to Step 4
Repair.
Go to Step 6
3Measure the RL speed sensor resistance at the sensor
connector.
Is the resistance between 1.3k and 1.9k ohms?Repair harness
abnormality
between sensors
and EHCU.
Go to Step 6
Replace sensor.
Go to Step 6
4Damage and powdered iron sticking to sensor/sensor ring?
Go to Step 5
Repair.
Go to Step 6
5Is sensor output normal? (Chart C-1-3 or TC-1)?Check for faults
in harness
between speed
sensor and
EHCU.
Fault found:
repair, and
perform system
self-check.
No fault found:
replace EHCU.
Go to Step 6
Replace sensor.
Go to Step 6
61. Reconnect all components and ensure all components are
properly mounted.
2. Clear diagnostic trouble code.
Was this step finished?
Repeat the “Basic
diagnostic flow
chart.”
Go to Step 6
NOTE: Even after repairing the faulty part the warning
light (W/L) does not go out if the vehicle is at a stop. Turn
the ignition switch to the ON position and drive the vehicle
at 12 km/h or higher to make sure that the warning light
goes out.
Page 4405 of 6000
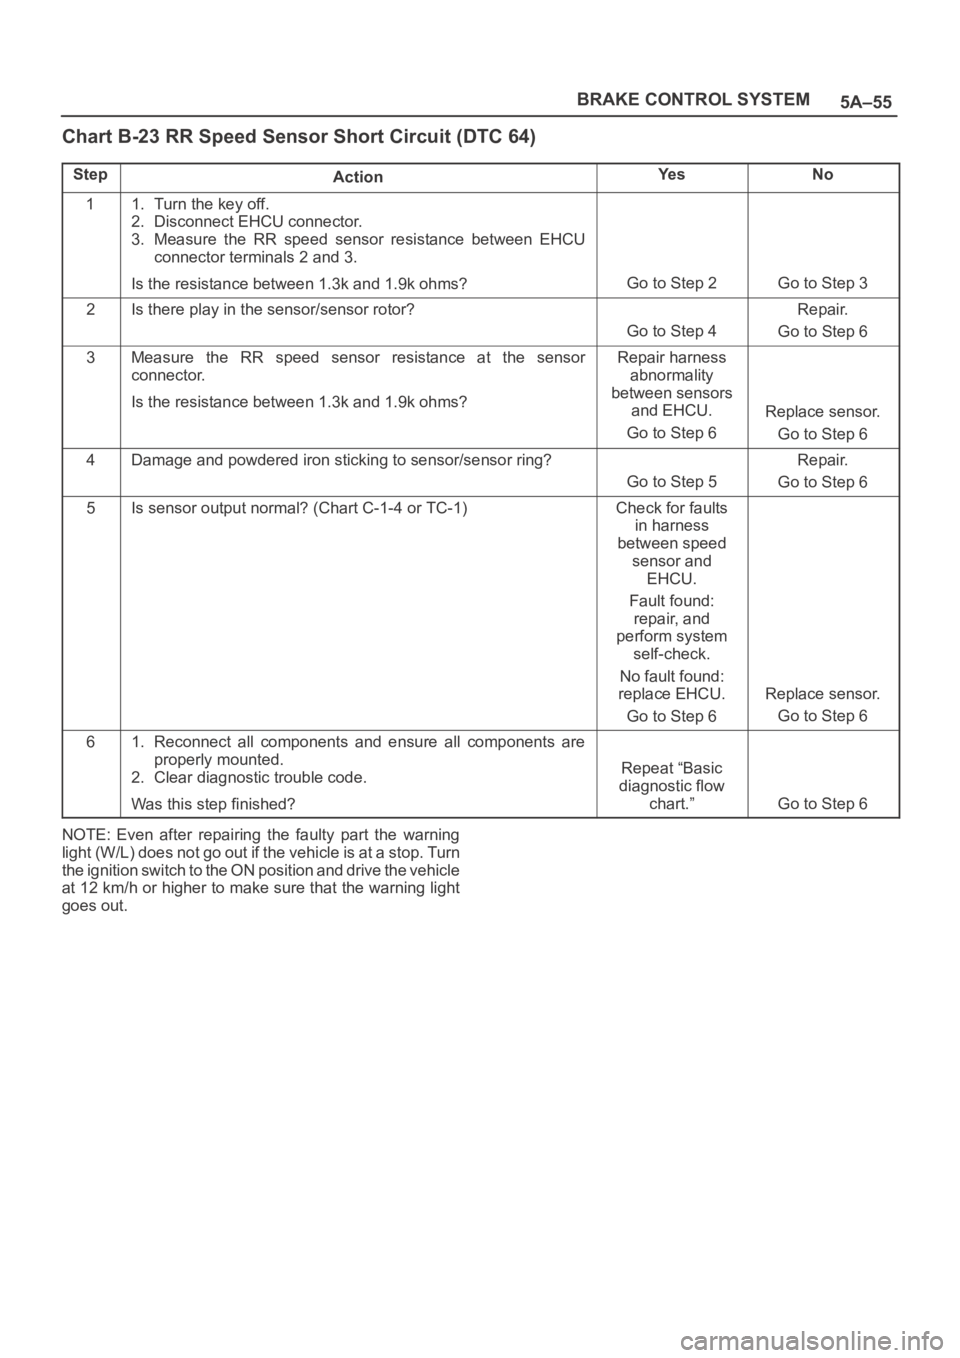
5A–55 BRAKE CONTROL SYSTEM
Chart B-23 RR Speed Sensor Short Circuit (DTC 64)
StepActionYe sNo
11. Turn the key off.
2. Disconnect EHCU connector.
3. Measure the RR speed sensor resistance between EHCU
connector terminals 2 and 3.
Is the resistance between 1.3k and 1.9k ohms?
Go to Step 2Go to Step 3
2Is there play in the sensor/sensor rotor?
Go to Step 4
Repair.
Go to Step 6
3Measure the RR speed sensor resistance at the sensor
connector.
Is the resistance between 1.3k and 1.9k ohms?Repair harness
abnormality
between sensors
and EHCU.
Go to Step 6
Replace sensor.
Go to Step 6
4Damage and powdered iron sticking to sensor/sensor ring?
Go to Step 5
Repair.
Go to Step 6
5Is sensor output normal? (Chart C-1-4 or TC-1)Check for faults
in harness
between speed
sensor and
EHCU.
Fault found:
repair, and
perform system
self-check.
No fault found:
replace EHCU.
Go to Step 6
Replace sensor.
Go to Step 6
61. Reconnect all components and ensure all components are
properly mounted.
2. Clear diagnostic trouble code.
Was this step finished?
Repeat “Basic
diagnostic flow
chart.”
Go to Step 6
NOTE: Even after repairing the faulty part the warning
light (W/L) does not go out if the vehicle is at a stop. Turn
the ignition switch to the ON position and drive the vehicle
at 12 km/h or higher to make sure that the warning light
goes out.
Page 4409 of 6000
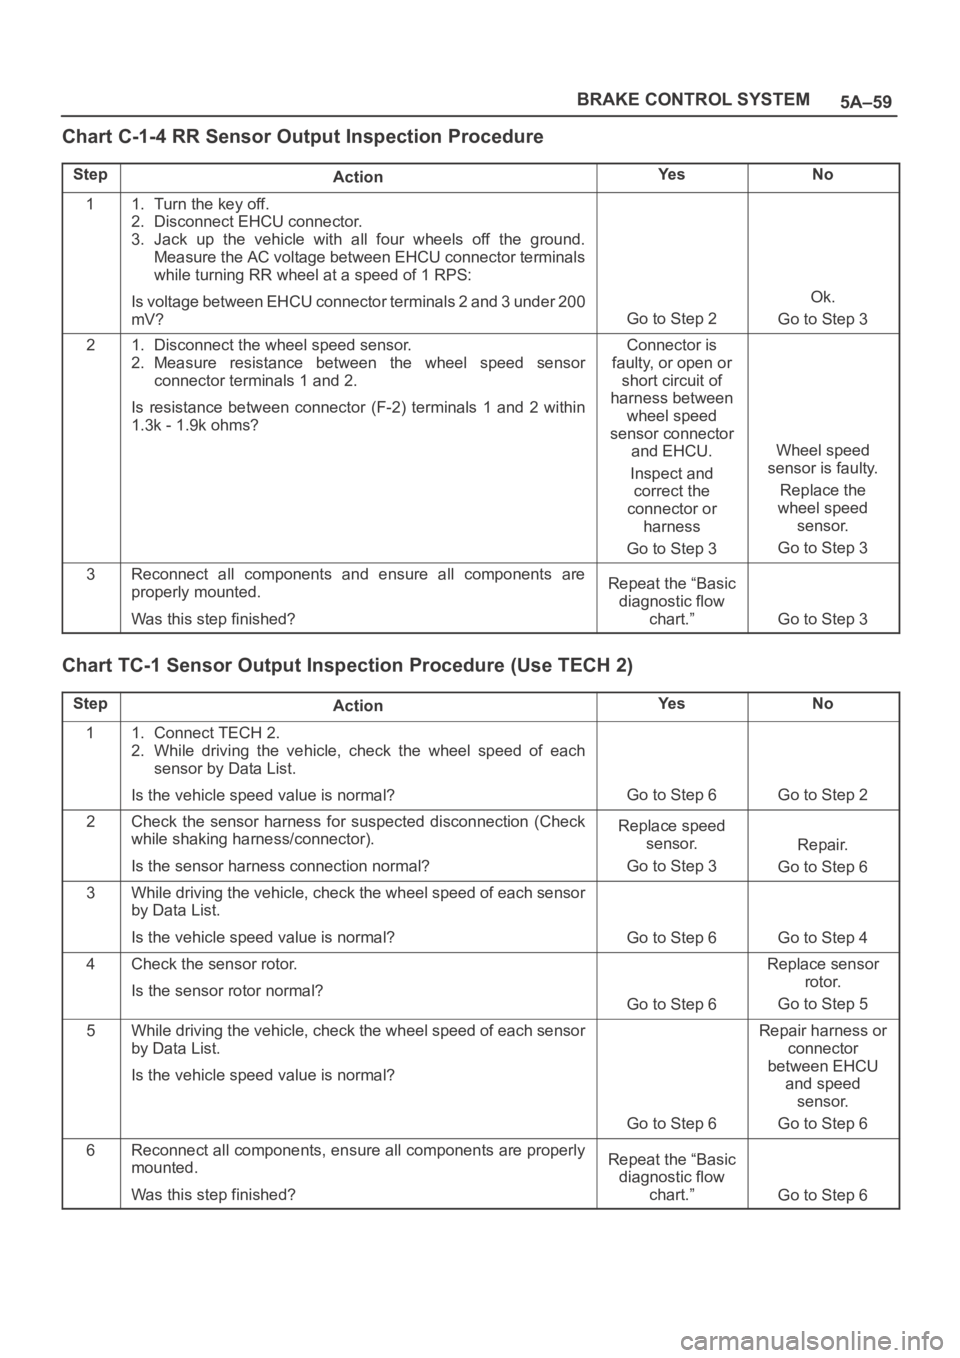
5A–59 BRAKE CONTROL SYSTEM
Chart C-1-4 RR Sensor Output Inspection Procedure
StepActionYe sNo
11. Turn the key off.
2. Disconnect EHCU connector.
3. Jack up the vehicle with all four wheels off the ground.
Measure the AC voltage between EHCU connector terminals
while turning RR wheel at a speed of 1 RPS:
Is voltage between EHCU connector terminals 2 and 3 under 200
mV?
Go to Step 2
Ok.
Go to Step 3
21. Disconnect the wheel speed sensor.
2. Measure resistance between the wheel speed sensor
connector terminals 1 and 2.
Is resistance between connector (F-2) terminals 1 and 2 within
1.3k - 1.9k ohms?Connector is
faulty, or open or
short circuit of
harness between
wheel speed
sensor connector
and EHCU.
Inspect and
correct the
connector or
harness
Go to Step 3
Wheel speed
sensor is faulty.
Replace the
wheel speed
sensor.
Go to Step 3
3Reconnect all components and ensure all components are
properly mounted.
Was this step finished?Repeat the “Basic
diagnostic flow
chart.”
Go to Step 3
Chart TC-1 Sensor Output Inspection Procedure (Use TECH 2)
StepActionYe sNo
11. Connect TECH 2.
2. While driving the vehicle, check the wheel speed of each
sensor by Data List.
Is the vehicle speed value is normal?
Go to Step 6Go to Step 2
2Check the sensor harness for suspected disconnection (Check
while shaking harness/connector).
Is the sensor harness connection normal?Replace speed
sensor.
Go to Step 3
Repair.
Go to Step 6
3While driving the vehicle, check the wheel speed of each sensor
by Data List.
Is the vehicle speed value is normal?
Go to Step 6Go to Step 4
4Check the sensor rotor.
Is the sensor rotor normal?
Go to Step 6
Replace sensor
rotor.
Go to Step 5
5While driving the vehicle, check the wheel speed of each sensor
by Data List.
Is the vehicle speed value is normal?
Go to Step 6
Repair harness or
connector
between EHCU
and speed
sensor.
Go to Step 6
6Reconnect all components, ensure all components are properly
mounted.
Was this step finished?Repeat the “Basic
diagnostic flow
chart.”
Go to Step 6