1998 OPEL FRONTERA battery
[x] Cancel search: batteryPage 1371 of 6000
6E–254
ENGINE DRIVEABILITY AND EMISSIONS
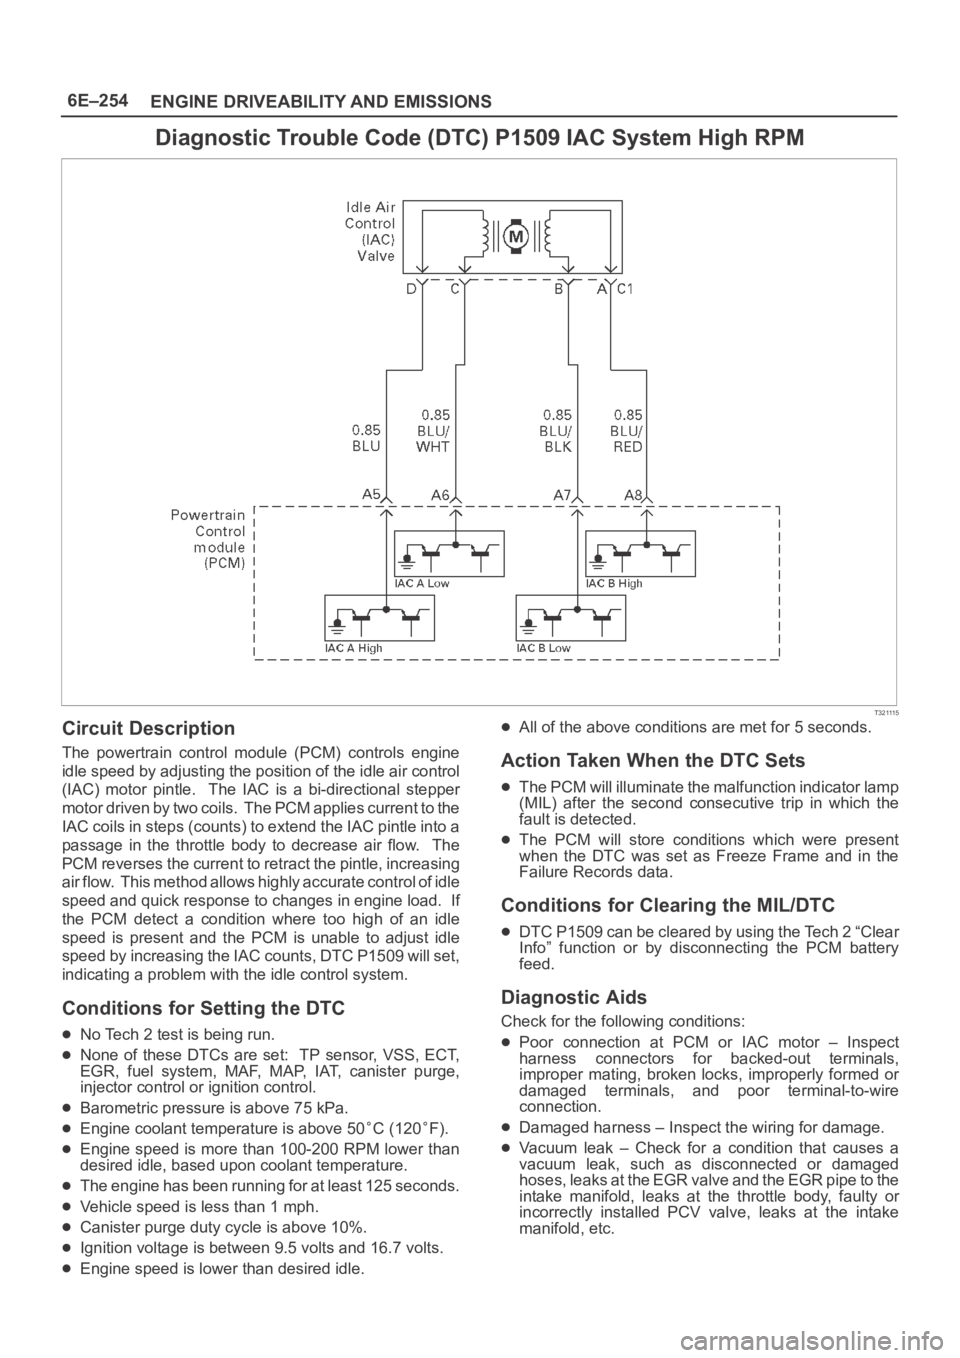
Diagnostic Trouble Code (DTC) P1509 IAC System High RPM
T321115
Circuit Description
The powertrain control module (PCM) controls engine
idle speed by adjusting the position of the idle air control
(IAC) motor pintle. The IAC is a bi-directional stepper
motor driven by two coils. The PCM applies current to the
IAC coils in steps (counts) to extend the IAC pintle into a
passage in the throttle body to decrease air flow. The
PCM reverses the current to retract the pintle, increasing
air flow. This method allows highly accurate control of idle
speed and quick response to changes in engine load. If
the PCM detect a condition where too high of an idle
speed is present and the PCM is unable to adjust idle
speed by increasing the IAC counts, DTC P1509 will set,
indicating a problem with the idle control system.
Conditions for Setting the DTC
No Tech 2 test is being run.
None of these DTCs are set: TP sensor, VSS, ECT,
EGR, fuel system, MAF, MAP, IAT, canister purge,
injector control or ignition control.
Barometric pressure is above 75 kPa.
Engine coolant temperature is above 50C (120F).
Engine speed is more than 100-200 RPM lower than
desired idle, based upon coolant temperature.
The engine has been running for at least 125 seconds.
Vehicle speed is less than 1 mph.
Canister purge duty cycle is above 10%.
Ignition voltage is between 9.5 volts and 16.7 volts.
Engine speed is lower than desired idle.
All of the above conditions are met for 5 seconds.
Action Taken When the DTC Sets
The PCM will illuminate the malfunction indicator lamp
(MIL) after the second consecutive trip in which the
fault is detected.
The PCM will store conditions which were present
when the DTC was set as Freeze Frame and in the
Failure Records data.
Conditions for Clearing the MIL/DTC
DTC P1509 can be cleared by using the Tech 2 “Clear
Info” function or by disconnecting the PCM battery
feed.
Diagnostic Aids
Check for the following conditions:
Poor connection at PCM or IAC motor – Inspect
harness connectors for backed-out terminals,
improper mating, broken locks, improperly formed or
damaged terminals, and poor terminal-to-wire
connection.
Damaged harness – Inspect the wiring for damage.
Vacuum leak – Check for a condition that causes a
vacuum leak, such as disconnected or damaged
h o s e s , l e a k s a t t h e E G R v a l v e a n d t h e E G R p i p e t o t h e
intake manifold, leaks at the throttle body, faulty or
incorrectly installed PCV valve, leaks at the intake
manifold, etc.
Page 1374 of 6000
6E–257 ENGINE DRIVEABILITY AND EMISSIONS
Diagnostic Trouble Code (DTC) P1618 Serial Peripheral Interface (SPI) PCM
Interprocessor Communication Error
Circuit Description
The serial peripheral interface (SPI) communication is
used internally by the PCM to send messages between
the engine processor and the automatic transmission
processor. Included in each message sent between the
two-processors is a checksum of the message. Both the
engine processor and automatic transmission processor
will compare this check sum value with the calculated
value. If the checksums don’t match, the processor will
view the new data as being corrupted and ignore the
values. The processor will then use the previous
message. The receiving processor will then send a
message to the sending processor informing it that it’s
last message was corrupted.
Conditions for Setting the DTC
Battery voltage is above 9.0 V for 2 seconds.
The PCM detects an internal program fault (check sum
of data communications error).
Check sum fault present for 3 out 6 seconds.
No TCM resets for 2 seconds.
Action Taken When the DTC Sets
The PCM will flash the “Check Trans” lamp the first
time the fault is detected.
The PCM will store conditions which were present
when the DTC was set as Freeze Frame and in the
Failure Records data.
The automatic transmission will operate in the “safety
mode” to protect the mechanical parts of the
transmission. Shift quality and/or gear changes may
not be normal.
Conditions for Clearing the MIL/DTC
DTC P1618 can be cleared by using the Tech 2 “Clear
Info” function or by disconnecting the PCM battery
feed.
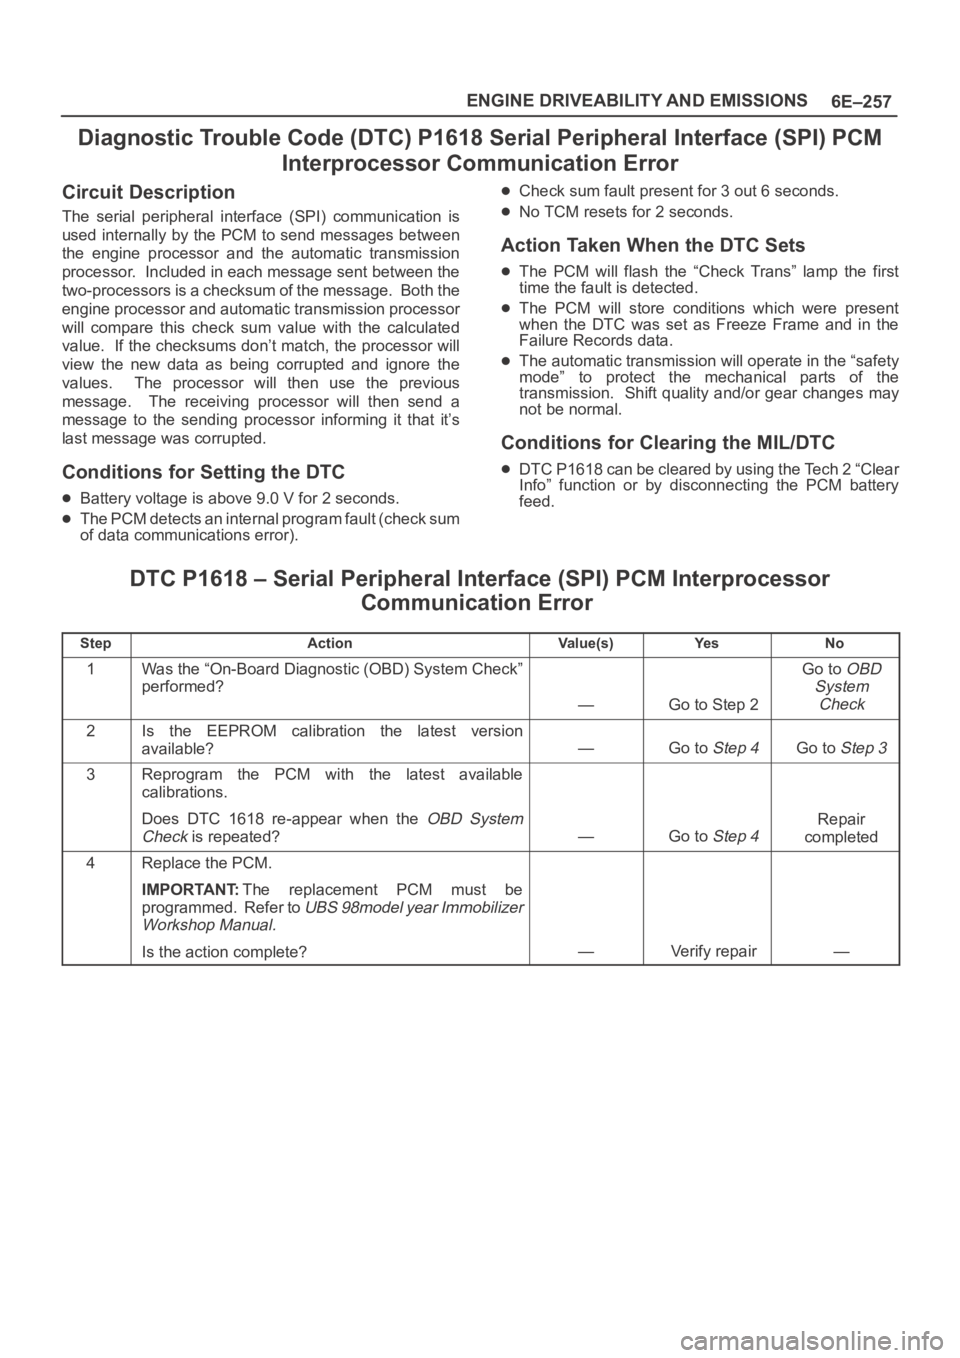
DTC P1618 – Serial Peripheral Interface (SPI) PCM Interprocessor
Communication Error
StepActionVa l u e ( s )Ye sNo
1Was the “On-Board Diagnostic (OBD) System Check”
performed?
—Go to Step 2
Go to OBD
System
Check
2Is the EEPROM calibration the latest version
available?
—Go to Step 4Go to Step 3
3Reprogram the PCM with the latest available
calibrations.
Does DTC 1618 re-appear when the
OBD System
Check
is repeated?—Go to Step 4
Repair
completed
4Replace the PCM.
IMPORTANT:The replacement PCM must be
programmed. Refer to
UBS 98model year Immobilizer
Workshop Manual.
Is the action complete?—Verify repair—
Page 1375 of 6000
6E–258
ENGINE DRIVEABILITY AND EMISSIONS
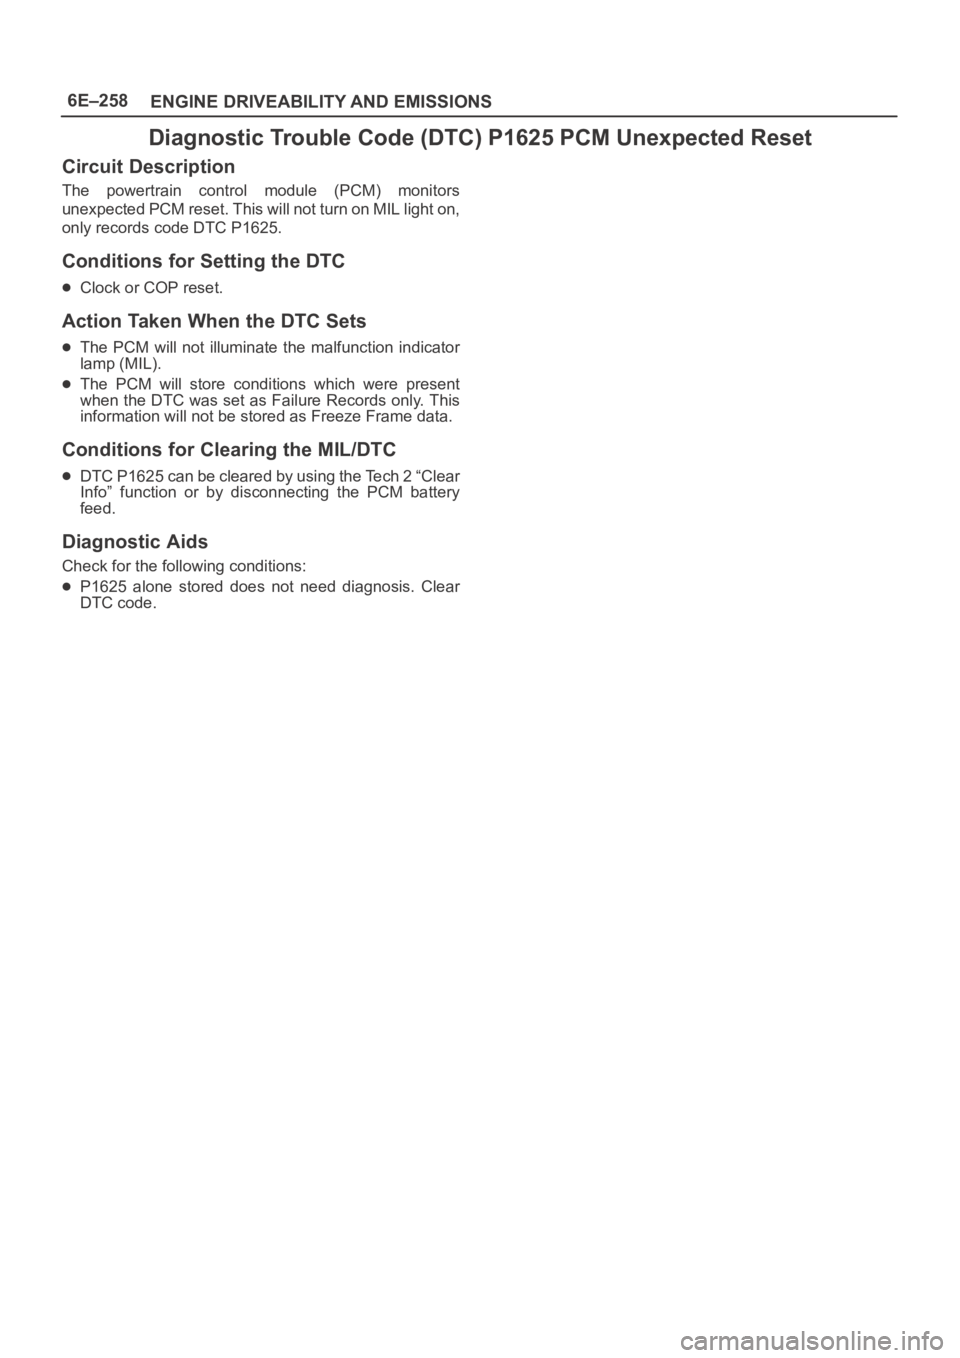
Diagnostic Trouble Code (DTC) P1625 PCM Unexpected Reset
Circuit Description
The powertrain control module (PCM) monitors
unexpected PCM reset. This will not turn on MIL light on,
only records code DTC P1625.
Conditions for Setting the DTC
Clock or COP reset.
Action Taken When the DTC Sets
The PCM will not illuminate the malfunction indicator
lamp (MIL).
The PCM will store conditions which were present
when the DTC was set as Failure Records only. This
information will not be stored as Freeze Frame data.
Conditions for Clearing the MIL/DTC
DTC P1625 can be cleared by using the Tech 2 “Clear
Info” function or by disconnecting the PCM battery
feed.
Diagnostic Aids
Check for the following conditions:
P1625 alone stored does not need diagnosis. Clear
DTC code.
Page 1376 of 6000
6E–259 ENGINE DRIVEABILITY AND EMISSIONS
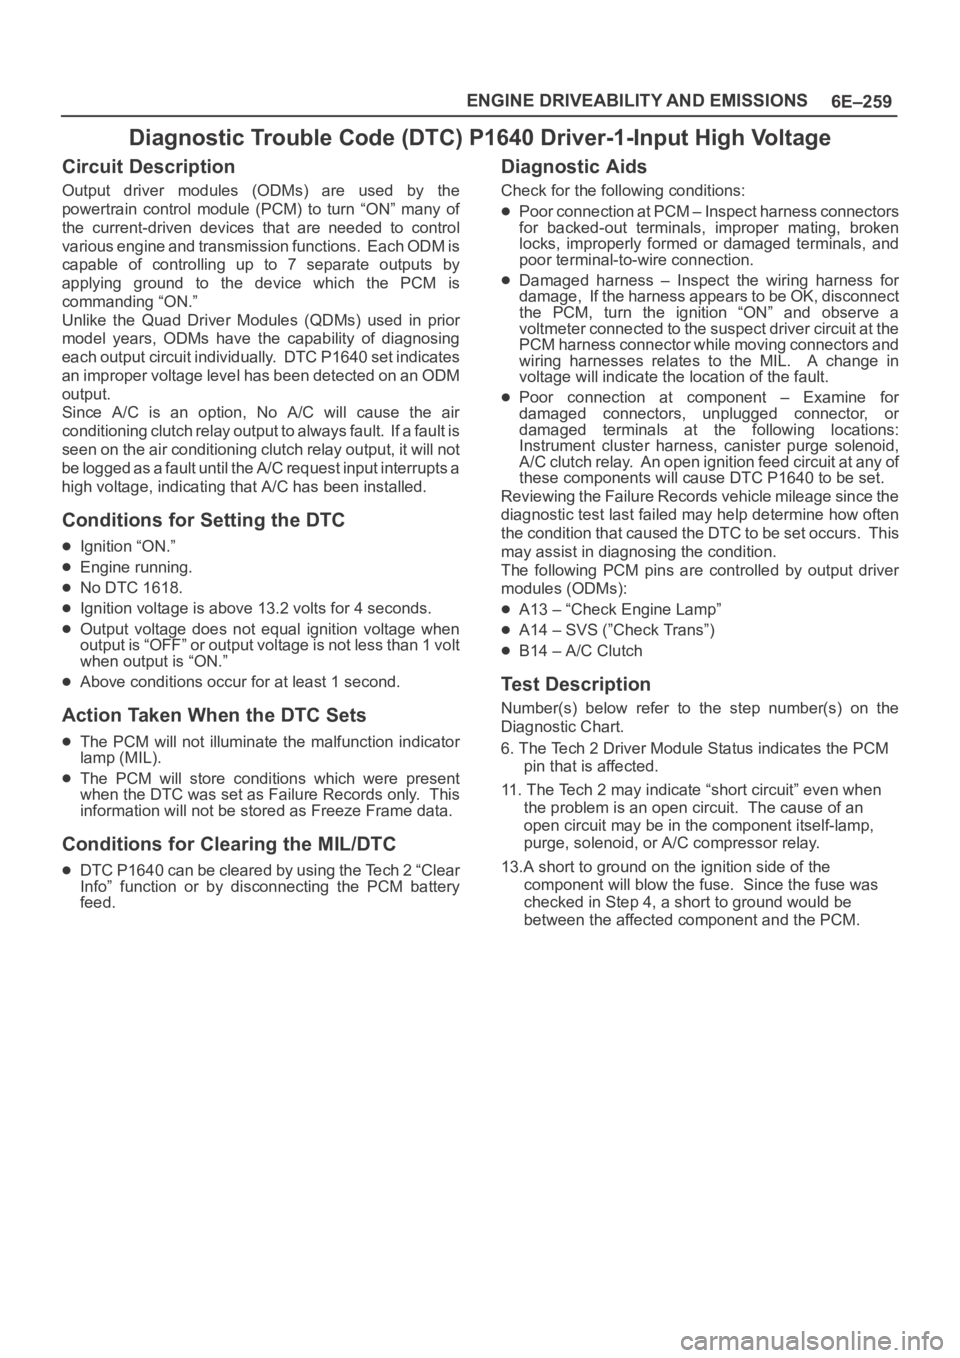
Diagnostic Trouble Code (DTC) P1640 Driver-1-Input High Voltage
Circuit Description
Output driver modules (ODMs) are used by the
powertrain control module (PCM) to turn “ON” many of
the current-driven devices that are needed to control
various engine and transmission functions. Each ODM is
capable of controlling up to 7 separate outputs by
applying ground to the device which the PCM is
commanding “ON.”
Unlike the Quad Driver Modules (QDMs) used in prior
model years, ODMs have the capability of diagnosing
each output circuit individually. DTC P1640 set indicates
an improper voltage level has been detected on an ODM
output.
Since A/C is an option, No A/C will cause the air
conditioning clutch relay output to always fault. If a fault is
seen on the air conditioning clutch relay output, it will not
be logged as a fault until the A/C request input interrupts a
high voltage, indicating that A/C has been installed.
Conditions for Setting the DTC
Ignition “ON.”
Engine running.
No DTC 1618.
Ignition voltage is above 13.2 volts for 4 seconds.
Output voltage does not equal ignition voltage when
output is “OFF” or output voltage is not less than 1 volt
when output is “ON.”
Above conditions occur for at least 1 second.
Action Taken When the DTC Sets
The PCM will not illuminate the malfunction indicator
lamp (MIL).
The PCM will store conditions which were present
when the DTC was set as Failure Records only. This
information will not be stored as Freeze Frame data.
Conditions for Clearing the MIL/DTC
DTC P1640 can be cleared by using the Tech 2 “Clear
Info” function or by disconnecting the PCM battery
feed.
Diagnostic Aids
Check for the following conditions:
Poor connection at PCM – Inspect harness connectors
for backed-out terminals, improper mating, broken
locks, improperly formed or damaged terminals, and
poor terminal-to-wire connection.
Damaged harness – Inspect the wiring harness for
damage, If the harness appears to be OK, disconnect
the PCM, turn the ignition “ON” and observe a
voltmeter connected to the suspect driver circuit at the
PCM harness connector while moving connectors and
wiring harnesses relates to the MIL. A change in
voltage will indicate the location of the fault.
Poor connection at component – Examine for
damaged connectors, unplugged connector, or
damaged terminals at the following locations:
Instrument cluster harness, canister purge solenoid,
A/C clutch relay. An open ignition feed circuit at any of
these components will cause DTC P1640 to be set.
Reviewing the Failure Records vehicle mileage since the
diagnostic test last failed may help determine how often
the condition that caused the DTC to be set occurs. This
may assist in diagnosing the condition.
The following PCM pins are controlled by output driver
modules (ODMs):
A13 – “Check Engine Lamp”
A14 – SVS (”Check Trans”)
B14 – A/C Clutch
Test Description
Number(s) below refer to the step number(s) on the
Diagnostic Chart.
6. The Tech 2 Driver Module Status indicates the PCM
pin that is affected.
11. The Tech 2 may indicate “short circuit” even when
the problem is an open circuit. The cause of an
open circuit may be in the component itself-lamp,
purge, solenoid, or A/C compressor relay.
13.A short to ground on the ignition side of the
component will blow the fuse. Since the fuse was
checked in Step 4, a short to ground would be
between the affected component and the PCM.
Page 1377 of 6000
6E–260
ENGINE DRIVEABILITY AND EMISSIONS
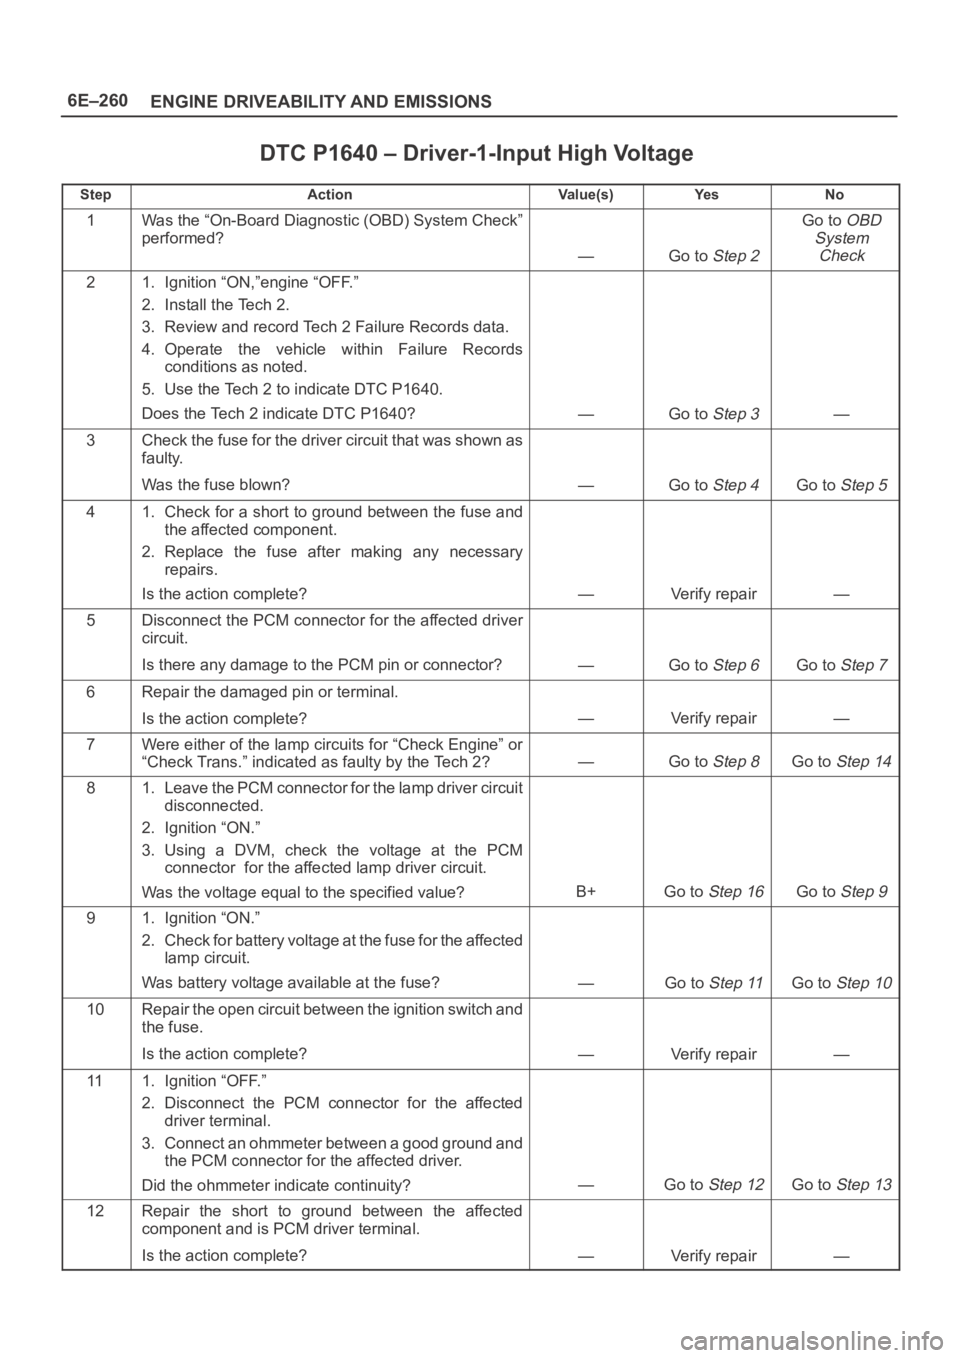
DTC P1640 – Driver-1-Input High Voltage
StepActionVa l u e ( s )Ye sNo
1Was the “On-Board Diagnostic (OBD) System Check”
performed?
—Go to Step 2
Go to OBD
System
Check
21. Ignition “ON,”engine “OFF.”
2. Install the Tech 2.
3. Review and record Tech 2 Failure Records data.
4. Operate the vehicle within Failure Records
conditions as noted.
5. Use the Tech 2 to indicate DTC P1640.
Does the Tech 2 indicate DTC P1640?
—Go to Step 3—
3Check the fuse for the driver circuit that was shown as
faulty.
Was the fuse blown?
—Go to Step 4Go to Step 5
41. Check for a short to ground between the fuse and
the affected component.
2. Replace the fuse after making any necessary
repairs.
Is the action complete?
—Verify repair—
5Disconnect the PCM connector for the affected driver
circuit.
Is there any damage to the PCM pin or connector?
—Go to Step 6Go to Step 7
6Repair the damaged pin or terminal.
Is the action complete?
—Verify repair—
7Were either of the lamp circuits for “Check Engine” or
“Check Trans.” indicated as faulty by the Tech 2?
—Go to Step 8Go to Step 14
81. Leave the PCM connector for the lamp driver circuit
disconnected.
2. Ignition “ON.”
3. Using a DVM, check the voltage at the PCM
connector for the affected lamp driver circuit.
Was the voltage equal to the specified value?
B+Go to Step 16Go to Step 9
91. Ignition “ON.”
2. Check for battery voltage at the fuse for the affected
lamp circuit.
Was battery voltage available at the fuse?
—Go to Step 11Go to Step 10
10Repair the open circuit between the ignition switch and
the fuse.
Is the action complete?
—Verify repair—
111. Ignition “OFF.”
2. Disconnect the PCM connector for the affected
driver terminal.
3. Connect an ohmmeter between a good ground and
the PCM connector for the affected driver.
Did the ohmmeter indicate continuity?
—Go to Step 12Go to Step 13
12Repair the short to ground between the affected
component and is PCM driver terminal.
Is the action complete?
—Verify repair—
Page 1378 of 6000
6E–261 ENGINE DRIVEABILITY AND EMISSIONS
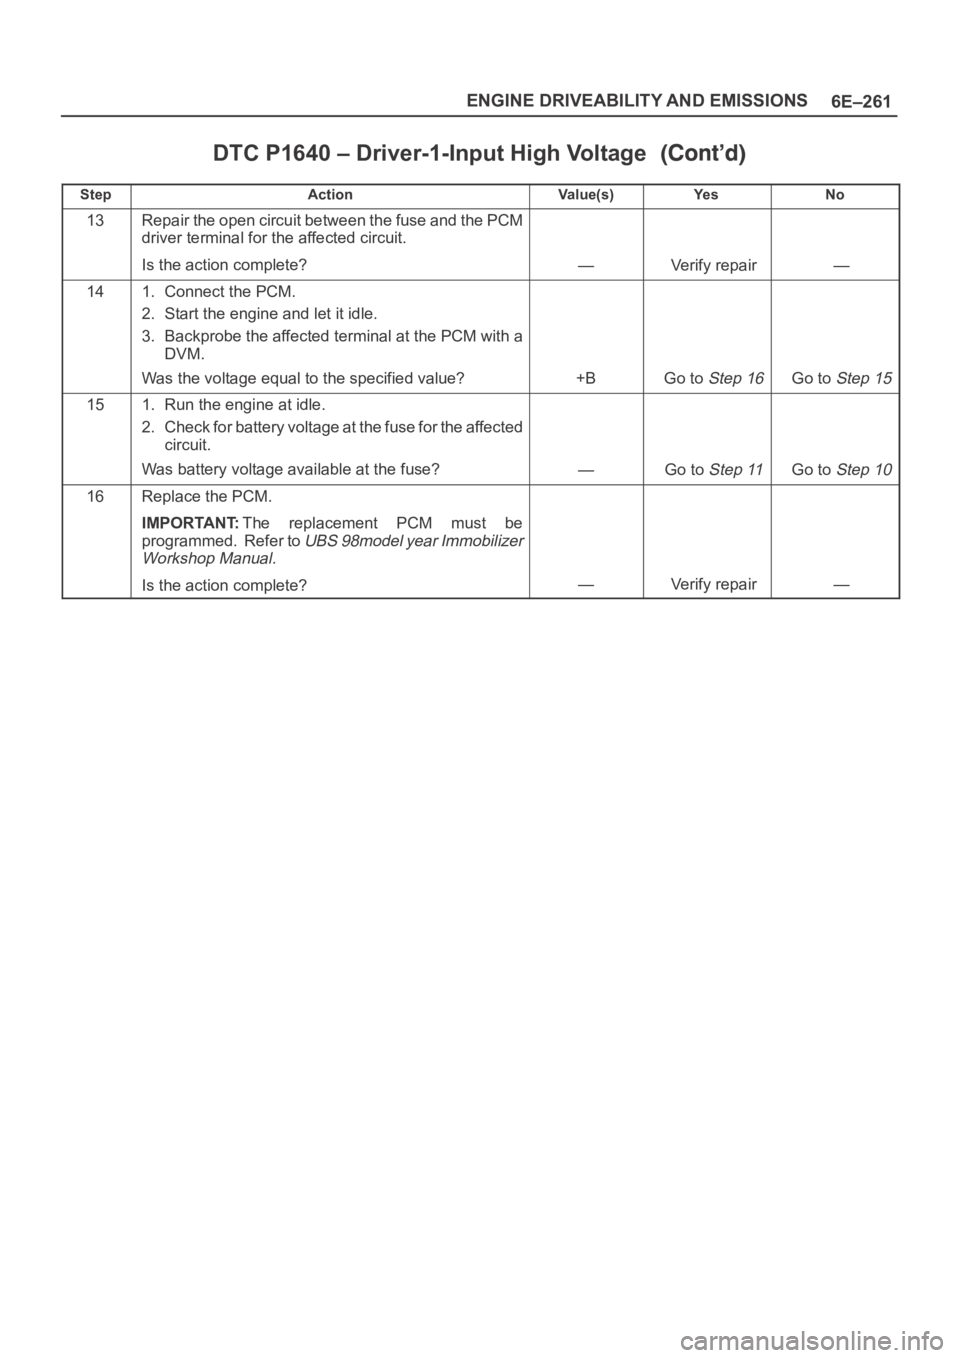
DTC P1640 – Driver-1-Input High Voltage
StepNo Ye s Va l u e ( s ) Action
13Repair the open circuit between the fuse and the PCM
driver terminal for the affected circuit.
Is the action complete?
—Verify repair—
141. Connect the PCM.
2. Start the engine and let it idle.
3. Backprobe the affected terminal at the PCM with a
DVM.
Was the voltage equal to the specified value?
+BGo to Step 16Go to Step 15
151. Run the engine at idle.
2. Check for battery voltage at the fuse for the affected
circuit.
Was battery voltage available at the fuse?
—Go to Step 11Go to Step 10
16Replace the PCM.
IMPORTANT:The replacement PCM must be
programmed. Refer to
UBS 98model year Immobilizer
Workshop Manual.
Is the action complete?—Verify repair—
Page 1408 of 6000
6E–291 ENGINE DRIVEABILITY AND EMISSIONS
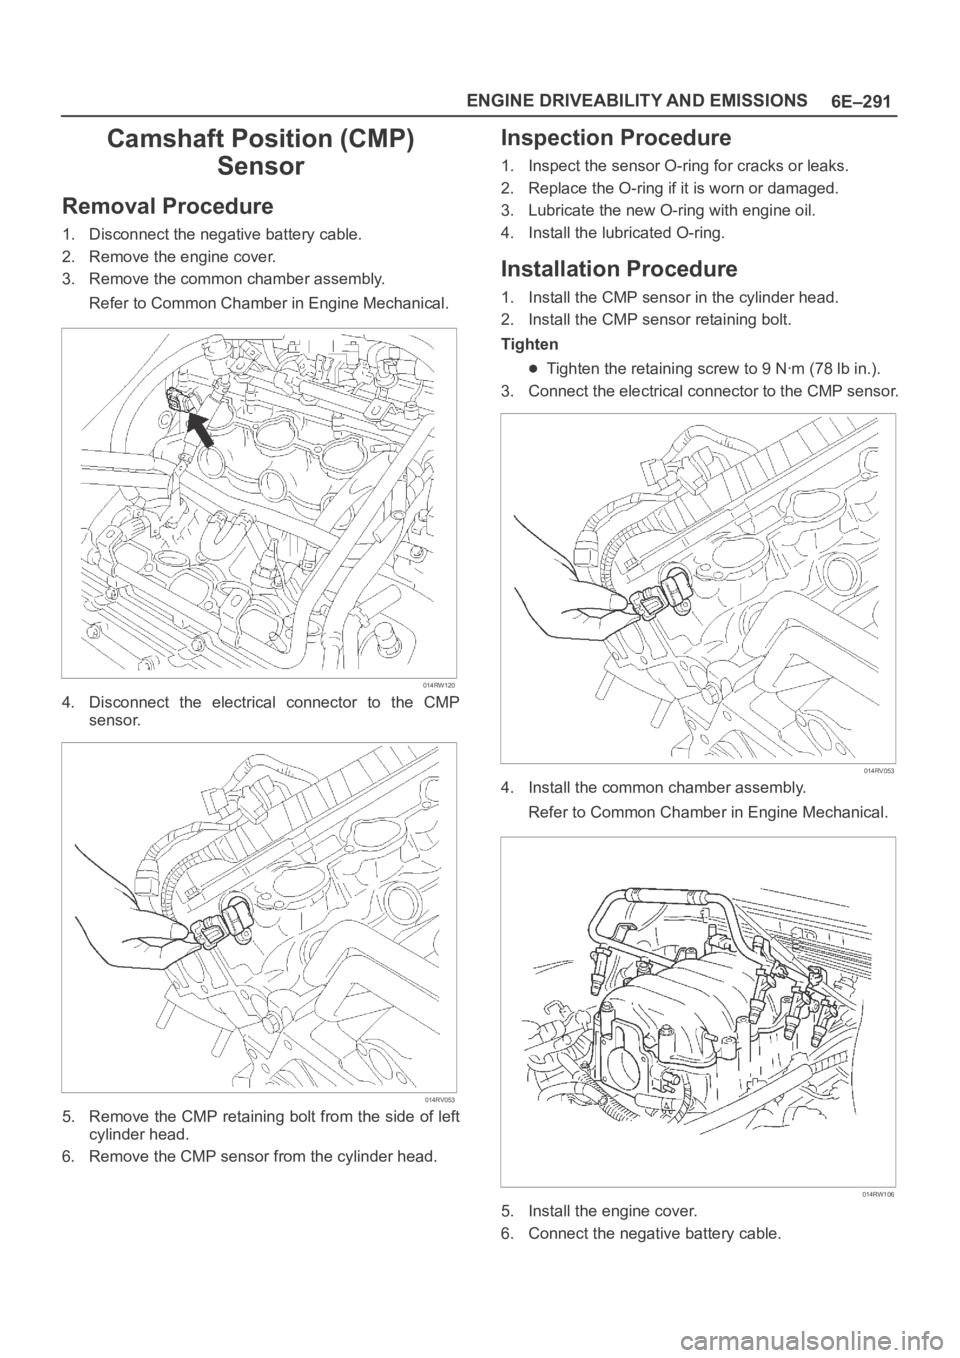
Camshaft Position (CMP)
Sensor
Removal Procedure
1. Disconnect the negative battery cable.
2. Remove the engine cover.
3. Remove the common chamber assembly.
Refer to Common Chamber in Engine Mechanical.
014RW120
4. Disconnect the electrical connector to the CMP
sensor.
014RV053
5. Remove the CMP retaining bolt from the side of left
cylinder head.
6. Remove the CMP sensor from the cylinder head.
Inspection Procedure
1. Inspect the sensor O-ring for cracks or leaks.
2. Replace the O-ring if it is worn or damaged.
3. Lubricate the new O-ring with engine oil.
4. Install the lubricated O-ring.
Installation Procedure
1. Install the CMP sensor in the cylinder head.
2. Install the CMP sensor retaining bolt.
Tighten
Tighten the retaining screw to 9 Nꞏm (78 lb in.).
3. Connect the electrical connector to the CMP sensor.
014RV053
4. Install the common chamber assembly.
Refer to Common Chamber in Engine Mechanical.
014RW106
5. Install the engine cover.
6. Connect the negative battery cable.
Page 1409 of 6000
6E–292
ENGINE DRIVEABILITY AND EMISSIONS
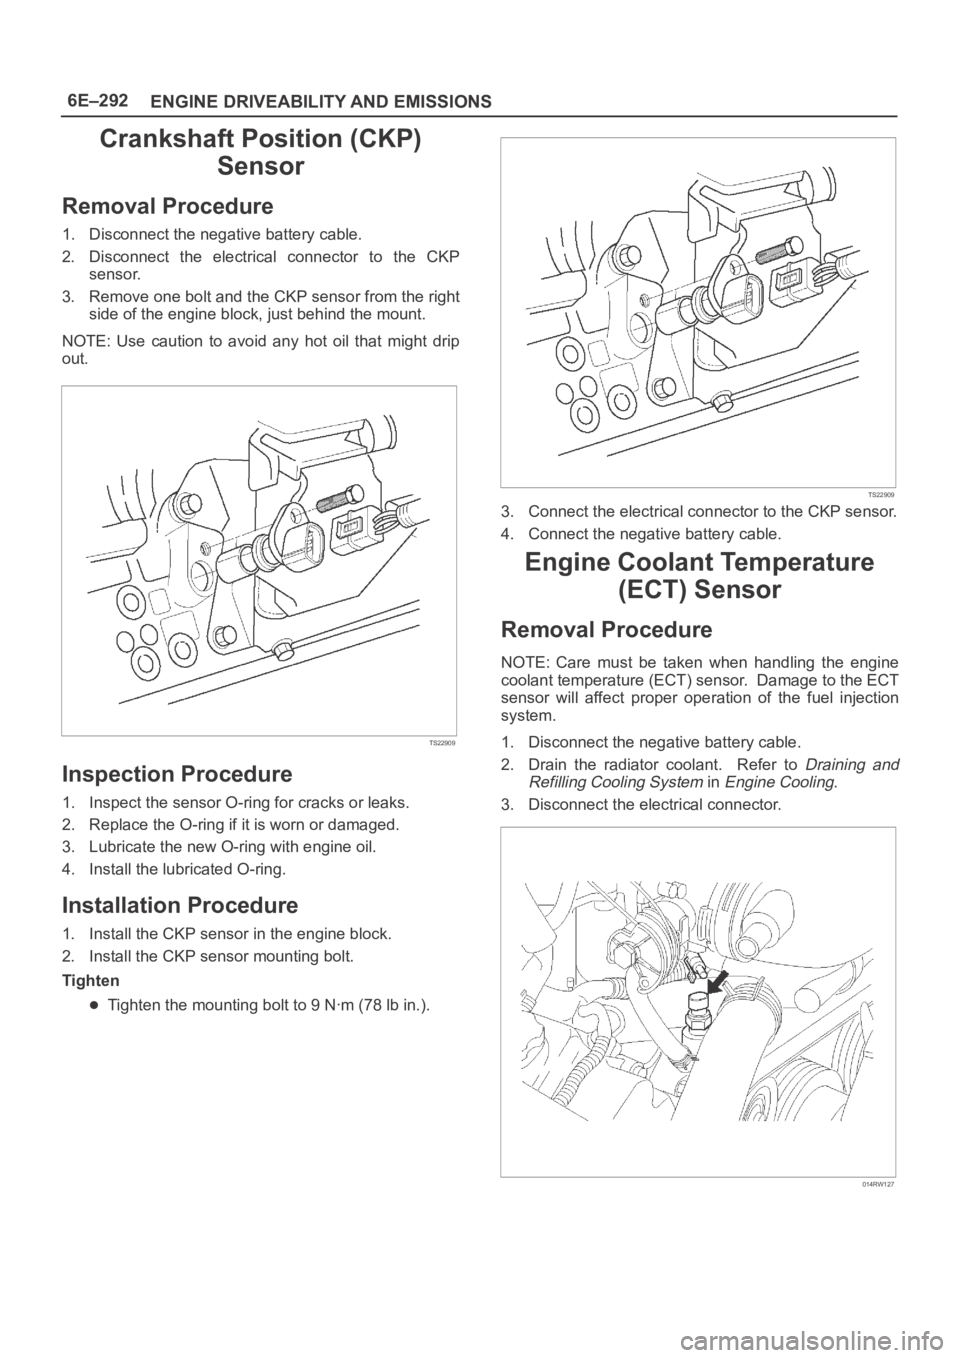
Crankshaft Position (CKP)
Sensor
Removal Procedure
1. Disconnect the negative battery cable.
2. Disconnect the electrical connector to the CKP
sensor.
3. Remove one bolt and the CKP sensor from the right
side of the engine block, just behind the mount.
NOTE: Use caution to avoid any hot oil that might drip
out.
TS22909
Inspection Procedure
1. Inspect the sensor O-ring for cracks or leaks.
2. Replace the O-ring if it is worn or damaged.
3. Lubricate the new O-ring with engine oil.
4. Install the lubricated O-ring.
Installation Procedure
1. Install the CKP sensor in the engine block.
2. Install the CKP sensor mounting bolt.
Tighten
Tighten the mounting bolt to 9 Nꞏm (78 lb in.).
TS22909
3. Connect the electrical connector to the CKP sensor.
4. Connect the negative battery cable.
Engine Coolant Temperature
(ECT) Sensor
Removal Procedure
NOTE: Care must be taken when handling the engine
coolant temperature (ECT) sensor. Damage to the ECT
sensor will affect proper operation of the fuel injection
system.
1. Disconnect the negative battery cable.
2. Drain the radiator coolant. Refer to
Draining and
Refilling Cooling System
in Engine Cooling.
3. Disconnect the electrical connector.
014RW127