1998 OPEL FRONTERA fuel
[x] Cancel search: fuelPage 1206 of 6000
6E–89 ENGINE DRIVEABILITY AND EMISSIONS
The valve or valve seat within the fuel pressure
regulator.
The fuel injector(s).
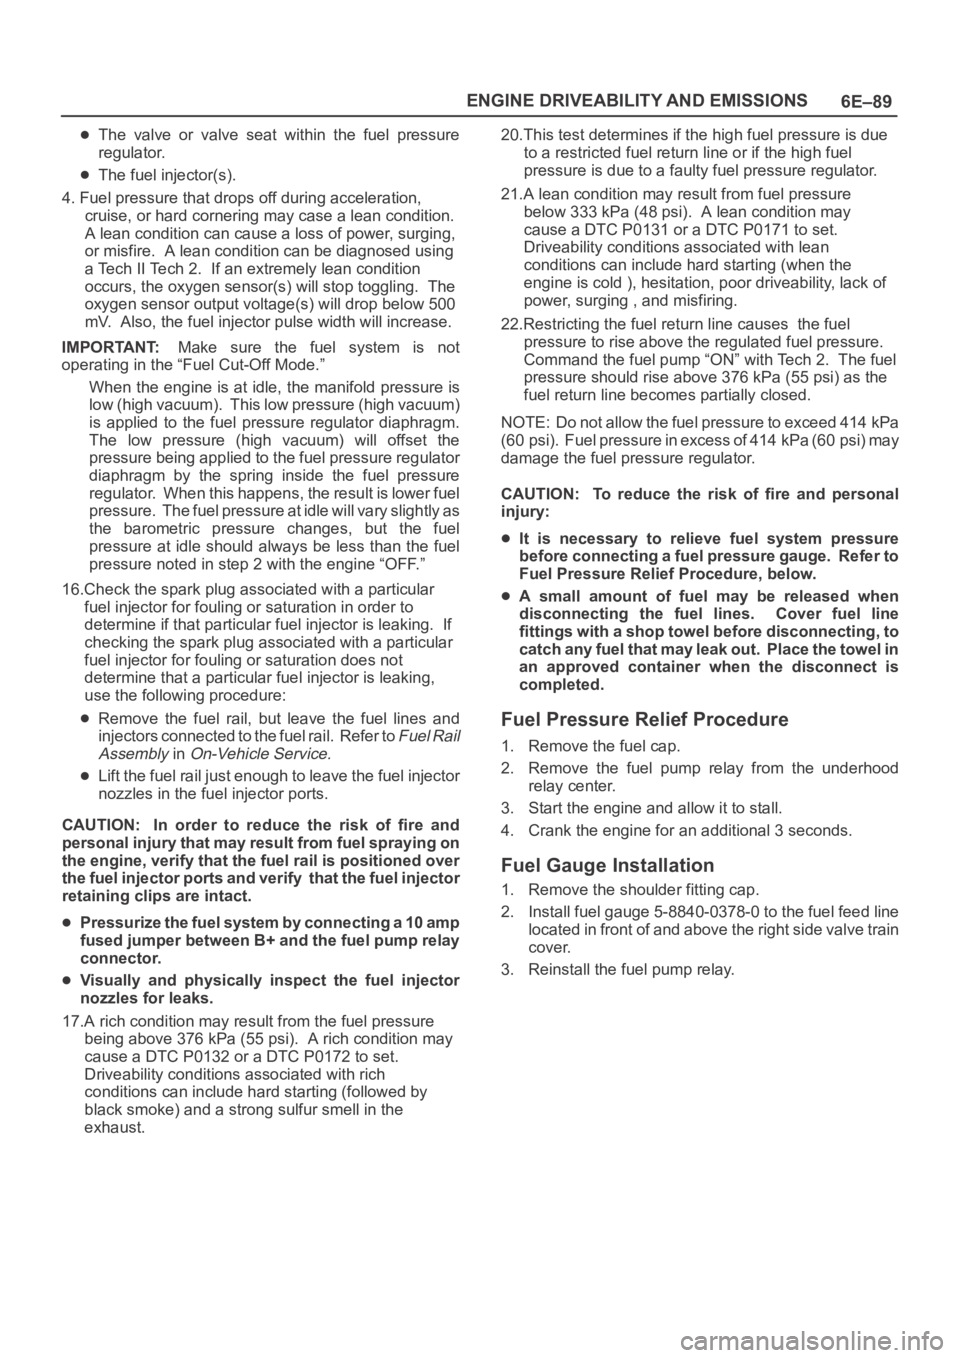
4. Fuel pressure that drops off during acceleration,
cruise, or hard cornering may case a lean condition.
A lean condition can cause a loss of power, surging,
or misfire. A lean condition can be diagnosed using
a Tech II Tech 2. If an extremely lean condition
occurs, the oxygen sensor(s) will stop toggling. The
oxygen sensor output voltage(s) will drop below 500
mV. Also, the fuel injector pulse width will increase.
IMPORTANT:Make sure the fuel system is not
operating in the “Fuel Cut-Off Mode.”
When the engine is at idle, the manifold pressure is
low (high vacuum). This low pressure (high vacuum)
is applied to the fuel pressure regulator diaphragm.
The low pressure (high vacuum) will offset the
pressure being applied to the fuel pressure regulator
diaphragm by the spring inside the fuel pressure
regulator. When this happens, the result is lower fuel
pressure. The fuel pressure at idle will vary slightly as
the barometric pressure changes, but the fuel
pressure at idle should always be less than the fuel
pressure noted in step 2 with the engine “OFF.”
16.Check the spark plug associated with a particular
fuel injector for fouling or saturation in order to
determine if that particular fuel injector is leaking. If
checking the spark plug associated with a particular
fuel injector for fouling or saturation does not
determine that a particular fuel injector is leaking,
use the following procedure:
Remove the fuel rail, but leave the fuel lines and
injectors connected to the fuel rail. Refer to
Fuel Rail
Assembly
in On-Vehicle Service.
Lift the fuel rail just enough to leave the fuel injector
nozzles in the fuel injector ports.
CAUTION: In order to reduce the risk of fire and
personal injury that may result from fuel spraying on
the engine, verify that the fuel rail is positioned over
the fuel injector ports and verify that the fuel injector
retaining clips are intact.
Pressurize the fuel system by connecting a 10 amp
fused jumper between B+ and the fuel pump relay
connector.
Visually and physically inspect the fuel injector
nozzles for leaks.
17.A rich condition may result from the fuel pressure
being above 376 kPa (55 psi). A rich condition may
cause a DTC P0132 or a DTC P0172 to set.
Driveability conditions associated with rich
conditions can include hard starting (followed by
black smoke) and a strong sulfur smell in the
exhaust.20.This test determines if the high fuel pressure is due
to a restricted fuel return line or if the high fuel
pressure is due to a faulty fuel pressure regulator.
21.A lean condition may result from fuel pressure
below 333 kPa (48 psi). A lean condition may
cause a DTC P0131 or a DTC P0171 to set.
Driveability conditions associated with lean
conditions can include hard starting (when the
engine is cold ), hesitation, poor driveability, lack of
power, surging , and misfiring.
22.Restricting the fuel return line causes the fuel
pressure to rise above the regulated fuel pressure.
Command the fuel pump “ON” with Tech 2. The fuel
pressure should rise above 376 kPa (55 psi) as the
fuel return line becomes partially closed.
NOTE: Do not allow the fuel pressure to exceed 414 kPa
( 6 0 p s i ) . F u e l p r e s s u r e i n e x c e s s o f 4 1 4 k P a ( 6 0 p s i ) m a y
damage the fuel pressure regulator.
CAUTION: To reduce the risk of fire and personal
injury:
It is necessary to relieve fuel system pressure
before connecting a fuel pressure gauge. Refer to
Fuel Pressure Relief Procedure, below.
A small amount of fuel may be released when
disconnecting the fuel lines. Cover fuel line
fittings with a shop towel before disconnecting, to
catch any fuel that may leak out. Place the towel in
an approved container when the disconnect is
completed.
Fuel Pressure Relief Procedure
1. Remove the fuel cap.
2. Remove the fuel pump relay from the underhood
relay center.
3. Start the engine and allow it to stall.
4. Crank the engine for an additional 3 seconds.
Fuel Gauge Installation
1. Remove the shoulder fitting cap.
2. Install fuel gauge 5-8840-0378-0 to the fuel feed line
located in front of and above the right side valve train
cover.
3. Reinstall the fuel pump relay.
Page 1207 of 6000
6E–90
ENGINE DRIVEABILITY AND EMISSIONS
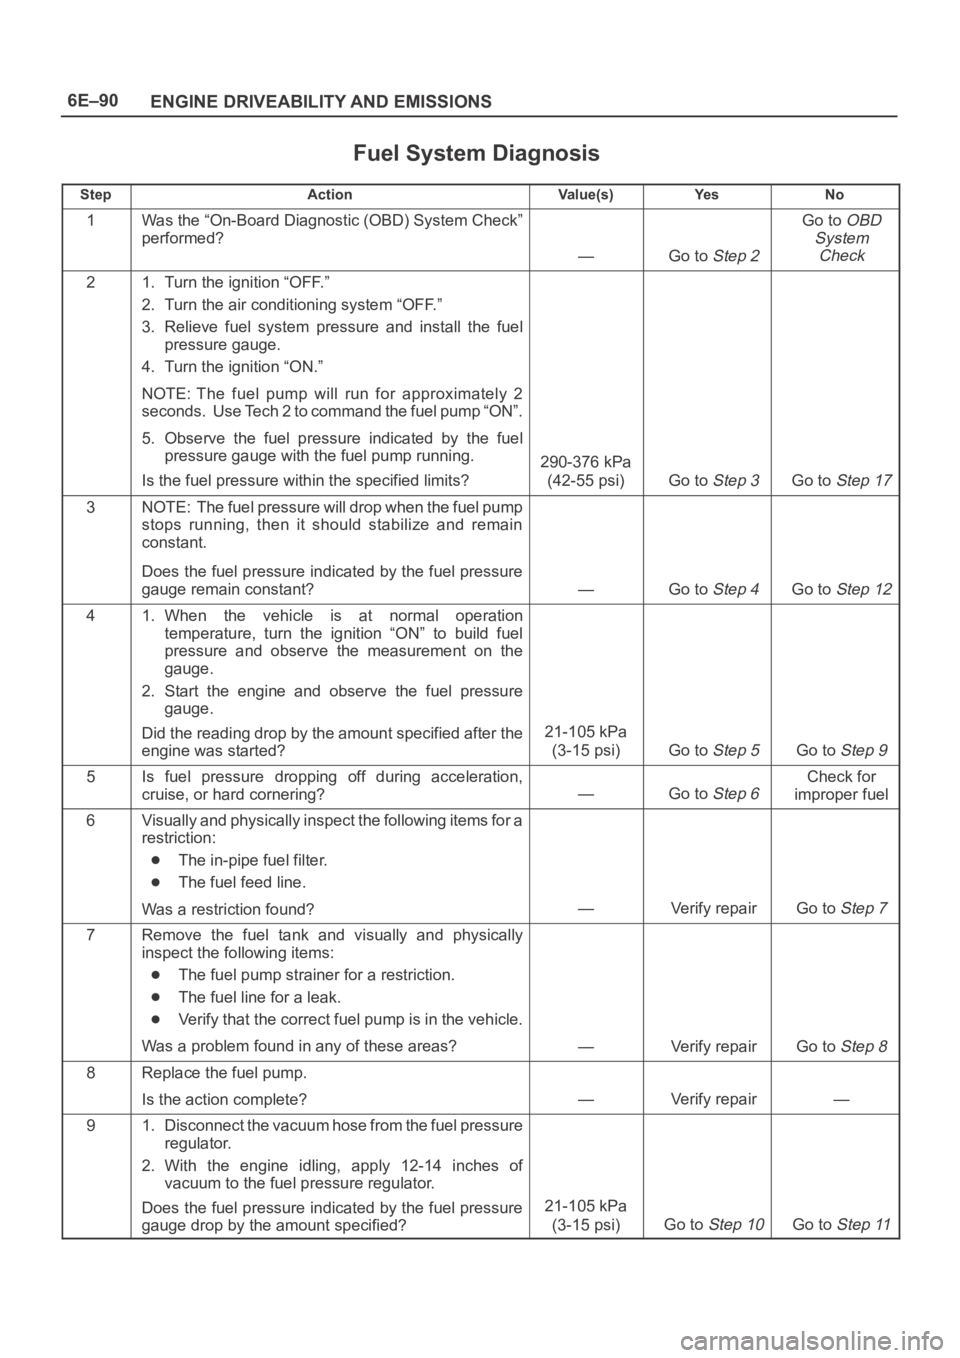
Fuel System Diagnosis
StepActionVa l u e ( s )Ye sNo
1Was the “On-Board Diagnostic (OBD) System Check”
performed?
—Go to Step 2
Go to OBD
System
Check
21. Turn the ignition “OFF.”
2. Turn the air conditioning system “OFF.”
3. Relieve fuel system pressure and install the fuel
pressure gauge.
4. Turn the ignition “ON.”
NOTE: The fuel pump will run for approximately 2
seconds. Use Tech 2 to command the fuel pump “ON”.
5. Observe the fuel pressure indicated by the fuel
pressure gauge with the fuel pump running.
Is the fuel pressure within the specified limits?
290-376 kPa
(42-55 psi)
Go to Step 3Go to Step 17
3NOTE: The fuel pressure will drop when the fuel pump
stops running, then it should stabilize and remain
constant.
Does the fuel pressure indicated by the fuel pressure
gauge remain constant?
—Go to Step 4Go to Step 12
41. When the vehicle is at normal operation
temperature, turn the ignition “ON” to build fuel
pressure and observe the measurement on the
gauge.
2. Start the engine and observe the fuel pressure
gauge.
Did the reading drop by the amount specified after the
engine was started?
21-105 kPa
(3-15 psi)
Go to Step 5Go to Step 9
5Is fuel pressure dropping off during acceleration,
cruise, or hard cornering?
—Go to Step 6
Check for
improper fuel
6Visually and physically inspect the following items for a
restriction:
The in-pipe fuel filter.
The fuel feed line.
Was a restriction found?
—Verify repairGo to Step 7
7Remove the fuel tank and visually and physically
inspect the following items:
The fuel pump strainer for a restriction.
The fuel line for a leak.
Verify that the correct fuel pump is in the vehicle.
Was a problem found in any of these areas?
—Verify repairGo to Step 8
8Replace the fuel pump.
Is the action complete?
—Verify repair—
91. Disconnect the vacuum hose from the fuel pressure
regulator.
2. With the engine idling, apply 12-14 inches of
vacuum to the fuel pressure regulator.
Does the fuel pressure indicated by the fuel pressure
gauge drop by the amount specified?
21-105 kPa
(3-15 psi)
Go to Step 10Go to Step 11
Page 1208 of 6000
6E–91 ENGINE DRIVEABILITY AND EMISSIONS
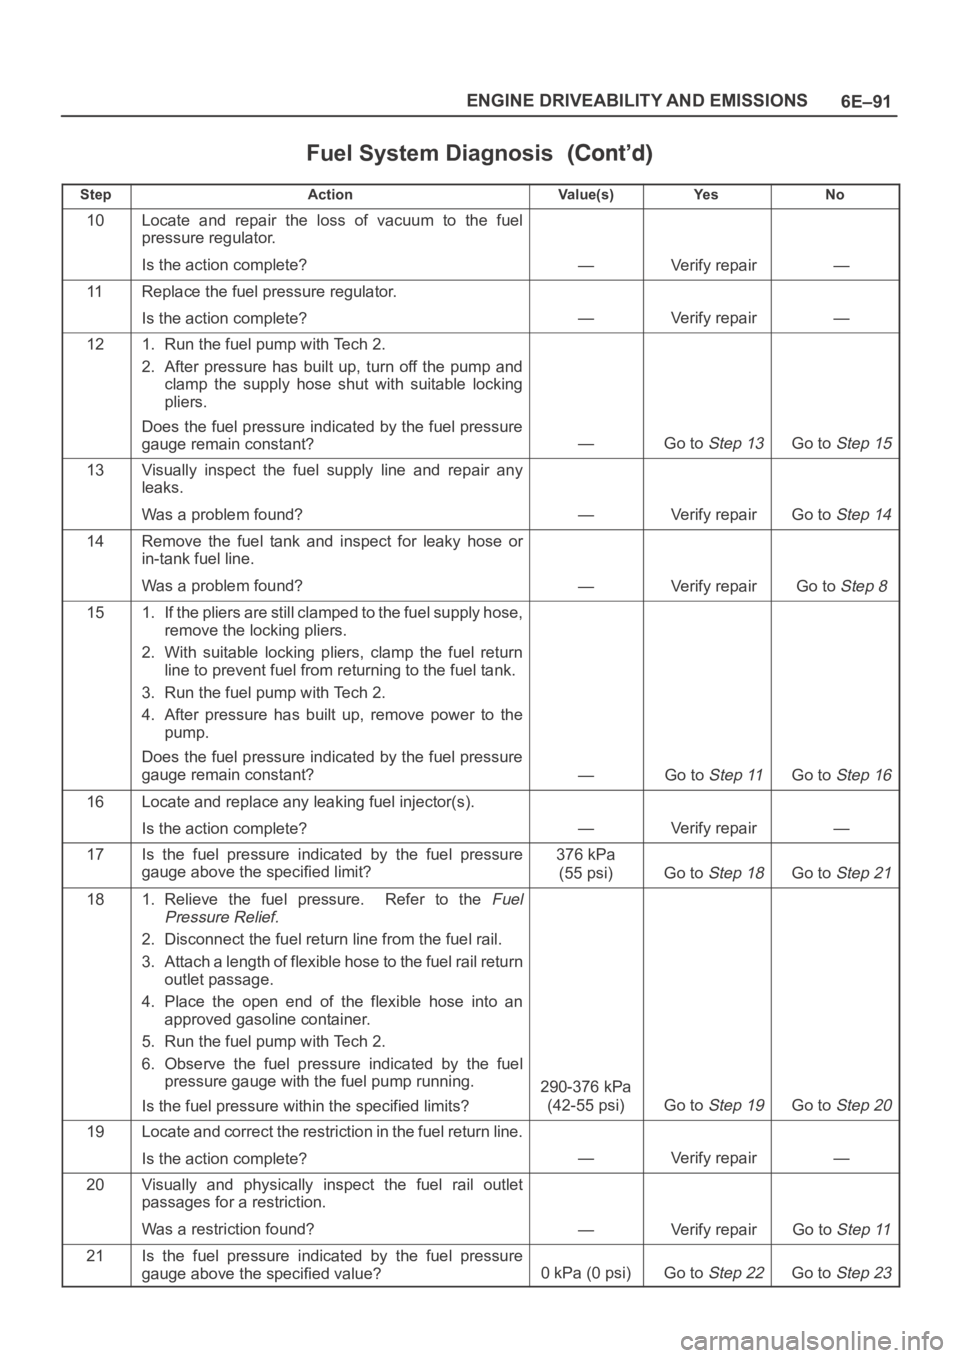
Fuel System Diagnosis
StepNo Ye s Va l u e ( s ) Action
10Locate and repair the loss of vacuum to the fuel
pressure regulator.
Is the action complete?
—Verify repair—
11Replace the fuel pressure regulator.
Is the action complete?
—Verify repair—
121. Run the fuel pump with Tech 2.
2. After pressure has built up, turn off the pump and
clamp the supply hose shut with suitable locking
pliers.
Does the fuel pressure indicated by the fuel pressure
gauge remain constant?
—Go to Step 13Go to Step 15
13Visually inspect the fuel supply line and repair any
leaks.
Was a problem found?
—Verify repairGo to Step 14
14Remove the fuel tank and inspect for leaky hose or
in-tank fuel line.
Was a problem found?
—Verify repairGo to Step 8
151. If the pliers are still clamped to the fuel supply hose,
remove the locking pliers.
2. With suitable locking pliers, clamp the fuel return
line to prevent fuel from returning to the fuel tank.
3. Run the fuel pump with Tech 2.
4. After pressure has built up, remove power to the
pump.
Does the fuel pressure indicated by the fuel pressure
gauge remain constant?
—Go to Step 11Go to Step 16
16Locate and replace any leaking fuel injector(s).
Is the action complete?
—Verify repair—
17Is the fuel pressure indicated by the fuel pressure
gauge above the specified limit?376 kPa
(55 psi)
Go to Step 18Go to Step 21
181. Relieve the fuel pressure. Refer to the Fuel
Pressure Relief.
2. Disconnect the fuel return line from the fuel rail.
3. Attach a length of flexible hose to the fuel rail return
outlet passage.
4. Place the open end of the flexible hose into an
approved gasoline container.
5. Run the fuel pump with Tech 2.
6. Observe the fuel pressure indicated by the fuel
pressure gauge with the fuel pump running.
Is the fuel pressure within the specified limits?
290-376 kPa
(42-55 psi)
Go to Step 19Go to Step 20
19Locate and correct the restriction in the fuel return line.
Is the action complete?
—Verify repair—
20Visually and physically inspect the fuel rail outlet
passages for a restriction.
Was a restriction found?
—Verify repairGo to Step 11
21Is the fuel pressure indicated by the fuel pressure
gauge above the specified value?
0kPa (0psi)Go to Step 22Go to Step 23
Page 1209 of 6000
6E–92
ENGINE DRIVEABILITY AND EMISSIONS
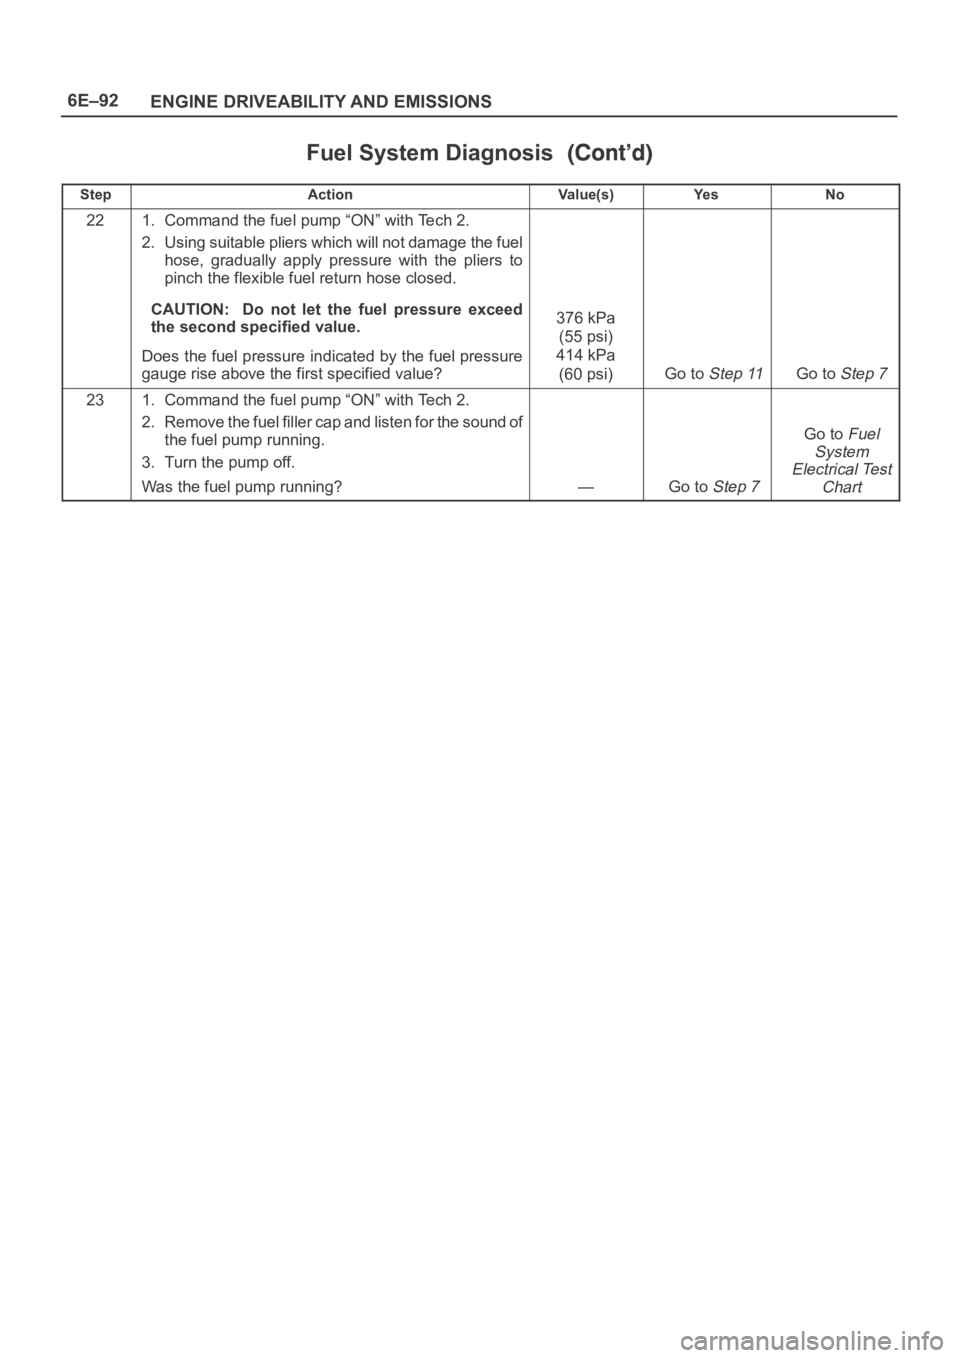
Fuel System Diagnosis
StepNo Ye s Va l u e ( s ) Action
221. Command the fuel pump “ON” with Tech 2.
2. Using suitable pliers which will not damage the fuel
hose, gradually apply pressure with the pliers to
pinch the flexible fuel return hose closed.
CAUTION: Do not let the fuel pressure exceed
the second specified value.
Does the fuel pressure indicated by the fuel pressure
gauge rise above the first specified value?
376 kPa
(55 psi)
414 kPa
(60 psi)
Go to Step 11Go to Step 7
231. Command the fuel pump “ON” with Tech 2.
2. Remove the fuel filler cap and listen for the sound of
the fuel pump running.
3. Turn the pump off.
Was the fuel pump running?
—Go to Step 7
Go to Fuel
System
Electrical Test
Chart
Page 1210 of 6000
6E–93 ENGINE DRIVEABILITY AND EMISSIONS
Idle Air Control (IAC) System Check
Circuit Description
The powertrain control module (PCM) controls engine
idle speed with the idle air control (IAC) valve. To increase
idle speed, the PCM retracts the IAC valve pintle away
from its seat, allowing more air to bypass the throttle bore.
To decrease idle speed, it extends the IAC valve pintle
towards its seat, reducing by pass air flow. Tech 2 will
read the PCM commands to the IAC valve in counts.
Higher counts indicate more air bypass (higher idle).
Lower counts indicate less air is allowed to bypass (lower
idle).
Diagnostic Aids
A slow, unstable, or fast idle may be caused by a non-IAC
system problem that cannot be overcome by the IAC
valve. Out of control range IAC Tech 2 counts will be
above 60 if idle is too low, and zero counts if idle is too
high. The following checks should be made to repair a
non-IAC system problem:
Vacuum leak (high idle) – If idle is too high, stop the
engine. Fully extend (low) IAC with the Tech 2. Start
the engine. If idle speed is above 800 RPM, locate and
correct the vacuum leak, including the PCV system.
Check for binding of the throttle blade or linkage.
Lean heated oxygen sensor signal (high air/fuel ratio) –
The idle speed may be too high or too low. Engine
speed may vary up and down, and disconnecting the
IAC valve does not help. Diagnostic trouble codes
P0131, P0151, P0171, or P0174 may be set. Tech 2
oxygen (O2) voltage will be less than 100 mV (0.1 V).
Check for low regulated fuel pressure, water in fuel, or
a restricted injector.
Rich heated oxygen sensor signal (low air/fuel ratio) –
The idle speed will be too low. Tech 2 IAC counts will
usually be above 80. The system is obviously rich and
may exhibit black smoke in the exhaust.
Tech 2 O2 voltage will be fixed at about 750 mV (0.75
V). Check for high fuel pressure, or a leaking or
sticking injector. A silicon-contaminated heated
oxygen sensor will show an O2 voltage slow to
respond on Tech 2.
Throttle body – Remove the IAC valve and inspect the
bore for foreign material.
IAC valve electrical connections – IAC valve
connections should be carefully checked for proper
contact.
PCV valve – An incorrect or faulty PCV valve may
result in an incorrect idle speed. Refer to
Diagnosis,
Rough Idle, Stalling.
If intermittent poor driveability or
idle symptoms are resolved by disconnecting the IAC,
carefully recheck the connections and valve terminal
resistance, or replace the IAC.
Test Description
Number(s) below refer to the step number(s) on the
Diagnostic Chart.
1. The Tech 2 is used to extend and retract the IAC
valve. Valve movement is verified by an engine
speed change. If no change in engine speed
occurs, the valve can be resettled when removed
from the throttle body.
2. This step checks the quality of the IAC movement in
step 1. Between 700 revolutions per minute (RPM)
and about 1500 RPM, the engine speed should
change smoothly with each flash of the tester light
in both extend and retract. If the IAC valve is
retracted beyond the control range (about 1500
RPM), it may take many flashes to extend the IAC
valve before engine speed will begin to drop. This
is normal on certain engines. Fully extending the
IAC may cause engine stall. This may be normal.
Page 1213 of 6000

6E–96
ENGINE DRIVEABILITY AND EMISSIONS
Knock Sensor (KS) System Check
(Engine Knock, Poor Performance, or Poor Economy)
StepActionVa l u e ( s )Ye sNo
1Is DTC P0325 or P0327 set?
—
Go to DTC
P0325 or
DTC P0327
Go to Step 2
2Run the engine at 1500 RPM.
Is there an internal engine knock?
—Go to Step 3Go to Step 4
3Repair the mechanical problem.
Is the action complete?
—Verify repair—
41. Install Tech 2.
2. Turn the ignition “ON.”
3. Cycle through the list until “Knock Retard” is
displayed.
Is knock retard at the specified value?
0Go to Step 6Go to Step 7
5Replace the PCM.
IMPORTANT:The replacement PCM must be
programmed. Refer to
UBS 98model year Immobilizer
Workshop Manual.
Is the action complete?—Verify repair—
61. Start the engine.
2. Monitor the knock retard display on Tech 2 while
changing the throttle setting to place different loads
on the engine.
Is knock retard at the specified value? (Turn the ignition
“OFF.”)
0Go to Step 9Go to Step 7
71. At the rear of the engine, behind the rear fuel
injector on the lift side, disconnect the 2-wire knock
sensor harness connector.
2. Attach the positive lead of DVM to B+.
3. On the m ain harness side of the connector, use th e
negative lead of the DVM to probe the connector pin
that is connected to the black wire.
Dose the DVM indicate the specified value?
(Reconnect the knock sensor harness.)
B+Go to Step 9Go to Step 8
8Repair the open black wire ground for the shield which
prevents stray electromagnetic pulses from affecting
the knock signal.
Is the action complete?
—Verify repair—
91. Reconnect the wire harness.
2. Set a DVM to AC voltage.
3. With the DVM, backprobe the PCM connector at
A2.
4. Tap the engine lift brackprobe with a socket
extension.
Did the DVM show an increase in AC voltage while
tapping on the lift bracket?
—System OKGo to Step 10
10Replace the knock sensor.
Is the action complete?
—Verify repair—
Page 1214 of 6000
6E–97 ENGINE DRIVEABILITY AND EMISSIONS
Exhaust Gas Recirculation (EGR) System Check
D06RW106
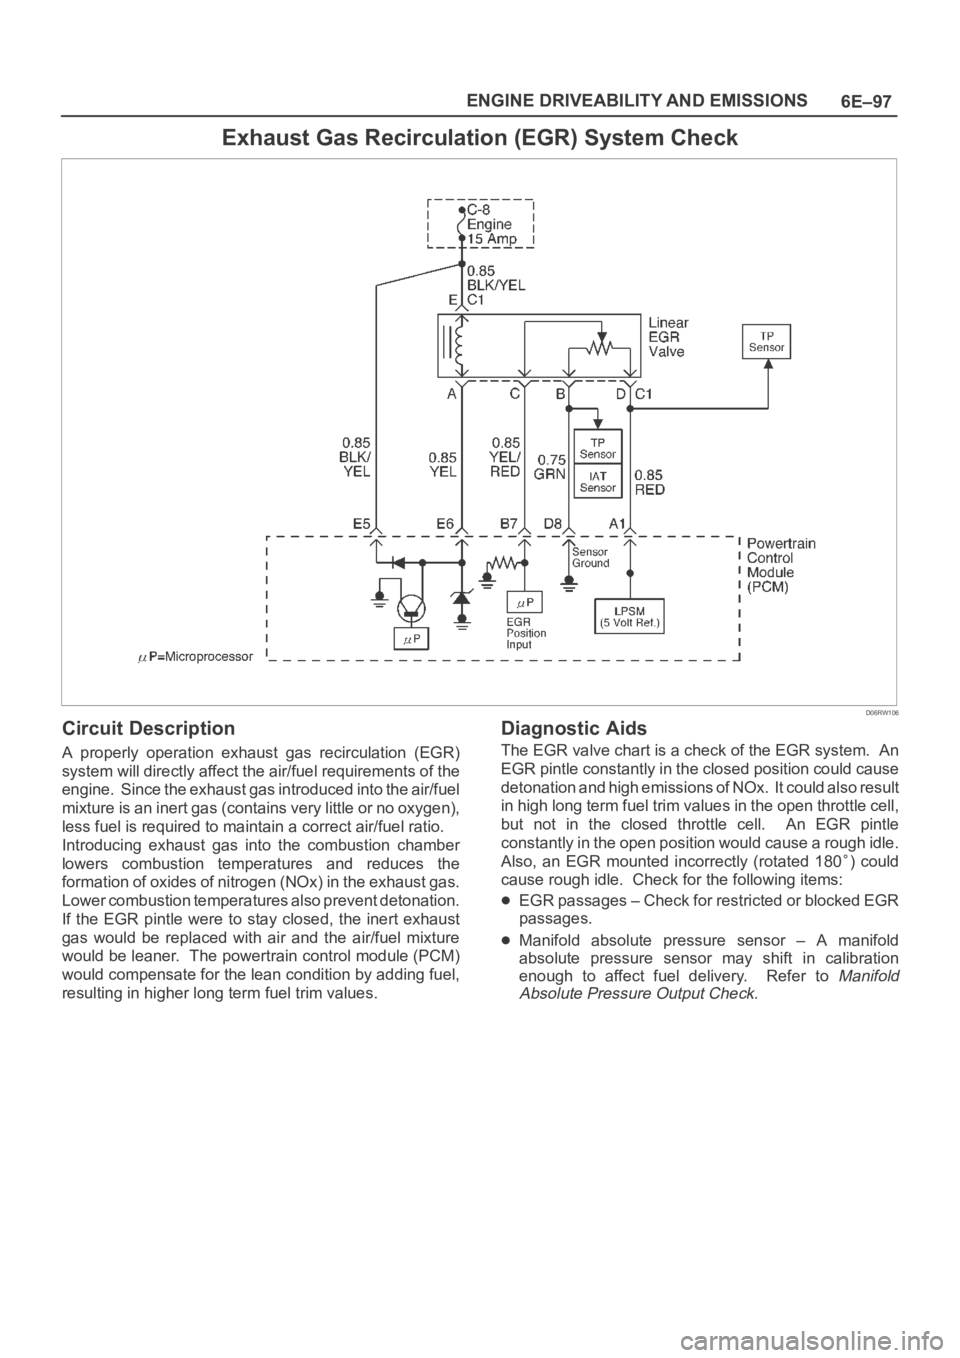
Circuit Description
A properly operation exhaust gas recirculation (EGR)
system will directly affect the air/fuel requirements of the
engine. Since the exhaust gas introduced into the air/fuel
mixture is an inert gas (contains very little or no oxygen),
less fuel is required to maintain a correct air/fuel ratio.
Introducing exhaust gas into the combustion chamber
lowers combustion temperatures and reduces the
formation of oxides of nitrogen (NOx) in the exhaust gas.
Lower combustion temperatures also prevent detonation.
If the EGR pintle were to stay closed, the inert exhaust
gas would be replaced with air and the air/fuel mixture
would be leaner. The powertrain control module (PCM)
would compensate for the lean condition by adding fuel,
resulting in higher long term fuel trim values.
Diagnostic Aids
The EGR valve chart is a check of the EGR system. An
EGR pintle constantly in the closed position could cause
detonation and high emissions of NOx. It could also result
in high long term fuel trim values in the open throttle cell,
but not in the closed throttle cell. An EGR pintle
constantly in the open position would cause a rough idle.
Also, an EGR mounted incorrectly (rotated 180
) could
cause rough idle. Check for the following items:
EGR passages – Check for restricted or blocked EGR
passages.
Manifold absolute pressure sensor – A manifold
absolute pressure sensor may shift in calibration
enough to affect fuel delivery. Refer to
Manifold
Absolute Pressure Output Check.
Page 1221 of 6000
6E–104
ENGINE DRIVEABILITY AND EMISSIONS
Diagnostic Trouble Code (DTC) P0101 MAF System Performance
D06RW103
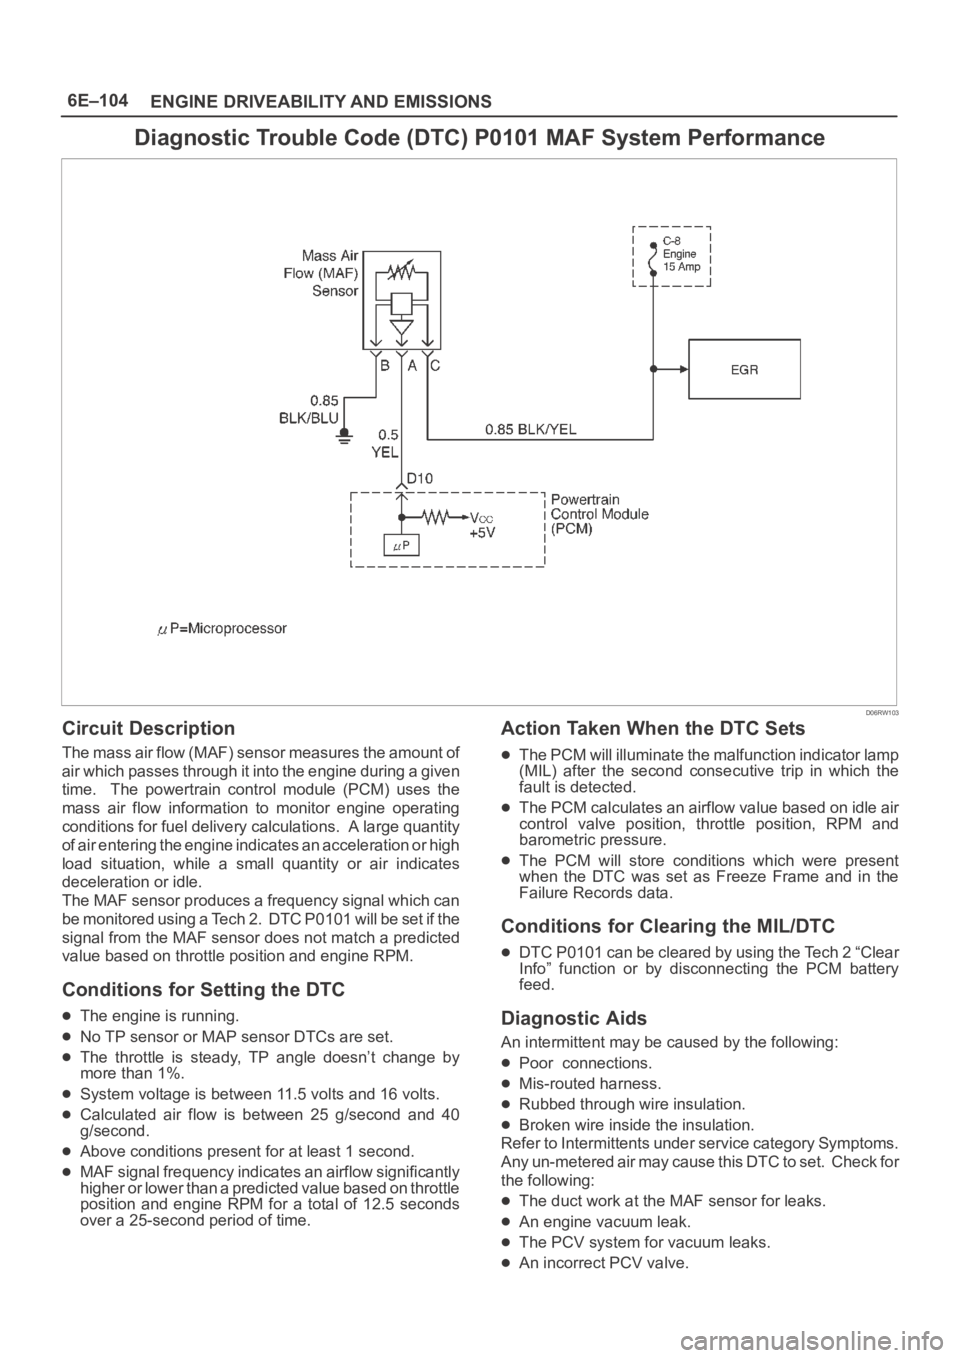
Circuit Description
The mass air flow (MAF) sensor measures the amount of
air which passes through it into the engine during a given
time. The powertrain control module (PCM) uses the
mass air flow information to monitor engine operating
conditions for fuel delivery calculations. A large quantity
of air entering the engine indicates an acceleration or high
load situation, while a small quantity or air indicates
deceleration or idle.
The MAF sensor produces a frequency signal which can
be monitored using a Tech 2. DTC P0101 will be set if the
signal from the MAF sensor does not match a predicted
value based on throttle position and engine RPM.
Conditions for Setting the DTC
The engine is running.
No TP sensor or MAP sensor DTCs are set.
The throttle is steady, TP angle doesn’t change by
more than 1%.
System voltage is between 11.5 volts and 16 volts.
Calculated air flow is between 25 g/second and 40
g/second.
Above conditions present for at least 1 second.
MAF signal frequency indicates an airflow significantly
higher or lower than a predicted value based on throttle
position and engine RPM for a total of 12.5 seconds
over a 25-second period of time.
Action Taken When the DTC Sets
The PCM will illuminate the malfunction indicator lamp
(MIL) after the second consecutive trip in which the
fault is detected.
The PCM calculates an airflow value based on idle air
control valve position, throttle position, RPM and
barometric pressure.
The PCM will store conditions which were present
when the DTC was set as Freeze Frame and in the
Failure Records data.
Conditions for Clearing the MIL/DTC
DTC P0101 can be cleared by using the Tech 2 “Clear
Info” function or by disconnecting the PCM battery
feed.
Diagnostic Aids
An intermittent may be caused by the following:
Poor connections.
Mis-routed harness.
Rubbed through wire insulation.
Broken wire inside the insulation.
Refer to Intermittents under service category Symptoms.
Any un-metered air may cause this DTC to set. Check for
the following:
The duct work at the MAF sensor for leaks.
An engine vacuum leak.
The PCV system for vacuum leaks.
An incorrect PCV valve.