1998 OLDSMOBILE SILHOUETTE key
[x] Cancel search: keyPage 146 of 444
Programmable Modes
Your vehicle can be programmed to one of the
following modes.
Mode 1: Both Features Off (Doors will always lock
immediately when you press LOCK on the the power
door lock switch or the remote lock control transmitter,
if equipped.)
Mode 2: Lockout Deterrent Only (If you leave your key
in the ignition with the driver’s door open, you won’t be
able to lock the doors with the power door locks).
Mode 3: Last Door Closed Locking Only (If the power
door lock switch or remote lock control transmitter (if
equipped) is used to lock the vehicle while any door or
the liftgate is open, you will hear three chimes. The
doors will not lock. Five seconds after the last door
is
closed, all doors and liftgate will lock.)
Mode 4: Both Features On (This combines Modes 2
and 3.)
Vehicles are delivered programmed in Mode 4.
To change the mode:
1. Follow the instructions for “Entering Programming
Mode” listed previously.
2. Press UNLOCK on the power door lock switch.
3.
4.
Count the number of chimes you hear. The number
of chimes tells you which mode your vehicle
is in.
You can change the mode by pressing
UNLOCK again.
Repeat Step
2 until you hear the number of chimes
that matches the mode you want.
The mode you selected is now set.
You can either exit
the programming mode by following the instructions
later in this section or program the next feature available
on your vehicle.
Remote Driver’s Unlock Control
With the Remote Driver’s Unlock Control feature, you
can program your vehicle to do the following:
0
0
When you press UNLOCK on your remote lock
control transmitter, the driver’s door will unlock and,
When
you press UNLOCK on your remote lock
control transmitter again within five seconds, all
doors and the liftgate will unlock.
To customize this feature to your preference, see
“Programmable Modes” following.
2-44
ProCarManuals.com
Page 150 of 444
Arming and Disarming the Content Theft-Deterrent System
To arm and disarm the Content Theft-Deterrent system,
the system must be turned on by using Modes 1,2 or
4
listed previously in this section under “Content
Theft-Deterrent System.”
With the Arming and Disarming feature, you can
program the vehicle to do the following:
Arm the system when you lock the doors using either
power door lock switch while any door or the liftgate
is open and the key
is removed from the ignition.
0 Arm the system when you lock the doors with your
key or remote lock control transmitter and the key is
removed from the ignition.
your key or remote lock control transmitter.
0 Disarm the system when you unlock the doors with
To customize this feature to your preference, see
“Programmable Modes” following.
Programmable Modes
Your vehicle can be programmed to one of the
following modes.
Mode 1: Power Door Lock Switch Arming Off
0 The system will arm when you lock the doors with
your key or remote lock control transmitter. The key
must be removed from the ignition when
you lock
the doors or
the Content Theft-Deterrent system will
not arm.
The system will disarm when you unlock the doors
with your key or remote lock control transmitter.
Mode 2: Remote Lock Control Transmitter
ArdDisarm Only
The system will arm when you lock the doors with
your remote lock control transmitter. The key must
be removed from the ignition when you lock the
doors or the Content Theft-Deterrent system
will not
arm.
The system will disarm when you unlock the doors
with your remote lock control transmitter.
2-48
ProCarManuals.com
Page 151 of 444
NOTE: While this mode provides increased security, it
can be a problem if your remote lock control transmitter
is damaged, lost or if it fails to operate for any reason
while the Content Theft-Deterrent system is armed. The
Content Theft-Deterrent system must be disarmed for
the engine to run while in Mode
2; your key can no
longer disarm the system.
If your vehicle is equipped with the optional dealer
installed Onstar@ system, OnStar will not be able to
remotely unlock your vehicle if it has been programmed
to Mode
2.
Mode 3: Standard Arming and Disarming
The system will arm when you lock the doors using
either power door lock switch while any door or the
liftgate is open and the key is removed from
the ignition.
The system will arm when you lock the doors with
your key
or remote lock control transmitter and the
key is removed from the ignition.
The system will disarm when you unlock the doors
with your key or remote lock control transmitter.
Vehicles are delivered programmed in Mode
1.
To change the mode:
1.
2.
3.
4.
5.
6.
Follow the instructions for “Entering Programming
Mode” listed previously.
Insert your second key fully into any door key
cylinder and turn it to the unlock position.
This step is inconvenient, but necessary to prevent
accidental programming of this feature to Mode
2.
Do not program this feature to Mode 2 without first
reading the special note contained in the description
for that mode. The door key cylinder must remain in
the unlock position during Steps
2 through 4.
Press the horn symbol on the remote lock
control transmitter.
Count the number of chimes you hear. The number
of chimes tells you which mode your vehicle
is in.
You can change the mode by pressing the horn
symbol on the remote lock control transmitter again.
Repeat Step
3 until you hear the number of chimes
that matches the mode you want.
Remove your key from the door key cylinder.
The mode you selected is now set. You can either exit
the programming mode by following the instructions
later in this section or program the next feature available
on your vehicle.
ProCarManuals.com
Page 152 of 444
Exiting Programming Mode
To exit programming mode, just turn the key from
ACCESSORY to
OFF and put the BCM PRGRM fuse
back into the instrument panel fuse block.
NOTE: After programming a feature, you can exit the
programming mode at anytime.
Windows
Power Windows
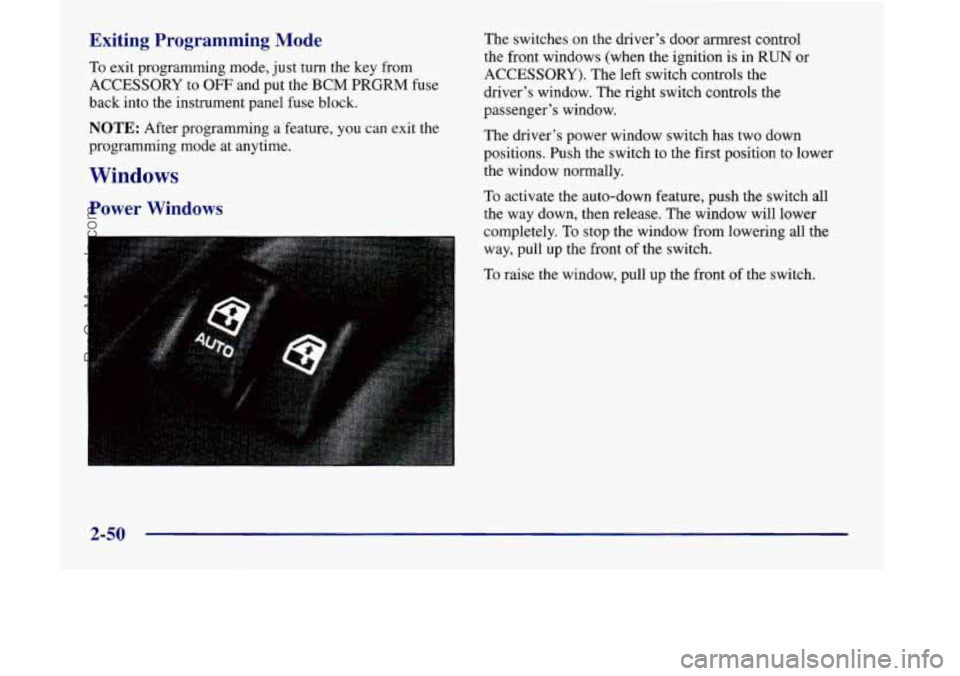
The switches on the driver’s door armrest control
the front windows (when the ignition is in
RUN or
ACCESSORY). The left switch controls the
driver’s window. The right switch controls the
passenger’s window.
The driver’s power window switch has two down
positions. Push the switch to the first position to lower
the window normally.
To activate the auto-down feature, push the switch all
the way down, then release. The window will lower
completely. To stop the window from lowering all the
way, pull up the front of the switch.
To raise the window, pull up the front of the switch.
2-50
ProCarManuals.com
Page 163 of 444

Interior Lamps
Instrument Panel Intensity Control
Turn the control, located below the headlamps switch, to
the right to increase the brightness of the instrument
panel lights, and to the left to decrease the brightness.
Turn the control all the way to the left to turn them off.
Interior Lamps Control
Turn the dial all the way to the right to turn on the
interior lamps,
if the interior lamps override switch is
off. Turn the dial to the left to turn the lamps off.
Interior Lamps Override Switch
--
I This switch is located in the
c- overhead console
switchbank. Press the
symbol on the bottom
of the
rocker switch to override control of the interior lamps
and turn off power to the
courtesy lamps, reading
lamps and glove box lamp. Press the top
of the interior
lamps override rocker switch
to turn power back on to the interior lamps. This will
allow the lamps to
stay on when any door is open.
Illuminated Entry
With illuminated entry, the interior of your vehicle is
illuminated
so you can see inside before you enter your
vehicle. The lamps will come on for
40 seconds if you
unlock your door using your key or the remote lock
control transmitter (if equipped) and the ignition is in
LOCK
or OFF. After 40 seconds have passed, the
interior lamps will slowly fade out. The lamps will turn
off before the 40 seconds if you:
lock all the doors using the key,
press LOCK on the power door lock switch or
0 press LOCK on the remote lock control transmmer
(if equipped).
When any door is opened, illuminated entry is cancelled.
The interior lamps will stay on while any door or the
liftgate
is open, and slowly fade out when all doors and
the liftgate are closed.
The interior lamps may stay on for up to
25 seconds
after all doors have been closed if they have not been
locked. See “Delayed Illumination’’ later
in this section.
ProCarManuals.com
Page 164 of 444
Delayed Illumination
The delayed illumination feature will continue to
illuminate the interior for
25 seconds after all doors have
been closed
so that you can find your ignition and
buckle your safety belt at night. Delayed illumination
will not occur while the ignition
is in RUN or
ACCESSORY. After 25 seconds have passed, the
interior lamps will slowly fade out. The lights will fade
out before the
25 seconds have passed if you:
0 turn the ignition to RUN or ACCESSORY,
lock all doors using the remote lock control
0 lock all the doors using the power door lock switch
transmitter
(if equipped) or
or the key.
Exit Lighting
With exit lighting, the interior lamps will come on for
about
25 seconds whenever you remove the key from
the ignition switch. If you turn the ignition switch
to
RUN or ACCESSORY, the lamps will fade out. The
lamps will also fade out if you lock the doors with the
power door lock switch or the remote lock control
transmitter (if equipped).
To turn the Delayed Illumination feature off or on, see
“Locks and Lighting Choices’’ in the Index. When
any door is opened, exit lighting is cancelled. The
interior lamps will stay on while any door
or liftgate is
open, and slowly fade out when all doors and the liftgate
are closed.
The interior lamps may stay on for up
to 25 seconds
after all doors have been closed if they have not been
locked, see “Delayed Illumination” earlier in
this section.
To turn the Exit Lighting feature off or on, see “Locks
and Lighting Choices” in the Index.
2-62
ProCarManuals.com
Page 167 of 444

Both outside mirrors can be folded forward or rearward.
In the rearward position, they will fold almost flush with
the vehicle. This feature is particularly useful in
automatic car washes.
Your mirrors have a blue tint to reduce glare while
driving at night.
Convex Outside Mirror
Your passenger’s side mirror is convex. A convex
mirror’s surface is curved
so you can see more from the
driver’s seat.
A convex mirror can make things (like other
vehicles) look farther away than they really are.
If you cut too sharply into the right lane, you
could hit a vehicle on your right. Check your
inside mirror or glance over
your shoulder before
changing lanes.
Storage Compartments
Your vehicle’s large carrying capacity can store many
items.
If you have the extended wheelbase version, you
can carry things as large as a
4‘ x 8’ piece of plywood.
You can
also use the floor pins that are used to attach the
seats, to secure larger loads. This section
also describes
storage areas for specific items like sunglasses and cups.
Glove Box
Your vehicle has a glove box below the
instrument panel.
To open the glove box, lift the latch release. Use the key
to lock or unlock the glove box.
The glove box door has a detent to prevent the door
from lowering too far. Open the glove box until the door
is partway open, then pull the door down if you need it
fully open. To close the glove box, the door must be
pushed up past the detent.
In the door of the glove box, you will find a tissue pack
holder and clip for a pen
or pencil.
2-65
ProCarManuals.com
Page 189 of 444

When one of the warning lights comes on and stays on
when you are driving, or when one of the gages shows
there may be a problem, check the section that tells you
what to do about it. Please follow this manual’s advice.
Waiting to do repairs can be costly
-- and even
dangerous.
So please get to know your warning lights
and gages. They’re a big help.
Safety Belt Reminder Light
When the key is turned to RUN or START, a chime will
come on for about eight seconds to remind people to
fasten their safety belts.
The safety belt light will
also come on and stay on
for about
70 seconds. If the
driver’s belt is already
buckled, neither the chime
nor the light will come on.
Air Bag Readiness Light
There is an air bag readiness light on the instrument
panel, which shows a deployed air bag. The system
checks the air bag’s electrical system for malfunctions.
The light tells
you if there is an electrical problem. The
system check includes the air bag sensors, the air bag
module, the wiring and the diagnostic module. For more
information on the air bag system, see “Air Bag” in
the Index.
This light will come on
when you start your engine,
and it will flash for a few
seconds. Then the light
should go out. This means
the system
is ready.
If the air bag readiness light stays on after you
start the
engine or comes
on when you are driving, your air bag
system may not work properly. Have your vehicle
serviced right away.
The air bag readiness light should flash for a few
seconds when you turn the ignition key to
RUN. If the
light doesn’t come on then, have it fixed
so it will be
ready
to warn you if there is a problem.
2-87
ProCarManuals.com