Page 71 of 216
Open the glove box by pulling the handle.
CAUTION
Keep glove box lid closed while driving
to prevent injury in an accident or a
sudden stop.
Opener lever operation
(if so equipped)
The trunk lid opener lever is located on the
outside of the driver's seat. To open the
trunk lid, pull up the opener lever. To close,
push the trunk lid down securely.
APD0601APD0642
GLOVE BOX TRUNK LID LOCK
OPERATION
3-10Pre-driving checks and adjustments
ZX
Page 72 of 216
Key operation
To open the trunk lid from outside the
vehicle, turn the key clockwise. To close the
trunk lid, lower and push the trunk lid down
securely.
WARNING
Do not drive with the trunk lid open.
This could allow dangerous exhaust
gases to be drawn into the vehicle. See
``Exhaust gas'' in the ``Starting and
driving'' section.
APD0605
Pre-driving checks and adjustments3-11
ZX
Page 73 of 216
Opener lever (if so equipped)
To open the fuel filler lid, push the opener
lever down. To lock, close the fuel filler lid
securely.
Manual Fuel Filler Lid
Open the fuel filler lid by pulling the raised
portion of the fuel filler lid.
FUEL FILLER CAP
The fuel filler cap is a screw-on ratcheting
type. Tighten the cap clockwise until ratch-
eting clicks are heard.
If the fuel filler cap is not tightened properly,
the
light may come on.
APD1045APD0620
FUEL FILLER LID LOCK
OPERATION
3-12Pre-driving checks and adjustments
ZX
Page 74 of 216
WARNING
cGasoline is extremely flammable and
highly explosive under certain con-
ditions. You could be burned or se-
riously injured if it is misused or
mishandled. Always stop the engine
and do not smoke or allow open
flames or sparks near the vehicle
when refueling.
cFuel may be under pressure. Turn
the cap one-half turn and wait for
any ``hissing'' sound to stop to pre-
vent fuel from spraying out and pos-
sibly causing personal injury. Then
remove the cap.
cDo not attempt to top off the fuel
tank after the fuel pump nozzle shuts
off automatically. Continued refuel-
ing may cause fuel overflow, result-
ing in fuel spray and possibly fire.
cUse only a genuine NISSAN fuel filler
cap as a replacement. It has a built-in
safety valve needed for proper op-
eration of the fuel system and emis-
sion control system. An incorrect
cap can result in a serious malfunc-
tion and possible injury.cNever pour fuel into the throttle body
to attempt to start your vehicle.
CAUTION
cIf fuel is spilled on the car body,
flush it away with water to avoid
paint damage.
cTighten until the cap clicks. Failure
to tighten the fuel cap properly may
cause the
malfunction indica-
tor light (MIL) to illuminate. If this
occurs, securely close the fuel filler
cap. After driving for a while, the
light should remain off. If the light
remains on, have the vehicle in-
spected by an authorized NISSAN
dealer.
For additional information, see the
``Malfunction indicator light (MIL)'' in
the ``Instruments and controls'' sec-
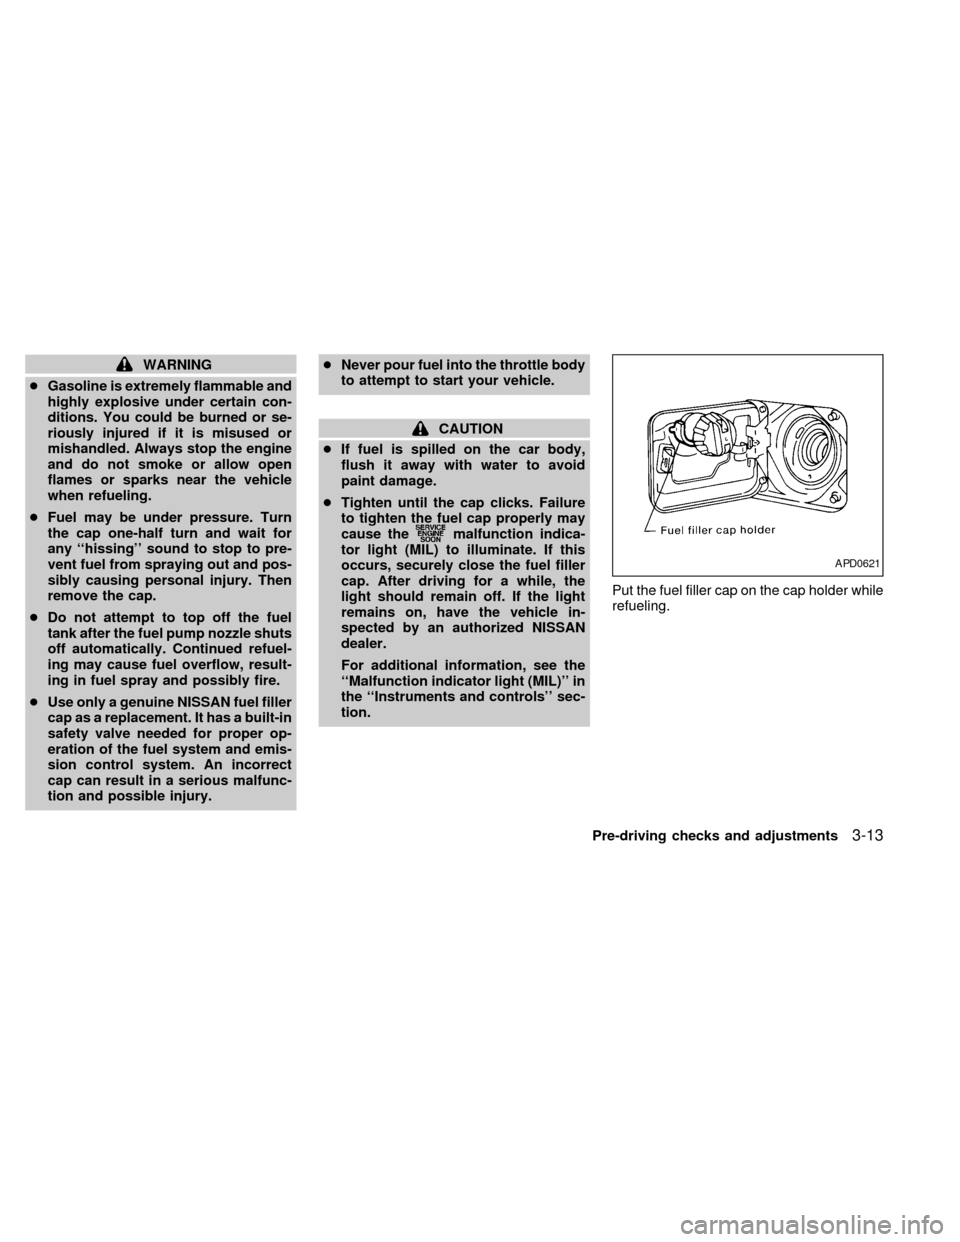
tion.Put the fuel filler cap on the cap holder while
refueling.
APD0621
Pre-driving checks and adjustments3-13
ZX
Page 107 of 216
WARNING
Do not leave children, unreliable
adults, or pets alone in your vehicle.
They could accidentally injure them-
selves or others through inadvertent
operation of the vehicle. Also, on hot,
sunny days, temperatures in a closed
vehicle could quickly become high
enough to cause severe or possibly
fatal injuries to people or animals.
EXHAUST GAS (carbon monoxide)
WARNING
Do not breathe exhaust gases; they
contain colorless and odorless carbon
monoxide. Carbon monoxide is dan-
gerous. It can cause unconsciousness
or death.
cIf you suspect that exhaust fumes
are entering the vehicle, drive with
all windows fully open, and have the
vehicle inspected immediately.
cDo not run the engine in a closed
space such as a garage.cDo not park the vehicle with the
engine running for any extended
length of time.
cKeep the trunk lid closed while driv-
ing, otherwise exhaust gases could
be drawn into the passenger com-
partment. If you must drive in this
manner for some reason, take the
following steps:
1. Open all the windows.
2. Set the air recirculation button (if
so equipped) off and the fan con-
trol dial to four (high) to circulate
the air.
3.
Be sure the rear seats are secured
and latched in the upright position.
cIf electrical wiring or other cable
connections must pass to a trailer
through the seal on the trunk lid or
the body, follow the manufacturer's
recommendation to prevent carbon
monoxide entry into the vehicle.
cThe exhaust system and body
should be inspected by a qualified
mechanic whenever:a. The vehicle is raised for service.
b. You suspect that exhaust fumes
are entering into the passenger
compartment.
c. You notice a change in the sound
of the exhaust system.
d.
You have had an accident involv-
ing damage to the exhaust system,
underbody, or rear of the vehicle.
THREE WAY CATALYST
The three way catalyst is an emission con-
trol device installed in the exhaust system.
Exhaust gases in the three way catalyst are
burned at high temperatures to help reduce
pollutants.
WARNING
c
The exhaust gas and the exhaust sys-
tem are very hot. Keep people or flam-
mable materials away from the ex-
haust pipe.
cDo not stop or park the vehicle over
flammable materials such as dry
grass, waste paper or rags. They
may ignite and cause a fire.
PRECAUTIONS WHEN
STARTING AND DRIVING
5-2Starting and driving
ZX
Page 127 of 216
If you have a flat tire, follow the instructions
below.
Stopping the vehicle
1. Safely move the vehicle off the road and
away from traffic.
2. Turn on the hazard warning flashers.
3. Park on a level surface and apply the
parking brake. Shift the manual transmis-
sion into R (Reverse), or the automatic
transmission into P (Park).
4. Turn off the engine.
5. Raise the hood to warn other traffic, and
to signal professional road assistance
personnel that you need assistance.
6. Have all passengers get out of the ve-
hicle and stand in a safe place, away
from traffic and clear of the vehicle.
WARNING
cMake sure that the parking brake is
securely applied and the manual
transmission is shifted into R (Re-
verse), or the automatic transmis-
sion into P (Park).cNever change tires when the vehicle
is on a slope, ice or slippery areas.
This is hazardous.
cNever change tires if oncoming traf-
fic is close to your vehicle. Wait for
professional road assistance.
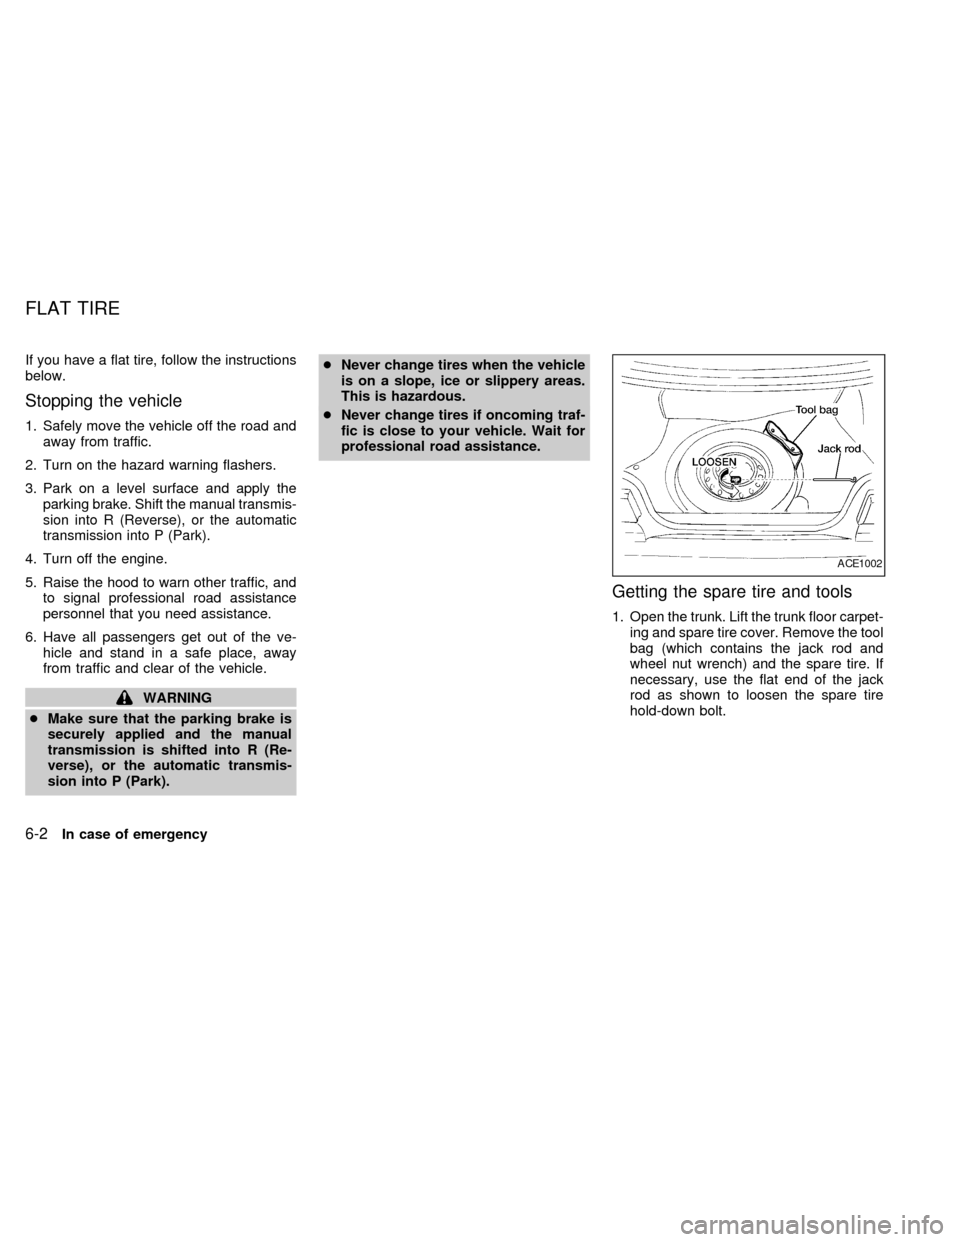
Getting the spare tire and tools
1. Open the trunk. Lift the trunk floor carpet-
ing and spare tire cover. Remove the tool
bag (which contains the jack rod and
wheel nut wrench) and the spare tire. If
necessary, use the flat end of the jack
rod as shown to loosen the spare tire
hold-down bolt.
ACE1002
FLAT TIRE
6-2In case of emergency
ZX
Page 130 of 216
Jacking up vehicle and removing the
damaged tire
Carefully read the caution label attached
to the jack body and the following in-
structions.
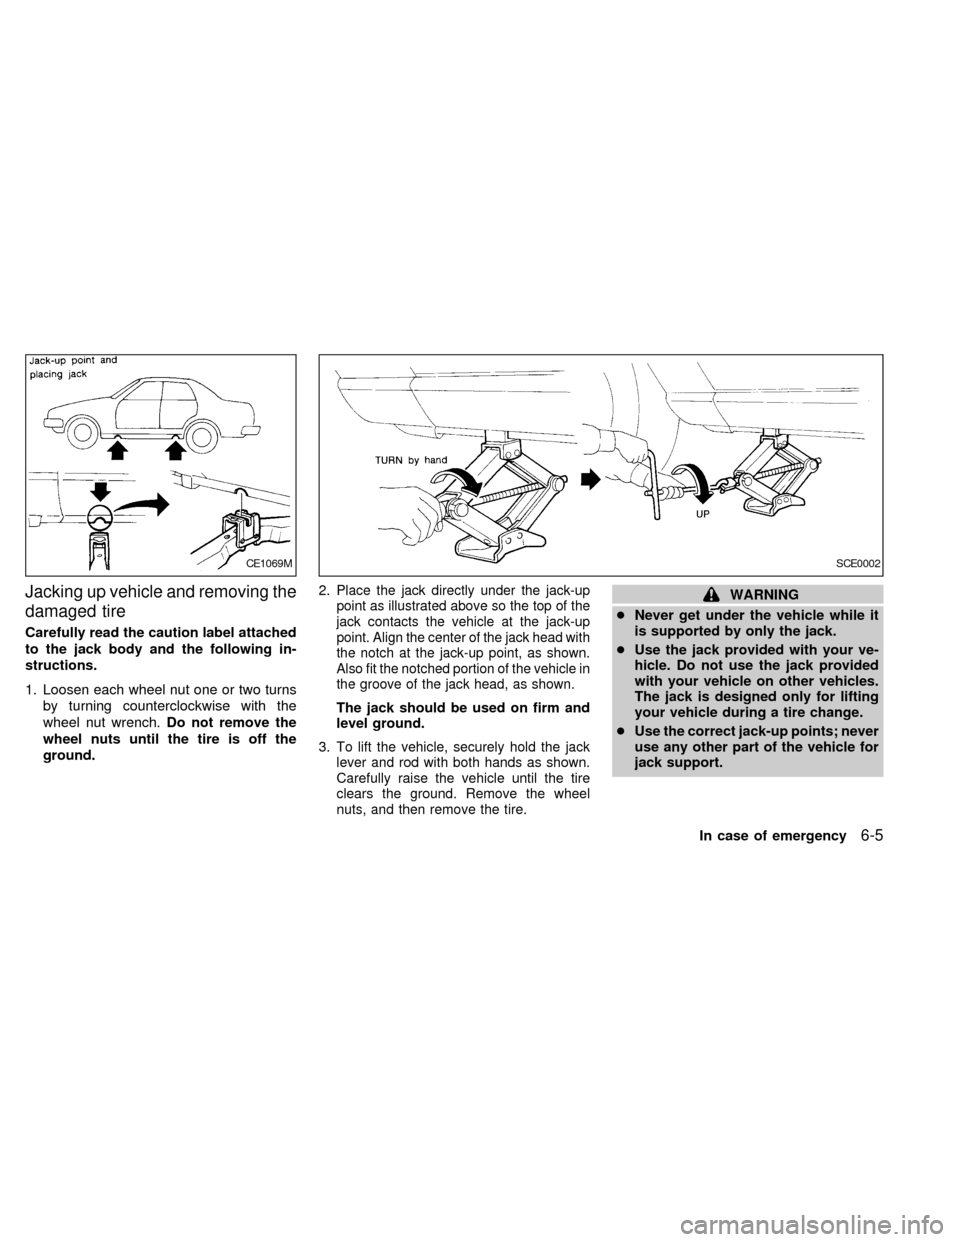
1. Loosen each wheel nut one or two turns
by turning counterclockwise with the
wheel nut wrench.Do not remove the
wheel nuts until the tire is off the
ground.2.
Place the jack directly under the jack-up
point as illustrated above so the top of the
jack contacts the vehicle at the jack-up
point. Align the center of the jack head with
the notch at the jack-up point, as shown.
Also fit the notched portion of the vehicle in
the groove of the jack head, as shown.
The jack should be used on firm and
level ground.
3.
To lift the vehicle, securely hold the jack
lever and rod with both hands as shown.
Carefully raise the vehicle until the tire
clears the ground. Remove the wheel
nuts, and then remove the tire.
WARNING
cNever get under the vehicle while it
is supported by only the jack.
cUse the jack provided with your ve-
hicle. Do not use the jack provided
with your vehicle on other vehicles.
The jack is designed only for lifting
your vehicle during a tire change.
cUse the correct jack-up points; never
use any other part of the vehicle for
jack support.
CE1069MSCE0002
In case of emergency6-5
ZX
Page 132 of 216
COLD pressure:
After vehicle has been parked for three
hours or more or driven less than 1 mile
(1.6 km).
COLD tire pressures are shown on thetire placard affixed to the driver's door
center pillar.
cRetighten the wheel nuts when the
vehicle has been run for 600 miles
(1,000 km).
5.
With the spare tire installed on the vehicle,
place the damaged tire in the spare tire
storage area. Put the jack rod and wheel
nut wrench in the tool bag and place the
tool bag in the spare tire storage area.
6. Place the spare tire cover and the trunk
floor carpeting over the damaged tire.
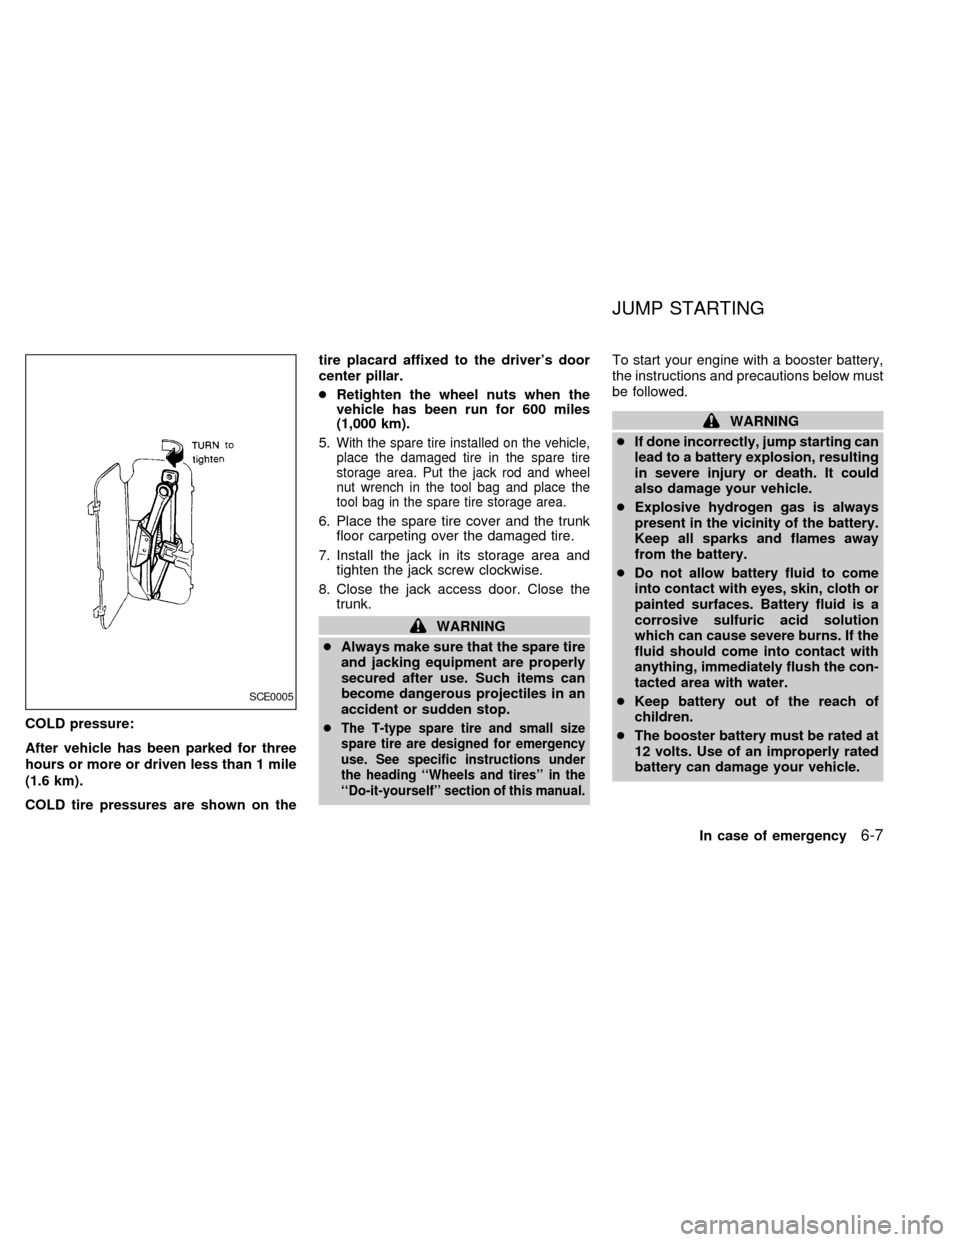
7. Install the jack in its storage area and
tighten the jack screw clockwise.
8. Close the jack access door. Close the
trunk.
WARNING
cAlways make sure that the spare tire
and jacking equipment are properly
secured after use. Such items can
become dangerous projectiles in an
accident or sudden stop.
c
The T-type spare tire and small size
spare tire are designed for emergency
use. See specific instructions under
the heading ``Wheels and tires'' in the
``Do-it-yourself'' section of this manual.
To start your engine with a booster battery,
the instructions and precautions below must
be followed.
WARNING
cIf done incorrectly, jump starting can
lead to a battery explosion, resulting
in severe injury or death. It could
also damage your vehicle.
cExplosive hydrogen gas is always
present in the vicinity of the battery.
Keep all sparks and flames away
from the battery.
cDo not allow battery fluid to come
into contact with eyes, skin, cloth or
painted surfaces. Battery fluid is a
corrosive sulfuric acid solution
which can cause severe burns. If the
fluid should come into contact with
anything, immediately flush the con-
tacted area with water.
cKeep battery out of the reach of
children.
cThe booster battery must be rated at
12 volts. Use of an improperly rated
battery can damage your vehicle.
SCE0005
JUMP STARTING
In case of emergency6-7
ZX