1998 NISSAN QUEST turn signal
[x] Cancel search: turn signalPage 82 of 260

2 Instruments and controls
Meters and gauges ................................................2-3
Speedometer and odometer ..................................2-4
Tachometer ............................................................2-4
Engine coolant temperature gauge........................2-4
Fuel gauge .............................................................2-5
Warning/indicator lights and chimes ......................2-6
Theft warning (if so equipped) .............................2-10
Windshield wiper and washer switch ...................2-11
Rear window wiper and washer switches ............2-12
Rear window defogger switch ..............................2-13
Headlight control switch .......................................2-13
Daytime running light system (Canada only) .......2-13
Autolamp switch (if so equipped) .........................2-14
Turn signal switch .............................................2-15
Cornering light ......................................................2-15
Instrument brightness control ...............................2-15
Hazard warning flasher switch .............................2-16Cigarette lighter (accessory) and ashtray ............2-16
Rear power point ..................................................2-17
Coin tray ...............................................................2-18
Compact disc and audio cassette storage
compartment.........................................................2-18
Cup holder ............................................................2-19
Power window ......................................................2-20
Automatic power window switch ..........................2-21
Sunroof (if so equipped).......................................2-22
Manual rear windows ...........................................2-22
Power rear windows (if so equipped) ..................2-23
Clock.....................................................................2-23
Interior lights .........................................................2-24
Luggage compartment lights ................................2-24
Personal reading light ..........................................2-25
Spotlights ..............................................................2-25
ZX
Page 89 of 260

1.Check the brake fluid level. Add brake fluid
as necessary. See ``Brake fluid'' in the
``Do-it-yourself'' section of this manual.
2. If the brake fluid level is correct, have the
warning system checked by an autho-
rized NISSAN dealer.
WARNING
cYour brake system may not be work-
ing properly if the warning light is
on. Driving could be dangerous. If
you judge it to be safe, drive care-
fully to the nearest service station
for repairs. Otherwise, have your ve-
hicle towed.
cPressing the brake pedal with the
engine stopped and/or low brake
fluid level may increase your stop-
ping distance and braking will re-
quire greater pedal effort as well as
pedal travel.
cIf the brake fluid level is below the
minimum mark on the brake fluid
reservoir, do not drive until the brake
system has been checked at an au-
thorized NISSAN dealer.
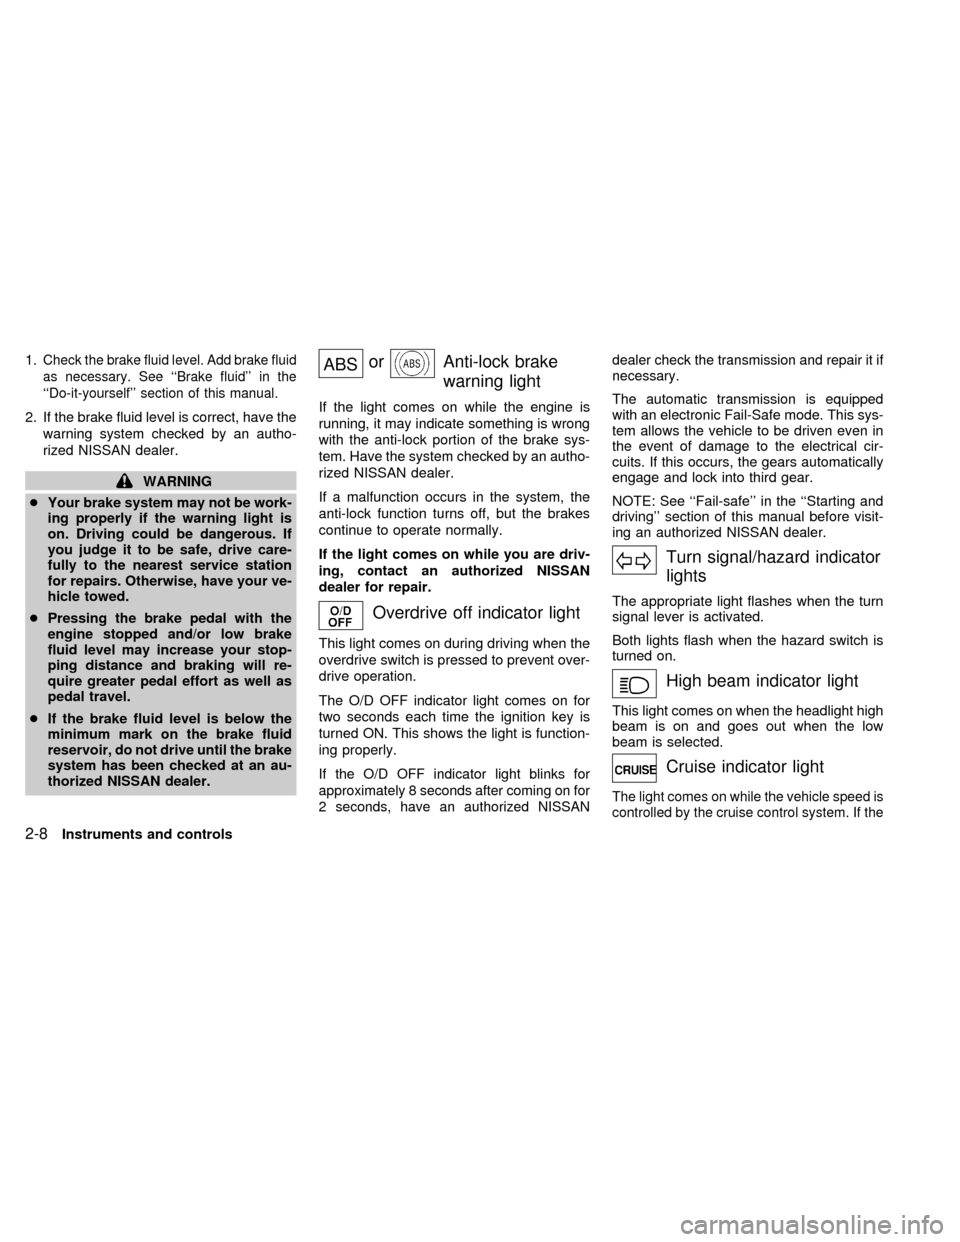
ABSorAnti-lock brake
warning light
If the light comes on while the engine is
running, it may indicate something is wrong
with the anti-lock portion of the brake sys-
tem. Have the system checked by an autho-
rized NISSAN dealer.
If a malfunction occurs in the system, the
anti-lock function turns off, but the brakes
continue to operate normally.
If the light comes on while you are driv-
ing, contact an authorized NISSAN
dealer for repair.
Overdrive off indicator light
This light comes on during driving when the
overdrive switch is pressed to prevent over-
drive operation.
The O/D OFF indicator light comes on for
two seconds each time the ignition key is
turned ON. This shows the light is function-
ing properly.
If the O/D OFF indicator light blinks for
approximately 8 seconds after coming on for
2 seconds, have an authorized NISSANdealer check the transmission and repair it if
necessary.
The automatic transmission is equipped
with an electronic Fail-Safe mode. This sys-
tem allows the vehicle to be driven even in
the event of damage to the electrical cir-
cuits. If this occurs, the gears automatically
engage and lock into third gear.
NOTE: See ``Fail-safe'' in the ``Starting and
driving'' section of this manual before visit-
ing an authorized NISSAN dealer.
Turn signal/hazard indicator
lights
The appropriate light flashes when the turn
signal lever is activated.
Both lights flash when the hazard switch is
turned on.
High beam indicator light
This light comes on when the headlight high
beam is on and goes out when the low
beam is selected.
Cruise indicator light
The light comes on while the vehicle speed is
controlled by the cruise control system. If the
2-8Instruments and controls
ZX
Page 91 of 260

cvehicle ran out of fuel, which caused
the engine to misfire.
cfuel filler cap was left off or improperly
installed, allowing fuel to evaporate
into the atmosphere.
If you suspect that you experienced such a
condition, drive the vehicle to an authorized
NISSAN dealer and have the vehicle in-
spected. Avoid any unnecessary diagnosis
during the service by informing the dealer of
the condition that may have occurred.
The theft warning system provides audio
and visual alarm signals if parts of the
vehicle are disturbed.
How to activate the theft warning
system
1. Close all windows.
2. Remove the key from the ignition switch.
3. Close all doors and the hood. Lock all
doors by pressing the
button on the
multi-remote controller. At this time, the
parking lights blink and the horn chirps to
indicate all doors are locked.The system can be activated even if the
windows are open.
4. Confirm that the SECURITY light, lo-
cated under the hazard warning switch,
illuminates. The SECURITY light illumi-
nates for about 30 seconds and then
begins to flash once every three sec-
onds. The system is now activated.
The theft warning system is NOT activated if
one of the following occurs:
cA door is unlocked or opened, the hood is
opened, or the ignition key is turned to
the ACC or ON position during the 30
seconds in which the SECURITY light
stays on.
cThe SECURITY light blinks at a steady
1/2 second on - 1/2 second off rate
because a door or the hood is open and
the key is not in the ACC or ON position.
When the ignition key is turned to the
ACC or ON position, the SECURITY light
turns off.
IC0005
THEFT WARNING
(if so equipped)
2-10Instruments and controls
ZX
Page 94 of 260

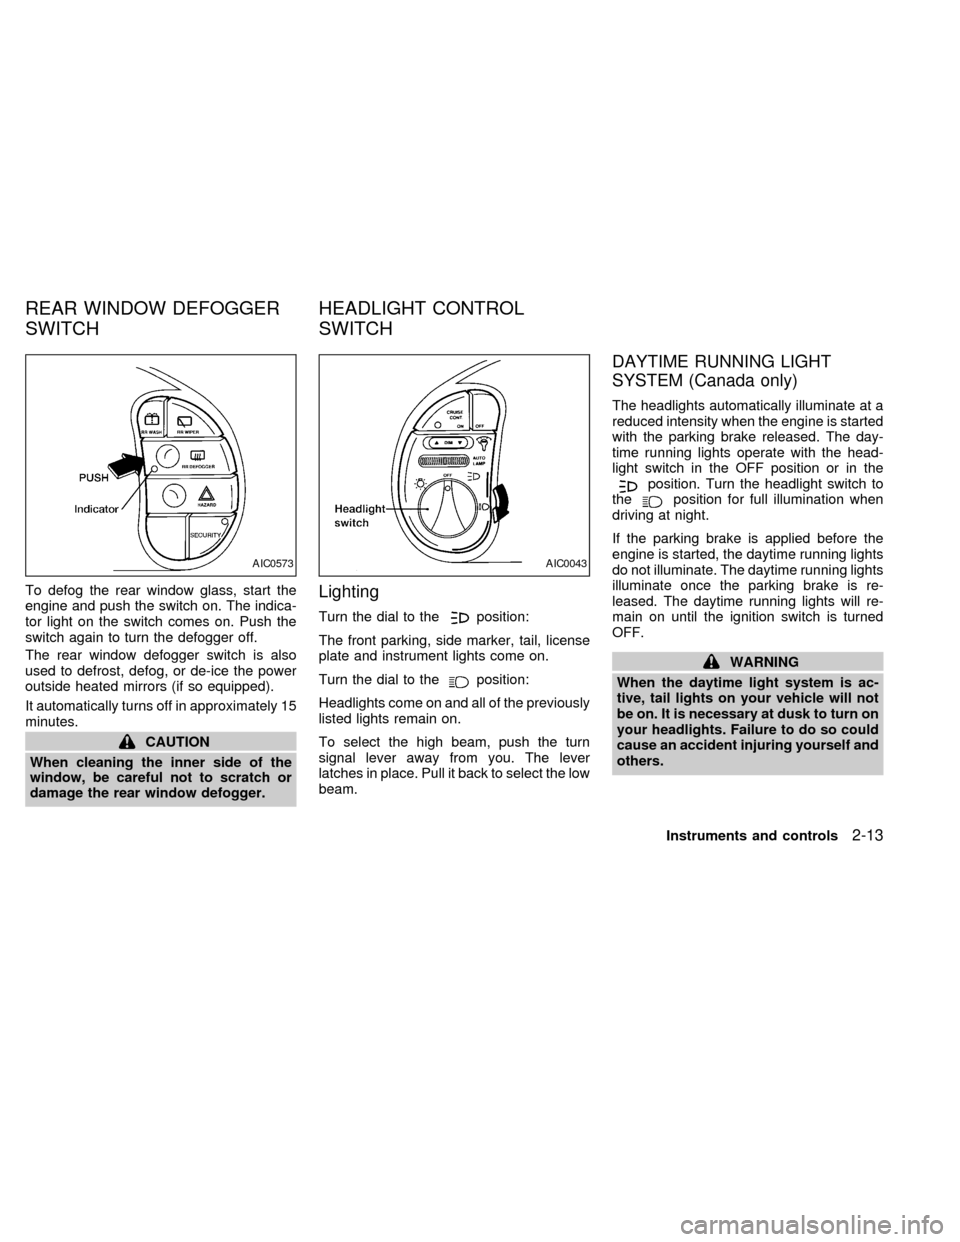
To defog the rear window glass, start the
engine and push the switch on. The indica-
tor light on the switch comes on. Push the
switch again to turn the defogger off.
The rear window defogger switch is also
used to defrost, defog, or de-ice the power
outside heated mirrors (if so equipped).
It automatically turns off in approximately 15
minutes.
CAUTION
When cleaning the inner side of the
window, be careful not to scratch or
damage the rear window defogger.
Lighting
Turn the dial to theposition:
The front parking, side marker, tail, license
plate and instrument lights come on.
Turn the dial to the
position:
Headlights come on and all of the previously
listed lights remain on.
To select the high beam, push the turn
signal lever away from you. The lever
latches in place. Pull it back to select the low
beam.
DAYTIME RUNNING LIGHT
SYSTEM (Canada only)
The headlights automatically illuminate at a
reduced intensity when the engine is started
with the parking brake released. The day-
time running lights operate with the head-
light switch in the OFF position or in the
position. Turn the headlight switch to
theposition for full illumination when
driving at night.
If the parking brake is applied before the
engine is started, the daytime running lights
do not illuminate. The daytime running lights
illuminate once the parking brake is re-
leased. The daytime running lights will re-
main on until the ignition switch is turned
OFF.
WARNING
When the daytime light system is ac-
tive, tail lights on your vehicle will not
be on. It is necessary at dusk to turn on
your headlights. Failure to do so could
cause an accident injuring yourself and
others.
AIC0573AIC0043
REAR WINDOW DEFOGGER
SWITCHHEADLIGHT CONTROL
SWITCH
Instruments and controls2-13
ZX
Page 96 of 260

Turn signal
Move the lever up or down to signal the
turning direction. When the turn is com-
pleted, the turn signal cancels automati-
cally.
Lane change signal
To indicate a lane change, move the lever
up or down to the point where the light
begins to flash, but the lever does not latch.
Passing signal
Pulling the lever toward you turns the head-
light high beam on. Release it and the
headlight high beam goes off.The cornering light provides additional illu-
mination toward the turning direction. The
light on the turning direction side comes on
when a turn is signaled with the headlights
on.The instrument brightness control operates
when the light switch is in the
orposition, or when the autolamp system
is operating.
Pressing the right side of the switch bright-
ens the instrument panel lights; pressing the
left side of the switch dims the instrument
panel lights.
AIC0560AIC0102AIC0011
TURN SIGNAL SWITCH CORNERING LIGHT INSTRUMENT BRIGHTNESS
CONTROL
Instruments and controls2-15
ZX
Page 97 of 260

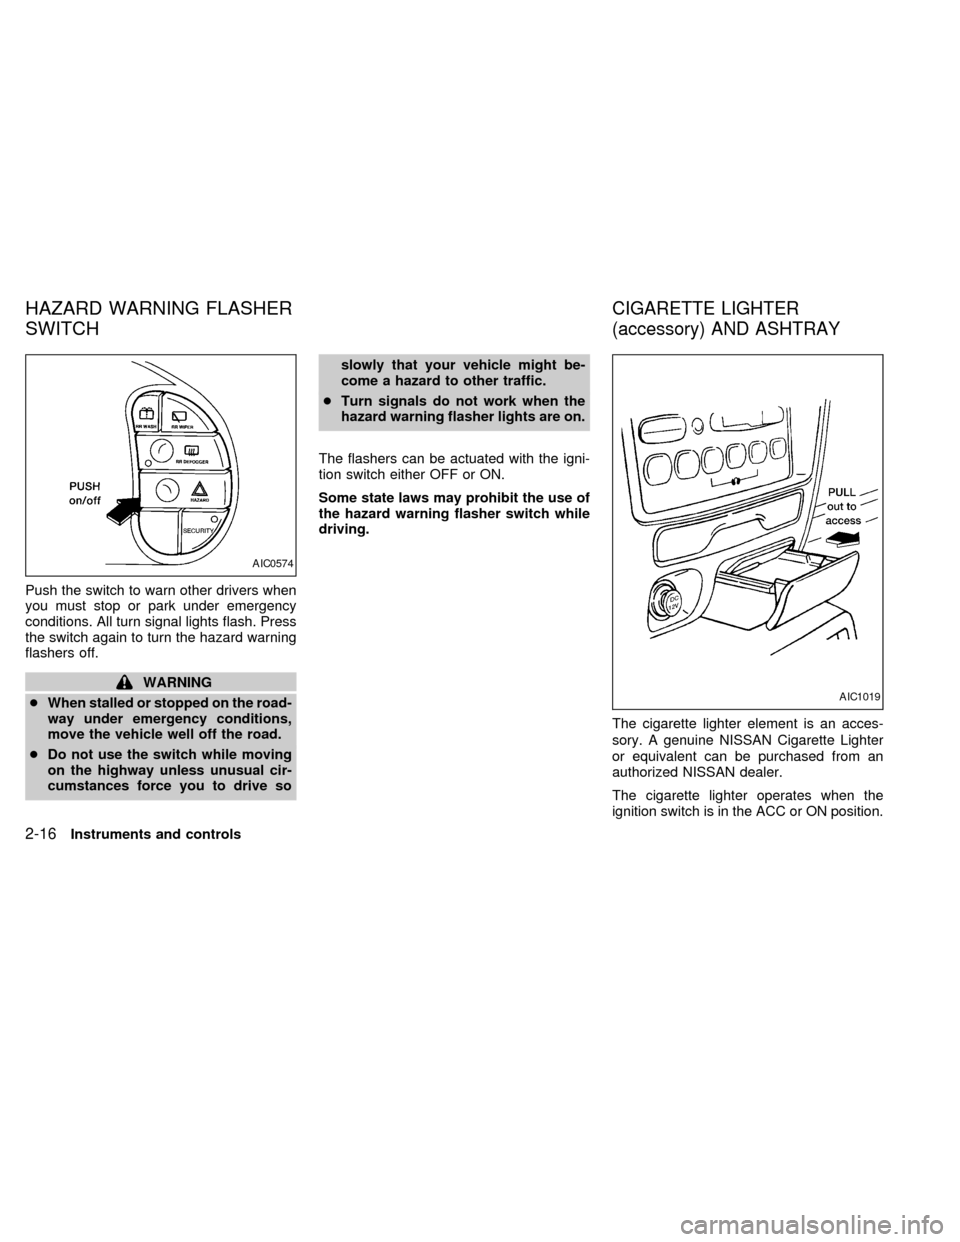
Push the switch to warn other drivers when
you must stop or park under emergency
conditions. All turn signal lights flash. Press
the switch again to turn the hazard warning
flashers off.
WARNING
cWhen stalled or stopped on the road-
way under emergency conditions,
move the vehicle well off the road.
cDo not use the switch while moving
on the highway unless unusual cir-
cumstances force you to drive soslowly that your vehicle might be-
come a hazard to other traffic.
cTurn signals do not work when the
hazard warning flasher lights are on.
The flashers can be actuated with the igni-
tion switch either OFF or ON.
Some state laws may prohibit the use of
the hazard warning flasher switch while
driving.
The cigarette lighter element is an acces-
sory. A genuine NISSAN Cigarette Lighter
or equivalent can be purchased from an
authorized NISSAN dealer.
The cigarette lighter operates when the
ignition switch is in the ACC or ON position.
AIC0574
AIC1019
HAZARD WARNING FLASHER
SWITCHCIGARETTE LIGHTER
(accessory) AND ASHTRAY
2-16Instruments and controls
ZX
Page 141 of 260

Servicing air conditioning
The air conditioning system in your NISSAN
vehicle is charged with a refrigerant de-
signed with the environment in mind.
This refrigerant does not harm the
earth's ozone layer.
Special charging equipment and lubricant
are required when servicing your NISSAN
air conditioner. Using improper refrigerants
or lubricants causes severe damage to your
air conditioning system. See ``Air condition-
ing system refrigerant and lubricant recom-
mendations'' in the ``Technical and con-
sumer information'' section of this manual.
An authorized NISSAN dealer is able to
service your environmentally ``friendly'' air
conditioning system.
WARNING
The air conditioner system contains
refrigerant under high pressure. To
avoid personal injury, any air condi-
tioner service should be done by an
experienced technician with proper
equipment.To turn the radio on, turn the ignition key to
ACC or ON. If you listen to the radio with the
engine not running, turn the key to the ACC
position.
Radio reception is affected by station signal
strength, distance from radio transmitter,
buildings, bridges, mountains and other ex-
ternal influences. Intermittent changes in
reception quality normally are caused by
these external influences.
Clock
For information on setting the clock, refer to
the section ``Instruments and controls''.
AM-FM RADIO WITH CASSETTE
PLAYER
Radio operation
Push the VOL-PUSH ON knob to turn the
radio on. Push the VOL-PUSH ON knob
once more to turn the radio off.
Turn the knob to adjust the volume.
Inserting a cassette tape into the cassette
player while the radio is on turns the radio
off and turns the cassette player on.
AUDIO SYSTEM
4-14Heater, air conditioner and audio systems
ZX
Page 144 of 260

SEEK tuning
This feature on your radio allows you to
automatically select strong frequency sta-
tions up or down the frequency band. Press
SEEK
to select the next strong sta-
tion up the frequency band. Press SEEK
to select the next strong station down
the frequency band. To change frequencies
quickly, press and hold either side of the
SEEK button.
SCAN tuning
Push SCAN to enter the scan tuning mode.
The radio searches up the frequency band,
stopping and playing each strong frequency
station for five seconds. This continues until
the SCAN button is pushed a second time
or a different tuning function is selected.
The AM or FM1 or FM2 symbol in the
display window flashes while each station is
being played.
AM/FM
Press the AM/FM button to select the de-
sired band: AM, FM1, or FM2. The stereo
indicator shows in the display window dur-
ing FM stereo reception. When the stereo
broadcast signal is weak, the radio auto-matically changes from stereo to monaural
reception.
Station memory operations
Your radio comes equipped with six
memory buttons, which are used to preset
up to six AM stations and 12 FM stations.
NOTE: If the vehicle's battery is discon-
nected, the memory buttons need to be
reset.
To set the memory buttons:
1. Select the desired band (AM, FM1, or
FM2) by pressing the AM/FM button.
2. Tune to the desired frequency.
3. Press one of the memory buttons and
hold the button in. The sound mutes out
for about two seconds, then returns. That
station is now held in memory on that
button.
Repeat the three steps above for each
memory button you want to set.
The memory buttons also control the rear
audio controls. Push memory buttons three
and five simultaneously to turn the rear
audio controls on. Push them again to turn
the rear audio controls off. A headphonesymbol appears in the display window when
the rear controls are activated.
ADJUSTING TONE QUALITY
BASS
Bass control allows you to adjust the lower,
bass frequencies to your preference.
Push the BASS button either
or; BASS and the setting indicator bar
appear in the display window. Pressing the
BASS button either
orin-
creases or decreases the level of bass, as
indicated by the number of bar segments
showing in the display window.
Following bass adjustment, the display win-
dow shows the current setting for three
seconds, then returns to the display prior to
adjustment.
TREB
Treble control allows you to adjust the
higher, treble frequencies to your prefer-
ence.
Push the TREB button either
or; TREB and the setting indicator bar
appear in the display window. Pressing the
TREB button either
orin-
Heater, air conditioner and audio systems
4-17
ZX