1998 NISSAN QUEST mirror
[x] Cancel search: mirrorPage 94 of 260
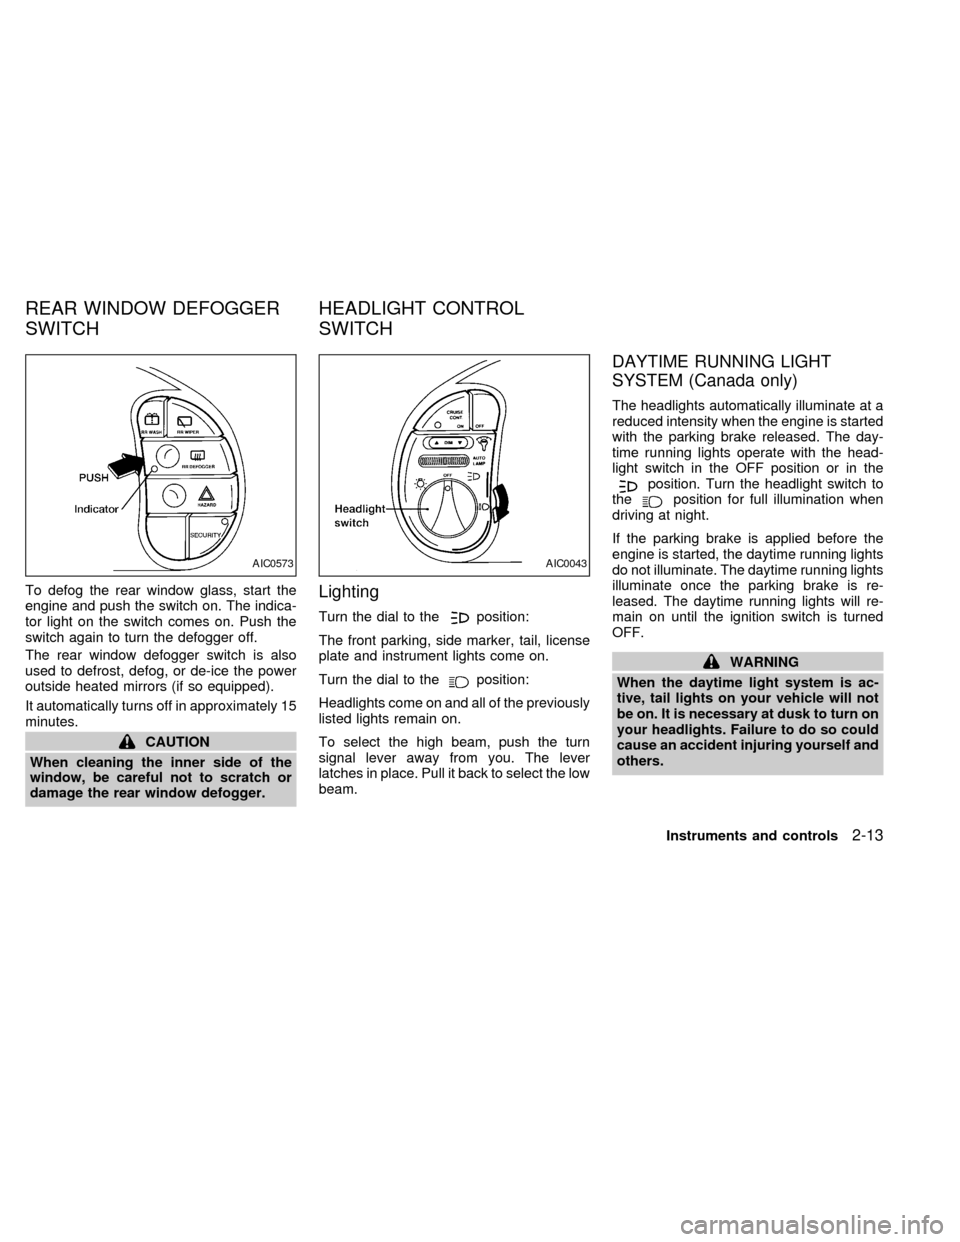
To defog the rear window glass, start the
engine and push the switch on. The indica-
tor light on the switch comes on. Push the
switch again to turn the defogger off.
The rear window defogger switch is also
used to defrost, defog, or de-ice the power
outside heated mirrors (if so equipped).
It automatically turns off in approximately 15
minutes.
CAUTION
When cleaning the inner side of the
window, be careful not to scratch or
damage the rear window defogger.
Lighting
Turn the dial to theposition:
The front parking, side marker, tail, license
plate and instrument lights come on.
Turn the dial to the
position:
Headlights come on and all of the previously
listed lights remain on.
To select the high beam, push the turn
signal lever away from you. The lever
latches in place. Pull it back to select the low
beam.
DAYTIME RUNNING LIGHT
SYSTEM (Canada only)
The headlights automatically illuminate at a
reduced intensity when the engine is started
with the parking brake released. The day-
time running lights operate with the head-
light switch in the OFF position or in the
position. Turn the headlight switch to
theposition for full illumination when
driving at night.
If the parking brake is applied before the
engine is started, the daytime running lights
do not illuminate. The daytime running lights
illuminate once the parking brake is re-
leased. The daytime running lights will re-
main on until the ignition switch is turned
OFF.
WARNING
When the daytime light system is ac-
tive, tail lights on your vehicle will not
be on. It is necessary at dusk to turn on
your headlights. Failure to do so could
cause an accident injuring yourself and
others.
AIC0573AIC0043
REAR WINDOW DEFOGGER
SWITCHHEADLIGHT CONTROL
SWITCH
Instruments and controls2-13
ZX
Page 108 of 260

3 Pre-driving checks and adjustments
Key .........................................................................3-2
Door locks ..............................................................3-2
Manual door lock ....................................................3-3
Child safety sliding door lock .................................3-5
Power door lock (if so equipped) ...........................3-6
Multi-remote control system (if so equipped).........3-8
Battery replacement ...............................................3-9
Illuminated entry system ......................................3-10
Hood release ........................................................3-11Rear door lock ......................................................3-12
Cargo net (if so equipped) ...................................3-14
Luggage rack (if so equipped) .............................3-15
Fuel filler lid and cap ............................................3-16
Tilting steering wheel ...........................................3-17
Outside mirror control...........................................3-17
Outside mirrors .....................................................3-18
Inside mirror .........................................................3-18
Vanity mirror .........................................................3-19
ZX
Page 124 of 260
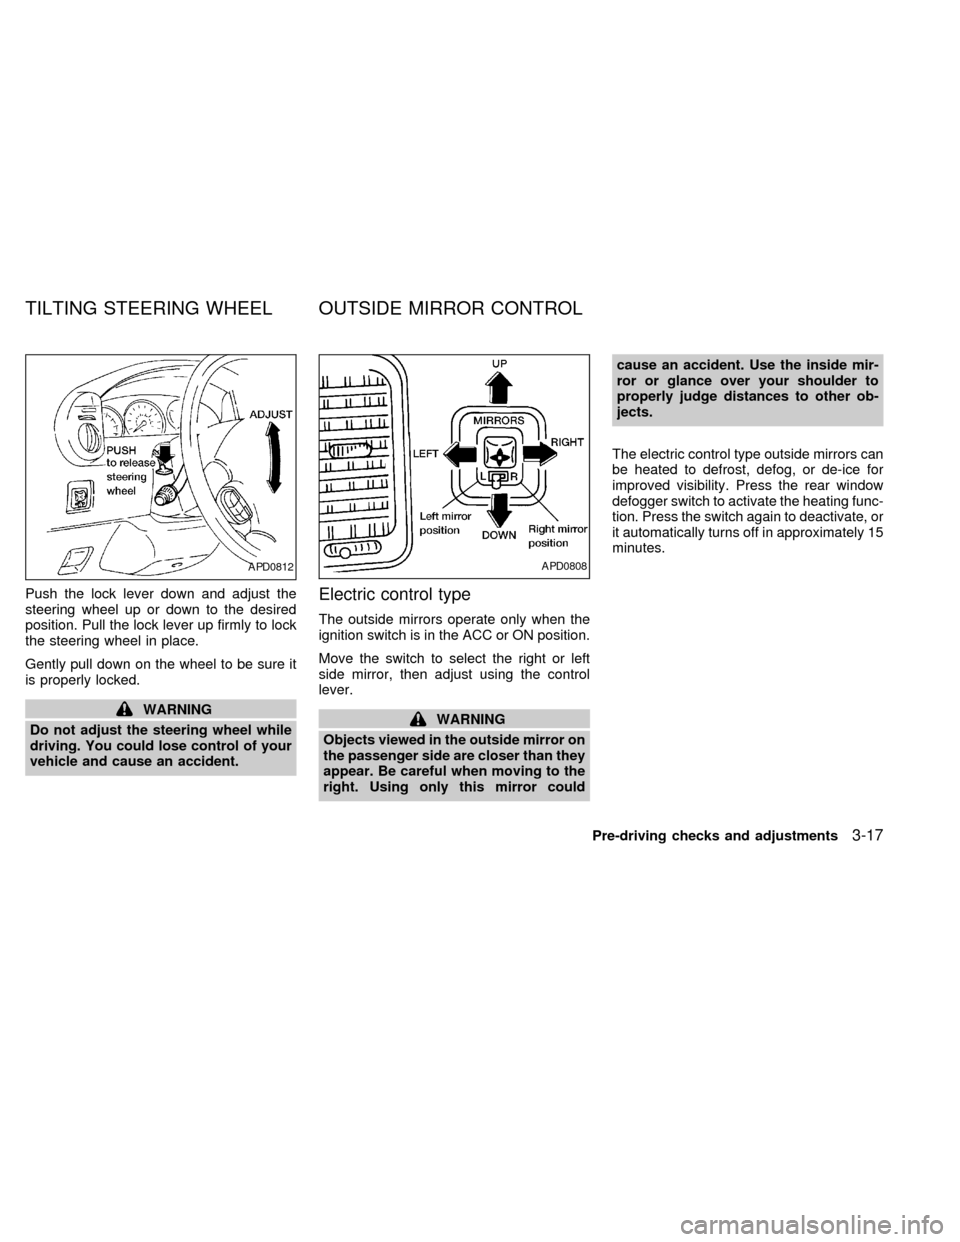
Push the lock lever down and adjust the
steering wheel up or down to the desired
position. Pull the lock lever up firmly to lock
the steering wheel in place.
Gently pull down on the wheel to be sure it
is properly locked.
WARNING
Do not adjust the steering wheel while
driving. You could lose control of your
vehicle and cause an accident.
Electric control type
The outside mirrors operate only when the
ignition switch is in the ACC or ON position.
Move the switch to select the right or left
side mirror, then adjust using the control
lever.
WARNING
Objects viewed in the outside mirror on
the passenger side are closer than they
appear. Be careful when moving to the
right. Using only this mirror couldcause an accident. Use the inside mir-
ror or glance over your shoulder to
properly judge distances to other ob-
jects.
The electric control type outside mirrors can
be heated to defrost, defog, or de-ice for
improved visibility. Press the rear window
defogger switch to activate the heating func-
tion. Press the switch again to deactivate, or
it automatically turns off in approximately 15
minutes.
APD0812APD0808
TILTING STEERING WHEEL OUTSIDE MIRROR CONTROL
Pre-driving checks and adjustments3-17
ZX
Page 125 of 260
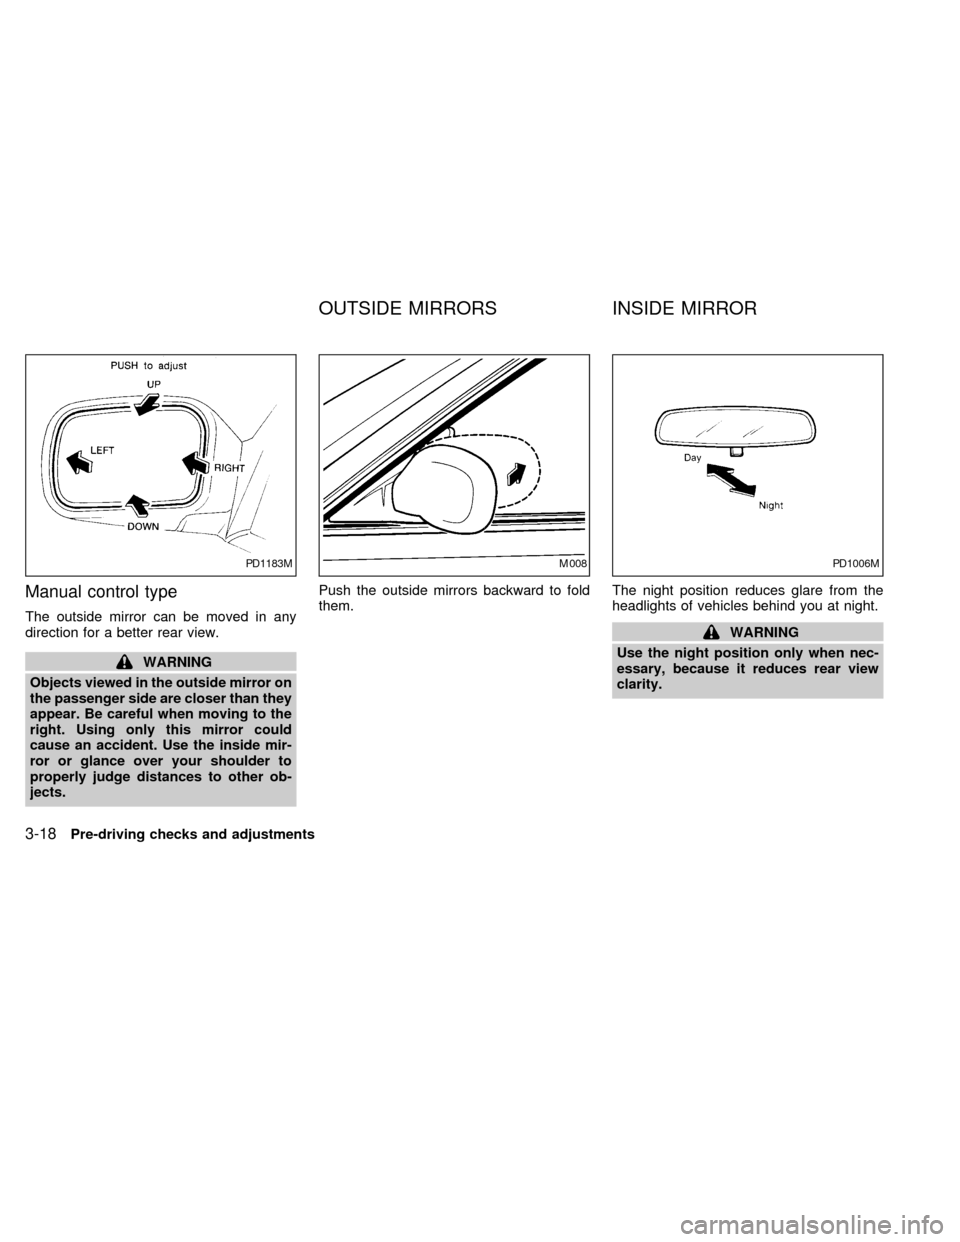
Manual control type
The outside mirror can be moved in any
direction for a better rear view.
WARNING
Objects viewed in the outside mirror on
the passenger side are closer than they
appear. Be careful when moving to the
right. Using only this mirror could
cause an accident. Use the inside mir-
ror or glance over your shoulder to
properly judge distances to other ob-
jects.Push the outside mirrors backward to fold
them.The night position reduces glare from the
headlights of vehicles behind you at night.
WARNING
Use the night position only when nec-
essary, because it reduces rear view
clarity.
PD1183MM008PD1006M
OUTSIDE MIRRORS INSIDE MIRROR
3-18Pre-driving checks and adjustments
ZX
Page 126 of 260

Your vehicle may be equipped with a driver
or passenger side vanity mirror. If the vanity
mirror on your vehicle has a cover, access
the mirror by pulling the sun visor down and
lifting the cover up. Some vanity mirrors
illuminate when the mirror cover is opened.
AIC0563
VANITY MIRROR
Pre-driving checks and adjustments3-19
ZX
Page 158 of 260
cMake sure the area around the vehicle is
clear.
cMaintenance items listed here should be
checked periodically (for example, each
time you check engine oil).
cCheck that all windows and lights are
clean.
cVisually inspect tires for their appearance
and condition. Also check tires for proper
inflation.
cLock all doors.
cPosition seat and adjust head restraints.
cAdjust inside and outside mirrors.
cFasten seat belts and ask all passengers
to do likewise.
cCheck the operation of warning lights
when key is turned to the ON position.WARNING
cDo not depress the accelerator pedal
while shifting from P (Park) or N
(Neutral) to: R (Reverse), D (Drive),
2 or 1. Always depress the brake
pedal until shifting is completed.
Failure to do so could cause you to
lose control and have an accident.
cCold engine idle speed is high, so
use caution when shifting into a for-
ward or reverse gear before the en-
gine has warmed up.
cNever shift to P (Park) or R (Reverse)
while the vehicle is moving. This
could cause an accident.
CAUTION
cWhen stopping the vehicle on an
uphill grade, do not hold the vehicle
by depressing the accelerator pedal.
The foot brakes should be used for
this purpose.
cOn slippery roads, do not downshift.
This may cause a loss of control.The automatic transmission in your vehicle
is electronically controlled by a transmission
control module to produce maximum power
and smooth operation.
Shown on the following pages are the rec-
ommended operating procedures for this
transmission. Follow these procedures for
maximum vehicle performance and driving
enjoyment.
Starting the vehicle
cAfter starting the engine, fully depress the
foot brake pedal before shifting the selec-
tor lever to the R (Reverse), N (Neutral),
D (Drive), 2 or 1 position. Be sure the
vehicle is at a complete stop before at-
tempting to shift the selector lever.
This automatic transmission is designed
so the foot brake pedal MUST be de-
pressed before shifting from P (Park) to
any other position while the ignition switch
is ON.
The shift lever cannot be moved out of P
(Park) and into any of the other gear
positions if the ignition key is turned to
ACC, LOCK, or if the key is removed
from the switch.
BEFORE STARTING THE
ENGINEDRIVING WITH AN
AUTOMATIC TRANSMISSION
Starting and driving5-5
ZX
Page 248 of 260
Trailer brakes
If your trailer is equipped with a braking
system, make sure it conforms to Federal
and/or local regulations and it is properly
installed.
WARNING
Never connect a trailer brake system
directly to the vehicle brake system.
Pre-towing tips
cBe certain your vehicle maintains a level
position when a loaded and/or unloaded
trailer is hitched. Do not drive the vehicle
if it has an abnormal nose-up or nose-
down condition; check for improper
tongue load, overload, worn suspension
or other possible causes of either condi-
tion.
cAlways secure items in the trailer to
prevent load shift while driving.
cBe certain your rear view mirrors conform
to all federal, state or local regulations. If
not, install any mirrors required for towing
before driving the vehicle.
Trailer towing tips
In order to gain skill and an understanding
of the vehicle's behavior, you should prac-
tice turning, stopping and backing up in an
area which is free from traffic. Steering,
stability, and braking performance are
somewhat different than under normal driv-
ing conditions.
cAlways secure items in the trailer to
prevent load shift while driving.
c
Avoid abrupt starts, acceleration or stops.
cAvoid sharp turns or lane changes.
cAlways drive your vehicle at a moderate
speed.
cAlways block the wheels on both vehicle
and trailer when parking. Parking on a
slope is not recommended; however, if
you must do so, first block the wheels
and apply the parking brake, and then
move the transmission shift selector le-
ver into the P (Park) position. If you move
the shift selector lever to the P (Park)
position before blocking the wheels and
applying the parking brake, transmission
damage could occur.
cWhen going down a hill, shift into a lowergear and use the engine braking effect.
When ascending a long grade, downshift
the transmission to a lower gear and
reduce speed to reduce chances of en-
gine overloading and/or overheating.
cIf the engine coolant rises to an ex-
tremely high temperature when the air
conditioning system is on, turn the air
conditioner off. Coolant heat can be ad-
ditionally vented by opening the win-
dows, switching the fan control dial to
high and setting the temperature control
dial to the WARM position.
cTrailer towing requires more fuel than
normal circumstances.
cAvoid towing a trailer for the first 500
miles (800 km) of the vehicle's life.
cHave your vehicle serviced more often
than at intervals specified in the recom-
mended Maintenance Schedule.
cWhen making a turn, your trailer wheels
will be closer to the inside of the turn than
your vehicle wheels. To compensate for
this, make a larger than normal turning
radius during the turn.
cCrosswinds and rough roads adversely
Technical and consumer information
10-17
ZX
Page 256 of 260

H
Hazard warning flasher switch .................. 2-16
Head restraints ............................................ 1-6
Headlight control switch............................. 2-13
Headlights .................................................. 8-20
Heater
Heater and air conditioner (automatic)
(if so equipped)..................................... 4-10
Heater and air conditioner (manual)....... 4-3
Rear seat heater and air conditioner ... 4-13
Hood release ............................................. 3-11
I
Ignition switch .............................................. 5-4
Important vehicle information label.......... 10-10
Increasing fuel economy............................ 5-12
Indicator lights and chimes (See warning/
indicator lights and chimes) ......................... 2-6
Inertial fuel shut off switch ......................... 6-11
Inside mirror ............................................... 3-18
Instrument brightness control .................... 2-15
Integrated child safety seats...................... 1-57
Interior lights .............................................. 2-24
J
Jump starting ...................................... 6-8, 8-12K
Key ............................................................... 3-2
Keyless entry system (See multi-remote
control system) ............................................ 3-8
L
Labels
Air conditioner specification label ....... 10-11
Emission control information label...... 10-10
Engine serial number ........................... 10-9
F.M.V.S.S. certification label .............. 10-10
Vehicle identification number (VIN) ...... 10-9
Vehicle identification number (VIN)
plate ...................................................... 10-9
Warning labels (for SRS) ..................... 1-23
License plate
Installing the license plate .................. 10-11
Light
Air bag warning light............................. 1-23
Brake light (See stop light) ................... 8-22
Bulb check/instrument panel .................. 2-6
Bulb replacement.................................. 8-22
Cornering light ...................................... 2-15
Headlight control switch ....................... 2-13
Headlights ............................................. 8-20
Interior lights ......................................... 2-24
Light bulbs ............................................ 8-20
Luggage compartment lights ................ 2-24
Spotlights (See map light) .................... 2-25Warning/indicator lights and chimes ...... 2-6
Lock
Child safety sliding door lock ................. 3-5
Door locks............................................... 3-2
Fuel filler lid lock opener lever ............. 3-16
Power door lock...................................... 3-6
Rear door lock ...................................... 3-12
Luggage compartment lights ..................... 2-24
Luggage rack ............................................. 3-15
Luggage (See vehicle loading
information ............................................... 10-12
M
Maintenance
General maintenance ............................. 9-2
Inside the vehicle.................................... 9-3
Maintenance precautions ....................... 8-2
Outside the vehicle ................................. 9-2
Periodic maintenance schedules ............ 9-5
Seat belt maintenance.......................... 1-38
Under the hood and vehicle ................... 9-4
Malfunction indicator light ............................ 2-9
Manual antenna ......................................... 4-20
Manual front seat adjustment ...................... 1-3
Manual rear windows................................. 2-22
Map light .................................................... 2-25
Mirror
Inside mirror.......................................... 3-18
Outside mirror control ........................... 3-17
Outside mirrors ..................................... 3-18
Vanity mirror ......................................... 3-19
11-3
ZX