1998 NISSAN QUEST low oil pressure
[x] Cancel search: low oil pressurePage 87 of 260

Checking bulbs
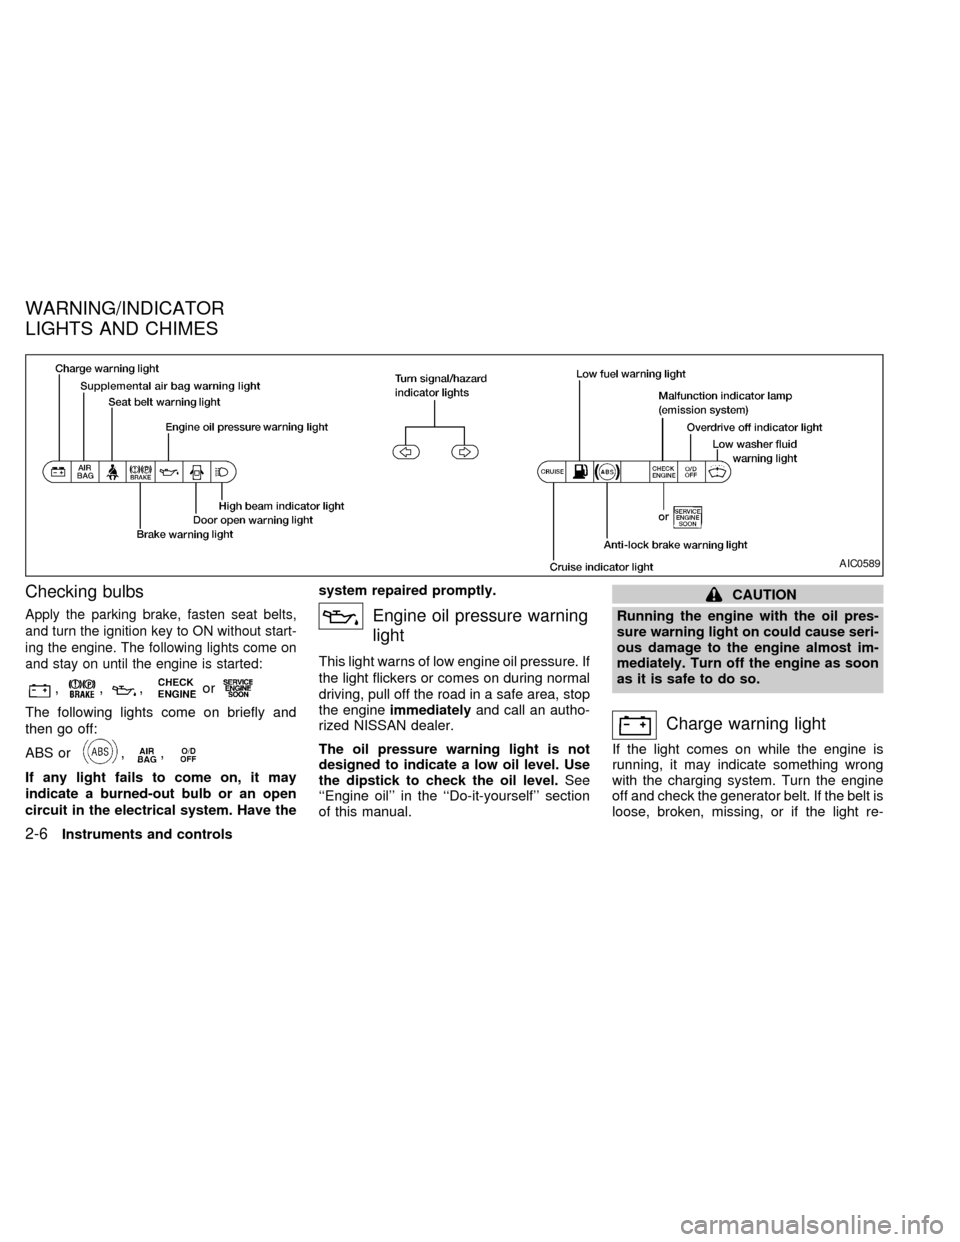
Apply the parking brake, fasten seat belts,
and turn the ignition key to ON without start-
ing the engine. The following lights come on
and stay on until the engine is started:
,,,or
The following lights come on briefly and
then go off:
ABS or
,,
If any light fails to come on, it may
indicate a burned-out bulb or an open
circuit in the electrical system. Have thesystem repaired promptly.
Engine oil pressure warning
light
This light warns of low engine oil pressure. If
the light flickers or comes on during normal
driving, pull off the road in a safe area, stop
the engineimmediatelyand call an autho-
rized NISSAN dealer.
The oil pressure warning light is not
designed to indicate a low oil level. Use
the dipstick to check the oil level.See
``Engine oil'' in the ``Do-it-yourself'' section
of this manual.
CAUTION
Running the engine with the oil pres-
sure warning light on could cause seri-
ous damage to the engine almost im-
mediately. Turn off the engine as soon
as it is safe to do so.
Charge warning light
If the light comes on while the engine is
running, it may indicate something wrong
with the charging system. Turn the engine
off and check the generator belt. If the belt is
loose, broken, missing, or if the light re-
AIC0589
WARNING/INDICATOR
LIGHTS AND CHIMES
2-6Instruments and controls
ZX
Page 177 of 260

cNever jack up the vehicle more than
necessary.
cNever use blocks on or under the
jack.
cDo not start or run engine while
vehicle is on the jack as it may cause
the vehicle to move.
cDo not allow passengers to stay in
the vehicle while it is on the jack.
cNever run the engine with the wheels
off of the ground. It may cause the
vehicle to move.
Installing wheel
The T-type spare tire is designed for
emergency use. See specific instruc-
tions under the heading ``Wheels and
tires'' in the ``Do-it-yourself'' section of
this manual.
1. Clean any mud or dirt from the surface
between the wheel and hub.
2. Carefully put the wheel on and tighten
the lug nuts finger tight.
3. With the lug wrench, tighten the lug nuts
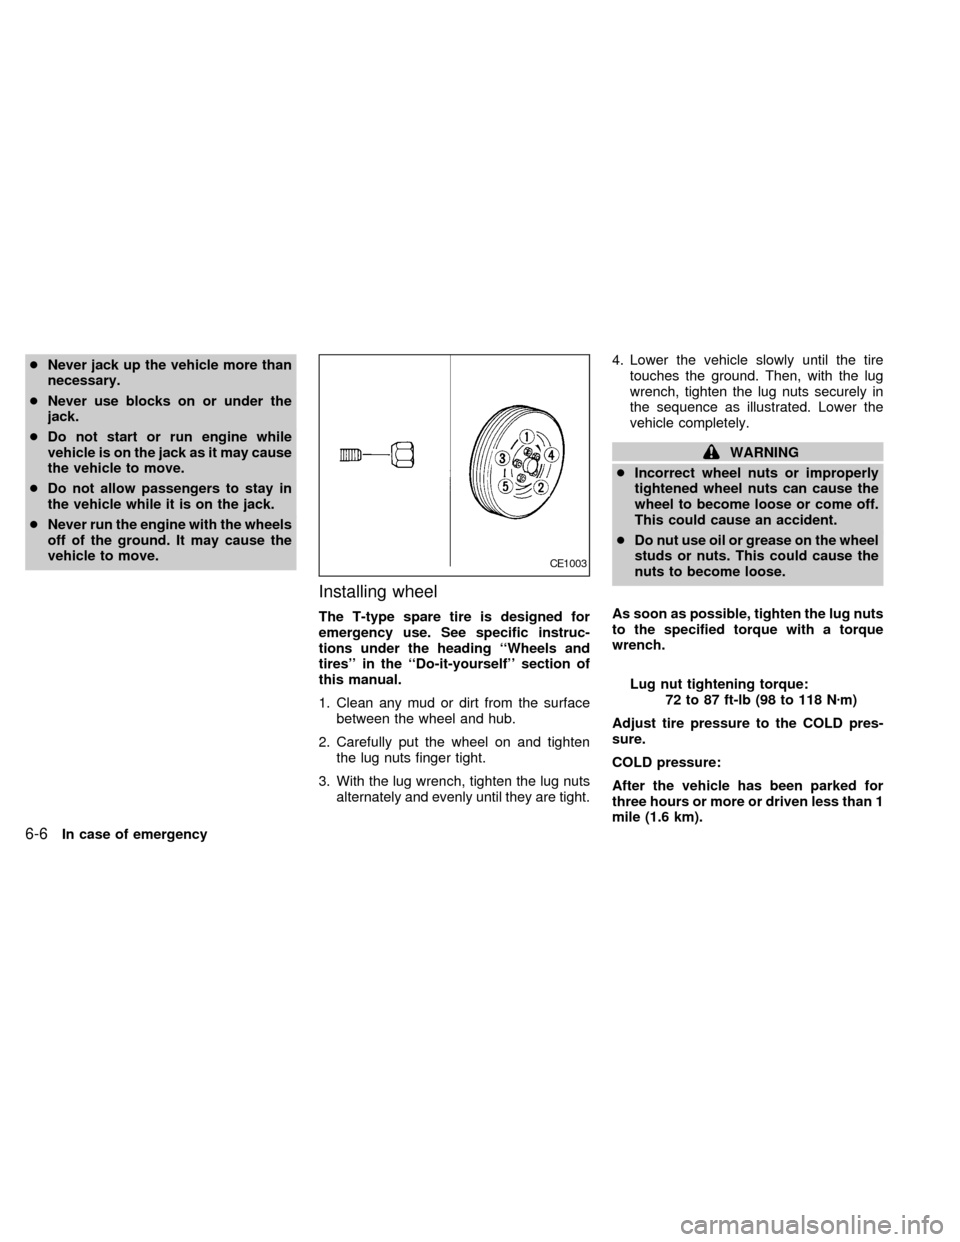
alternately and evenly until they are tight.4. Lower the vehicle slowly until the tire
touches the ground. Then, with the lug
wrench, tighten the lug nuts securely in
the sequence as illustrated. Lower the
vehicle completely.
WARNING
cIncorrect wheel nuts or improperly
tightened wheel nuts can cause the
wheel to become loose or come off.
This could cause an accident.
cDo nut use oil or grease on the wheel
studs or nuts. This could cause the
nuts to become loose.
As soon as possible, tighten the lug nuts
to the specified torque with a torque
wrench.
Lug nut tightening torque:
72 to 87 ft-lb (98 to 118 Nzm)
Adjust tire pressure to the COLD pres-
sure.
COLD pressure:
After the vehicle has been parked for
three hours or more or driven less than 1
mile (1.6 km).
CE1003
6-6In case of emergency
ZX
Page 193 of 260

When performing any inspection or mainte-
nance work on your vehicle, always take
care to prevent serious accidental injury to
yourself or damage to the vehicle. The
following are general precautions which
should be closely observed.
WARNING
cPark the vehicle on a level surface,
apply the parking brake securely and
block the wheels to prevent the ve-
hicle from moving. Move the gear-
shift lever to N (neutral).
cBe sure the ignition key is OFF when
performing any replacement or re-
pair.
c
Be sure to turn the ignition key to the
OFF or LOCK position. When the igni-
tion key is in the ON or ACC position,
the cooling fan may start to operate
suddenly even when the engine is not
running. To avoid injury always dis-
connect the negative battery cable
before working near the fan.
cIf you must work with the engine run-
ning, keep your hands, clothing, hair
and tools away from moving fans,
belts and any other moving parts.
cIt is advisable to remove ties and any
jewelry, such as rings, watches, etc.
before working on your vehicle.
cAlways wear eye protection when-
ever you work on your vehicle.
cIf you must run the engine in an
enclosed space such as a garage, be
sure there is proper ventilation for
exhaust gases.
cNever get under the vehicle while it
is supported only by a jack. If it is
necessary to work under the vehicle,
support it with safety stands.
cKeep smoking materials, flame and
sparks away from fuel and the bat-
tery.
cOn gasoline engine models with the
multiport fuel injection (MFI) system,
the fuel filter or fuel lines should be
serviced by an authorized NISSAN
dealer because the fuel lines are
under high pressure even when the
engine is off.CAUTION
cDo not work under the hood while
the engine is hot. Turn off the engine
and wait until it cools down.
cNever connect or disconnect either
the battery or any transistorized
component connector while the igni-
tion is ON.
cAvoid contact with used engine oil.
Improperly disposed motor oil and/
or other vehicle fluids can hurt the
environment. Always conform to lo-
cal regulations for disposal of ve-
hicle fluid.
This ``Do-it-yourself'' section gives instruc-
tions regarding only those items which are
relatively easy for an owner to perform.
You should be aware that incomplete or
improper servicing may result in operating
difficulties or excessive emissions, and
could affect your warranty coverage.If in
doubt about any servicing, have it done
by an authorized NISSAN dealer.
MAINTENANCE
PRECAUTIONS
8-2Do-it-yourself
ZX
Page 196 of 260

If the cooling system frequently requires
coolant, have it checked by an autho-
rized NISSAN dealer.
CHANGING ENGINE COOLANT
An authorized NISSAN dealer can change
the engine coolant. The service procedure
is found in NISSAN's service manual.
Improper servicing can result in reduced
heater performance and engine
overheating.
WARNING
cTo avoid danger of being scalded,
never change the coolant when the
engine is hot.
cNever remove the radiator cap when
the engine is hot. Serious burns
could be caused by high pressure
fluid escaping from the radiator.
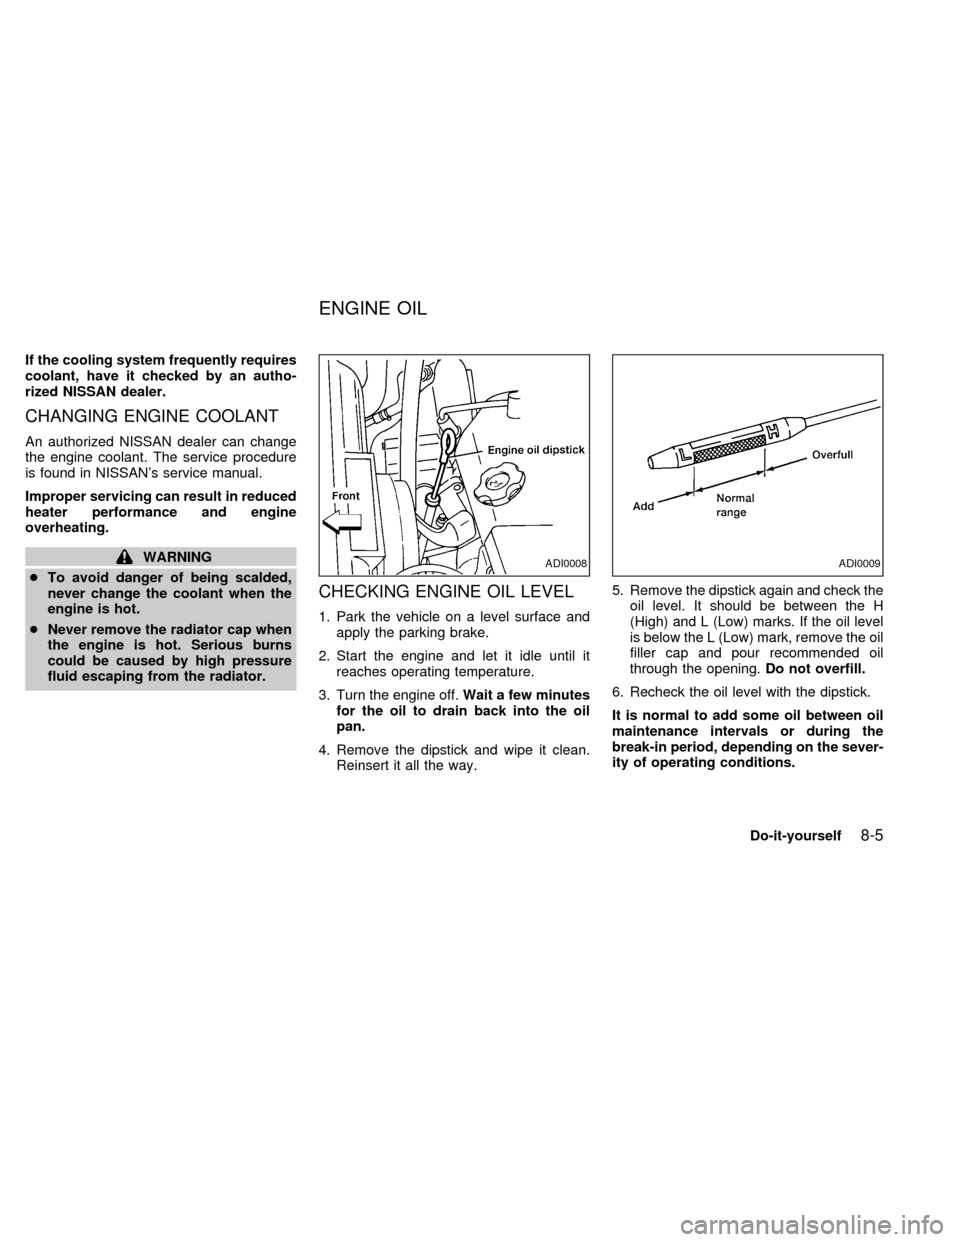
CHECKING ENGINE OIL LEVEL
1. Park the vehicle on a level surface and
apply the parking brake.
2. Start the engine and let it idle until it
reaches operating temperature.
3. Turn the engine off.Wait a few minutes
for the oil to drain back into the oil
pan.
4. Remove the dipstick and wipe it clean.
Reinsert it all the way.5. Remove the dipstick again and check the
oil level. It should be between the H
(High) and L (Low) marks. If the oil level
is below the L (Low) mark, remove the oil
filler cap and pour recommended oil
through the opening.Do not overfill.
6. Recheck the oil level with the dipstick.
It is normal to add some oil between oil
maintenance intervals or during the
break-in period, depending on the sever-
ity of operating conditions.
ADI0008ADI0009
ENGINE OIL
Do-it-yourself8-5
ZX
Page 260 of 260

Recommended fuel:
Unleaded gasoline, at least 87 AKI number
(RON 91).
For further details such as gasohol, see
``Fuel recommendation'' in the ``Technical
and consumer information'' section.
Recommended engine oil:
cAPI SG or SH and Energy Conserving II
cAPI Certification Mark
cSAE 5W-30 viscosity oil is preferred for
all ambient temperatures
See ``Engine oil and oil filter recommenda-
tion'' in the ``Technical and consumer infor-
mation'' section.
Cold tire pressure:
See tire placard affixed to the glove com-
partment lid.
Recommended new vehicle
break-in procedure:
During the first 1,000 miles (1,600 km) of
vehicle use, follow the recommendations
outlined in the ªBreak-in schedule'' informa-
tion found in the ªStarting and Drivingº sec-
tion of this Owner's Manual. Follow these
recommendations for the future reliability
and economy of your new vehicle. Failure to
follow these recommendations may result in
vehicle damage or shortened engine life.
AGS1009
GAS STATION INFORMATION QUICK REFERENCE
ZX