1998 NISSAN FRONTIER transmission fluid
[x] Cancel search: transmission fluidPage 48 of 224
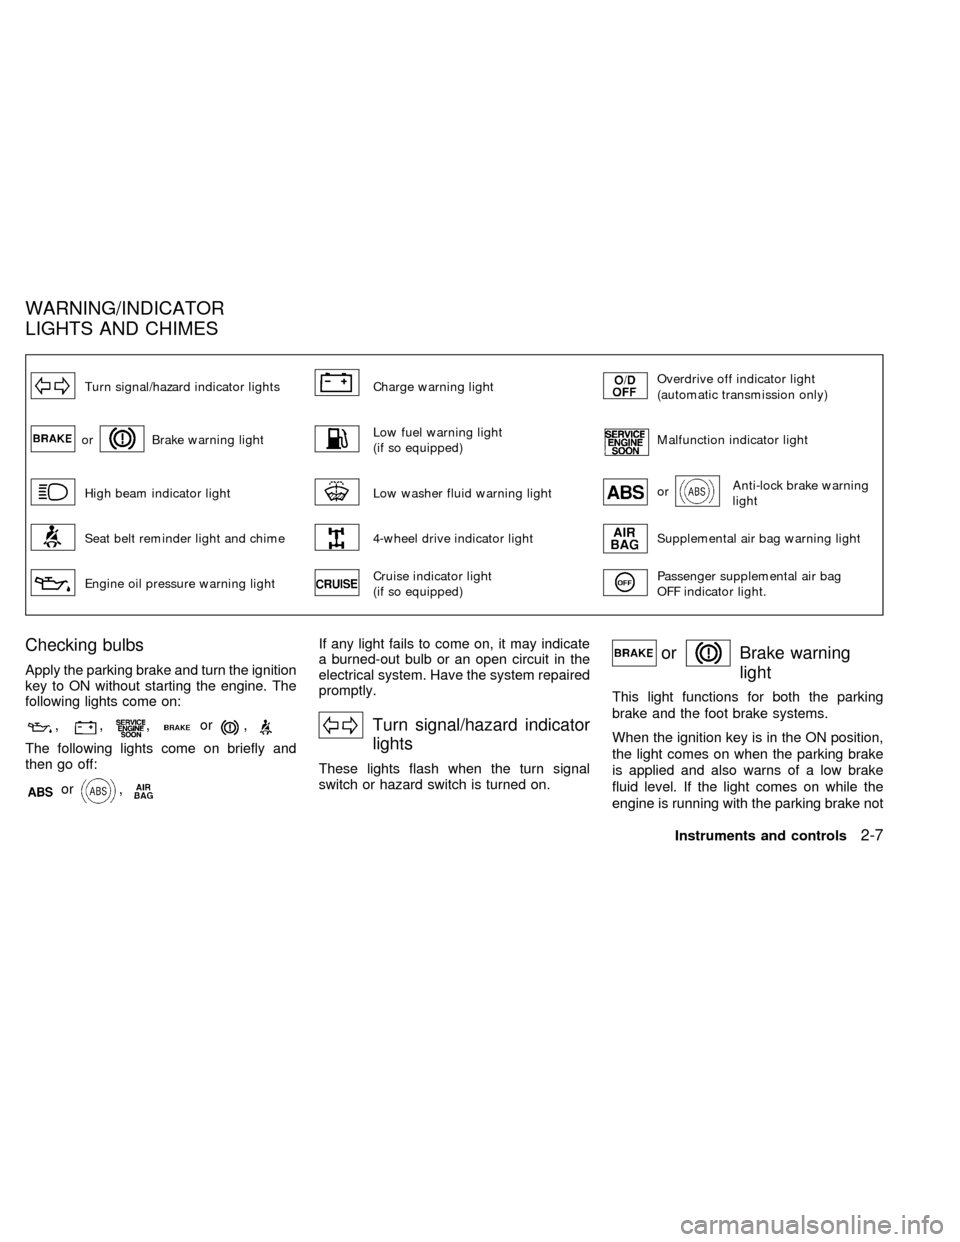
Turn signal/hazard indicator lightsCharge warning lightOverdrive off indicator light
(automatic transmission only)
orBrake warning lightLow fuel warning light
(if so equipped)Malfunction indicator light
High beam indicator lightLow washer fluid warning lightorAnti-lock brake warning
light
Seat belt reminder light and chime4-wheel drive indicator lightSupplemental air bag warning light
Engine oil pressure warning lightCruise indicator light
(if so equipped)Passenger supplemental air bag
OFF indicator light.
Checking bulbs
Apply the parking brake and turn the ignition
key to ON without starting the engine. The
following lights come on:
,,,or,
The following lights come on briefly and
then go off:
or,
If any light fails to come on, it may indicate
a burned-out bulb or an open circuit in the
electrical system. Have the system repaired
promptly.
Turn signal/hazard indicator
lights
These lights flash when the turn signal
switch or hazard switch is turned on.
orBrake warning
light
This light functions for both the parking
brake and the foot brake systems.
When the ignition key is in the ON position,
the light comes on when the parking brake
is applied and also warns of a low brake
fluid level. If the light comes on while the
engine is running with the parking brake not
WARNING/INDICATOR
LIGHTS AND CHIMES
Instruments and controls2-7
ZX
Page 107 of 224
cMake sure the area around the vehicle is
clear.
cCheck fluid levels such as engine oil,
coolant, brake and clutch fluid, and win-
dow washer fluid as frequently as pos-
sible, at least whenever you refuel.
cCheck that all windows and lights are
clean.
cVisually inspect tires for their appearance
and condition. Also check tires for proper
inflation.
cLock all doors.
cPosition seat and adjust head restraints.
cAdjust inside and outside mirrors.
cFasten seat belts and ask all passengers
to do likewise.
c
Check the operation of warning lights when
key is turned to the ON (3) position. See
``Warning/indicator lights and chimes'' in
the ``Instruments and controls'' section.
WARNING
cDo not depress the accelerator pedal
while shifting from P (Park) or N
(Neutral) to R (Reverse), D (Drive), 2
or 1. Always depress the brake pedal
until shifting is completed. Failure to
do so could cause you to lose con-
trol and have an accident.
cCold engine idle speed is high, so
use caution when shifting into a for-
ward or reverse gear before the en-
gine has warmed up.
cNever shift to P (Park) or R (Reverse)
while the vehicle is moving. This
could cause an accident.
CAUTION
cWhen stopping the vehicle on an
uphill grade, do not hold the vehicle
by depressing the accelerator pedal.
The foot brake should be used for
this purpose.
cOn slippery roads, do not downshift.
This may cause a loss of control.
The automatic transmission in your vehicle
is electronically controlled by a transmission
control module to produce maximum power
and smooth operation.
The recommended operating procedures for
this transmission are shown on the following
pages. Follow these procedures for maximum
vehicle performance and driving enjoyment.
Starting the vehicle
cAfter starting the engine, fully depress
the foot brake pedal to ensure the vehicle
is at a complete stop before attempting to
shift the selector lever.
cKeep the foot brake pedal depressed and
shift the selector lever into a driving gear.
cRelease the foot brake, then gradually
start the vehicle in motion.
This automatic transmission is designed
so the foot brake pedal MUST be de-
pressed before shifting from P (Park) to
any drive position while the ignition
switch is ON.
The shift lever cannot be moved out of P
(Park) and into any of the other gear
positions if the ignition key is turned to
LOCK or if the key is removed.
If the battery charge is low, the shift lever
can be moved if the ignition switch is in
the ACC position.
BEFORE STARTING THE
ENGINEDRIVING WITH AUTOMATIC
TRANSMISSION (if so
equipped)
5-6Starting and driving
ZX
Page 136 of 224
To start your engine with a booster battery,
the instructions and precautions below must
be followed.
WARNING
cIf done incorrectly, jump starting can
lead to a battery explosion, resulting
in severe injury or death. It could
also damage your vehicle.
cExplosive hydrogen gas is always
present in the vicinity of the battery.
Keep all sparks and flames away
from the battery.
cDo not allow battery fluid to come
into contact with eyes, skin, cloth or
painted surfaces. Battery fluid is a
corrosive sulphuric acid solution
which can cause severe burns. If the
fluid should come into contact with
anything, immediately flush the con-
tacted area with water.
cKeep battery out of the reach of
children.
cThe booster battery must be rated at
12 volts. Use of an improperly rated
battery can damage your vehicle.cWhenever working on or near a bat-
tery, always wear suitable eye pro-
tectors (e.g., goggles or industrial
safety spectacles) and remove rings,
metal bands, or any other jewelry.
Do not lean over the battery when
jump starting.
cDo not attempt to jump start a frozen
battery. It could explode and cause
serious injury.
Always follow the instructions below
exactly. Failure to do so could result
in damage to the charging system and
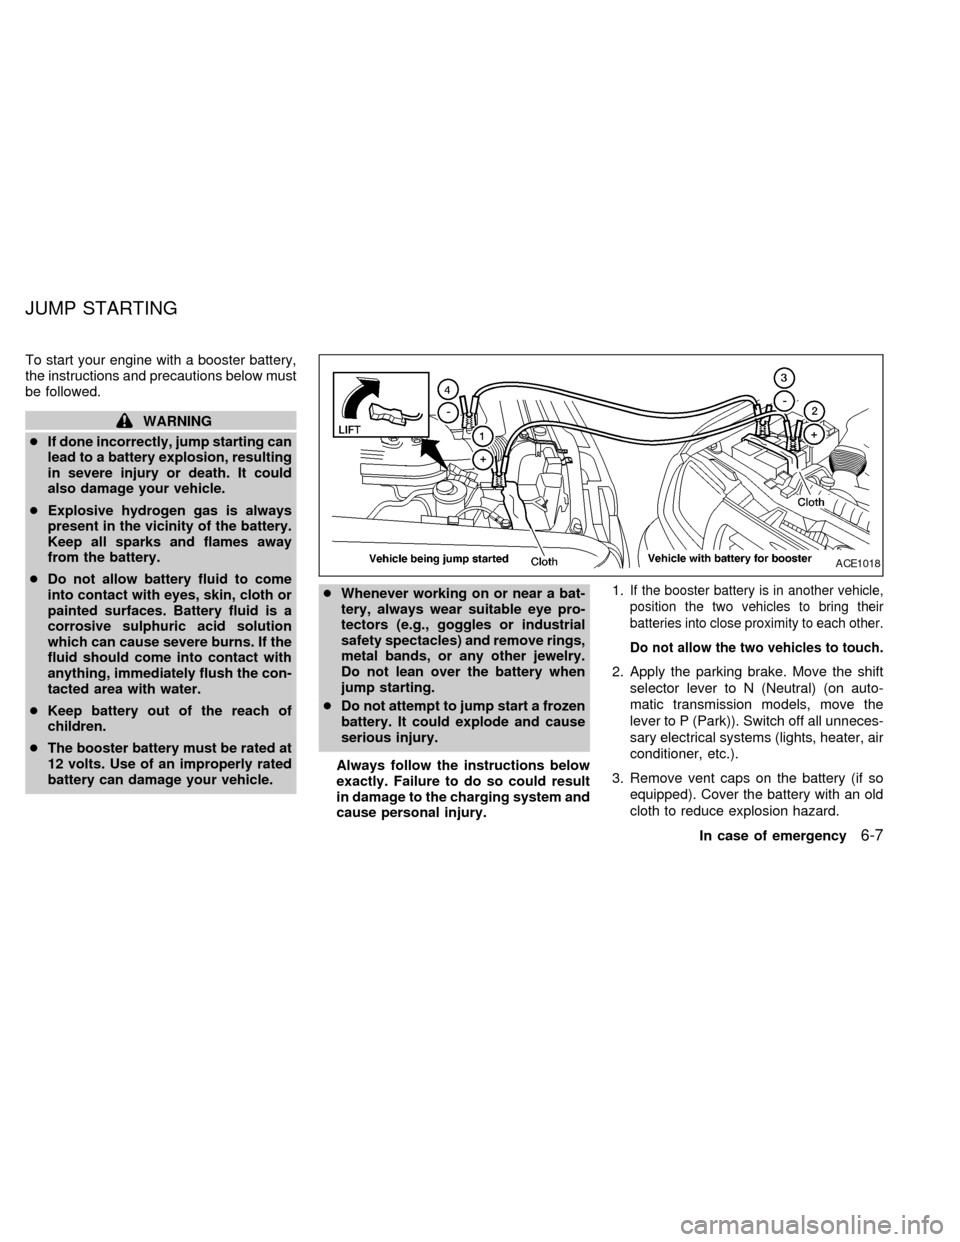
cause personal injury.1.
If the booster battery is in another vehicle,
position the two vehicles to bring their
batteries into close proximity to each other.
Do not allow the two vehicles to touch.
2. Apply the parking brake. Move the shift
selector lever to N (Neutral) (on auto-
matic transmission models, move the
lever to P (Park)). Switch off all unneces-
sary electrical systems (lights, heater, air
conditioner, etc.).
3. Remove vent caps on the battery (if so
equipped). Cover the battery with an old
cloth to reduce explosion hazard.
ACE1018
JUMP STARTING
In case of emergency6-7
ZX
Page 148 of 224

8 Do-it-yourself
Maintenance precautions .......................................8-2
Engine compartment check locations ....................8-3
Engine cooling system ...........................................8-4
Checking engine coolant level ...............................8-4
Changing engine coolant .......................................8-5
Engine oil ...............................................................8-6
Checking engine oil level .......................................8-6
Changing engine oil ...............................................8-7
Changing engine oil filter .......................................8-9
Automatic transmission fluid (ATF) ........................8-9
Temperature conditions for checking ATF .............8-9
Power steering fluid..............................................8-11
Brake and clutch fluid...........................................8-11
Window washer fluid ............................................8-12
Battery ..................................................................8-13Jump starting ........................................................8-13
Drive belts ............................................................8-14
Spark plug replacement .......................................8-15
Air cleaner housing filter ......................................8-16
Wiper blades ........................................................8-17
Parking brake check.............................................8-19
Brake pedal ..........................................................8-19
Brake booster .......................................................8-20
Clutch pedal .........................................................8-21
Fuses ....................................................................8-22
Light bulbs ............................................................8-23
Headlights ............................................................8-23
Bulb replacement .................................................8-24
Wheels and tires ..................................................8-26
Four-wheel drive models ......................................8-29
ZX
Page 149 of 224
When performing any inspection or mainte-
nance work on your vehicle, always take
care to prevent serious accidental injury to
yourself or damage to the vehicle. The
following are general precautions which
should be closely observed.
WARNING
cPark the vehicle on a level surface,
apply the parking brake securely and
block the wheels to prevent the ve-
hicle from moving. For a manual
transmission, move the shift lever to
N (Neutral). For an automatic trans-
mission, move the shift lever to P
(Park).
cBe sure the ignition key is OFF when
performing any parts replacement or
repairs.
cIf you must work with the engine
running, keep your hands, clothing,
hair and tools away from moving
fans, belts, and any other moving
parts.
cIt is advisable to remove ties and any
jewelry, such as rings, watches, etc.,
before working on your vehicle.cAlways wear eye protection when-
ever you work on your vehicle.
cIf you must run the engine in an
enclosed space such as a garage, be
sure there is proper ventilation for
exhaust gases.
cNever get under the vehicle while it
is supported only by a jack. If it is
necessary to work under the vehicle,
support it with safety stands.
cKeep smoking materials, flame and
sparks away from fuel and battery.
cOn gasoline engine models with the
Multiport Fuel Injection (MFI) sys-
tem, the fuel filter or fuel lines
should be serviced by an authorized
NISSAN dealer because the fuel
lines are under high pressure even
when the engine is off.
CAUTION
cDo not work under the hood while
the engine is hot. Turn the engine off
and wait until it cools down.cNever connect or disconnect either
the battery or any transistorized
component connector while the igni-
tion is on.
cAvoid contact with used motor oil.
Improperly disposed motor oil
and/or other vehicle fluids can hurt
the environment. Always conform to
local regulations for disposal of ve-
hicle fluid.
This ``Do-it-yourself'' section gives instruc-
tions regarding only those items which are
relatively easy for an owner to perform.
You should be aware that incomplete or
improper servicing may result in operating
difficulties or excessive emissions, and
could affect your warranty coverage.If in
doubt about any servicing, have it done
by an authorized NISSAN dealer.
MAINTENANCE
PRECAUTIONS
8-2Do-it-yourself
ZX
Page 156 of 224
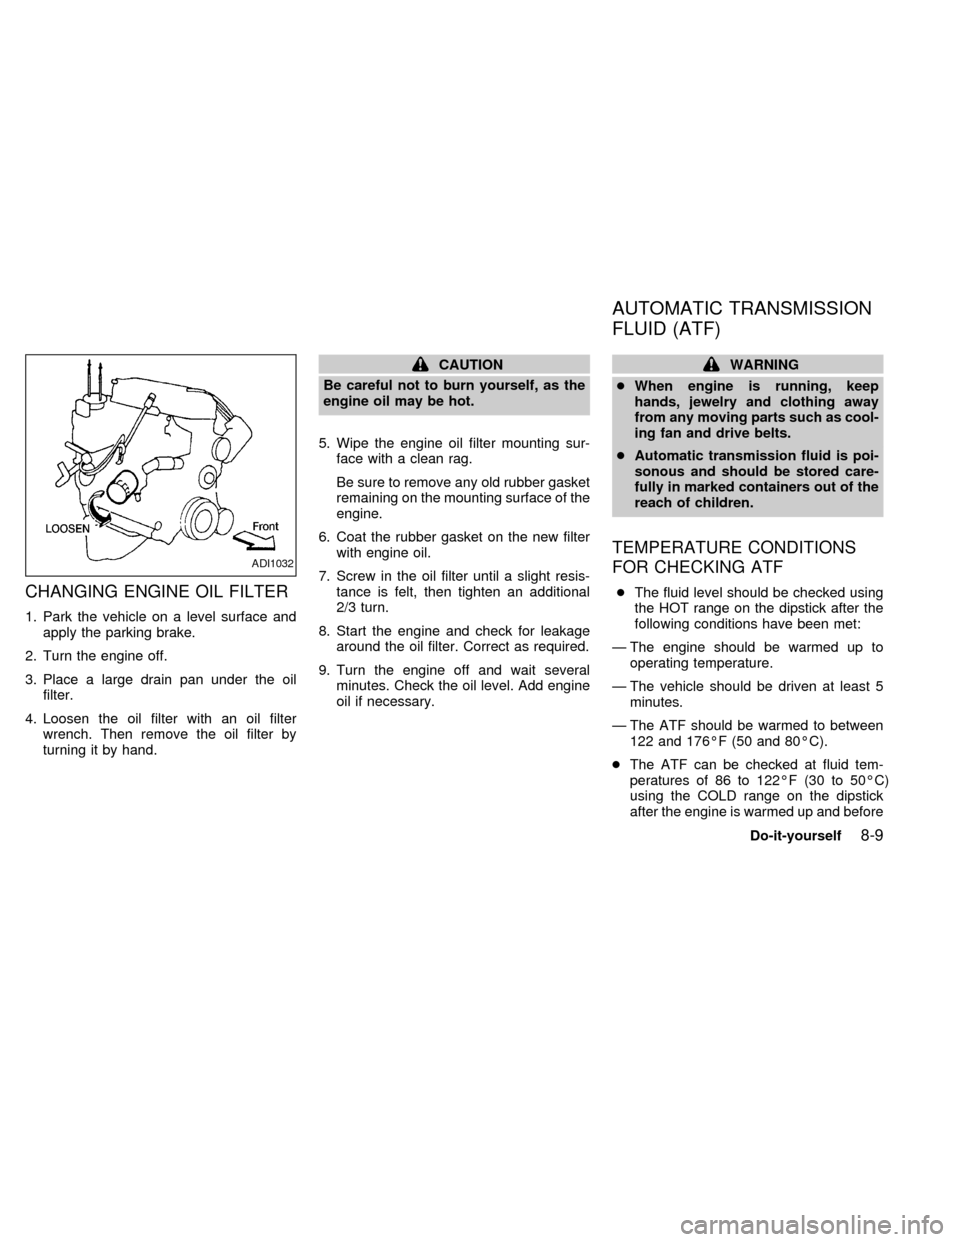
CHANGING ENGINE OIL FILTER
1. Park the vehicle on a level surface and
apply the parking brake.
2. Turn the engine off.
3. Place a large drain pan under the oil
filter.
4. Loosen the oil filter with an oil filter
wrench. Then remove the oil filter by
turning it by hand.
CAUTION
Be careful not to burn yourself, as the
engine oil may be hot.
5. Wipe the engine oil filter mounting sur-
face with a clean rag.
Be sure to remove any old rubber gasket
remaining on the mounting surface of the
engine.
6. Coat the rubber gasket on the new filter
with engine oil.
7. Screw in the oil filter until a slight resis-
tance is felt, then tighten an additional
2/3 turn.
8. Start the engine and check for leakage
around the oil filter. Correct as required.
9. Turn the engine off and wait several
minutes. Check the oil level. Add engine
oil if necessary.WARNING
cWhen engine is running, keep
hands, jewelry and clothing away
from any moving parts such as cool-
ing fan and drive belts.
cAutomatic transmission fluid is poi-
sonous and should be stored care-
fully in marked containers out of the
reach of children.
TEMPERATURE CONDITIONS
FOR CHECKING ATF
cThe fluid level should be checked using
the HOT range on the dipstick after the
following conditions have been met:
Ð The engine should be warmed up to
operating temperature.
Ð The vehicle should be driven at least 5
minutes.
Ð The ATF should be warmed to between
122 and 176ÉF (50 and 80ÉC).
cThe ATF can be checked at fluid tem-
peratures of 86 to 122ÉF (30 to 50ÉC)
using the COLD range on the dipstick
after the engine is warmed up and before
ADI1032
AUTOMATIC TRANSMISSION
FLUID (ATF)
Do-it-yourself8-9
ZX
Page 157 of 224
driving. However, the fluid should be
re-checked using the HOT range.
1. Park the vehicle on a level surface and
set the parking brake.
2. Start the engine and then move the se-
lector lever through each gear range,
ending in P (Park).
3. Check the fluid level with the engine
idling.
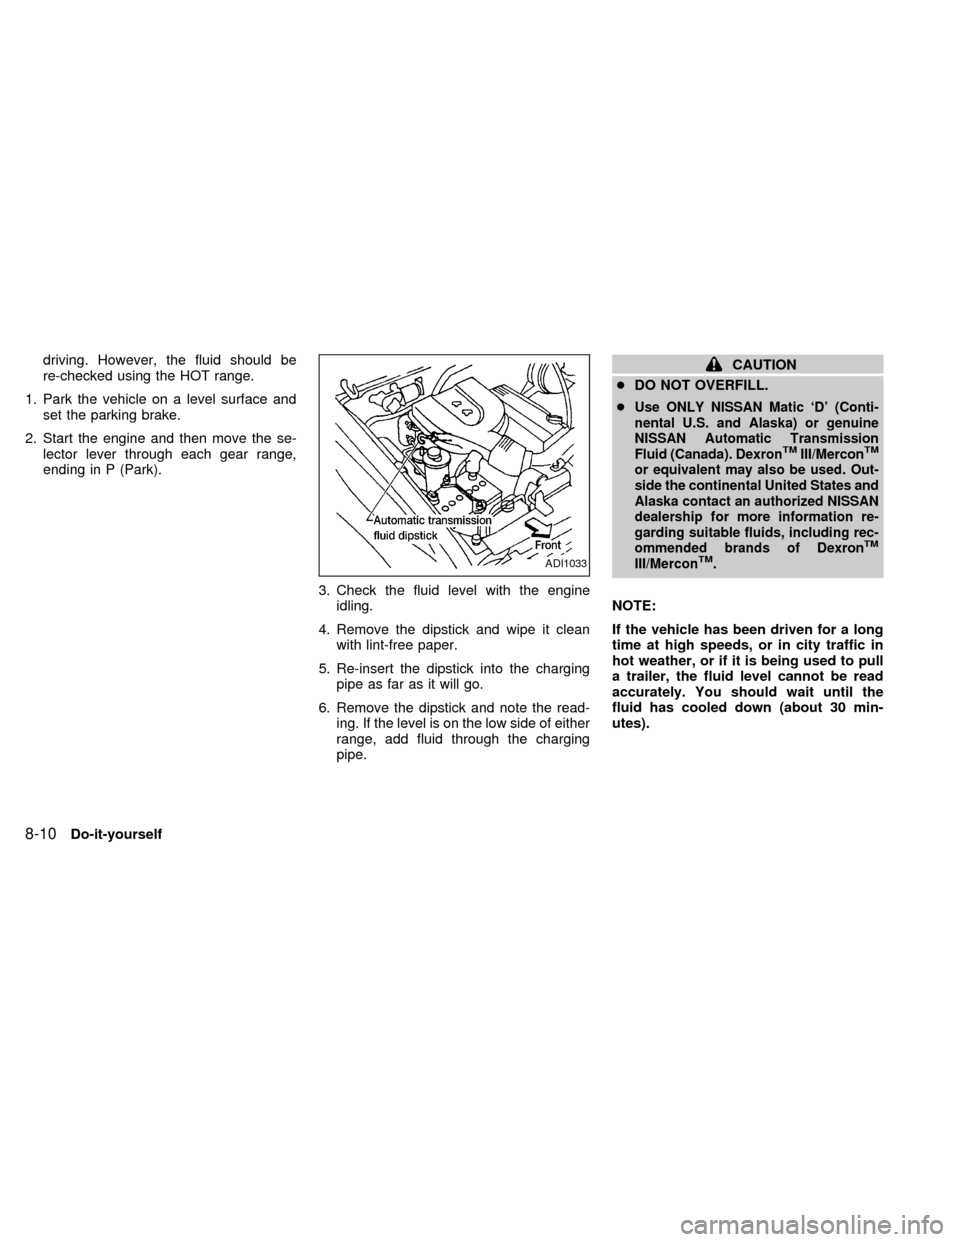
4. Remove the dipstick and wipe it clean
with lint-free paper.
5. Re-insert the dipstick into the charging
pipe as far as it will go.
6. Remove the dipstick and note the read-
ing. If the level is on the low side of either
range, add fluid through the charging
pipe.CAUTION
cDO NOT OVERFILL.
c
Use ONLY NISSAN Matic `D' (Conti-
nental U.S. and Alaska) or genuine
NISSAN Automatic Transmission
Fluid (Canada). Dexron
TMIII/MerconTM
or equivalent may also be used. Out-
side the continental United States and
Alaska contact an authorized NISSAN
dealership for more information re-
garding suitable fluids, including rec-
ommended brands of Dexron
TM
III/MerconTM.
NOTE:
If the vehicle has been driven for a long
time at high speeds, or in city traffic in
hot weather, or if it is being used to pull
a trailer, the fluid level cannot be read
accurately. You should wait until the
fluid has cooled down (about 30 min-
utes).
ADI1033
8-10Do-it-yourself
ZX
Page 158 of 224
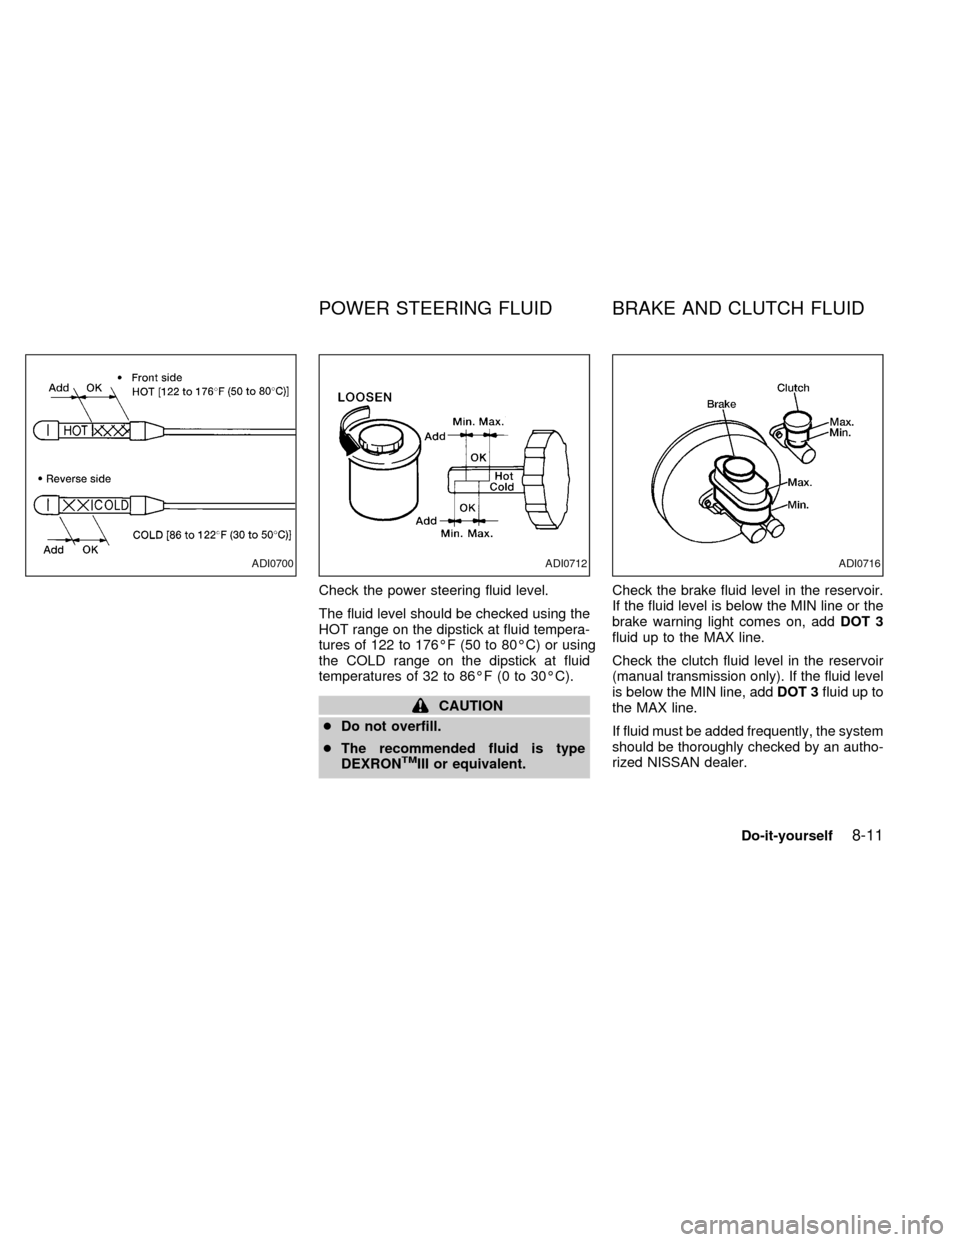
Check the power steering fluid level.
The fluid level should be checked using the
HOT range on the dipstick at fluid tempera-
tures of 122 to 176ÉF (50 to 80ÉC) or using
the COLD range on the dipstick at fluid
temperatures of 32 to 86ÉF (0 to 30ÉC).
CAUTION
cDo not overfill.
cThe recommended fluid is type
DEXRON
TMIII or equivalent.Check the brake fluid level in the reservoir.
If the fluid level is below the MIN line or the
brake warning light comes on, addDOT 3
fluid up to the MAX line.
Check the clutch fluid level in the reservoir
(manual transmission only). If the fluid level
is below the MIN line, addDOT 3fluid up to
the MAX line.
If fluid must be added frequently, the system
should be thoroughly checked by an autho-
rized NISSAN dealer.
ADI0700ADI0712ADI0716
POWER STEERING FLUID BRAKE AND CLUTCH FLUID
Do-it-yourself8-11
ZX