1998 NISSAN FRONTIER parking brake
[x] Cancel search: parking brakePage 48 of 224
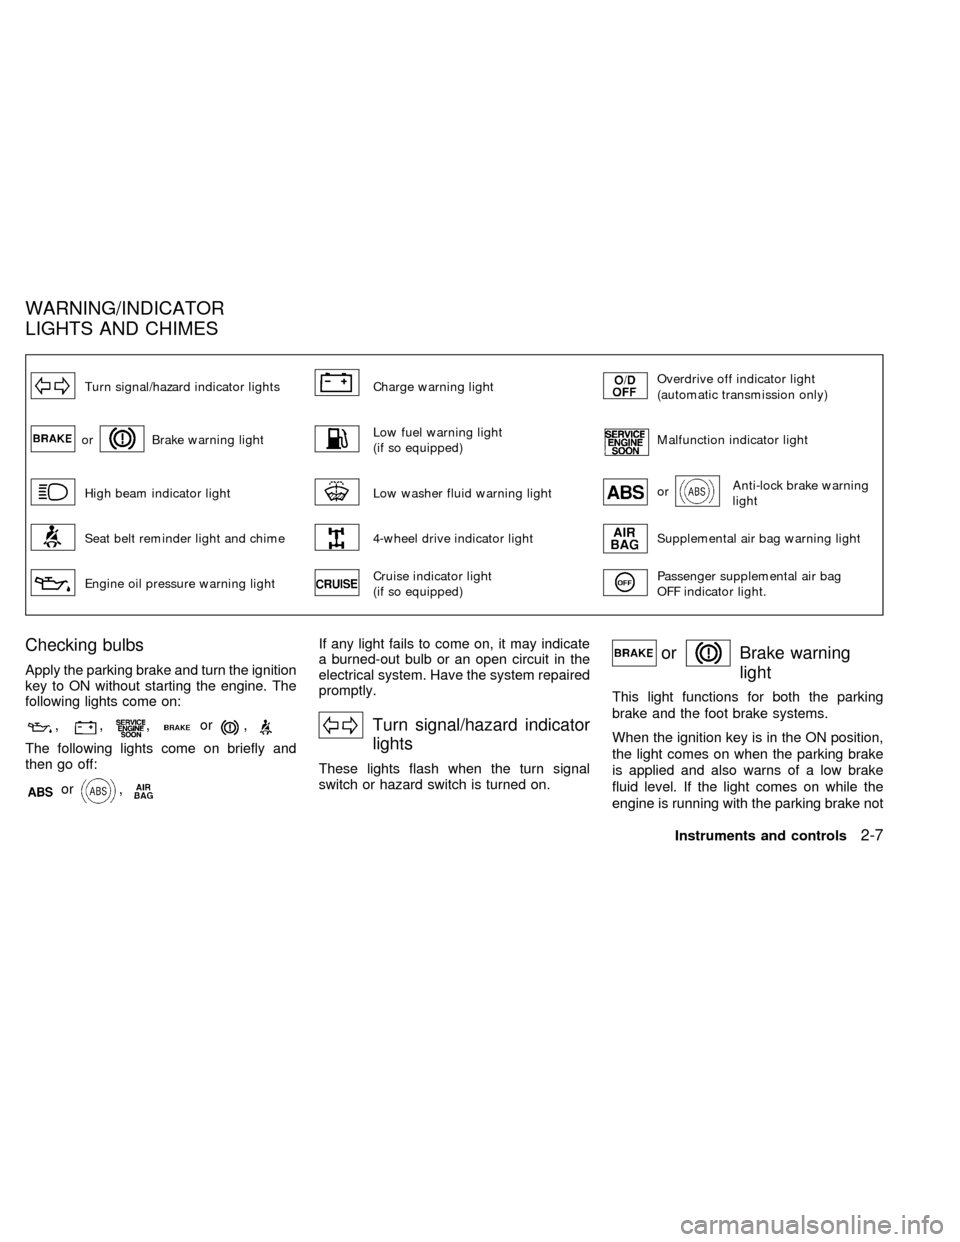
Turn signal/hazard indicator lightsCharge warning lightOverdrive off indicator light
(automatic transmission only)
orBrake warning lightLow fuel warning light
(if so equipped)Malfunction indicator light
High beam indicator lightLow washer fluid warning lightorAnti-lock brake warning
light
Seat belt reminder light and chime4-wheel drive indicator lightSupplemental air bag warning light
Engine oil pressure warning lightCruise indicator light
(if so equipped)Passenger supplemental air bag
OFF indicator light.
Checking bulbs
Apply the parking brake and turn the ignition
key to ON without starting the engine. The
following lights come on:
,,,or,
The following lights come on briefly and
then go off:
or,
If any light fails to come on, it may indicate
a burned-out bulb or an open circuit in the
electrical system. Have the system repaired
promptly.
Turn signal/hazard indicator
lights
These lights flash when the turn signal
switch or hazard switch is turned on.
orBrake warning
light
This light functions for both the parking
brake and the foot brake systems.
When the ignition key is in the ON position,
the light comes on when the parking brake
is applied and also warns of a low brake
fluid level. If the light comes on while the
engine is running with the parking brake not
WARNING/INDICATOR
LIGHTS AND CHIMES
Instruments and controls2-7
ZX
Page 51 of 224
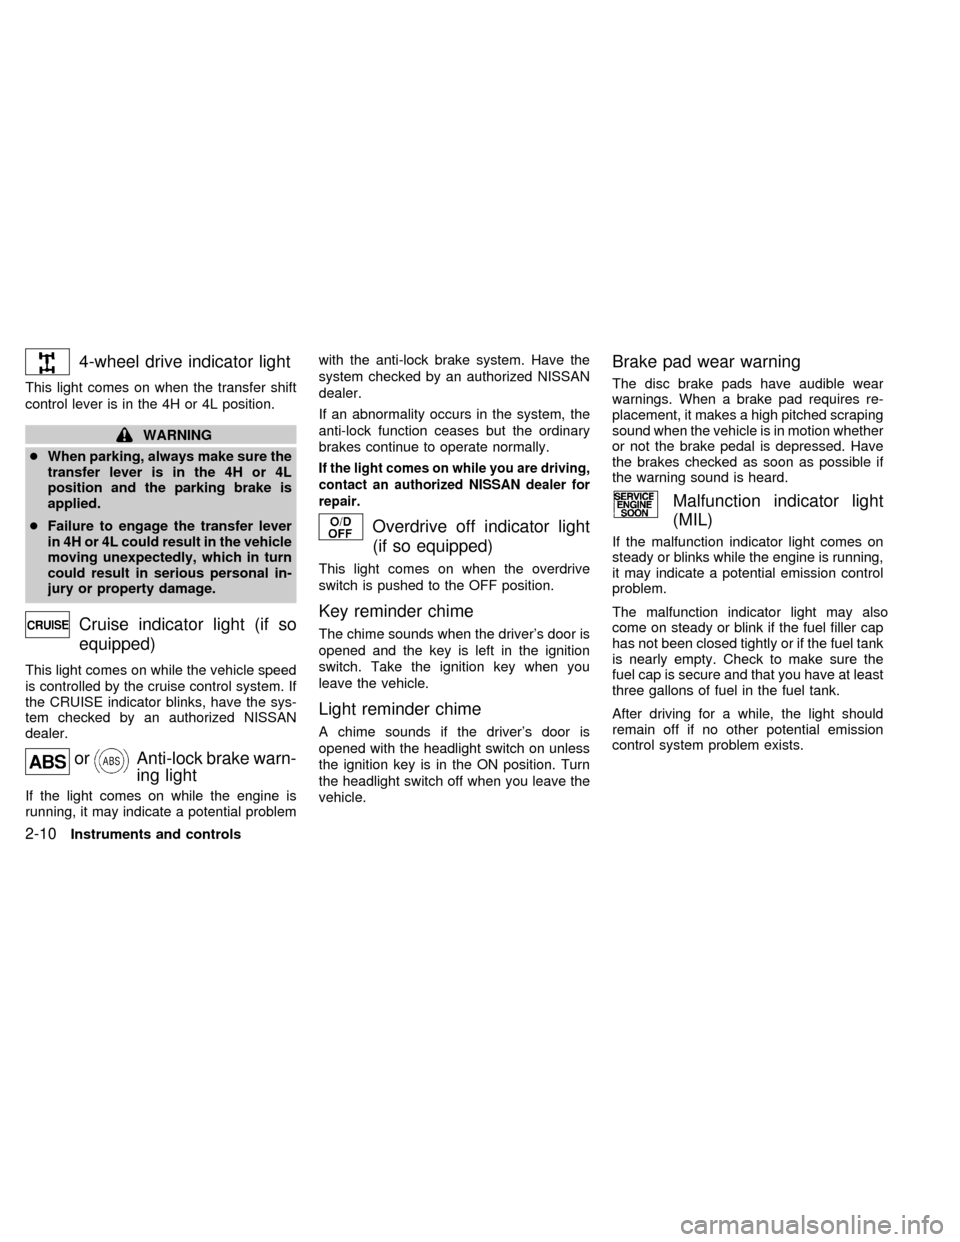
4-wheel drive indicator light
This light comes on when the transfer shift
control lever is in the 4H or 4L position.
WARNING
cWhen parking, always make sure the
transfer lever is in the 4H or 4L
position and the parking brake is
applied.
cFailure to engage the transfer lever
in 4H or 4L could result in the vehicle
moving unexpectedly, which in turn
could result in serious personal in-
jury or property damage.
Cruise indicator light (if so
equipped)
This light comes on while the vehicle speed
is controlled by the cruise control system. If
the CRUISE indicator blinks, have the sys-
tem checked by an authorized NISSAN
dealer.
orAnti-lock brake warn-
ing light
If the light comes on while the engine is
running, it may indicate a potential problemwith the anti-lock brake system. Have the
system checked by an authorized NISSAN
dealer.
If an abnormality occurs in the system, the
anti-lock function ceases but the ordinary
brakes continue to operate normally.
If the light comes on while you are driving,
contact an authorized NISSAN dealer for
repair.
Overdrive off indicator light
(if so equipped)
This light comes on when the overdrive
switch is pushed to the OFF position.
Key reminder chime
The chime sounds when the driver's door is
opened and the key is left in the ignition
switch. Take the ignition key when you
leave the vehicle.
Light reminder chime
A chime sounds if the driver's door is
opened with the headlight switch on unless
the ignition key is in the ON position. Turn
the headlight switch off when you leave the
vehicle.
Brake pad wear warning
The disc brake pads have audible wear
warnings. When a brake pad requires re-
placement, it makes a high pitched scraping
sound when the vehicle is in motion whether
or not the brake pedal is depressed. Have
the brakes checked as soon as possible if
the warning sound is heard.
Malfunction indicator light
(MIL)
If the malfunction indicator light comes on
steady or blinks while the engine is running,
it may indicate a potential emission control
problem.
The malfunction indicator light may also
come on steady or blink if the fuel filler cap
has not been closed tightly or if the fuel tank
is nearly empty. Check to make sure the
fuel cap is secure and that you have at least
three gallons of fuel in the fuel tank.
After driving for a while, the light should
remain off if no other potential emission
control system problem exists.
2-10Instruments and controls
ZX
Page 55 of 224
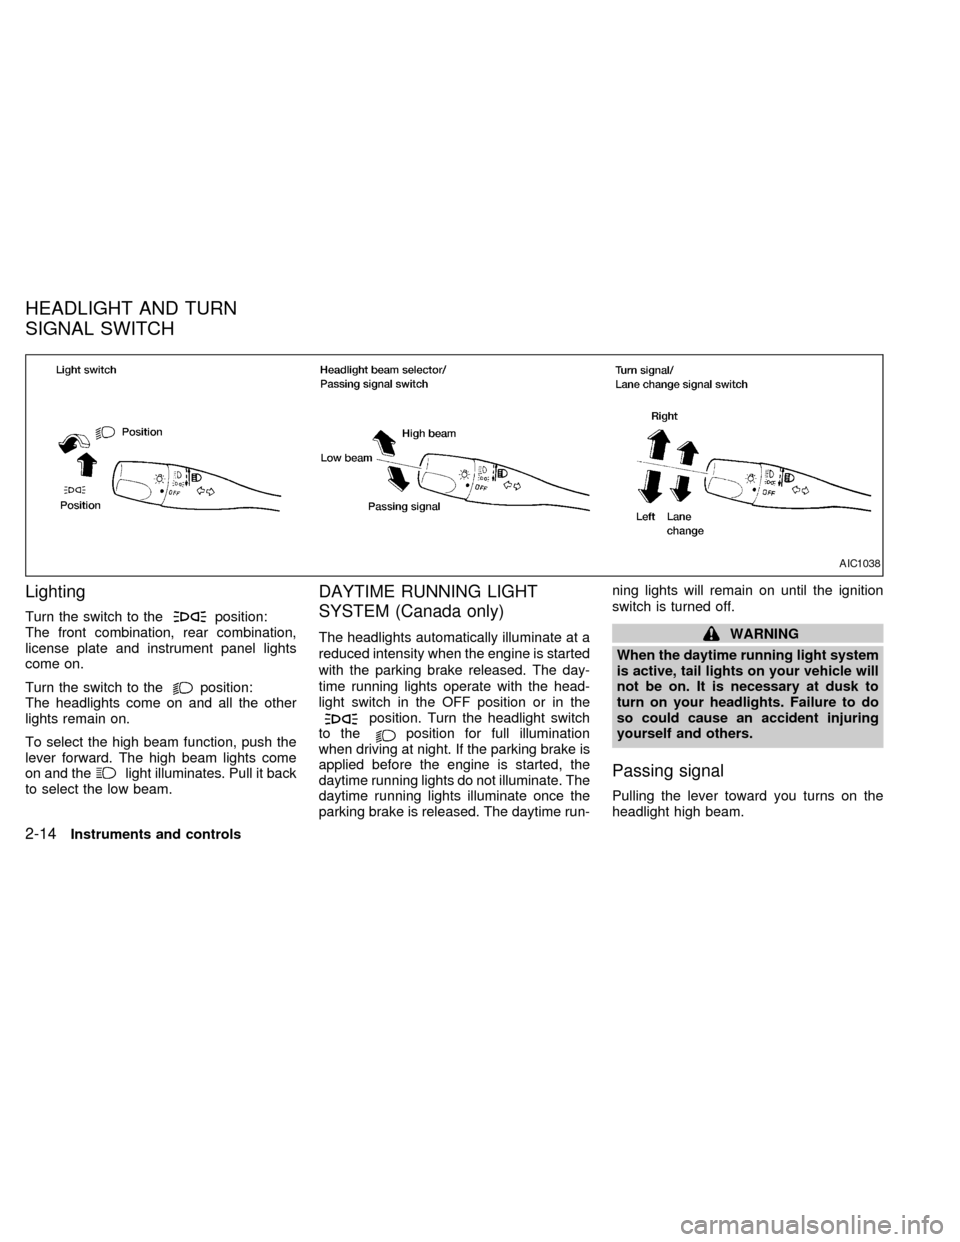
Lighting
Turn the switch to theposition:
The front combination, rear combination,
license plate and instrument panel lights
come on.
Turn the switch to the
position:
The headlights come on and all the other
lights remain on.
To select the high beam function, push the
lever forward. The high beam lights come
on and the
light illuminates. Pull it back
to select the low beam.
DAYTIME RUNNING LIGHT
SYSTEM (Canada only)
The headlights automatically illuminate at a
reduced intensity when the engine is started
with the parking brake released. The day-
time running lights operate with the head-
light switch in the OFF position or in the
position. Turn the headlight switch
to theposition for full illumination
when driving at night. If the parking brake is
applied before the engine is started, the
daytime running lights do not illuminate. The
daytime running lights illuminate once the
parking brake is released. The daytime run-ning lights will remain on until the ignition
switch is turned off.
WARNING
When the daytime running light system
is active, tail lights on your vehicle will
not be on. It is necessary at dusk to
turn on your headlights. Failure to do
so could cause an accident injuring
yourself and others.
Passing signal
Pulling the lever toward you turns on the
headlight high beam.
AIC1038
HEADLIGHT AND TURN
SIGNAL SWITCH
2-14Instruments and controls
ZX
Page 102 of 224

5 Starting and driving
Precautions when starting and driving ...................5-2
Exhaust gas (carbon monoxide) ............................5-2
Three-way catalyst .................................................5-2
On-pavement and off-road driving precautions .....5-3
Avoiding collision and rollover................................5-3
Drinking alcohol/drugs and driving .........................5-4
Ignition switch .........................................................5-4
Manual transmission ..............................................5-4
Automatic transmission ..........................................5-5
Before starting the engine ......................................5-6
Driving with automatic transmission (if so
equipped) ...............................................................5-6
Driving with manual transmission ..........................5-8
Starting the engine ...............................................5-10
Parking brake operation .......................................5-11Cruise control (if so equipped) .............................5-12
Break-in schedule ................................................5-14
Increasing fuel economy ......................................5-14
Transfer case shifting procedures for 4-wheel
drive vehicles........................................................5-15
Auto-lock free-running hubs .................................5-16
Manual-lock free-running hubs.............................5-19
Driving your four-wheel drive safely.....................5-21
Tires of four-wheel drive ......................................5-22
Parking/parking on hills ........................................5-23
Power steering system .........................................5-24
Brake system........................................................5-25
Anti-lock brake system (ABS) ..............................5-25
Cold weather driving ............................................5-26
ZX
Page 106 of 224
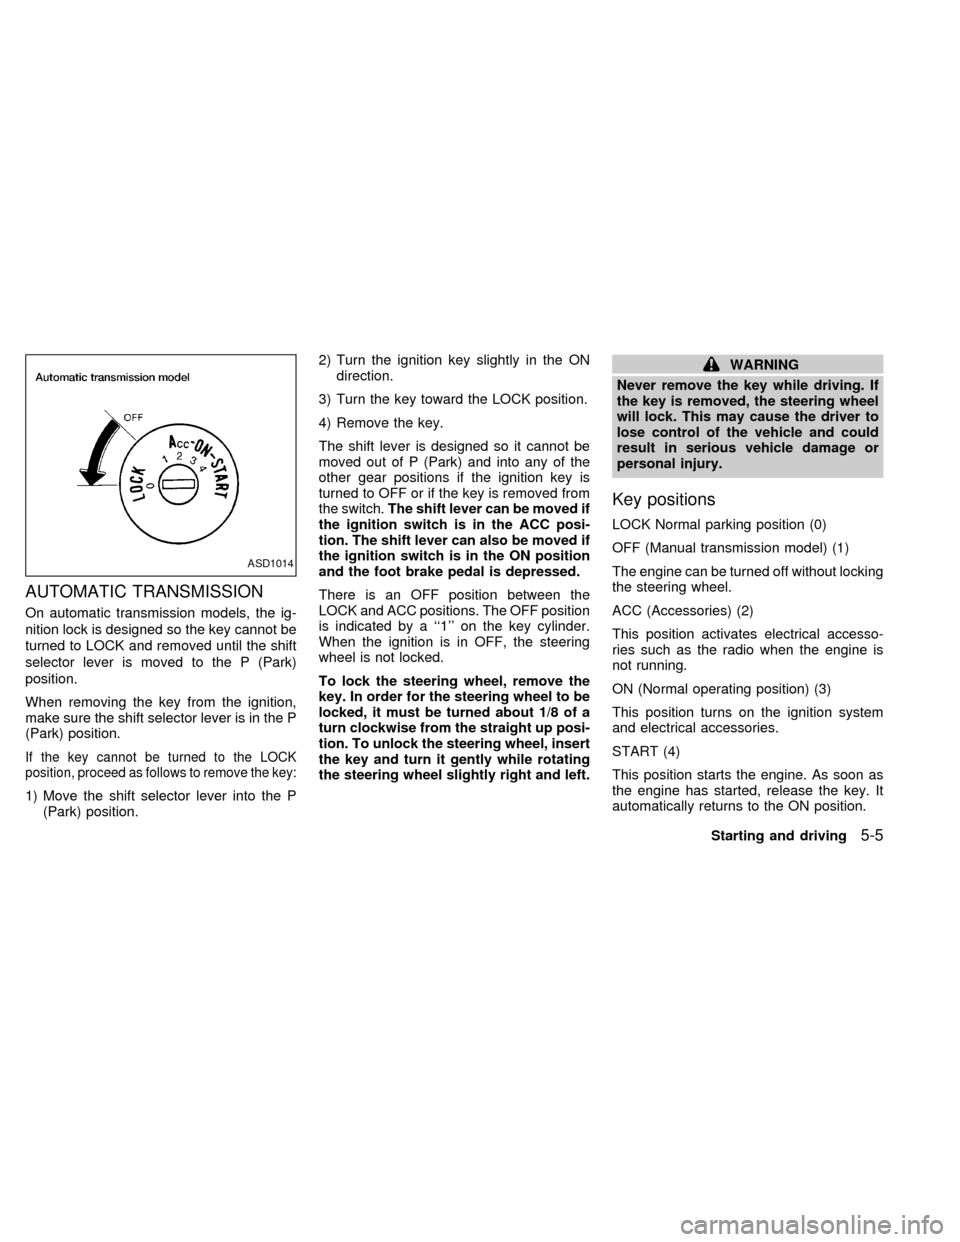
AUTOMATIC TRANSMISSION
On automatic transmission models, the ig-
nition lock is designed so the key cannot be
turned to LOCK and removed until the shift
selector lever is moved to the P (Park)
position.
When removing the key from the ignition,
make sure the shift selector lever is in the P
(Park) position.
If the key cannot be turned to the LOCK
position, proceed as follows to remove the key:
1) Move the shift selector lever into the P
(Park) position.2) Turn the ignition key slightly in the ON
direction.
3) Turn the key toward the LOCK position.
4) Remove the key.
The shift lever is designed so it cannot be
moved out of P (Park) and into any of the
other gear positions if the ignition key is
turned to OFF or if the key is removed from
the switch.The shift lever can be moved if
the ignition switch is in the ACC posi-
tion. The shift lever can also be moved if
the ignition switch is in the ON position
and the foot brake pedal is depressed.
There is an OFF position between the
LOCK and ACC positions. The OFF position
is indicated by a ``1'' on the key cylinder.
When the ignition is in OFF, the steering
wheel is not locked.
To lock the steering wheel, remove the
key. In order for the steering wheel to be
locked, it must be turned about 1/8 of a
turn clockwise from the straight up posi-
tion. To unlock the steering wheel, insert
the key and turn it gently while rotating
the steering wheel slightly right and left.
WARNING
Never remove the key while driving. If
the key is removed, the steering wheel
will lock. This may cause the driver to
lose control of the vehicle and could
result in serious vehicle damage or
personal injury.
Key positions
LOCK Normal parking position (0)
OFF (Manual transmission model) (1)
The engine can be turned off without locking
the steering wheel.
ACC (Accessories) (2)
This position activates electrical accesso-
ries such as the radio when the engine is
not running.
ON (Normal operating position) (3)
This position turns on the ignition system
and electrical accessories.
START (4)
This position starts the engine. As soon as
the engine has started, release the key. It
automatically returns to the ON position.
ASD1014
Starting and driving5-5
ZX
Page 108 of 224

Shifting with automatic transmission
Pull the selector lever rearward to shift into
P (Park), or R (Reverse) or from D (Drive) to
2or1.
P (Park):
Use this position when the vehicle is parked or
when starting the engine. Always be sure the
vehicle is at a complete stop. For maximum
safety, depress the brake pedal, then move
the selector lever to the P (Park) position.
Apply the parking brake. When parking on a
hill, apply the parking brake first, then shift the
selector lever into the P (Park) position.
Shifting from P (Park)
If the ignition switch is in the ON position
and the foot brake pedal is depressed, but
the shift lever still cannot be moved out of P
(Park), use the following procedure:
1. Shut the engine off and remove the key.
2. Apply the parking brake.
3. Reinsert the key and turn it clockwise to
the ACC position.
4. Depress the brake pedal, move the shift
selector lever to N (Neutral).
5. Start the engine.
These instructions for starting the vehicle in
N (Neutral) should only be used until service
can be obtained.
R (Reverse):
Use this position to back up. Shift into this
position only after the vehicle has com-
pletely stopped.
N (Neutral):
Neither forward or reverse gear is engaged.
The engine can be started in this position.
You may shift to N (Neutral) and restart a
stalled engine while the vehicle is moving.D (Drive):
Use this position for normal forward driving.
2 (Second gear):
Use for moderate uphill grades engine brak-
ing on downhill grades or starting on slip-
pery surfaces.
Do not downshift into the 2 position at speeds
above 62 MPH (100 km/h), and do not exceed
62 MPH (100 km/h) in the 2 position.
1 (Low gear):
Use this position for steep uphill grades,
driving slowly through deep snow, sand or
mud, or for maximum engine braking on
steep downhill grades.
Do not downshift into the 1 position at
speeds above 30 MPH (48 km/h), and do
not exceed 30 MPH (48 km/h) in the 1
position.
Accelerator downshift
In D position
For rapid passing or hill climbing, while
driving fully depress the accelerator pedal to
the floor. This shifts the transmission down
into second gear or first gear, depending on
the vehicle speed.
ASD1008
Starting and driving5-7
ZX
Page 111 of 224
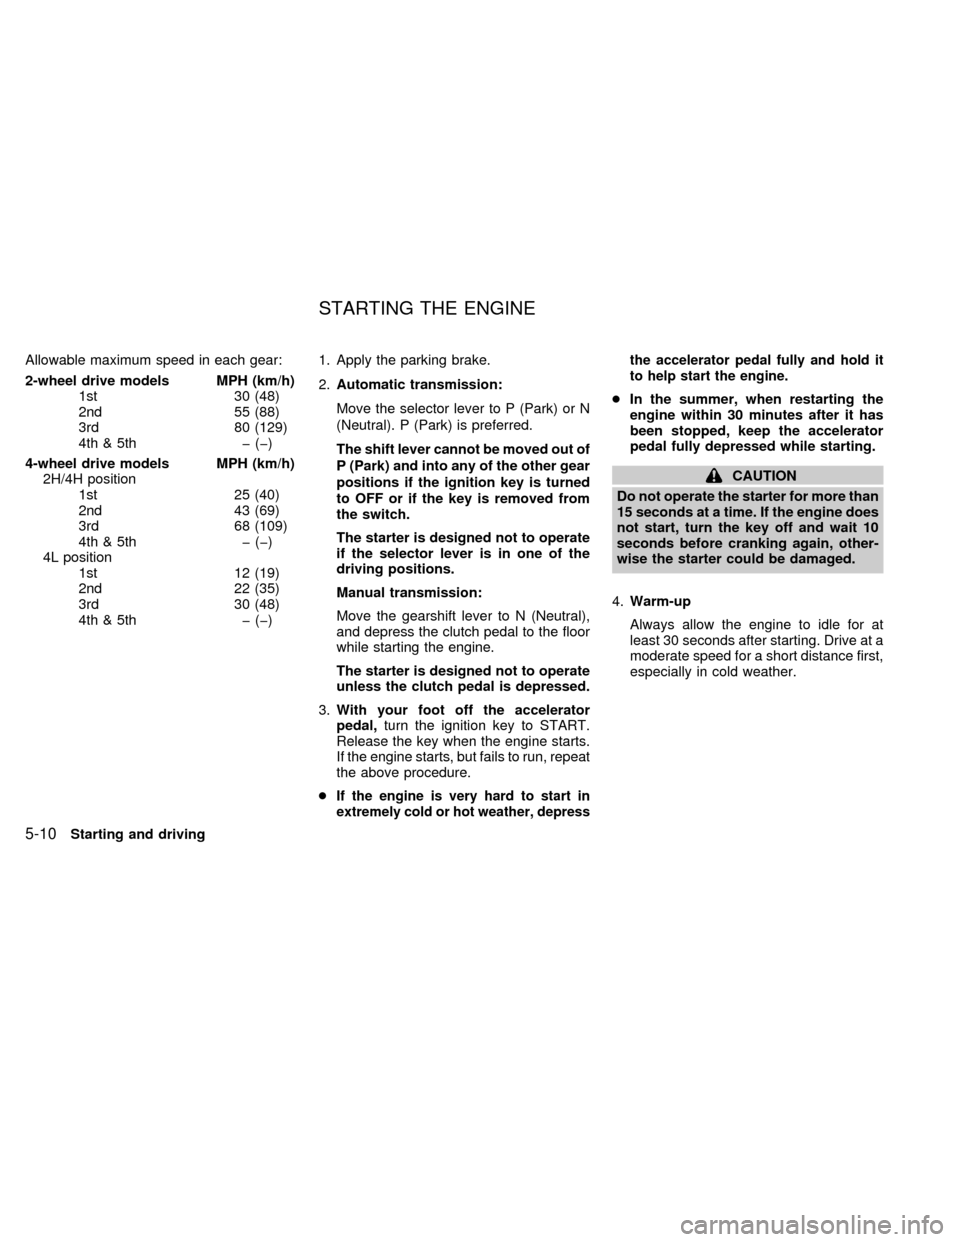
Allowable maximum speed in each gear:
2-wheel drive models MPH (km/h)
1st 30 (48)
2nd 55 (88)
3rd 80 (129)
4th & 5th þ (þ)
4-wheel drive models MPH (km/h)
2H/4H position
1st 25 (40)
2nd 43 (69)
3rd 68 (109)
4th & 5th þ (þ)
4L position
1st 12 (19)
2nd 22 (35)
3rd 30 (48)
4th & 5th þ (þ)1. Apply the parking brake.
2.Automatic transmission:
Move the selector lever to P (Park) or N
(Neutral). P (Park) is preferred.
The shift lever cannot be moved out of
P (Park) and into any of the other gear
positions if the ignition key is turned
to OFF or if the key is removed from
the switch.
The starter is designed not to operate
if the selector lever is in one of the
driving positions.
Manual transmission:
Move the gearshift lever to N (Neutral),
and depress the clutch pedal to the floor
while starting the engine.
The starter is designed not to operate
unless the clutch pedal is depressed.
3.With your foot off the accelerator
pedal,turn the ignition key to START.
Release the key when the engine starts.
If the engine starts, but fails to run, repeat
the above procedure.
c
If the engine is very hard to start in
extremely cold or hot weather, depressthe accelerator pedal fully and hold it
to help start the engine.
cIn the summer, when restarting the
engine within 30 minutes after it has
been stopped, keep the accelerator
pedal fully depressed while starting.
CAUTION
Do not operate the starter for more than
15 seconds at a time. If the engine does
not start, turn the key off and wait 10
seconds before cranking again, other-
wise the starter could be damaged.
4.Warm-up
Always allow the engine to idle for at
least 30 seconds after starting. Drive at a
moderate speed for a short distance first,
especially in cold weather.
STARTING THE ENGINE
5-10Starting and driving
ZX
Page 112 of 224
WARNING
cBe sure the parking brake is fully
released before driving. Failure to do
so can cause brake failure and lead
to an accident.
cDo not release the parking brake
from outside the vehicle.
cDo not use the gear shift in place of
the parking brake. When parking, be
sure the parking brake is fully en-
gaged.
c
Do not leave children unattended in a
vehicle. They could release the park-
ing brake and cause an accident.
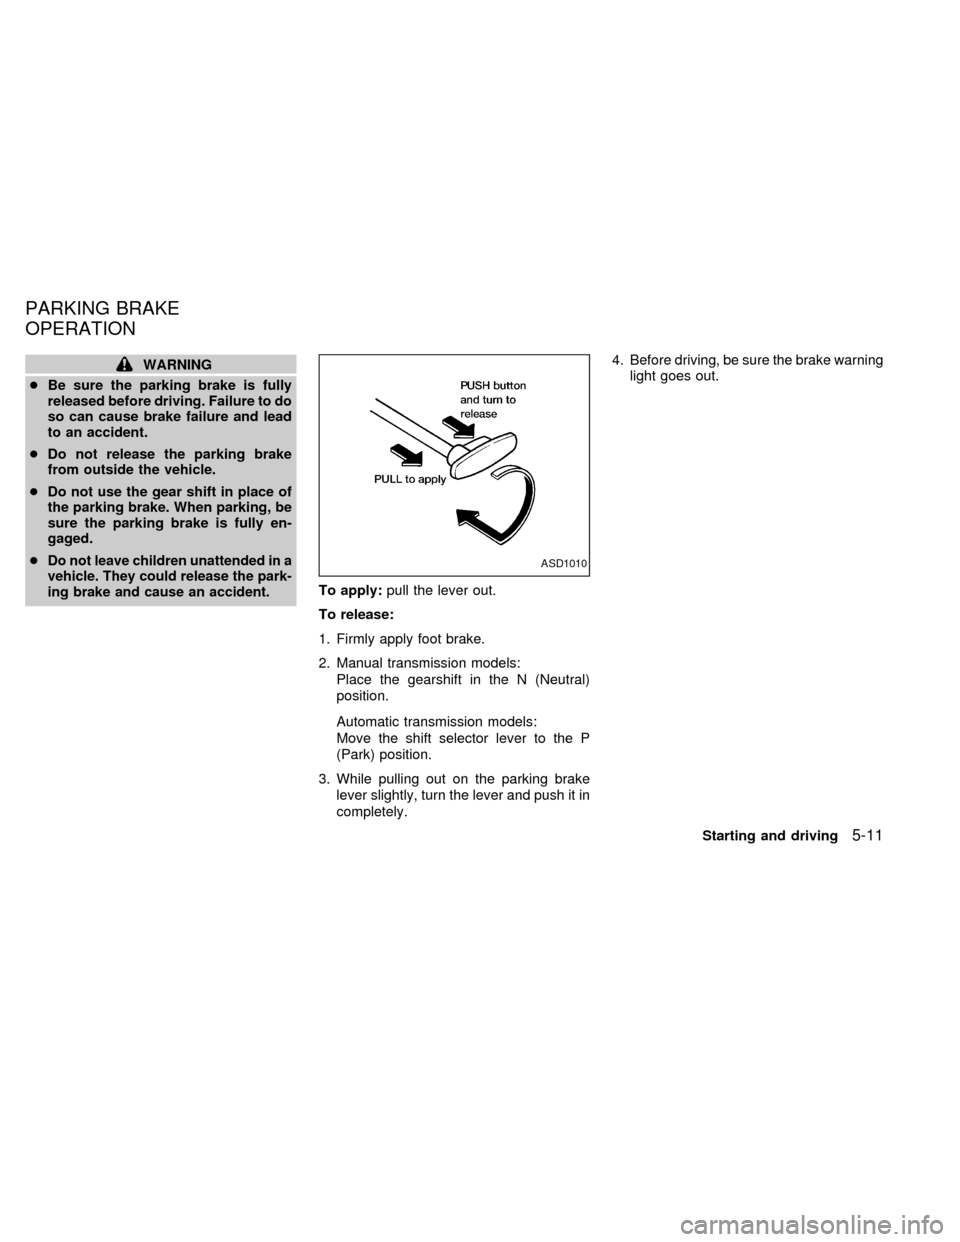
To apply:pull the lever out.
To release:
1. Firmly apply foot brake.
2. Manual transmission models:
Place the gearshift in the N (Neutral)
position.
Automatic transmission models:
Move the shift selector lever to the P
(Park) position.
3. While pulling out on the parking brake
lever slightly, turn the lever and push it in
completely.4. Before driving, be sure the brake warning
light goes out.
ASD1010
PARKING BRAKE
OPERATION
Starting and driving5-11
ZX