1998 NISSAN FRONTIER engine
[x] Cancel search: enginePage 163 of 224
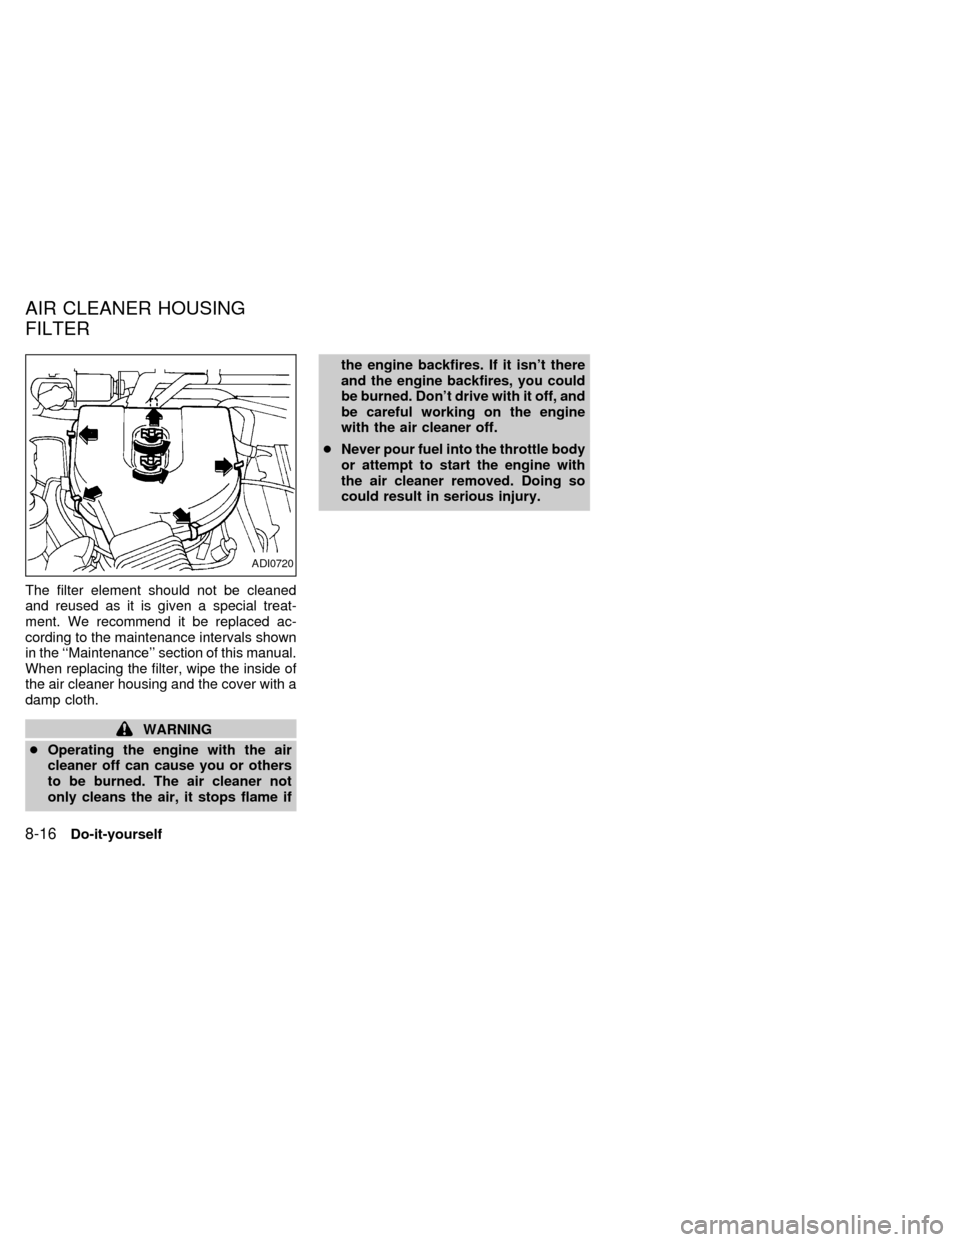
The filter element should not be cleaned
and reused as it is given a special treat-
ment. We recommend it be replaced ac-
cording to the maintenance intervals shown
in the ``Maintenance'' section of this manual.
When replacing the filter, wipe the inside of
the air cleaner housing and the cover with a
damp cloth.
WARNING
cOperating the engine with the air
cleaner off can cause you or others
to be burned. The air cleaner not
only cleans the air, it stops flame ifthe engine backfires. If it isn't there
and the engine backfires, you could
be burned. Don't drive with it off, and
be careful working on the engine
with the air cleaner off.
cNever pour fuel into the throttle body
or attempt to start the engine with
the air cleaner removed. Doing so
could result in serious injury.
ADI0720
AIR CLEANER HOUSING
FILTER
8-16Do-it-yourself
ZX
Page 164 of 224
CAUTION
c
After wiper blade replacement, return
the wiper arm to its original position.
Otherwise it may be damaged when
the engine hood is opened.
cMake sure the wiper blade contacts
the glass. Otherwise, the arm may be
damaged from wind pressure.
If your windshield is not clear after using the
windshield washer or if a wiper blade chat-
ters when running, wax or another material
may be on the blade or windshield.Clean the outside of the windshield with a
washer solution or a mild detergent. Your
windshield is clean if beads do not form
when rinsing with clear water.
Clean the blade by wiping it with a cloth
soaked in a washer solution or a mild deter-
gent. Then rinse the blade with clear water.
If your windshield is still not clear after
cleaning the blades and using the wiper,
replace the blades.
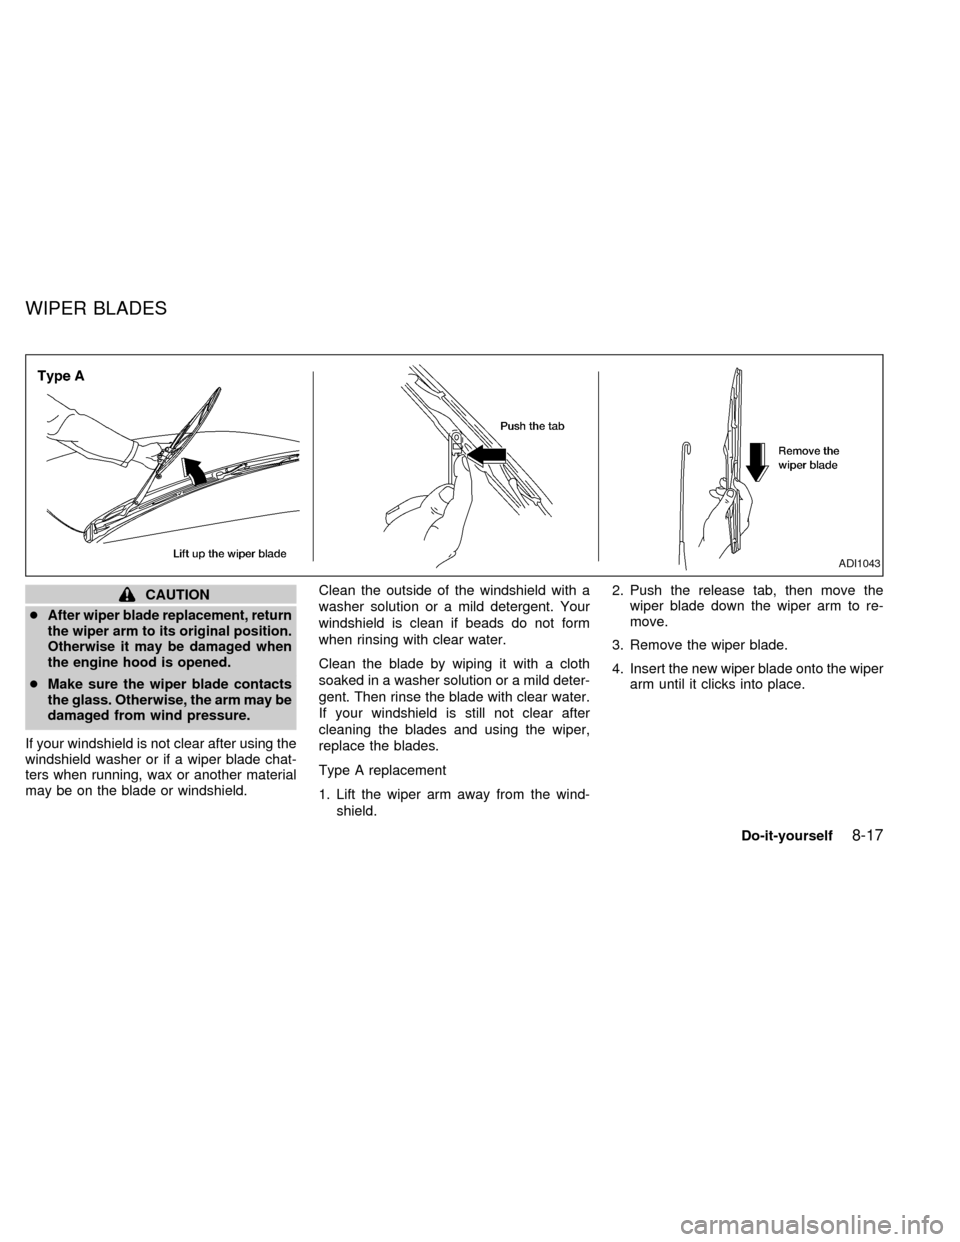
Type A replacement
1. Lift the wiper arm away from the wind-
shield.2. Push the release tab, then move the
wiper blade down the wiper arm to re-
move.
3. Remove the wiper blade.
4. Insert the new wiper blade onto the wiper
arm until it clicks into place.
ADI1043
WIPER BLADES
Do-it-yourself8-17
ZX
Page 166 of 224
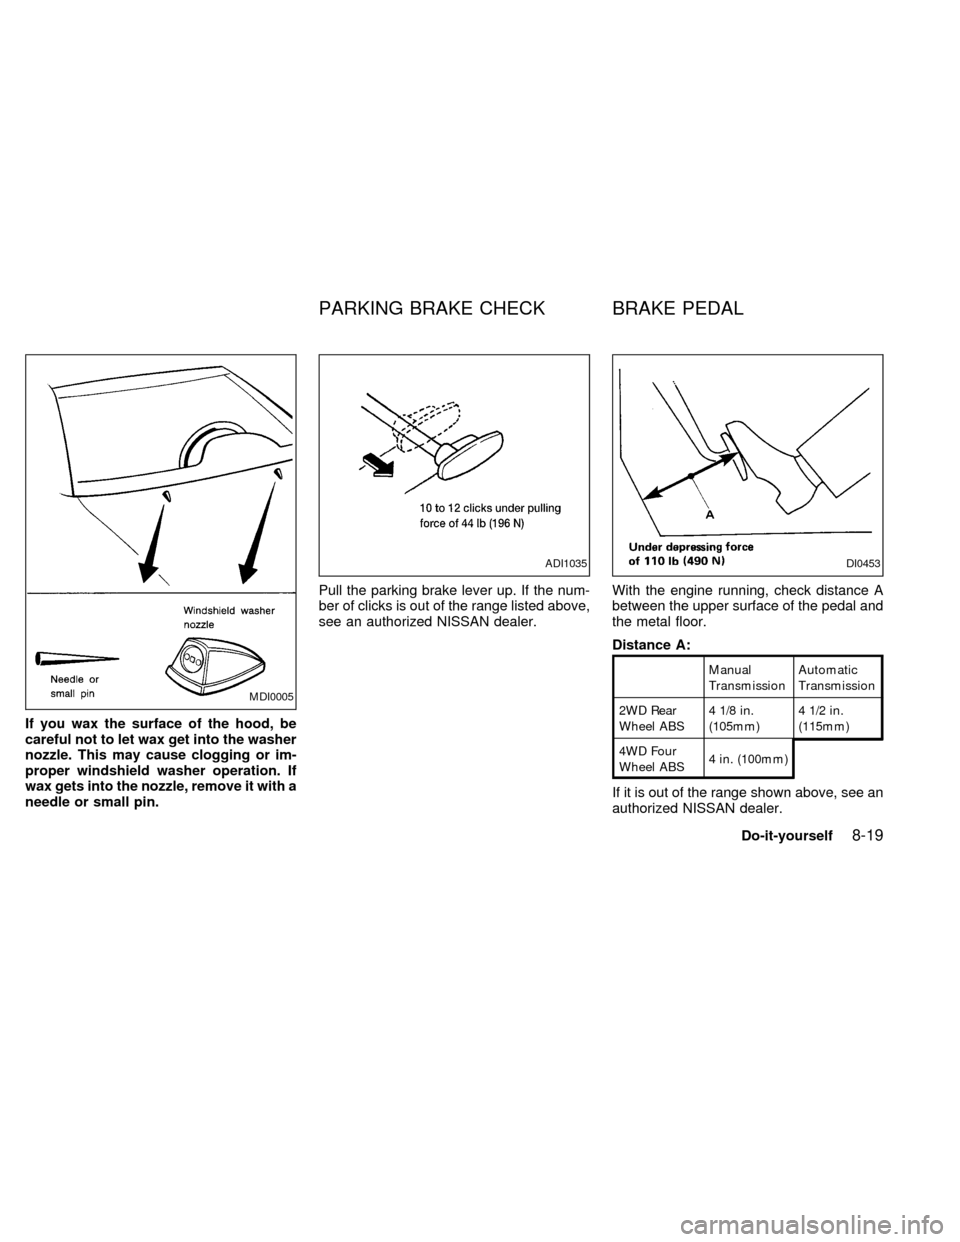
If you wax the surface of the hood, be
careful not to let wax get into the washer
nozzle. This may cause clogging or im-
proper windshield washer operation. If
wax gets into the nozzle, remove it with a
needle or small pin.Pull the parking brake lever up. If the num-
ber of clicks is out of the range listed above,
see an authorized NISSAN dealer.With the engine running, check distance A
between the upper surface of the pedal and
the metal floor.
Distance A:
Manual
TransmissionAutomatic
Transmission
2WD Rear
Wheel ABS4 1/8 in.
(105mm)4 1/2 in.
(115mm)
4WD Four
Wheel ABS4 in. (100mm)
If it is out of the range shown above, see an
authorized NISSAN dealer.
MDI0005
ADI1035DI0453
PARKING BRAKE CHECK BRAKE PEDAL
Do-it-yourself8-19
ZX
Page 167 of 224
Self-adjusting brakes
Your vehicle is equipped with self-adjusting
brakes.
The front disc-type brakes self-adjust every
time the brake pedal is applied. The rear
drum-type brakes on two-wheel drive trucks
self-adjust every time the parking brake is
applied. The rear drum-type brakes on four-
wheel drive trucks self-adjust every time the
brake pedal is applied. If the brake pedal
goes down farther than normal, it may be
due to a lack of adjustment of the rear drum
brakes. Apply the parking brake several
times.
WARNING
If the brake pedal height does not re-
turn to normal, see an authorized NIS-
SAN dealer and have it checked.
Brake pad wear indicators
The disc brake pads on your vehicle have
audible wear indicators. When a brake pad
requires replacement, it will make a high
pitched scraping or screeching sound when
the vehicle is in motion whether or not the
brake pedal is depressed. Have the brakeschecked as soon as possible if the wear
indicator sound is heard.
Under some driving or climate conditions,
occasional brake squeak, squeal or other
noise may be heard. Occasional brake
noise during light to moderate stops is nor-
mal and does not affect the function or
performance of the brake system.
The rear drum brakes (if so equipped) do
not have audible wear indicators. Should
you ever hear an unusually loud noise from
the rear drum brakes, have them inspected
as soon as possible by an authorized NIS-
SAN dealer.
Proper brake inspection intervals should
be followed.For more information regard-
ing brake inspections, see the appropriate
maintenance schedule information in the
``Maintenance Schedule'' section of this
manual.Check the brake booster function with the
following steps:
1. With the engine off, press and release
the brake pedal several times. When
brake pedal movement (distance of
travel) remains the same from one pedal
application to the next, continue on to
next step.
2. While depressing the brake pedal, start
the engine. The pedal height should drop
a little.
3. With the brake pedal depressed, stop the
engine. Keeping the pedal depressed for
about 30 seconds, the pedal height
should not change.
4. Run the engine for one minute without
depressing the brake pedal, then turn it
off. Depress the brake pedal several
times. The pedal travel distance will de-
crease gradually with each depression
as the vacuum is released from the
booster.
If the brakes do not operate properly, have
the brakes checked by an authorized NIS-
SAN dealer.
BRAKE BOOSTER
8-20Do-it-yourself
ZX
Page 170 of 224
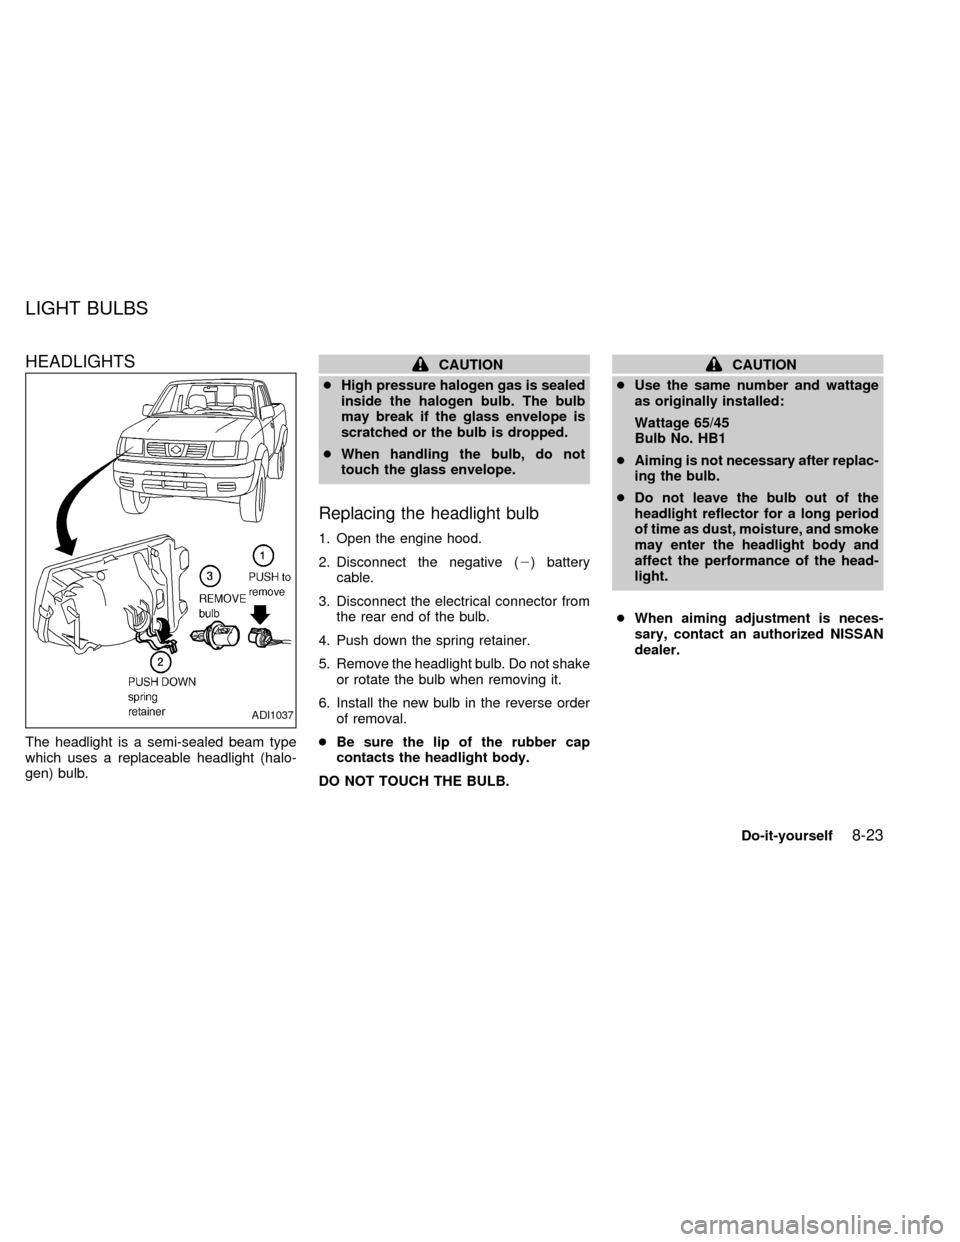
HEADLIGHTS
The headlight is a semi-sealed beam type
which uses a replaceable headlight (halo-
gen) bulb.
CAUTION
cHigh pressure halogen gas is sealed
inside the halogen bulb. The bulb
may break if the glass envelope is
scratched or the bulb is dropped.
cWhen handling the bulb, do not
touch the glass envelope.
Replacing the headlight bulb
1. Open the engine hood.
2. Disconnect the negative (2) battery
cable.
3. Disconnect the electrical connector from
the rear end of the bulb.
4. Push down the spring retainer.
5. Remove the headlight bulb. Do not shake
or rotate the bulb when removing it.
6. Install the new bulb in the reverse order
of removal.
cBe sure the lip of the rubber cap
contacts the headlight body.
DO NOT TOUCH THE BULB.
CAUTION
cUse the same number and wattage
as originally installed:
Wattage 65/45
Bulb No. HB1
cAiming is not necessary after replac-
ing the bulb.
cDo not leave the bulb out of the
headlight reflector for a long period
of time as dust, moisture, and smoke
may enter the headlight body and
affect the performance of the head-
light.
cWhen aiming adjustment is neces-
sary, contact an authorized NISSAN
dealer.
ADI1037
LIGHT BULBS
Do-it-yourself8-23
ZX
Page 179 of 224

Your new NISSAN has been designed to
have minimum maintenance requirements
with longer service intervals to save you
both time and money. However, some day-
to-day and regular maintenance is essential
to maintain your NISSAN's good mechani-
cal condition, as well as its emission and
engine performance.
It is the owner's responsibility to make sure
that the specified maintenance, as well as
general maintenance, is performed.
As the vehicle owner, you are the only one
who can ensure that your vehicle receives
proper maintenance. You are a vital link in
the maintenance chain.
General maintenance
General maintenance includes those items
which should be checked during normal
day-to-day operation of the vehicle. They
are essential if your vehicle is to continue to
operate properly. It is your responsibility to
perform these maintenance procedures
regularly as prescribed.
These checks or inspections can be done
by yourself, a qualified technician or, if you
prefer, an authorized NISSAN dealer.
Periodic maintenance
The maintenance items listed under peri-
odic maintenance in this section are re-
quired to be serviced at regular intervals.
However, under severe driving conditions,
additional or more frequent maintenance
will be required.
Where to go for service
If maintenance service is required or your
vehicle appears to malfunction, have the
systems checked and tuned by an autho-
rized NISSAN dealer.
NISSAN technicians are well-trained spe-
cialists who and are kept up to date with the
latest service information through technical
bulletins, service tips, and in-dealership
training programs. They are completely
qualified to work on NISSAN vehicles
beforethey work on your vehicle, rather
than after they have worked on it.
You can be confident that an authorized
NISSAN dealer's service department per-
forms the best job to meet the maintenance
requirements on your vehicle Ð in a reliable
and economic way.During the normal day-to-day operation of
the vehicle, general maintenance should be
performed regularly as prescribed in this
section. If you detect any unusual sounds,
vibrations or smells, be sure to check for the
cause or have an authorized NISSAN
dealer do it promptly. In addition, you should
notify an authorized NISSAN dealer if you
think that repairs are required.
When performing any checks or mainte-
nance work, closely observe the precau-
tions in the ``Do-it-yourself'' section of this
manual.
OUTSIDE THE VEHICLE
The maintenance items listed here should
be performed from time to time, unless
otherwise specified.
Additional information on the following
items with ``*'' is found in the ``Do-it-
yourself'' section of this manual.
Tires*Check the pressure with a gauge
periodically when at a service station, in-
cluding the spare, and adjust to the speci-
fied pressure if necessary. Check carefully
for damage, cuts or excessive wear.
Wheel nuts*When checking the tires, make
GENERAL MAINTENANCE
9-2Maintenance
ZX
Page 181 of 224

tion. Be certain to keep the floor mat away
from the pedal.
Parking brake*Check that the lever has
the proper travel and confirm that your
vehicle is held securely on a fairly steep hill
with only the parking brake applied.
Automatic transmission Park position
mechanismCheck that the lock release
button on the selector lever operates prop-
erly and smoothly. On a fairly steep hill
check that your vehicle is held securely with
the selector lever in the P position without
applying any brakes.
UNDER THE HOOD AND
VEHICLE
The maintenance items listed here should
be checked periodically (e.g., each time you
check the engine oil or refuel).
Additional information on the following
items with an ``*'' is found in the ``Do-it-
yourself operations'' section.
Windshield washer fluid*Check that there
is adequate fluid in the reservoir.
Engine coolant level*Check the coolant
level when the engine is cold.Radiator and hosesCheck the front of the
radiator and clean off any dirt, insects,
leaves, etc., that may have accumulated.
Make sure the hoses have no cracks, de-
formation, rot or loose connections.
Brake and clutch fluid levels*Make sure
that the brake and clutch fluid level is be-
tween the MIN and MAX lines on the reser-
voir.
Battery*Check the fluid level in each cell. It
should be between the MAX and MIN lines.
Engine drive belts*Make sure the drive
belts are not frayed, worn, cracked or oily.
Engine oil level*Check the level after
parking the vehicle on a level surface with
the engine off. Wait a few minutes for the oil
to drain back into the oil pan.
Power steering fluid level* and lines
Check the level when the fluid is cold, with
the engine off. Check the lines for proper
attachment, leaks, cracks, etc.
Automatic transmission fluid level*
Check the level after putting the selector
lever in P with the engine idling at operating
temperature.
Exhaust systemMake sure there are noloose supports, cracks or holes. If the sound
of the exhaust seems unusual or there is a
smell of exhaust fumes, immediately have
the exhaust system inspected by an autho-
rized NISSAN dealer. See the carbon mon-
oxide warning in the ``Starting and driving''
section of this manual.
UnderbodyThe underbody is frequently
exposed to corrosive substances such as
those used on icy roads or to control dust. It
is very important to remove these sub-
stances from the underbody, otherwise rust
may form on the floor pan, frame, fuel lines
and exhaust system. At the end of winter,
the underbody should be thoroughly flushed
with plain water, in those areas where mud
and dirt may have accumulated. See the
``Appearance and care'' section of this
manual.
Fluid leaksCheck under the vehicle for
fuel, oil, water or other fluid leaks after the
vehicle has been parked for a while. Water
dripping from the air conditioner after use is
normal. If you should notice any leaks or if
gasoline fumes are evident, check for the
cause and have it corrected immediately.
9-4Maintenance
ZX
Page 183 of 224
![NISSAN FRONTIER 1998 D22 / 1.G Owners Manual Schedule One
Abbreviations: R = Replace I = Inspect. Correct or replace if necessary. [ ]: At the mileage intervals only
MAINTENANCE OPERATIONMAINTENANCE INTERVAL
Perform at number of miles, kilometer NISSAN FRONTIER 1998 D22 / 1.G Owners Manual Schedule One
Abbreviations: R = Replace I = Inspect. Correct or replace if necessary. [ ]: At the mileage intervals only
MAINTENANCE OPERATIONMAINTENANCE INTERVAL
Perform at number of miles, kilometer](/manual-img/5/607/w960_607-182.png)
Schedule One
Abbreviations: R = Replace I = Inspect. Correct or replace if necessary. [ ]: At the mileage intervals only
MAINTENANCE OPERATIONMAINTENANCE INTERVAL
Perform at number of miles, kilometers or
months, whichever comes first.Miles ý 1,000 3.75 7.5 11.25 15 18.75 22.5 26.25 30 33.75 37.5 41.25 45 48.75 52.5 56.25 60
(km ý 1,000) (6) (12) (18) (24) (30) (36) (42) (48) (54) (60) (66) (72) (78) (84) (90) (96)
Months 3 6 9 12 15 18 21 24 27 30 33 36 39 42 45 48
Emission control system maintenance
Drive beltsI* I*
Air cleaner filter See NOTE (1) [R] [R]
Positive crankcase ventilation (PCV) filter See NOTE (2) [R] [R]
EVAP vapor linesI* I*
Fuel linesI* I*
Fuel filterSee NOTE
(2)*
Engine coolant See NOTE (3)R*
Engine oilRRRRRRRRRRRRRRRR
Engine oil filterRRRRRRRRRRRRRRRR
Spark plugs[R] [R]
NOTE: (1) If operating mainly in dusty conditions, more frequent maintenance may be required.
(2) If vehicle is operated under extremely adverse weather conditions or in areas where ambient temperatures are either extremely low or
extremely high, the filters might become clogged. In such an event, replace them immediately.
(3) After 60,000 miles (96,000 km) or 48 months, replace every 30,000 miles (48,000 km) or 24 months.
* Maintenance items and intervals with an ``*'' are recommended by NISSAN for reliable vehicle operation. The owner need not perform
such maintenance in order to maintain the emission warranty or manufacturer recall liability. Other maintenance items and intervals
are required.
9-6Maintenance
ZX