1998 NISSAN ALTIMA wheel
[x] Cancel search: wheelPage 131 of 217
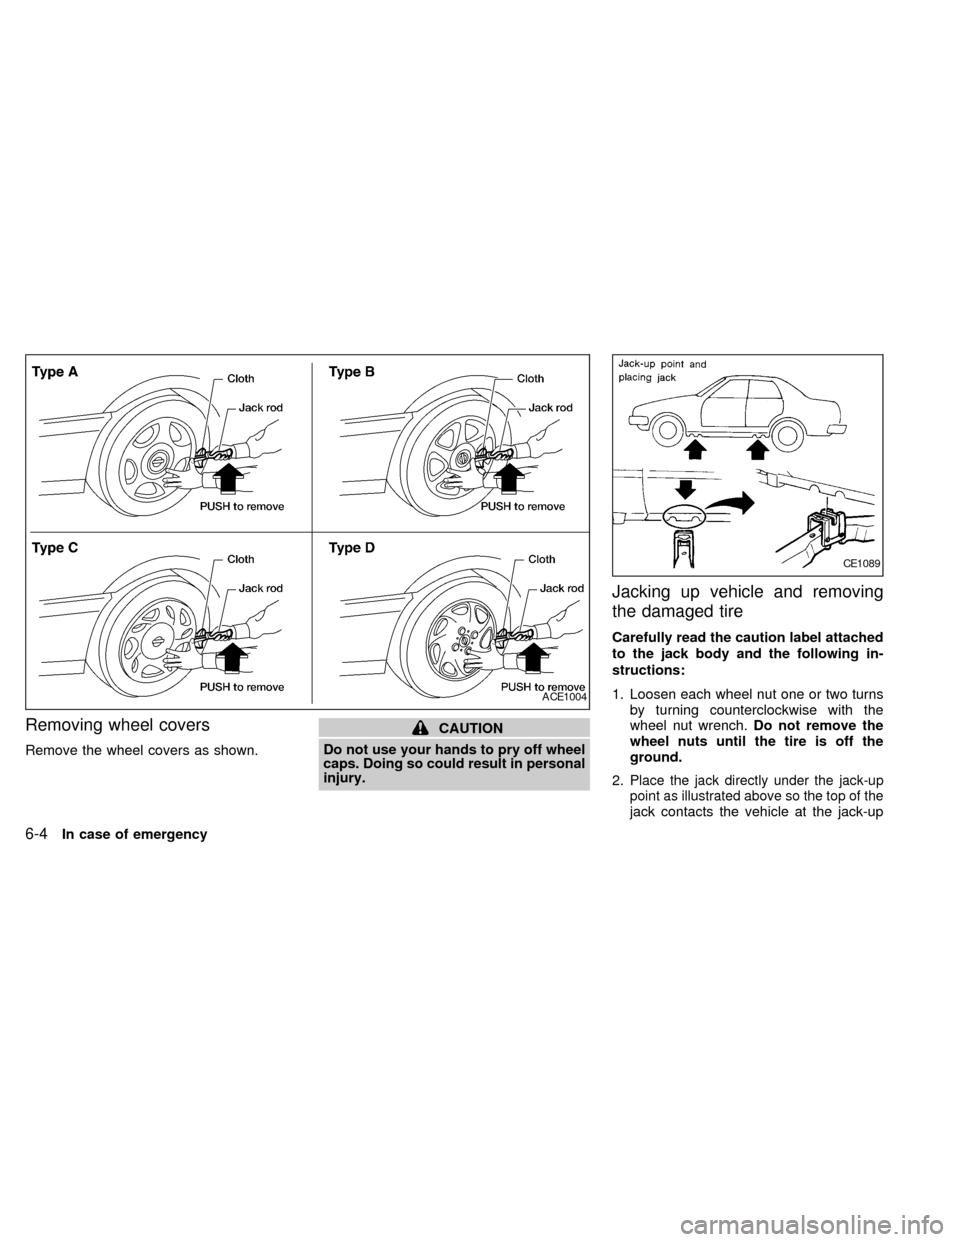
Removing wheel covers
Remove the wheel covers as shown.
CAUTION
Do not use your hands to pry off wheel
caps. Doing so could result in personal
injury.
Jacking up vehicle and removing
the damaged tire
Carefully read the caution label attached
to the jack body and the following in-
structions:
1. Loosen each wheel nut one or two turns
by turning counterclockwise with the
wheel nut wrench.Do not remove the
wheel nuts until the tire is off the
ground.
2.
Place the jack directly under the jack-up
point as illustrated above so the top of the
jack contacts the vehicle at the jack-up
ACE1004
CE1089
6-4In case of emergency
ZX
Page 132 of 217
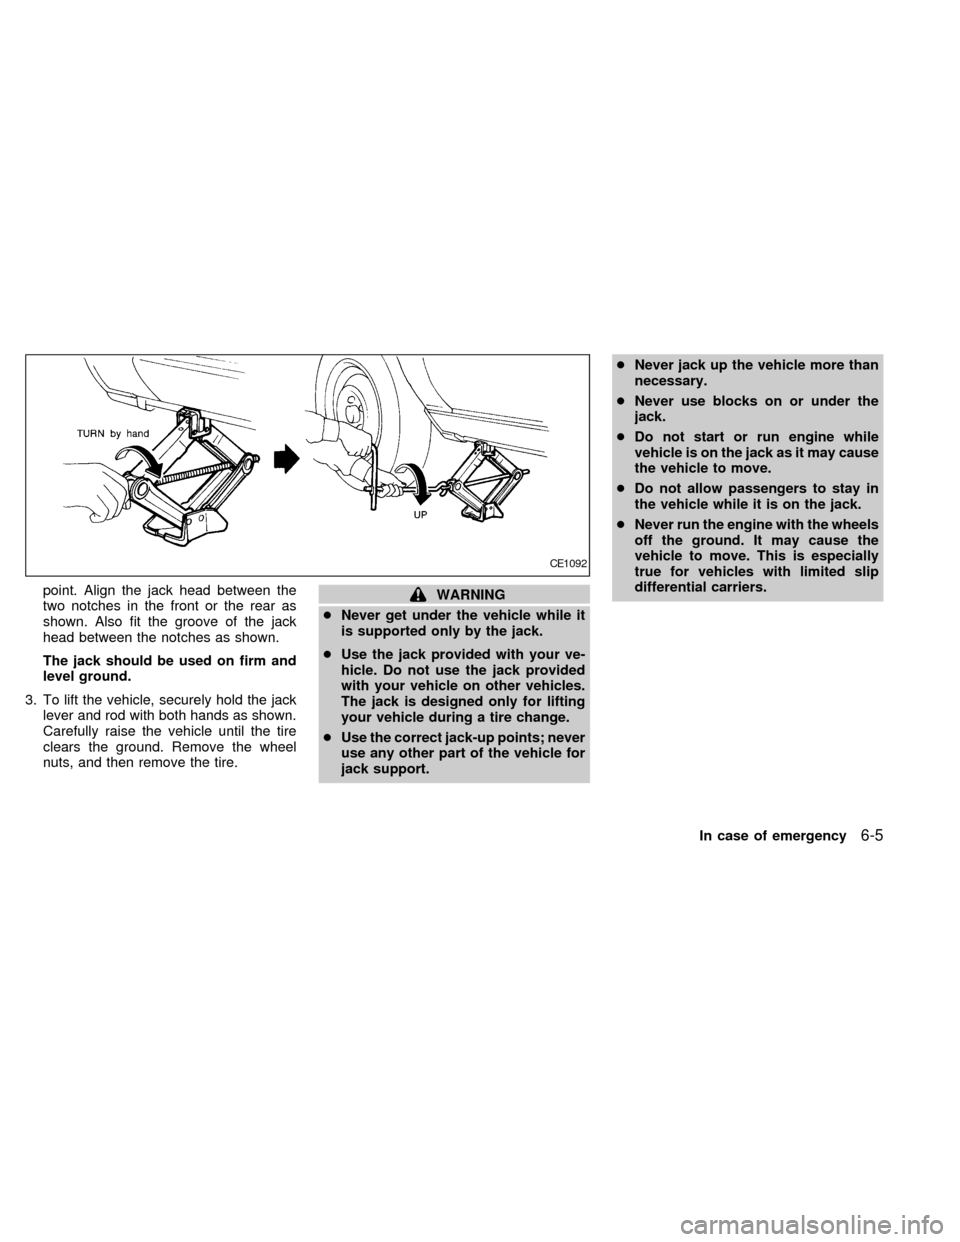
point. Align the jack head between the
two notches in the front or the rear as
shown. Also fit the groove of the jack
head between the notches as shown.
The jack should be used on firm and
level ground.
3. To lift the vehicle, securely hold the jack
lever and rod with both hands as shown.
Carefully raise the vehicle until the tire
clears the ground. Remove the wheel
nuts, and then remove the tire.WARNING
cNever get under the vehicle while it
is supported only by the jack.
cUse the jack provided with your ve-
hicle. Do not use the jack provided
with your vehicle on other vehicles.
The jack is designed only for lifting
your vehicle during a tire change.
cUse the correct jack-up points; never
use any other part of the vehicle for
jack support.cNever jack up the vehicle more than
necessary.
cNever use blocks on or under the
jack.
cDo not start or run engine while
vehicle is on the jack as it may cause
the vehicle to move.
cDo not allow passengers to stay in
the vehicle while it is on the jack.
cNever run the engine with the wheels
off the ground. It may cause the
vehicle to move. This is especially
true for vehicles with limited slip
differential carriers.
CE1092
In case of emergency6-5
ZX
Page 133 of 217
Installing the spare tire
The T-type spare tire is designed for
emergency use. See specific instruc-
tions under the heading ``Wheels and
tires'' in the ``Do-it-yourself'' section.
1. Clean any mud or dirt from the surface
between the wheel and hub.
2. Carefully put the spare tire on and install
the wheel nuts finger-tight.
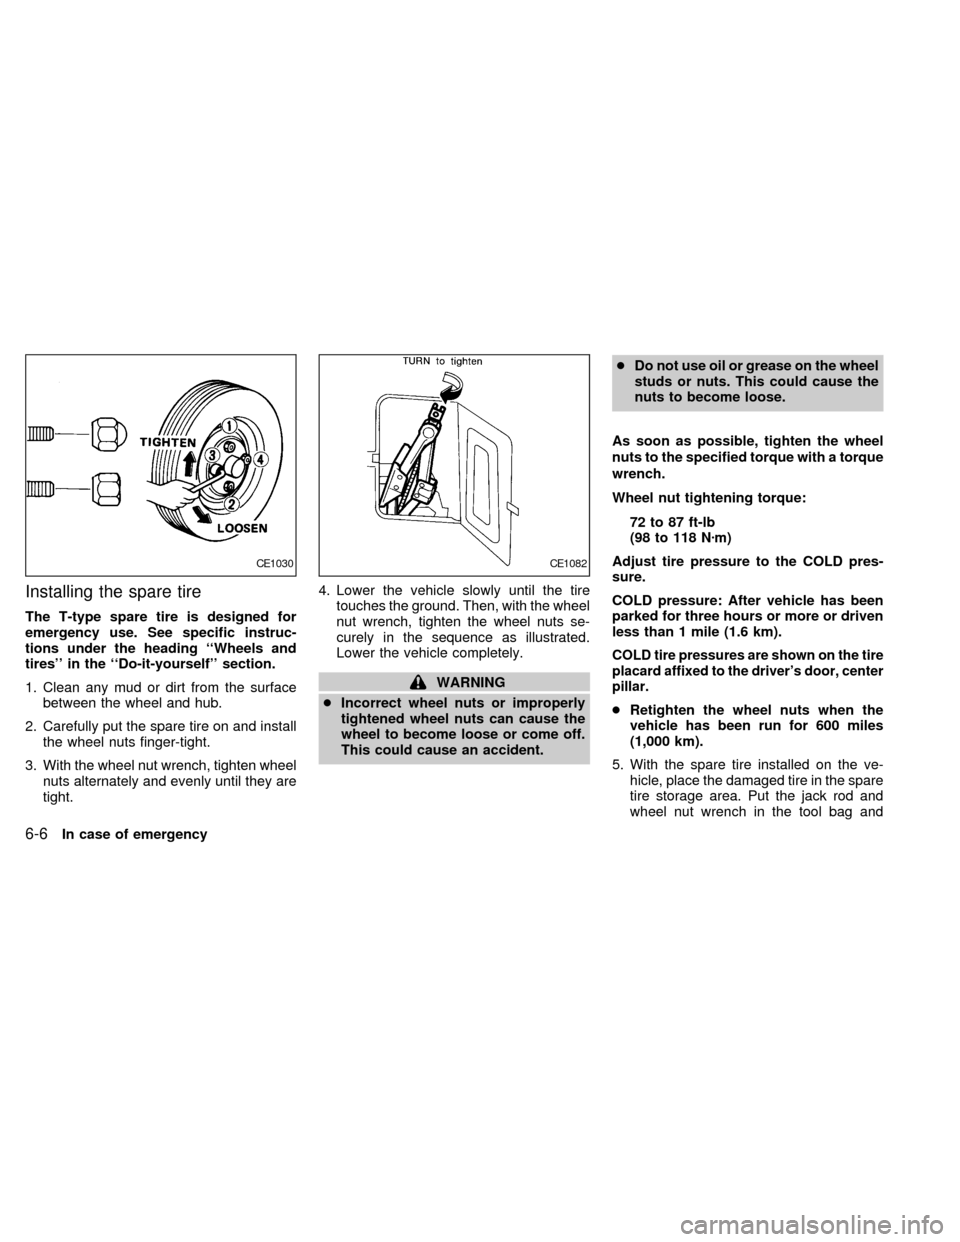
3. With the wheel nut wrench, tighten wheel
nuts alternately and evenly until they are
tight.4. Lower the vehicle slowly until the tire
touches the ground. Then, with the wheel
nut wrench, tighten the wheel nuts se-
curely in the sequence as illustrated.
Lower the vehicle completely.
WARNING
cIncorrect wheel nuts or improperly
tightened wheel nuts can cause the
wheel to become loose or come off.
This could cause an accident.cDo not use oil or grease on the wheel
studs or nuts. This could cause the
nuts to become loose.
As soon as possible, tighten the wheel
nuts to the specified torque with a torque
wrench.
Wheel nut tightening torque:
72 to 87 ft-lb
(98 to 118 Nzm)
Adjust tire pressure to the COLD pres-
sure.
COLD pressure: After vehicle has been
parked for three hours or more or driven
less than 1 mile (1.6 km).
COLD tire pressures are shown on the tire
placard affixed to the driver's door, center
pillar.
cRetighten the wheel nuts when the
vehicle has been run for 600 miles
(1,000 km).
5. With the spare tire installed on the ve-
hicle, place the damaged tire in the spare
tire storage area. Put the jack rod and
wheel nut wrench in the tool bag and
CE1030CE1082
6-6In case of emergency
ZX
Page 134 of 217
place the tool bag in the spare tire stor-
age area.
6. Place the spare tire cover and the trunk
floor carpeting over the damaged tire.
7. Install the jack in its storage area and
tighten the jack screw clockwise.
8. Close the jack access door. Close the
trunk.
WARNING
cAlways make sure that the spare tire
and jacking equipment are properly
secured after use. Such items can
become dangerous projectiles in an
accident or sudden stop.
cThe T-type spare tire is designed for
emergency use. See specific instruc-
tions under the heading ``Wheels
and tires'' in the ``Do-it-yourself''
section.To start your engine with a booster battery,
the instructions and precautions below must
be followed.
WARNING
cIf done incorrectly, jump starting can
lead to a battery explosion, resulting
in severe injury or death. It could
also damage your vehicle.
cExplosive hydrogen gas is always
present in the vicinity of the battery.
Keep all sparks and flames away
from the battery.
cDo not allow battery fluid to come
into contact with eyes, skin, cloth or
painted surfaces. Battery fluid is a
corrosive sulphuric acid solution
which can cause severe burns. If the
fluid should come into contact with
anything, immediately flush the con-
tacted area with water.
cKeep battery out of the reach of
children.
cThe booster battery must be rated at
12 volts. Use of an improper rated
battery can damage your vehicle.cWhenever working on or near a bat-
tery, always wear suitable eye pro-
tectors (for example, goggles or in-
dustrial safety spectacles) and
remove rings, metal bands, or any
other jewelry. Do not lean over the
battery when jump starting.
cDo not attempt to jump start a frozen
battery. It could explode and cause
serious injury.
cYour vehicle has an automatic en-
gine cooling fan. It could come on at
any time. Keep hands and other ob-
jects away from it.
JUMP STARTING
In case of emergency6-7
ZX
Page 137 of 217
WARNING
Be careful not to allow your hands, hair,
jewelry or clothing to come into contact
with, or to get caught in, the running
fan, belts, or fan motor.
The fan motor can start at any time
when the coolant temperature is high.
7. After the engine cools down, check the
coolant level in the reservoir tank with the
engine running. Add coolant to the res-
ervoir tank if necessary. Have your ve-
hicle repaired at an authorized NISSAN
dealer.When towing your vehicle, U.S. States,
Canadian Provinces and local regulations
for towing must be followed. Incorrect tow-
ing equipment could damage your vehicle.
Towing instructions are available from an
authorized NISSAN dealer. Local service
operators will generally be familiar with the
applicable laws and procedures for towing.
To assure proper towing and to prevent
accidental damage to your vehicle, NISSAN
recommends that you have a service opera-
tor tow your vehicle. It is advisable to have
the service operator carefully read the fol-
lowing precautions:
WARNING
cNever ride in a vehicle that is being
towed.
cNever get under your vehicle after it
has been lifted by a tow truck.
CAUTION
cWhen towing, make sure that the
transmission, axles, steering system
and powertrain are in working con-
dition. If any unit is damaged, dollies
must be used.cWhen towing with the front wheels
on the ground:
Turn the ignition key to the OFF
position and secure the steering
wheel in a straight-ahead position
with a rope or similar device. Never
place the ignition key in the LOCK
position. This will result in damage
to the steering lock mechanism.
Move the gearshift lever to the Neu-
tral (N position).
On automatic transmission models,
to move the shift lever to the Neutral
position, turn the ignition key to the
ACC position. After moving the shift
lever to the Neutral position, be sure
to turn the ignition key to the OFF
position.
c
When towing with the rear wheels on
the ground, release the parking brake.
On automatic transmission models,
to move the shift lever to the Neutral
position, turn the ignition key to the
ACC position. After moving the shift
lever to the Neutral position, be sure
to turn the ignition key to the OFF
position.
cAttach safety chains for all towing.
TOW TRUCK TOWING
6-10In case of emergency
ZX
Page 138 of 217
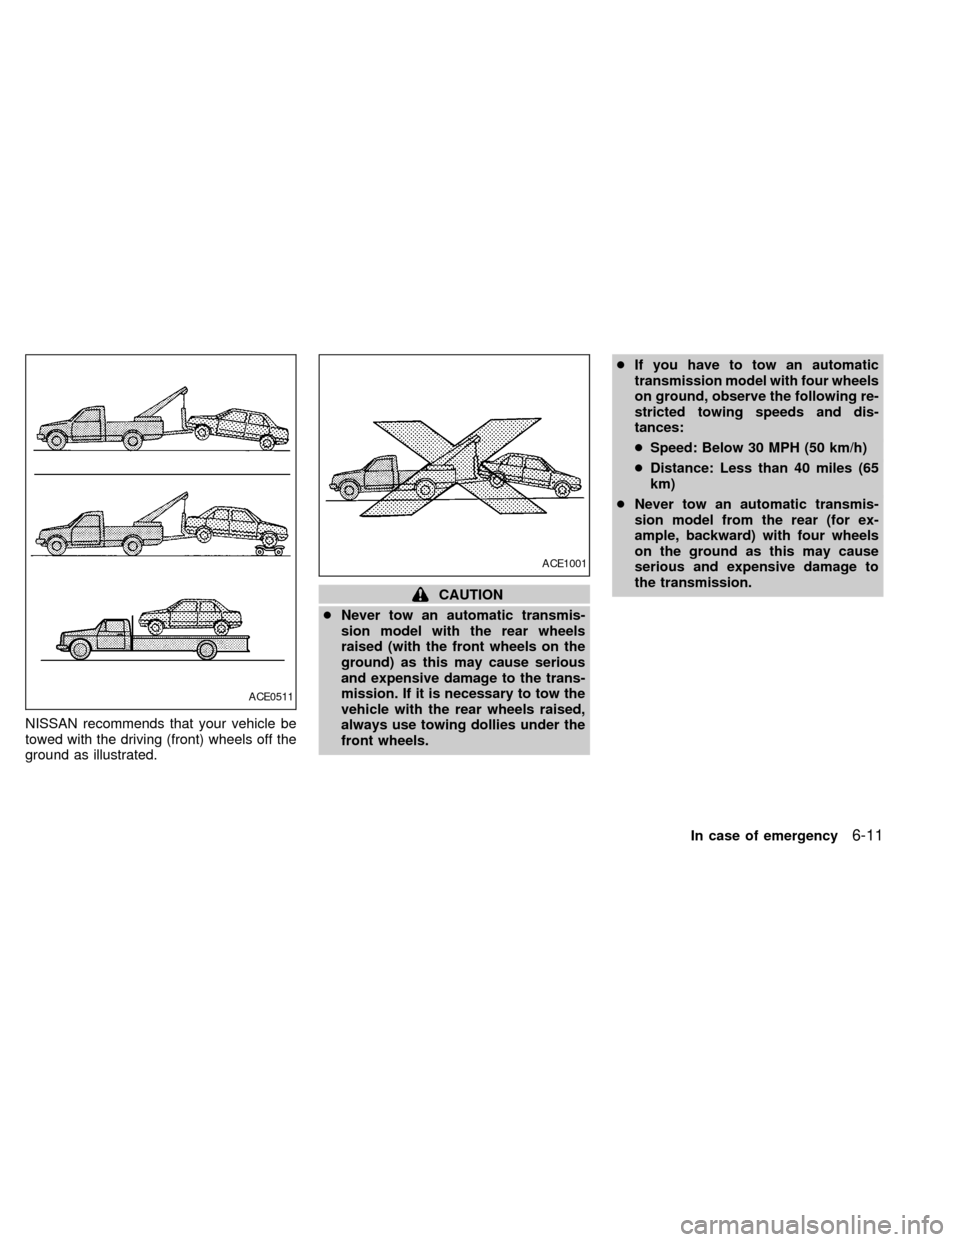
NISSAN recommends that your vehicle be
towed with the driving (front) wheels off the
ground as illustrated.
CAUTION
cNever tow an automatic transmis-
sion model with the rear wheels
raised (with the front wheels on the
ground) as this may cause serious
and expensive damage to the trans-
mission. If it is necessary to tow the
vehicle with the rear wheels raised,
always use towing dollies under the
front wheels.cIf you have to tow an automatic
transmission model with four wheels
on ground, observe the following re-
stricted towing speeds and dis-
tances:
cSpeed: Below 30 MPH (50 km/h)
cDistance: Less than 40 miles (65
km)
cNever tow an automatic transmis-
sion model from the rear (for ex-
ample, backward) with four wheels
on the ground as this may cause
serious and expensive damage to
the transmission.
ACE0511
ACE1001
In case of emergency6-11
ZX
Page 141 of 217
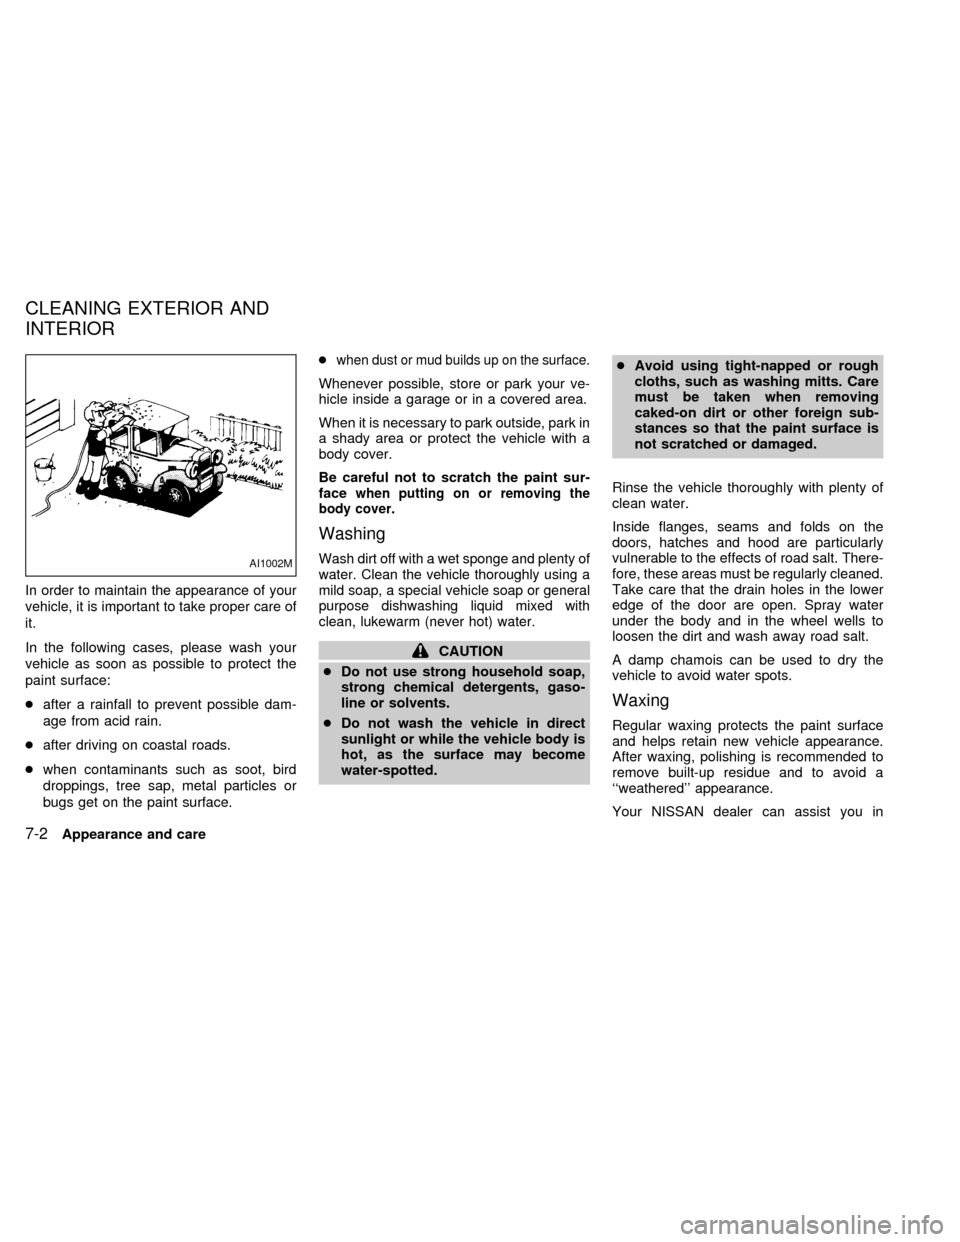
In order to maintain the appearance of your
vehicle, it is important to take proper care of
it.
In the following cases, please wash your
vehicle as soon as possible to protect the
paint surface:
cafter a rainfall to prevent possible dam-
age from acid rain.
cafter driving on coastal roads.
cwhen contaminants such as soot, bird
droppings, tree sap, metal particles or
bugs get on the paint surface.c
when dust or mud builds up on the surface.
Whenever possible, store or park your ve-
hicle inside a garage or in a covered area.
When it is necessary to park outside, park in
a shady area or protect the vehicle with a
body cover.
Be careful not to scratch the paint sur-
face
when putting on or removing the
body cover.
Washing
Wash dirt off with a wet sponge and plenty of
water. Clean the vehicle thoroughly using a
mild soap, a special vehicle soap or general
purpose dishwashing liquid mixed with
clean, lukewarm (never hot) water.
CAUTION
cDo not use strong household soap,
strong chemical detergents, gaso-
line or solvents.
cDo not wash the vehicle in direct
sunlight or while the vehicle body is
hot, as the surface may become
water-spotted.cAvoid using tight-napped or rough
cloths, such as washing mitts. Care
must be taken when removing
caked-on dirt or other foreign sub-
stances so that the paint surface is
not scratched or damaged.
Rinse the vehicle thoroughly with plenty of
clean water.
Inside flanges, seams and folds on the
doors, hatches and hood are particularly
vulnerable to the effects of road salt. There-
fore, these areas must be regularly cleaned.
Take care that the drain holes in the lower
edge of the door are open. Spray water
under the body and in the wheel wells to
loosen the dirt and wash away road salt.
A damp chamois can be used to dry the
vehicle to avoid water spots.
Waxing
Regular waxing protects the paint surface
and helps retain new vehicle appearance.
After waxing, polishing is recommended to
remove built-up residue and to avoid a
``weathered'' appearance.
Your NISSAN dealer can assist you in
AI1002M
CLEANING EXTERIOR AND
INTERIOR
7-2Appearance and care
ZX
Page 143 of 217
after the vehicle is parked in the hot sun.
Glass cleaner and a soft cloth will easily
remove this film.
CAUTION
When cleaning the inside of the win-
dow, do not use sharp-edged tools,
abrasive cleaners or chlorine based
disinfectant cleaners. They could dam-
age the rear window defogger.
Cleaning aluminum alloy wheels
Wash regularly, especially during winter
months in areas where road salt is used. If
not removed, salt could discolor the wheels.
Chrome parts
Clean all chrome parts regularly with a
non-abrasive chrome polish to maintain the
finish.
Cleaning interior
Occasionally remove loose dust from the
interior trim, plastic parts and seats using a
vacuum cleaner or soft brush. Wipe the
vinyl and leather surfaces with a clean, soft
cloth dampened in mild soap solution, then
wipe clean with a dry, soft cloth. Before
using any fabric protector, read the manu-
facturer's recommendations. Some fabric
protectors contain chemicals that may stain
or bleach the seat material.
CAUTION
cNever use benzine, thinner, or any
similar material.
cThe leather seats should be regu-
larly coated with a leather wax like
saddle soap. Never use car wax.
cNever use fabric protectors unless
recommended by the manufacturer.
7-4Appearance and care
ZX