1998 MITSUBISHI MONTERO diagram
[x] Cancel search: diagramPage 296 of 1501

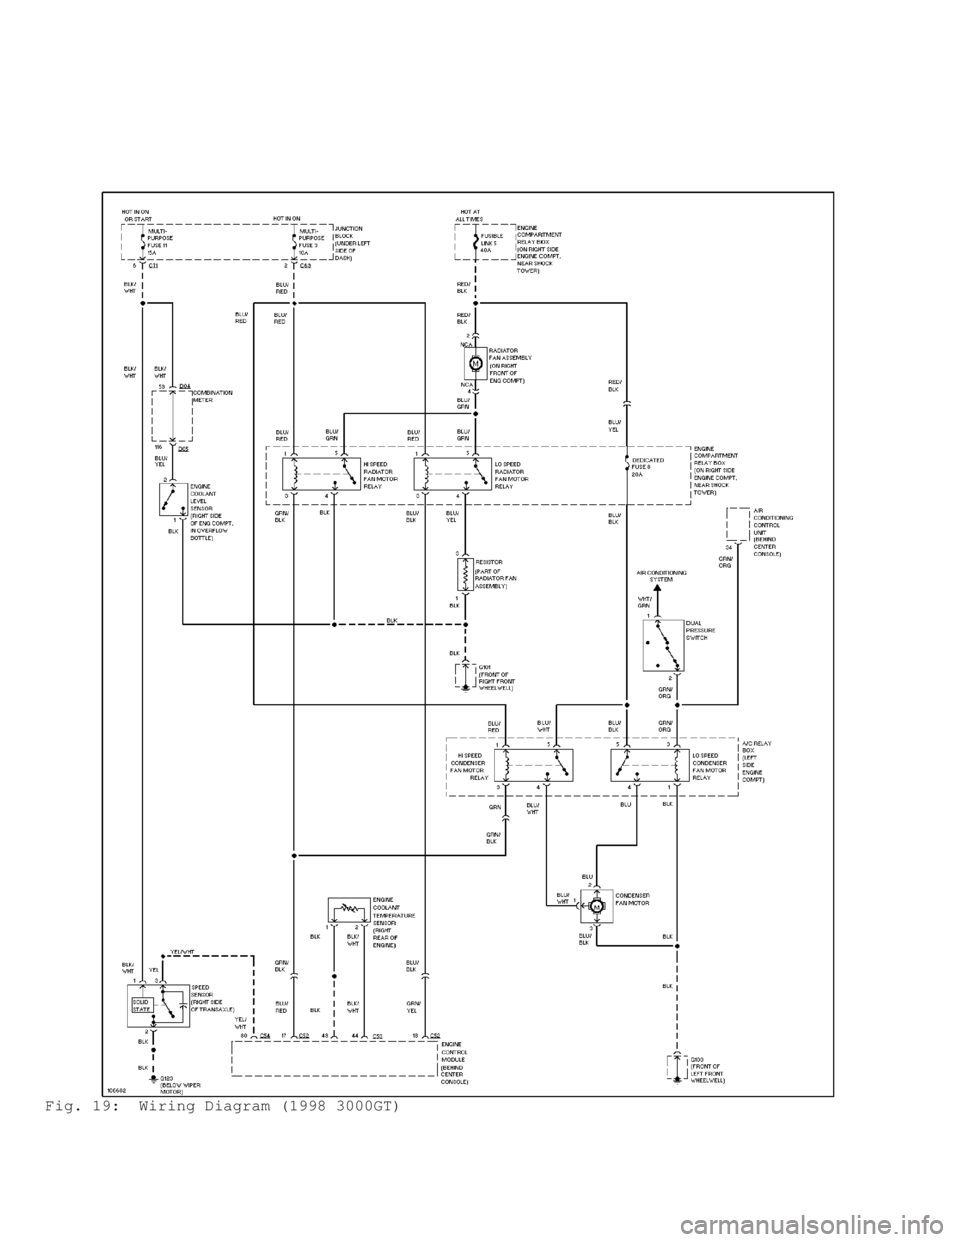
Fig. 19: Wiring Diagram (1998 3000GT)
Page 326 of 1501

check cruise control ECU connector C-50 and joint connector C-130.
Repair as necessary. See Figs. 13, 16 and 28. If malfunction remains,
check harness between combination meter (instrument cluster) and
cruise control ECU. Repair as necessary.
3) Disconnect combination meter connector C-04. See Fig. 9.
Check for continuity at harness side between terminal No. 43 and
ground. If continuity is present, go to next step. If continuity is
not present, check harness between combination meter and ground.
Repair as necessary.
4) Inspect combination meter connector C-04. If connector is
defective, repair as necessary. If connector is okay and malfunction
remains, replace cruise control ECU.
CODE 14: VACUUM PUMP POWER SUPPLY
Code 14 is displayed when drive signals for vacuum pump
release valve, control valve and motor are not input into cruise
control ECU. Probable causes are:
* Malfunction of stoplight switch.
* Malfunction of connector.
* Malfunction of harness.
* Malfunction of cruise control ECU.
1) Disconnect vacuum pump connector A-105. See Fig. 6. At
harness side of connector, check voltage between terminal No. 1 and
ground. If battery voltage is present, go to next step. If battery
voltage is not present, check stoplight switch. See
BRAKELIGHT/STOPLIGHT SWITCH TEST under COMPONENT TESTS. Replace as
necessary. If switch is okay, check connectors to combination meter,
stoplight switch and vacuum pump. Repair as necessary. If connectors
are okay and malfunction remains, check and repair circuit between
cruise control ECU and vacuum pump. If malfunction remains, replace
cruise control ECU.
2) Check connectors and circuit between cruise control ECU
and vacuum pump. See WIRING DIAGRAMS. Repair as necessary. If
connectors and circuit are okay, replace cruise control ECU.
CODE 15: CRUISE CONTROL SWITCH
Code 15 is displayed if RESUME switch or SET switch remains
on. Probable cause is malfunction of cruise control switch. Replace
cruise control switch.
CODE 16: CRUISE CONTROL ECU
Code 16 is displayed if there is an abnormality in CANCEL
hold circuit or microprocessor monitor circuit in cruise control ECU.
Probable cause is malfunction of cruise control ECU. Replace cruise
control ECU.
CODE 17: THROTTLE POSITION SENSOR
Code 17 is displayed if a voltage of 1.5 volts or more exists
when closed throttle position switch is ON or 0.2 volt or less exists
when closed throttle position switch is OFF for a continuous period of
4 seconds or more. Probable causes are:
* Malfunction of throttle position sensor.
* Malfunction of connector.
* Malfunction of harness.
* Malfunction of cruise control ECU.
Page 329 of 1501

* PLEASE READ THIS FIRST *
WARNING: Deactivate air bag system before performing any service
operation. See AIR BAG RESTRAINT SYSTEMS article. Do not
apply electrical power to any component on steering column
without first deactivating air bag system. Air bag may
deploy.
ACTUATOR
Removal & Installation
Disconnect cruise control cable from link. Disconnect
actuator wiring connector. Remove vacuum pump and vacuum pump bracket.
Remove actuator and actuator bracket. To install, reverse removal
procedure.
CRUISE CONTROL ECU
Removal & Installation
Cruise control ECU is located behind center of dash panel.
Remove center trim panel and radio or radio plug bezel. Remove control
unit. To install, reverse removal procedure.
CRUISE CONTROL SWITCH
Removal & Installation
Remove lower steering column cover. Disconnect electrical
connectors. Remove screws attaching cruise control switch to steering
column. Remove switch. To install, reverse removal procedure.
INSTRUMENT CLUSTER
Removal & Installation
Disconnect negative battery cable. Remove cluster cover.
Disconnect speedometer cable. Remove instrument cluster. To install,
reverse removal procedure.
WIRING DIAGRAMS
Page 330 of 1501

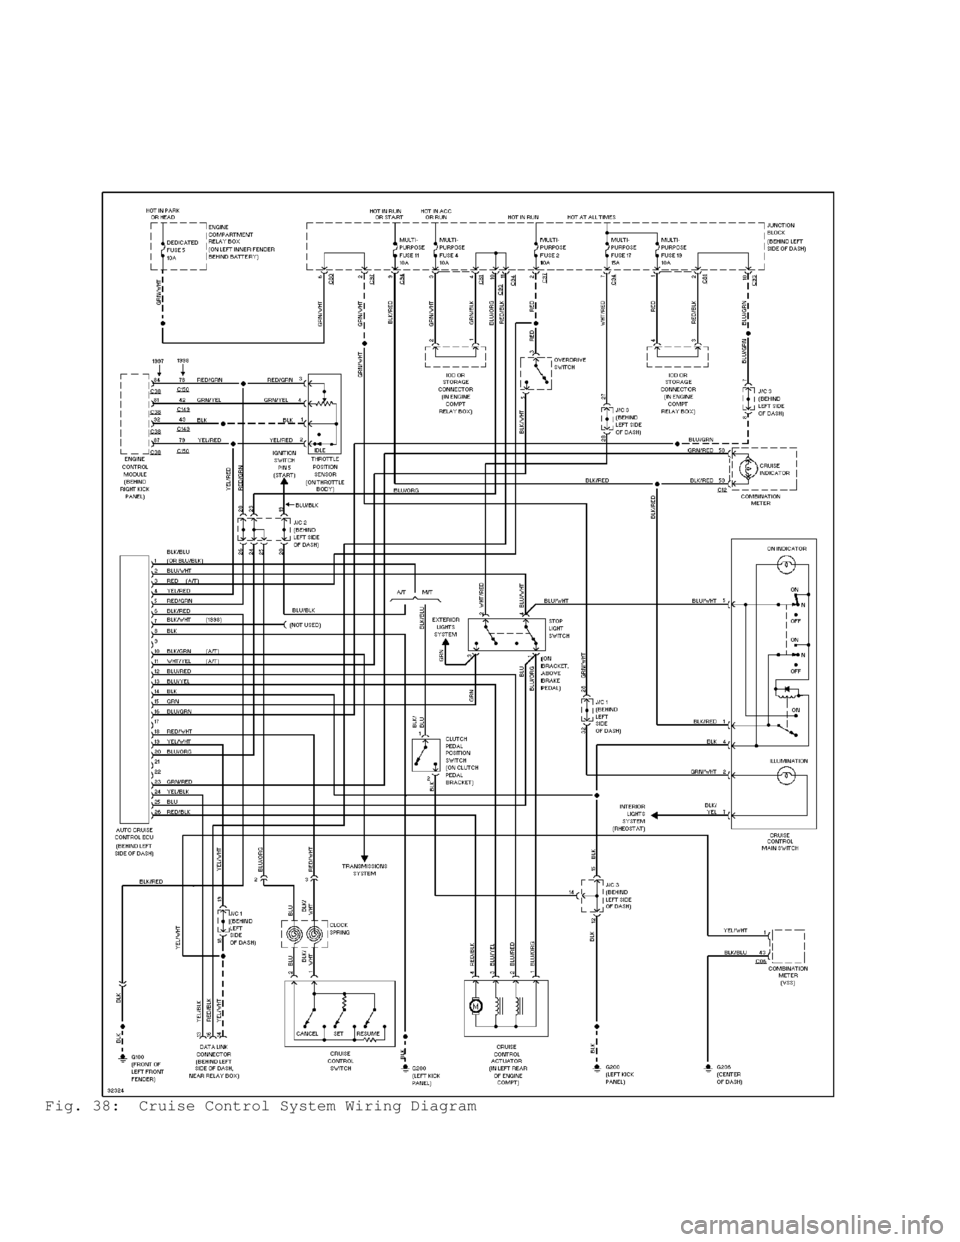
Fig. 38: Cruise Control System Wiring Diagram
Page 344 of 1501

NOTE: The following information only applies to Eclipse and Galant.
NOTE: Perform INPUT SIGNAL INSPECTION before proceeding with
SYSTEM TESTS. To identify circuit connector terminals, see
WIRING DIAGRAMS .
Communication With All Systems Not Possible (Eclipse &
Galant)
1) Check voltage between ground and Data Link Connector (DLC)\
terminal No. 16 (Red/Black wire on Eclipse or Brown/Red wire on
Galant). See Fig. 1. If battery voltage is present, go to step 3). If
battery voltage is not present, go to next step.
2) Check junction block connectors between DLC and power
supply. See WIRING DIAGRAMS . If connectors are okay, check circuit
between power supply and DLC. See WIRING DIAGRAMS. Repair as
necessary.
3) Check continuity between ground and DLC terminals No. 4
and 5. If continuity is present, replace scan tool and retest. If
continuity is not present, check circuit between ground and DLC. See
WIRING DIAGRAMS . Repair as necessary.
Communication With One-Shot Pulse Input Signal Only Is Not
Possible (Eclipse & Galant)
Check circuit between DLC and junction block No. 1. See
WIRING DIAGRAMS . Repair as necessary. If circuit is okay, check
harness connectors to ETACS-ECU, DLC and junction/joint connectors.
Repair as necessary. If connectors are okay, replace ECU.
Defogger Does Not Operate With Defogger Switch ON (Eclipse &
Galant)
1) Check defogger switch input signal. See
INPUT SIGNAL INSPECTION . If switch input signal is okay, check
defogger circuit and relay. See DEFOGGER RELAY TEST under COMPONENT
TESTS. Repair or replace as necessary. If switch input signal is not
okay, go to next step.
2) Check defogger switch. See DEFOGGER SWITCH TEST under
COMPONENT TESTS. Replace as necessary. If defogger switch is okay,
turn ignition on. Check voltage between ground and defogger switch
harness-side connector terminal No. 4 (Eclipse) or terminal No. 2
(Galant). See WIRING DIAGRAMS . If voltage reading is 5 volts (Eclipse)
or battery voltage (Galant), go to next step. If voltage reading is
not as specified, go to step 4).
3) Check joint/junction connectors between switch, instrument
panel cluster and ETACS-ECU. See WIRING DIAGRAMS. Repair as necessary.
If connectors are okay, check circuit between defogger switch and
ground. Repair as necessary. If circuit is okay, replace ECU.
4) Check harness connectors to ETACS-ECU and instrument panel
cluster. Repair as necessary. If connectors are okay, check circuit
between ECU and defogger switch. Repair as necessary.
Defogger Relay Circuit System Check (Eclipse & Galant)
1) Check defogger relay. See DEFOGGER RELAY TEST under
COMPONENT TESTS. Replace as necessary. If relay is okay, go to next
step.
2) Check voltage between ground and relay harness-side
connector terminals No. 3 and 5. See WIRING DIAGRAMS. If battery
voltage is present, go to next step. If battery voltage is not
present, go to step 4).
3) Check harness connectors to relay, ETACS-ECU, junction
block and rear wiring/liftgate. See WIRING DIAGRAMS. Repair as
necessary. If connectors are okay, check circuit between defogger
relay and rear defogger, defogger and ground, or defogger relay and
ECU. See WIRING DIAGRAMS . Repair as necessary. If circuits are okay,
Page 345 of 1501

replace ECU.
4) Check harness connectors to junction block and ignition
switch. Repair as necessary. If connectors are okay, check circuit
between ignition switch and junction block, and between fusible link
No. 2 and junction block. See WIRING DIAGRAMS. Repair as necessary.
COMPONENT TESTS
DEFOGGER RELAY TEST
Diamante & Eclipse
1) Remove defogger relay. See COMPONENT LOCATIONS. Ground
relay terminal No. 1, and apply battery voltage to terminal No. 3. See
Fig. 2 . Check relay continuity using ohmmeter.
2) Continuity should exist between terminals No. 2 and 5.
With voltage disconnected, continuity should not exist between
terminals No. 2 and 5. Ensure continuity exists between terminals No.
1 and 3. If continuity is not as specified, replace relay.
Galant, Mirage & Montero Sport
1) Remove defogger relay. See COMPONENT LOCATIONS. Ground
relay terminal No. 3, and apply battery voltage to terminal No. 1. See
Fig. 2 . Check relay continuity using ohmmeter.
2) Continuity should exist between terminals No. 2 and 5.
With voltage disconnected, continuity should not exist between
terminals No. 2and 5. Ensure continuity exists between terminals No. 1
and 3. If continuity is not as specified, replace relay.
Montero
1) Remove defogger relay. See COMPONENT LOCATIONS. Ground
relay terminal No. 3 and apply battery voltage to terminal No. 1. See
Fig. 3 . Check relay continuity using ohmmeter.
2) Continuity should exist between terminals No. 4 and 5.
With voltage disconnected, continuity should not exist between
terminals No. 4and 5. Ensure continuity exists between terminals No. 1
and 3. If continuity is not as specified, replace relay.
3000GT
1) Remove defogger relay. See COMPONENT LOCATIONS. Ground
relay terminal No. 3, and apply battery voltage to terminal No. 5. See
Fig. 4 . Check relay continuity using ohmmeter.
2) Continuity should exist between terminals No. 1 and 2.
With voltage disconnected, continuity should not exist between
terminals No. 1and 2. Ensure continuity exists between terminals No. 3
and 5. If continuity is not as specified, replace relay.
Fig. 2: Identifying Defogger Relay Terminals (Diamante, Eclipse,
Galant, Mirage & Montero Sport)
Courtesy of Mitsubishi Motor Sales of America
Page 350 of 1501

At heater unit, remove center air outlet cool air by-pass
lever cable from damper lever. To remove center air outlet, push
springs at bottom of center air outlet upward. Outlet is located above
radio. Remove switch from center air outlet. To install, reverse
removal procedure. Turn cool air by-pass lever on outlet fully upward.
Pull air by-pass lever fully downward and install cool air by-pass
lever cable to damper lever.
Removal & Installation (Mirage)
Remove driver-side lower dash panel. Remove center console
assembly and foot distribution duct. Disconnect rear window defogger
switch harness connector. Remove switch. To install, reverse removal
procedure.
Removal & Installation (Montero)
Remove defogger switch by prying switch off instrument
cluster bezel. Disconnect wiring harness from defogger switch. Remove
switch. To install, reverse removal procedure.
Removal & Installation (Montero Sport)
Remove instrument cluster bezel. Bezel is held in by metal
clips. Disconnect wiring harness from defogger switch. Remove switch
from behind bezel. To install, reverse removal procedure.
Removal & Installation (3000GT)
Remove knee protector. Remove steering column upper and lower
covers. Remove instrument cluster bezel. Disconnect wiring harness
from defogger switch. Remove defogger switch. To install, reverse
removal procedure.
WIRING DIAGRAMS
Page 351 of 1501

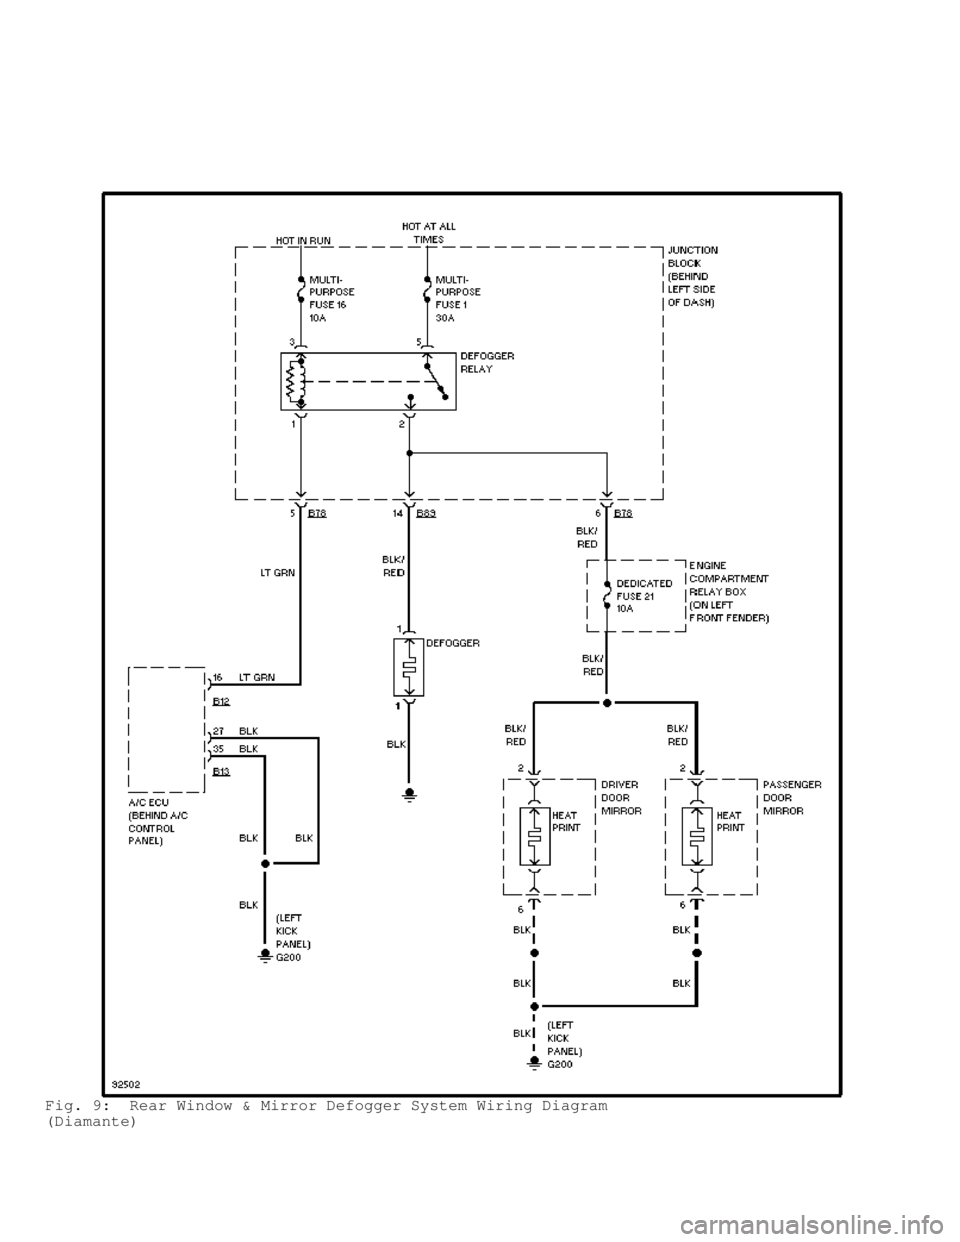
Fig. 9: Rear Window & Mirror Defogger System Wiring Diagram
(Diamante)