Page 226 of 396

REAR AXLE – Differential Carrier 27-40
REMOVAL SERVICE POINT
�A�REAR CROSSMEMBER AND DIFFERENTIAL
CARRIER ASSEMBLY REMOVAL
(1) Using a jack, support the differential carrier from its
underside.
(2) Remove the rear crossmember mounting bolts and
remove the differential carrier, where it is attached to
the rear crossmember, from the vehicle.
INSTALLATION SERVICE POINTS
�A�REAR CROSSMEMBER AND DIFFERENTIAL
CARRIER ASSEMBLY
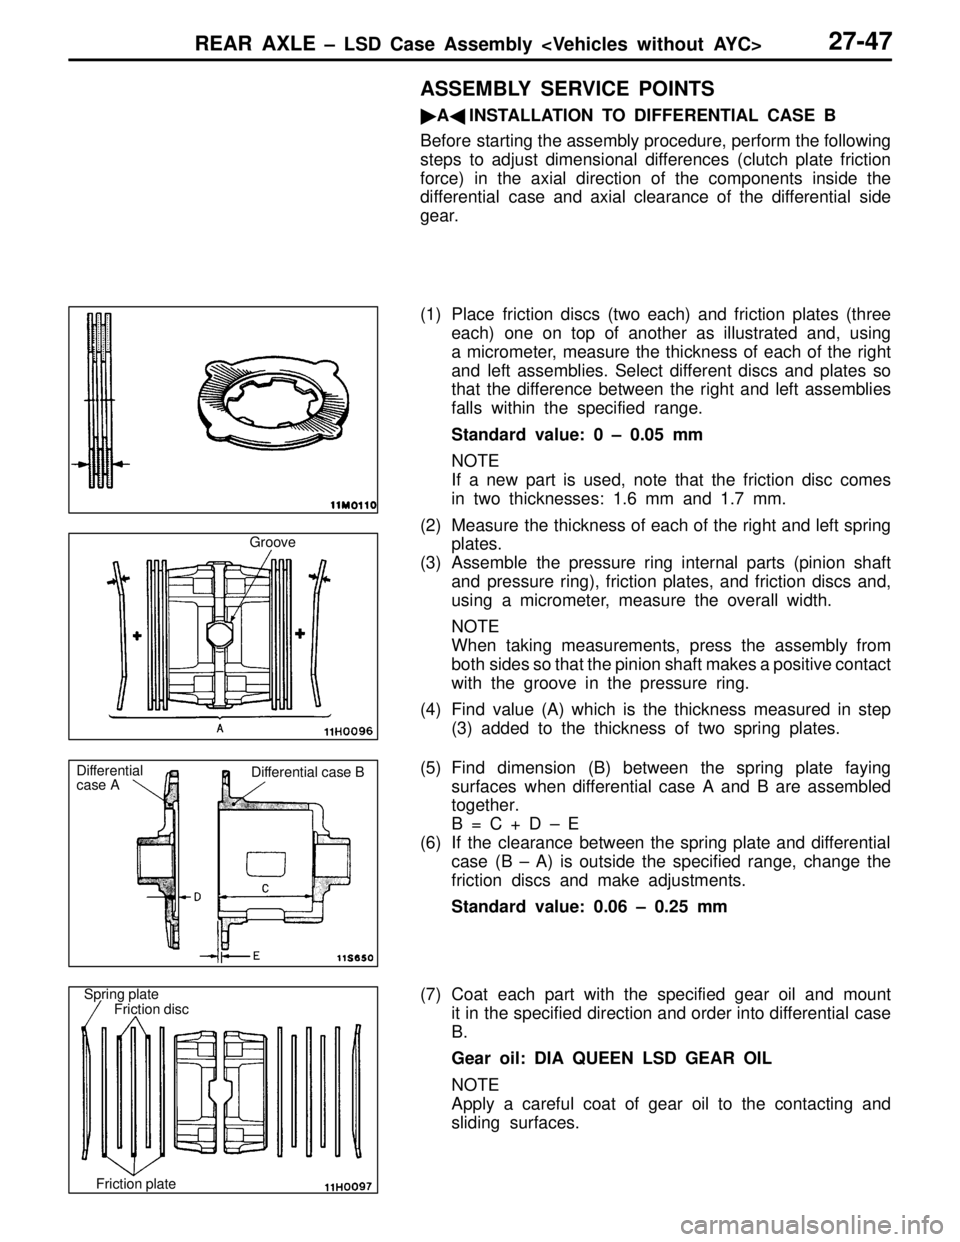
Tighten the rear crossmember mounting bolts in the numerical
order shown.
NOTE
To ensure both good installation accuracy and ease of
installation, the rear crossmember mounting holes have
different diameters between front and rear. This is the reason
for specifying the tightening sequence of the mounting bolts.
�B�PROPELLER SHAFT CONNECTION
Align the alignment mark on the differential carrier with that
of the propeller shaft at installation.
Caution
Oil or grease on the threads of the mounting bolt or nut
can allow the bolt or nut to come loose. Be sure to
degrease the threads before installation.
Bolt size (thread dia. × length mm)
1 to 3: Flange bolt (with washer) 12 × 70
4: Flange bolt (with washer) 12 × 152
5: Bolt (with spring washer + washer) 12 × 105 Front of vehicle
13
3
442
5
5
Page 227 of 396
REAR AXLE – Differential Carrier 27-41
DIFFERENTIAL CARRIER
REMOVAL AND INSTALLATION
Pre-removal Operation
(1) Differential Gear Oil Draining
(2) Lower Arm Assembly Removal
(3) Rear Stabilizer Removal
(4) Drive Shaft RemovalPost-installation Operation
(1) Drive Shaft Installation
(2) Rear Stabilizer Installation
(3) Lower Arm Assembly Installation
(4) Differential Gear Oil Filling
12
3
4 5
6
78
9 10
Unit: Nm {kgf�m}
29 – 34
{3.0 – 3.5}88 {9.0} 108 – 127
{11.0 – 13.0}
3
6
9
7 2
108 – 127
{11.0 – 13.0}108 – 127
{11.0 – 13.0}
88 {9.0}88 {9.0} 88 {9.0}
69 {7.0}
108 – 127
{11.0 – 13.0}
3
3
69 {7.0}
88 {9.0}
Removal steps
�A��B�1. Propeller shaft connection
2. Toe control bar
3. Differential support member mount-
ing bolt and nut
�B��A�4. Rear crossmember and differential
carrier assembly5. Differential support member
6. Upper stopper
7. Lowe
r stopper
8.Differential support arm
9.Differential mount bracket
10.Differential carrier
Page 228 of 396

REAR AXLE – Differential Carrier 27-42
REMOVAL SERVICE POINTS
�A�PROPELLER SHAFT DISCONNECTION
Make an alignment mark on the companion flange and flange
yoke, then disconnect the propeller shaft from the companion
flange.
Caution
Suspend the propeller shaft from the body with a wire
to prevent the bend at the joint from catching and
damaging the joint boot.
�B�REAR CROSSMEMBER AND DIFFERENTIAL
CARRIER ASSEMBLY REMOVAL
(1) Using a jack, support the differential carrier from its
underside.
(2) Remove the rear crossmember mounting bolts and
remove the differential carrier, where it is attached to
the rear crossmember, from the vehicle.
INSTALLATION SERVICE POINTS
�A�REAR CROSSMEMBER AND DIFFERENTIAL
CARRIER ASSEMBLY INSTALLATION
Tighten the rear crossmember mounting bolts in the numerical
order shown.
NOTE
To ensure both good installation accuracy and ease of
installation, the rear crossmember mounting holes have
different diameters between front and rear. This is the reason
for specifying the tightening sequence of the mounting bolts.
�B�PROPELLER SHAFT CONNECTION
Align the alignment mark on the companion flange with that
of the flange yoke at installation.
Caution
Oil or grease on the threads of the mounting bolt or nut
can allow the bolt or nut to come loose. Be sure to
degrease the threads before installation.
Bolt size (thread dia. × length mm)
1 to 3: Flange bolt (with washer) 12 × 105
4: Flange bolt (with washer) 12 × 152
5: Bolt (with spring washer + washer) 12 × 70
13
3
442
5
5
Page 229 of 396
REAR AXLE – Torque Transfer Differential 27-43
TORQUE TRANSFER DIFFERENTIAL
DISASSEMBLY AND REASSEMBLY
1 23
4 5
6
7 891011
12 1314
Unit: Nm {kgf�m}
186 {19.0}4
49 {5.0}
49 {5.0}9 {0.9}9 {0.9} 49 {5.0}
3
Disassembly steps
1. Drain plug
2. Packing
3. Filler plug
4. Gasket
5. Vent plug
6. Bleeder screw
7. Cover
�A�8. Self-locking nut
9. Washer
10. Companion flange11. Oil seal
�B�12. Oil seal
�A�13. Oil seal
14. Differential carrier assembly
Caution
(1) The differential carrier assembly is non-main-
tainable.
(2) No foreign matter should be allowed inside and
at the joints of the differential carrier assembly.
Page 231 of 396
REAR AXLE – Torque Transfer Differential 27-45
DISASSEMBLY SERVICE POINT
�A�SELF-LOCKING NUT REMOVAL
ASSEMBLY SERVICE POINTS
�A�OIL SEAL INSTALLATION
(1) Using the special tool, pressfit the oil seal as far as it
will go.
(2) Apply the specified grease to the oil seal lip.
Specified grease: Vaseline
�B�OIL SEAL INSTALLATION
(1) Using the special tool, pressfit the oil seal as far as it
will go.
(2) Apply the multi-purpose grease to the oil seal lip.
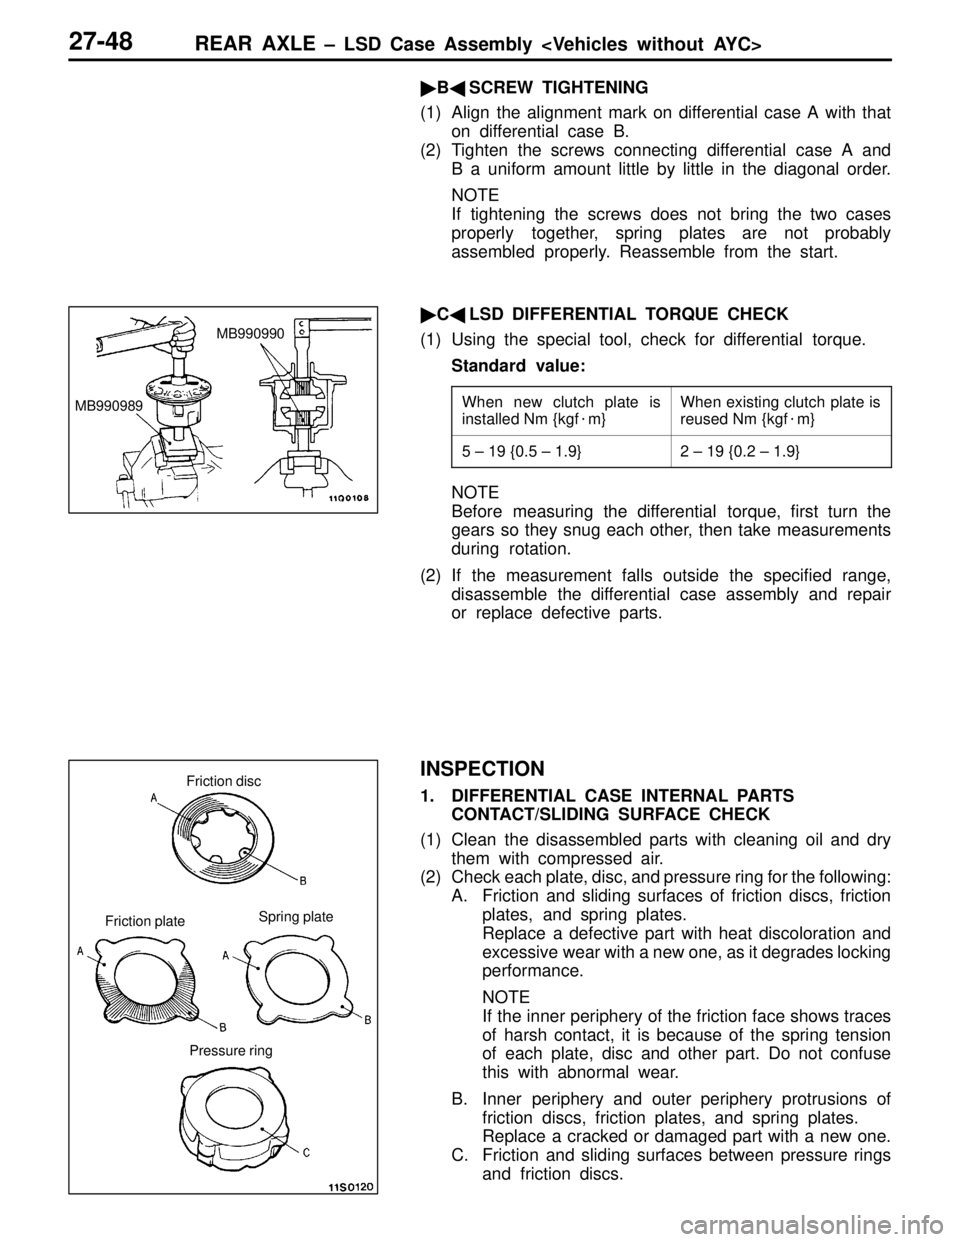
MB990850
MD998812MD998829
MD998813
MB990938
MB991115
Page 233 of 396

REAR AXLE – LSD Case Assembly 27-47
ASSEMBLY SERVICE POINTS
�A�INSTALLATION TO DIFFERENTIAL CASE B
Before starting the assembly procedure, perform the following
steps to adjust dimensional differences (clutch plate friction
force) in the axial direction of the components inside the
differential case and axial clearance of the differential side
gear.
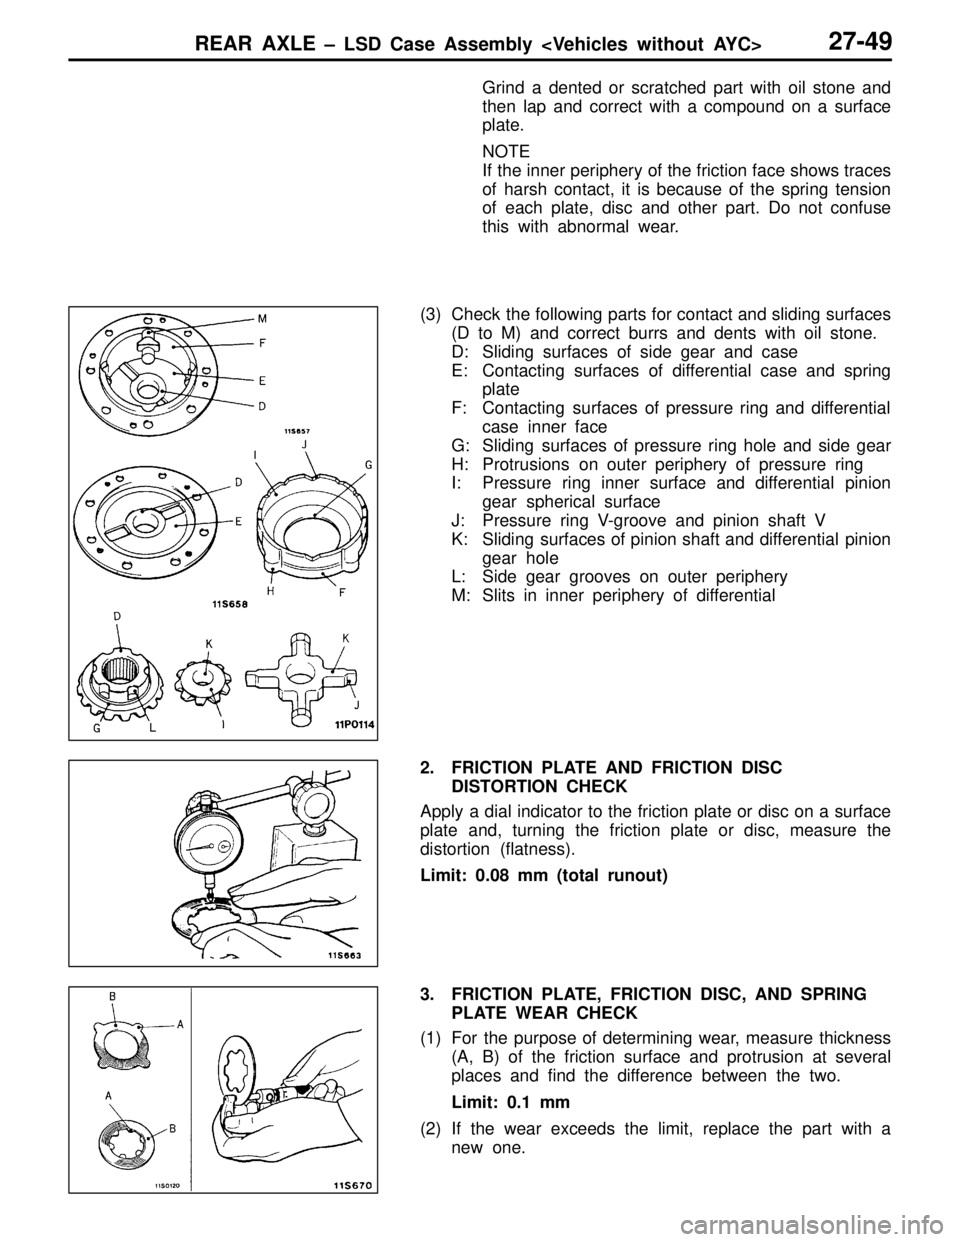
(1) Place friction discs (two each) and friction plates (three
each) one on top of another as illustrated and, using
a micrometer, measure the thickness of each of the right
and left assemblies. Select different discs and plates so
that the difference between the right and left assemblies
falls within the specified range.
Standard value: 0 – 0.05 mm
NOTE
If a new part is used, note that the friction disc comes
in two thicknesses: 1.6 mm and 1.7 mm.
(2) Measure the thickness of each of the right and left spring
plates.
(3) Assemble the pressure ring internal parts (pinion shaft
and pressure ring), friction plates, and friction discs and,
using a micrometer, measure the overall width.
NOTE
When taking measurements, press the assembly from
both sides so that the pinion shaft makes a positive contact
with the groove in the pressure ring.
(4) Find value (A) which is the thickness measured in step
(3) added to the thickness of two spring plates.
(5) Find dimension (B) between the spring plate faying
surfaces when differential case A and B are assembled
together.
B = C + D – E
(6) If the clearance between the spring plate and differential
case (B – A) is outside the specified range, change the
friction discs and make adjustments.
Standard value: 0.06 – 0.25 mm
(7) Coat each part with the specified gear oil and mount
it in the specified direction and order into differential case
B.
Gear oil: DIA QUEEN LSD GEAR OIL
NOTE
Apply a careful coat of gear oil to the contacting and
sliding surfaces.
Groove
Differential
case ADifferential case B
Spring plate
Friction disc
Friction plate
Page 234 of 396

REAR AXLE – LSD Case Assembly 27-48
�B�SCREW TIGHTENING
(1) Align the alignment mark on differential case A with that
on differential case B.
(2) Tighten the screws connecting differential case A and
B a uniform amount little by little in the diagonal order.
NOTE
If tightening the screws does not bring the two cases
properly together, spring plates are not probably
assembled properly. Reassemble from the start.
�C�LSD DIFFERENTIAL TORQUE CHECK
(1) Using the special tool, check for differential torque.
Standard value:
When new clutch plate is
installed Nm {kgf�m}When existing clutch plate is
reused Nm {kgf�m}
5 – 19 {0.5 – 1.9}2 – 19 {0.2 – 1.9}
NOTE
Before measuring the differential torque, first turn the
gears so they snug each other, then take measurements
during rotation.
(2) If the measurement falls outside the specified range,
disassemble the differential case assembly and repair
or replace defective parts.
INSPECTION
1. DIFFERENTIAL CASE INTERNAL PARTS
CONTACT/SLIDING SURFACE CHECK
(1) Clean the disassembled parts with cleaning oil and dry
them with compressed air.
(2) Check each plate, disc, and pressure ring for the following:
A. Friction and sliding surfaces of friction discs, friction
plates, and spring plates.
Replace a defective part with heat discoloration and
excessive wear with a new one, as it degrades locking
performance.
NOTE
If the inner periphery of the friction face shows traces
of harsh contact, it is because of the spring tension
of each plate, disc and other part. Do not confuse
this with abnormal wear.
B. Inner periphery and outer periphery protrusions of
friction discs, friction plates, and spring plates.
Replace a cracked or damaged part with a new one.
C. Friction and sliding surfaces between pressure rings
and friction discs.
MB990989MB990990
Friction disc
Friction plateSpring plate
Pressure ring
Page 235 of 396

REAR AXLE – LSD Case Assembly 27-49
Grind a dented or scratched part with oil stone and
then lap and correct with a compound on a surface
plate.
NOTE
If the inner periphery of the friction face shows traces
of harsh contact, it is because of the spring tension
of each plate, disc and other part. Do not confuse
this with abnormal wear.
(3) Check the following parts for contact and sliding surfaces
(D to M) and correct burrs and dents with oil stone.
D: Sliding surfaces of side gear and case
E: Contacting surfaces of differential case and spring
plate
F: Contacting surfaces of pressure ring and differential
case inner face
G: Sliding surfaces of pressure ring hole and side gear
H: Protrusions on outer periphery of pressure ring
I: Pressure ring inner surface and differential pinion
gear spherical surface
J: Pressure ring V-groove and pinion shaft V
K: Sliding surfaces of pinion shaft and differential pinion
gear hole
L: Side gear grooves on outer periphery
M: Slits in inner periphery of differential
2. FRICTION PLATE AND FRICTION DISC
DISTORTION CHECK
Apply a dial indicator to the friction plate or disc on a surface
plate and, turning the friction plate or disc, measure the
distortion (flatness).
Limit: 0.08 mm (total runout)
3. FRICTION PLATE, FRICTION DISC, AND SPRING
PLATE WEAR CHECK
(1) For the purpose of determining wear, measure thickness
(A, B) of the friction surface and protrusion at several
places and find the difference between the two.
Limit: 0.1 mm
(2) If the wear exceeds the limit, replace the part with a
new one.