Page 178 of 272
Cooling System
Replacing Engine Coolant
The cooling system should be completely drained and refilled with
new coolant according to the time
and distance recommendations in
the maintenance schedule. Only use Genuine Honda antifreeze/coolant.
Draining the coolant requires access
to the underside of the vehicle. Unless you have the tools and
knowledge, you should have this
maintenance done by a skilled
mechanic.
1. Slide the heater temperature
control lever to maximum heat.
Open the hood. Make sure the
engine and radiator are cool to the
touch.
2. Remove the radiator cap. 3. Loosen the drain plug on the
bottom of the radiator. Thecoolant will drain through the
splash guard. Remove the drain
bolt and washer from the engine
block.
CONTINUED
Maintenance
DRAIN PLUG
DRAIN BOLTProCarManuals.comMain Menu Table of Contents s t
Page 179 of 272

Cooling System
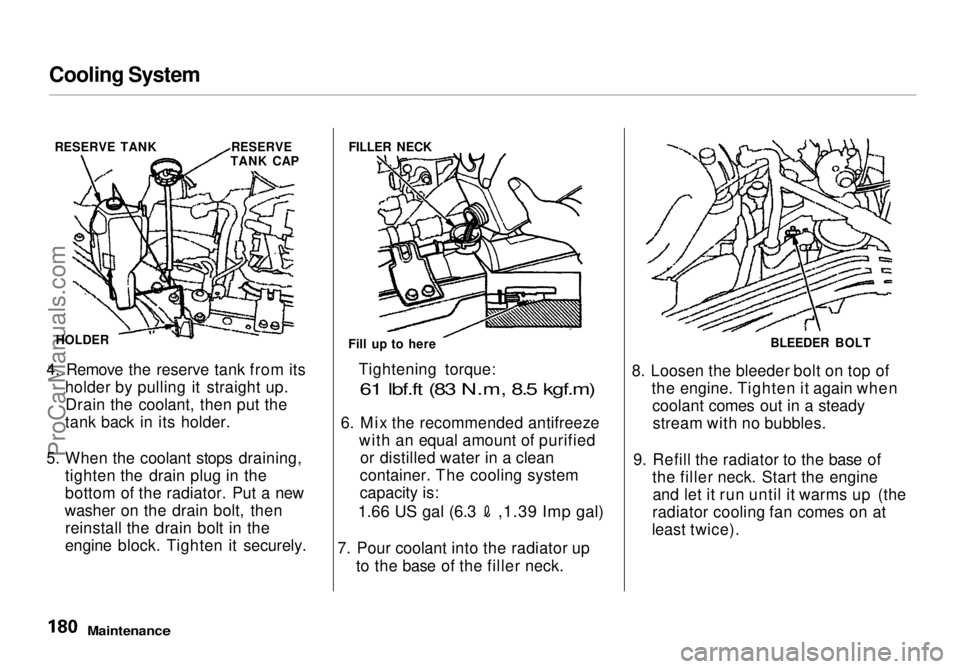
4. Remove the reserve tank from its holder by pulling it straight up.Drain the coolant, then put the
tank back in its holder.
5. When the coolant stops draining, tighten the drain plug in the
bottom of the radiator. Put a new
washer on the drain bolt, then reinstall the drain bolt in the
engine block. Tighten it securely. Tightening torque:
61 lbf.ft (83 N.m, 8.5 kgf.m)
6. Mix
the recommended antifreeze
with an equal amount of purified or distilled water in a clean
container. The cooling system
capacity is:
1.66 US gal (6.3 ,1.39 Imp gal)
7. Pour coolant into the radiator up
to the base of the filler neck. 8. Loosen the bleeder bolt on top of
the engine. Tighten it again whencoolant comes out in a steadystream with no bubbles.
9. Refill the radiator to the base of the filler neck. Start the engineand let it run until it warms up (the
radiator cooling fan comes on at
least twice).
Maintenance
RESERVE TANK RESERVE
TANK CAP
HOLDER FILLER NECK
Fill up to here BLEEDER BOLT
ProCarManuals.comMain Menu Table of Contents s t
Page 180 of 272

Cooling System, Windshield Washers
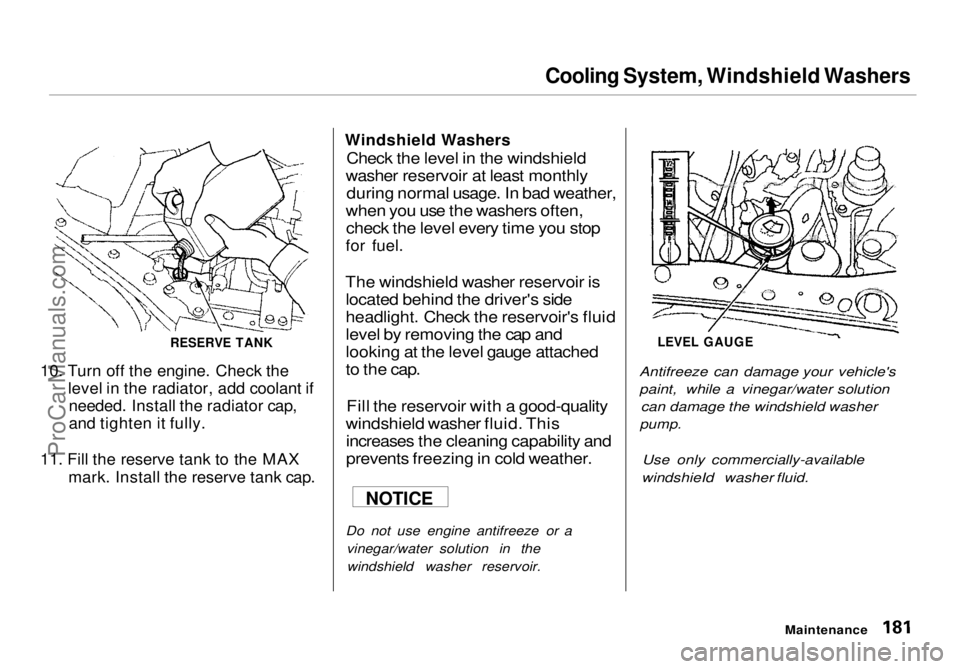
10. Turn off the engine. Check the level in the radiator, add coolant ifneeded. Install the radiator cap,
and tighten it fully.
11. Fill the reserve tank to the MAX mark. Install the reserve tank cap. Windshield Washers
Check the level in the windshield
washer reservoir at least monthly during normal usage. In bad weather,
when you use the washers often, check the level every time you stop
for fuel.
The windshield washer reservoir is located behind the driver's side
headlight. Check the reservoir's fluid
level by removing the cap and
looking at the level gauge attached
to the cap.
Fill the reservoir with a good-quality
windshield washer fluid. This increases the cleaning capability and
prevents freezing in cold weather.
Do not use engine antifreeze or a vinegar/water solution in thewindshield washer reservoir.
LEVEL GAUGE
Antifreeze can damage your vehicle's
paint, while a vinegar/water solution
can damage the windshield washer
pump.
Use only commercially-available
windshieId washer fluid.
Maintenance
RESERVE TANK
NOTICEProCarManuals.comMain Menu Table of Contents s t
Page 181 of 272

Automatic Transmission Fluid
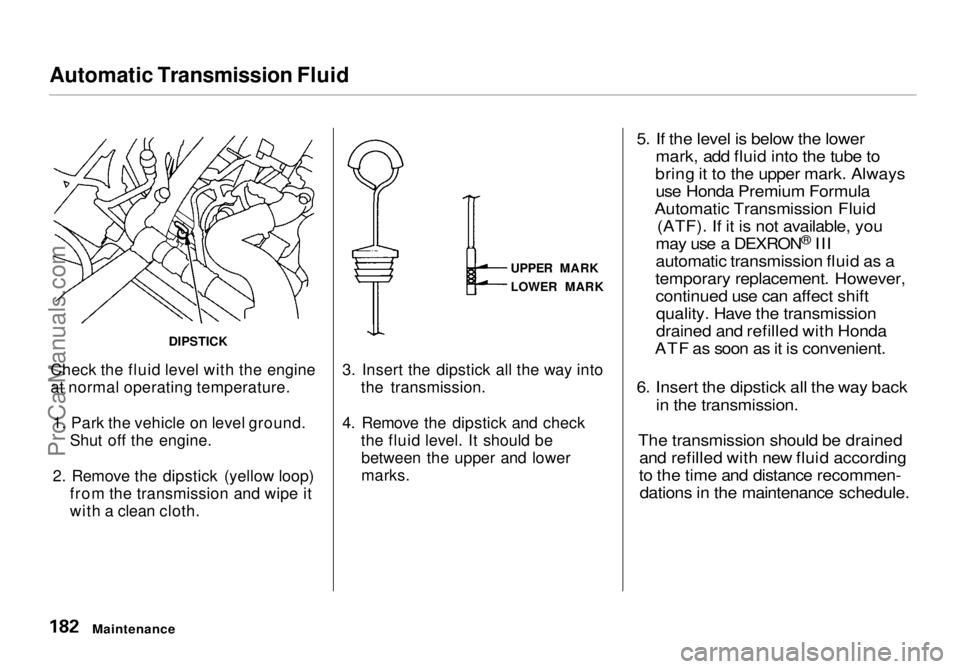
Check the fluid level with the engine
at normal operating temperature. 1. Park the vehicle on level ground. Shut off the engine.
2. Remove the dipstick (yellow loop) from the transmission and wipe it
with a clean cloth. 3. Insert the dipstick all the way into
the transmission.
4. Remove the dipstick and check the fluid level. It should bebetween the upper and lower
marks.
5. If the level is below the lower
mark, add fluid into the tube to
bring it to the upper mark. Always use Honda Premium Formula
Automatic Transmission Fluid (ATF). If it is not available, you
may use a DEXRON ®
III
automatic transmission fluid as a
temporary replacement. However, continued use can affect shiftquality. Have the transmission
drained and refilled with Honda
ATF as soon as it is convenient.
6. Insert the dipstick all the way back in the transmission.
The transmission should be drained and refilled with new fluid according
to the time and distance recommen- dations in the maintenance schedule.
Maintenance
DIPSTICK
UPPER MARK
LOWER MARKProCarManuals.comMain Menu Table of Contents s t
Page 182 of 272
Brake Fluid
Check the fluid level in the brake
fluid reservoir monthly.
The brake fluid should be replaced according to the time and distance
recommendations in the mainte-
nance schedule. Always use Genuine Honda DOT 3
brake fluid. If it is not available, youshould use only DOT 3 or DOT 4
fluid, from a sealed container, as a
temporary replacement. However,
the use of any non-Honda brake fluid can cause corrosion and decrease
the life of the system. Have the
brake system flushed and refilled
with Honda DOT 3 brake fluid as soon as possible.
Brake fluid marked DOT 5 is not
compatible with your vehicle's
braking system and can cause extensive damage. The fluid level should be between
the MIN and MAX marks on the sideof the reservoir. If the level is at or
below the MIN mark, your brake system needs attention. Have the
brake system inspected for leaks or
worn brake pads.
Maintenance
Brake System
MAX
MINProCarManuals.comMain Menu Table of Contents s t
Page 183 of 272
Power Steering
Check the level when the engine is
cold. Look at the side of the
reservoir. The fluid should be
between the UPPER LEVEL and LOWER LEVEL. If it is below the
LOWER LEVEL, add power steering
fluid to the UPPER LEVEL. Always use Genuine Honda Power
Steering Fluid. If it is not available,
you may use another power steering fluid as an emergency replacement.However, continued use can cause
increased wear and poor steering in
cold weather. Have the power
steering system flushed and refilled
with Honda PSF as soon as possible. A low power steering fluid level can
indicate a leak in the system. Check
the fluid level frequently and have
the system inspected as soon as
possible.
Turning the steering wheel to full left
or right lock and holding it there can
damage the power steering pump.
Maintenance
UPPER LEVEL
LOWER LEVEL NOTICEProCarManuals.comMain Menu Table of Contents s t
Page 184 of 272
Air Cleaner Element
The air cleaner element should be cleaned or replaced according to the
time and distance recommendations
in the maintenance schedule. Cleaning (Severe Conditions)
Clean the air cleaner element by
blowing compressed air through it in
the opposite direction to normal air
flow. If you do not have access to compressed air (such as a service
station), ask your Honda dealer to do
this service.
Follow the replacement procedure
for removal and reinstallation. Replacement
The air cleaner element is inside the air cleaner housing on the passenger's
side of the engine compartment.
To replace it:
1. Remove the two pins holding the air intake cover by pulling the
head on each pin. Remove the air
intake cover.
2. Remove the air duct from the air cleaner housing cover.
Maintenance
CONTINUEDProCarManuals.comMain Menu Table of Contents s t
Page 185 of 272
Air Cleaner Element
3. Loosen the four bolts and remove the air cleaner housing cover.
Remove the maintenance hole capso you can reach the right front
bolt through the hole.
4. Remove the old air cleaner
element.
Clean the inside of the air cleaner
housing with a damp rag. 5. Place the new air cleaner element
in the air cleaner housing.
6. Reinstall the air cleaner housing cover, tighten the four bolts.
7. Reinstall the air intake cover. Reinstall the two pins and secure
them by pushing on the heads
until they lock. 8. Reinstall the air duct on the air
cleaner housing cover.
Reinstall the maintenance hole cap.
Maintenance
MAINTENANCE
HOLE CAP
BOLTS
AIR CLEANER ELEMENTProCarManuals.comMain Menu Table of Contents s t