Page 90 of 272
Cigarette Lighter, Ashtrays
Cigarette Lighter
The ignition switch must be in
ACCESSORY (I) or ON (II) for the cigarette lighter to work. To heat up
the lighter, push it in. It will pop out
when it is ready for use. Do not hold the lighter in while it is heating up,
you could cause it to overheat. Ashtrays
ASHTRAY
Open the front ashtray by pulling on
the bottom edge. Push it in to close it.
To remove the ashtray for emptying, push down on the metal plate inside,
then pull the ashtray out completely. The rear ashtray is in the armrest on
the left rear door. To use the rearashtray, swing the lid open.
To remove the rear ashtray, open the lid and pull it straight up.
CONTINUED
Instruments and Controls
CIGARETTE LIGHTER
ASHTRAYProCarManuals.comMain Menu Table of Contents s t
Page 91 of 272
Ashtrays, Interior Lights
Use the ashtray only for cigarettes,
cigars, and other smoking materials. To prevent a possible fire and damage
to your vehicle, don't put paper or
other things that can burn in the
ashtray.
Ceiling Lights
Your Honda has two ceiling lights. Each ceiling light has a three-
position switch. In the OFF position,
the lights do not come on. In the center position they come on when
you open any door. In the ON position, they stay on continuously.
Spotlights
On some models
Turn on the spotlight by pushing the button next to each light. Push the
button again to turn it off.
Instruments and Controls
DOOR ACTIVATED
NOTICEProCarManuals.comMain Menu Table of Contents s t
Page 92 of 272
Interior Lights
You can turn on the spotlight by pushing the button next to each light
when the position lights are turned on. Push the button again to turn it
off.
Tailgate Light
The tailgate light has a two position
switch. In the OFF (down) position,
the light does not come on. In the ON (up) position, the light comes on
when you open the tailgate.
Courtesy Lights
Each door has a courtesy light. This
light comes on when you open the
door.
Your vehicle also has a courtesy light in the ignition switch. This light
comes on when you open the driver's
door.
It remains on for several seconds
after the door is closed.
Instruments and ControlsProCarManuals.comMain Menu Table of Contents s t
Page 93 of 272

Comfort and Convenience Features
The heating and air conditioning systems in your Honda provide a
comfortable driving environment in all weather conditions.
The standard audio system has
many features. This section de-
scribes those features and how to
use them. (If you selected an optional audio system, refer to the
operating instructions that came
with it.)
Some models have an anti-theft
audio system that requires a code
number to enable it.
Heating and Cooling........................ 94
What Each Control Does............ 94How to Use the System............... 96
To Turn Everything Off........... 101
Rear A/C Unit............................ 102
Audio System (U.S. LX and
Canadian EX)......................... 103
Operating the Radio.................. 104
Adjusting the Sound.................. 106
Audio System Lighting............. 106
Radio Frequencies and Reception................................ 106
Operating the Cassette Player...................................... 107
Tape Search Functions............. 108 Caring for Cassettes.................. 109
Operating the Optional CD Player/Changer..................... 110
Audio System (U.S. EX)................ 112 Operating the Radio.................. 113
Adjusting the Sound.................. 116 Radio Frequencies..................... 117
Radio Reception......................... 117
Operating the Cassette Player...................................... 119
Tape Search Functions............. 120 Caring for the Cassette
Player...................................... 121
Operating the Optional CD Player/Changer..................... 122
Protecting Compact Discs........ 124 CD Changer Error
Indications.............................. 125
Theft Protection........................ 126
Comfort and Convenience FeaturesProCarManuals.comMain Menu s t
Page 94 of 272
Heating and Cooling
Proper use of the Heating and
Cooling system can make the
interior dry and comfortable, and
keep the windows clear for best
visibility.
What Each Control Does Fan Control Lever
Sliding this lever to the right
increases the fan's speed, which
increases air flow.
Temperature Control Lever
Sliding this lever to the right
increases the temperature of the air
flow.
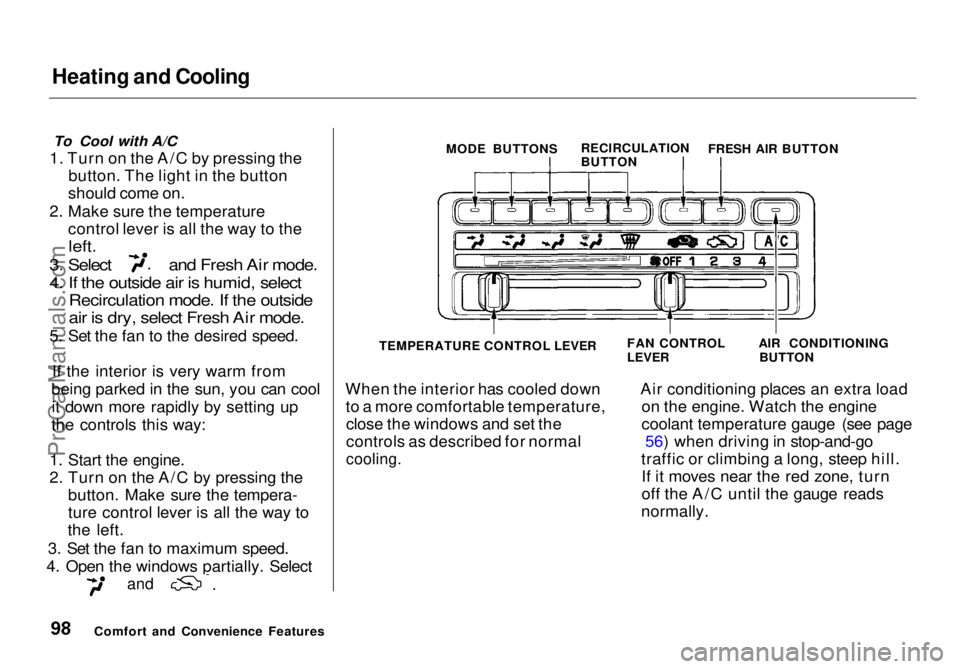
Air Conditioning (A/C) Button This button turns the air condi-tioning ON and OFF. The indicator
in the button lights when the A/C is
on.
Fresh Air and Recirculation
Buttons
These two buttons control the source of air going into the system. In Fresh Air mode air
comes from outside the car. In
Recirculation mode the
interior air recycles through the
system.
Comfort and Convenience Features MODE BUTTONS
RECIRCULATION
BUTTON FRESH AIR BUTTON
TEMPERATURE CONTROL LEVER FAN CONTROL
LEVER
AIR CONDITIONING
BUTTONProCarManuals.comMain Menu Table of Contents s t
Page 98 of 272

Heating and Cooling
To Cool with A/C
1. Turn on the A/C by pressing the button. The light in the button
should come on.
2. Make sure the temperature control lever is all the way to the
left.
3. Select and Fresh Air mode.
4. If the outside air is humid, select
Recirculation mode. If the outside
air is dry, select Fresh Air mode.
5. Set the fan to the desired speed.
If the interior is very warm from
being parked in the sun, you can cool it down more rapidly by setting up
the controls this way:
1. Start the engine.
2. Turn on the A/C by pressing the button. Make sure the tempera-
ture control lever is all the way to
the left.
3. Set the fan to maximum speed.
4. Open the windows partially. Select
and
When the interior has cooled down
to a more comfortable temperature,close the windows and set the
controls as described for normal
cooling.
Air conditioning places an extra load
on the engine. Watch the engine
coolant temperature gauge (see page 56) when driving in stop-and-go
traffic or climbing a long, steep hill. If it moves near the red zone, turn
off the A/C until the gauge reads
normally.
Comfort and Convenience Features MODE BUTTONS
RECIRCULATION
BUTTONFRESH AIR BUTTON
TEMPERATURE CONTROL LEVER
FAN CONTROL
LEVER
AIR CONDITIONING
BUTTONProCarManuals.comMain Menu Table of Contents s t
Page 106 of 272

Audio System
Adjusting the Sound
Balance/Fader — These two
controls adjust the strength of thesound coming from each speaker.
The Balance control adjusts the side- to-side strength, while the Fader
control adjusts the front-to-back
strength.
To use these controls, push on the knob to get them to pop out. Adjust
the Fader to your liking by turning
the outside ring. Adjust the Balance
by turning the knob. Push the controls back in when you are done.
Treble/Bass — Use these controls to adjust the tone to your liking.Push on the controls to get them to
pop out. Adjust the Bass by turning
the outer ring. Adjust the Treble by
turning the knob. Push the controls
back in when you are finished so you cannot change the settings by
accidentally bumping them.
Audio System Lighting
You can use the Balance control knob to turn off the illumination of
the audio system. Push the Balance/Fader controls so they pop out, then
pull the Balance control knob out slightly farther.
Check the Balance control knob if
the audio system does not illuminate
with the instrument panel lights. Radio Frequencies and Reception
For information, See page 117.
Comfort and Convenience Features BASS
CONTROL
TREBLE
CONTROL
FADER
CONTROL BALANCE
CONTROLProCarManuals.comMain Menu Table of Contents s t
Page 107 of 272

Audio System
Operating the Cassette Player
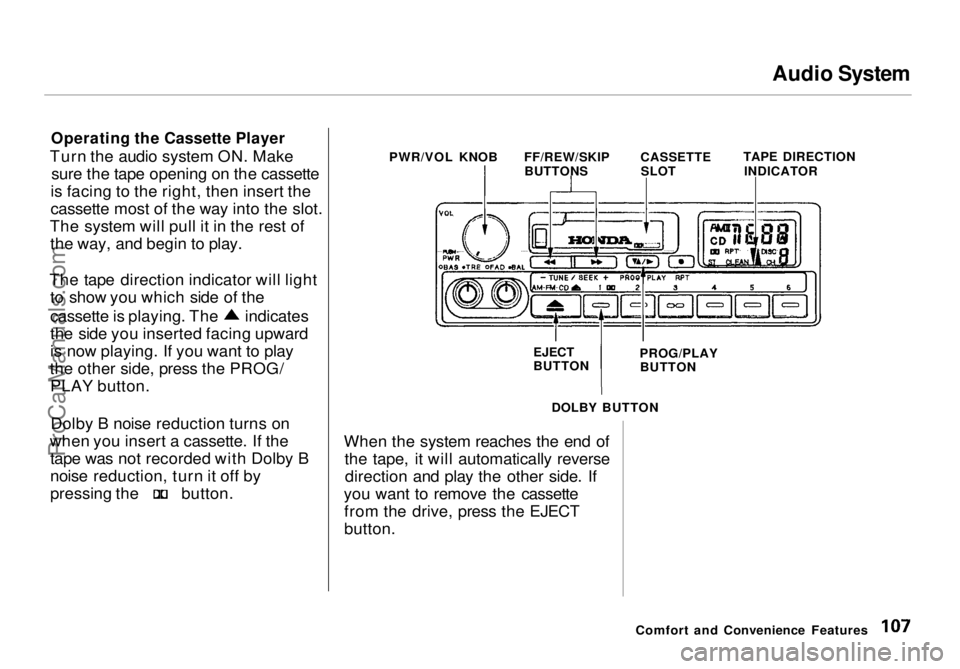
Turn the audio system ON. Make sure the tape opening on the cassette
is facing to the right, then insert the
cassette most of the way into the slot.
The system will pull it in the rest of the way, and begin to play.
The tape direction indicator will light to show you which side of the cassette is playing. The indicates
the side you inserted facing upward
is now playing. If you want to play
the other side, press the PROG/ PLAY button.
Dolby B noise reduction turns on
when you insert a cassette. If the tape was not recorded with Dolby B
noise reduction, turn it off by pressing the button.
When the system reaches the end of
the tape, it will automatically reversedirection and play the other side. If
you want to remove the cassette from the drive, press the EJECT
button.
Comfort and Convenience Features
PWR/VOL KNOB
FF/REW/SKIP
BUTTONS CASSETTE
SLOT TAPE DIRECTION
INDICATOR
EJECT
BUTTON PROG/PLAY
BUTTON
DOLBY BUTTONProCarManuals.comMain Menu Table of Contents s t