Page 169 of 272
Required Maintenance Record (for Normal and Severe Schedules)
MaintenanceProCarManuals.comMain Menu Table of Contents s t
Page 173 of 272
Engine Oil
The oil container may also display the API Certification seal. Make sure
it says "For Gasoline Engines."
API CERTIFICATION MARK The SAE numbers tell you the oil's
viscosity or weight. Select the oil for
your vehicle according to this chart.
An oil with a viscosity of 5W-30 is preferred for improved fuel economyand year-round protection in your
Honda. You may use a 10W-30 oil if
the temperature in your area never
goes below 20°F ( — 7°C). Synthetic Oil
You may use a synthetic motor oil if it meets the same requirements
given for conventional motor oil; energy conserving, a service
classification of SJ, and the proper
weight as shown on the chart. When using synthetic oil, you must follow
the oil and filter change intervals
given in the maintenance schedule.
Maintenance
Ambient TemperatureProCarManuals.comMain Menu Table of Contents s t
Page 174 of 272
Engine Oil
Additives Your Honda does not need any oil
additives. Purchasing additives for
the engine or transmission will not
increase your vehicle's performance
or longevity. It only increases the
cost of operating your vehicle. Changing the Oil and Filter
Always change the oil and filter according to the time and distance (miles/kilometers) recommenda-
tions in the maintenance schedule.
The oil and filter collect contami- nants that can damage your engine if
they are not removed regularly.
Changing the oil and filter requires
special tools and access from
underneath the vehicle. The vehicle should be raised on a service station-
type hydraulic lift for this service. Unless you have the knowledge and
proper equipment, you should have
this maintenance done by a skilled
mechanic.
1. Run the engine until it reaches normal operating temperature,
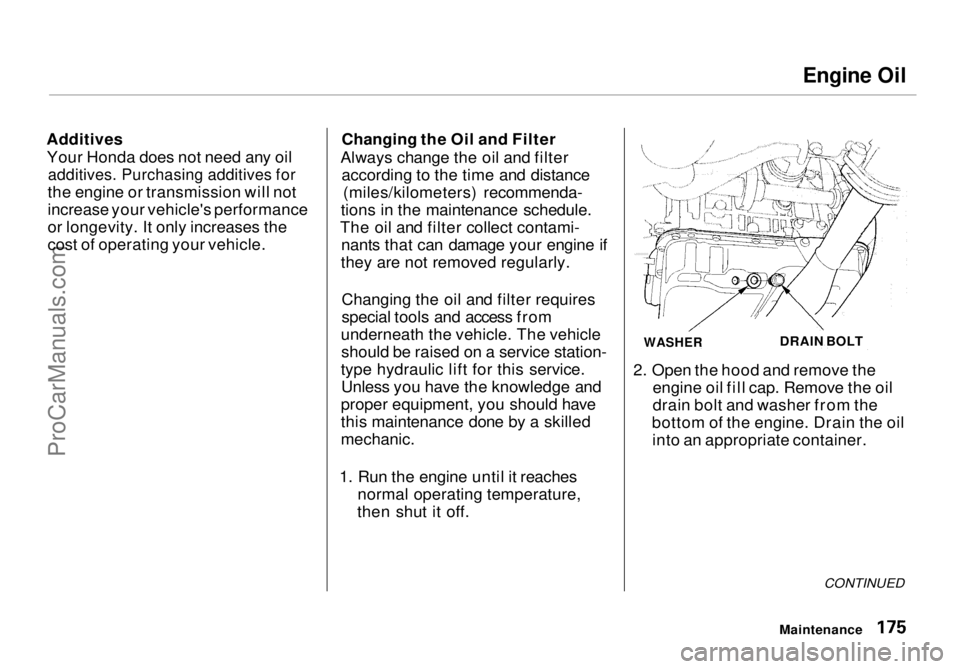
then shut it off. 2. Open the hood and remove the
engine oil fill cap. Remove the oil
drain bolt and washer from the
bottom of the engine. Drain the oil into an appropriate container.
CONTINUED
Maintenance
WASHER
DRAIN BOLTProCarManuals.comMain Menu Table of Contents s t
Page 178 of 272
Cooling System
Replacing Engine Coolant
The cooling system should be completely drained and refilled with
new coolant according to the time
and distance recommendations in
the maintenance schedule. Only use Genuine Honda antifreeze/coolant.
Draining the coolant requires access
to the underside of the vehicle. Unless you have the tools and
knowledge, you should have this
maintenance done by a skilled
mechanic.
1. Slide the heater temperature
control lever to maximum heat.
Open the hood. Make sure the
engine and radiator are cool to the
touch.
2. Remove the radiator cap. 3. Loosen the drain plug on the
bottom of the radiator. Thecoolant will drain through the
splash guard. Remove the drain
bolt and washer from the engine
block.
CONTINUED
Maintenance
DRAIN PLUG
DRAIN BOLTProCarManuals.comMain Menu Table of Contents s t
Page 181 of 272
Automatic Transmission Fluid
Check the fluid level with the engine
at normal operating temperature. 1. Park the vehicle on level ground. Shut off the engine.
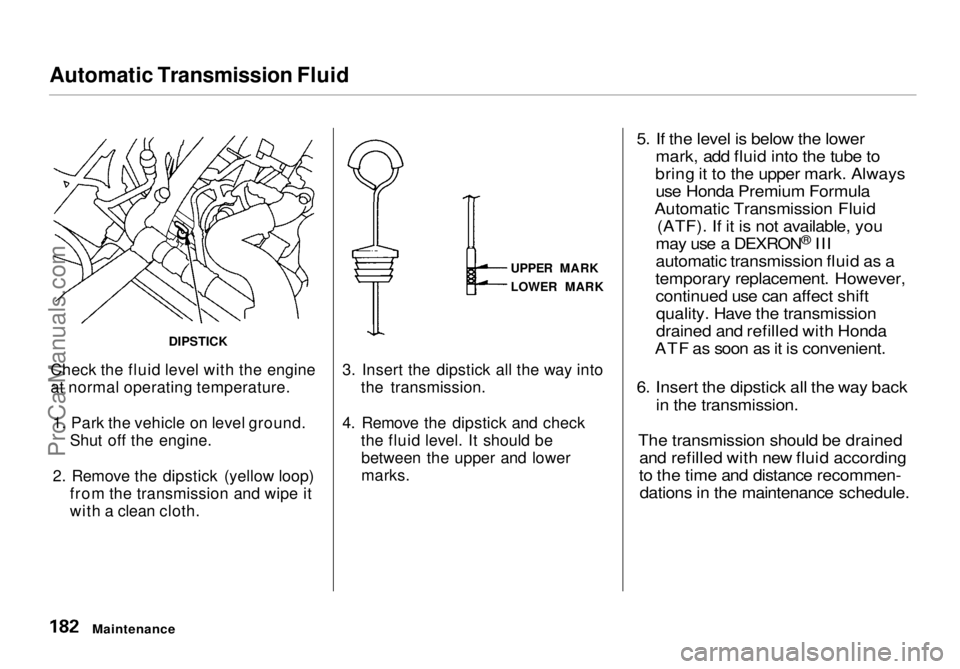
2. Remove the dipstick (yellow loop) from the transmission and wipe it
with a clean cloth. 3. Insert the dipstick all the way into
the transmission.
4. Remove the dipstick and check the fluid level. It should bebetween the upper and lower
marks.
5. If the level is below the lower
mark, add fluid into the tube to
bring it to the upper mark. Always use Honda Premium Formula
Automatic Transmission Fluid (ATF). If it is not available, you
may use a DEXRON ®
III
automatic transmission fluid as a
temporary replacement. However, continued use can affect shiftquality. Have the transmission
drained and refilled with Honda
ATF as soon as it is convenient.
6. Insert the dipstick all the way back in the transmission.
The transmission should be drained and refilled with new fluid according
to the time and distance recommen- dations in the maintenance schedule.
Maintenance
DIPSTICK
UPPER MARK
LOWER MARKProCarManuals.comMain Menu Table of Contents s t
Page 182 of 272
Brake Fluid
Check the fluid level in the brake
fluid reservoir monthly.
The brake fluid should be replaced according to the time and distance
recommendations in the mainte-
nance schedule. Always use Genuine Honda DOT 3
brake fluid. If it is not available, youshould use only DOT 3 or DOT 4
fluid, from a sealed container, as a
temporary replacement. However,
the use of any non-Honda brake fluid can cause corrosion and decrease
the life of the system. Have the
brake system flushed and refilled
with Honda DOT 3 brake fluid as soon as possible.
Brake fluid marked DOT 5 is not
compatible with your vehicle's
braking system and can cause extensive damage. The fluid level should be between
the MIN and MAX marks on the sideof the reservoir. If the level is at or
below the MIN mark, your brake system needs attention. Have the
brake system inspected for leaks or
worn brake pads.
Maintenance
Brake System
MAX
MINProCarManuals.comMain Menu Table of Contents s t
Page 184 of 272
Air Cleaner Element
The air cleaner element should be cleaned or replaced according to the
time and distance recommendations
in the maintenance schedule. Cleaning (Severe Conditions)
Clean the air cleaner element by
blowing compressed air through it in
the opposite direction to normal air
flow. If you do not have access to compressed air (such as a service
station), ask your Honda dealer to do
this service.
Follow the replacement procedure
for removal and reinstallation. Replacement
The air cleaner element is inside the air cleaner housing on the passenger's
side of the engine compartment.
To replace it:
1. Remove the two pins holding the air intake cover by pulling the
head on each pin. Remove the air
intake cover.
2. Remove the air duct from the air cleaner housing cover.
Maintenance
CONTINUEDProCarManuals.comMain Menu Table of Contents s t
Page 194 of 272
Drive Belts, Timing Belt
Drive Belts
Check the condition of the two drive
belts. Examine the edges of each
belt for cracks or fraying. Check the tension of each belt by
pushing on it with your thumb midway between the pulleys.
The belts should have the following "play" or deflection.
Alternator belt:0.28 — 0.37 in (7.0 — 9.5 mm)
Power steering
belt:
0.51 — 0.63 in (13.0 —
16.0
mm)
If you
see signs of wear or looseness,
have your dealer adjust or replace
the belts. Timing Belt
The timing belt and balancer belt should normally be replaced at the
intervals shown in the maintenance
schedule.
Replace these belts at 60,000 miles (U.S.) or 100,000 km (Canada) if you
regularly drive your vehicle in one or
more of these conditions: In very high temperatures
(over 110°F, 43°C).
In very low temperatures
(under — 20°F, — 29°C).
Maintenance
ALTERNATOR BELT
POWER STEERING BELTProCarManuals.comMain Menu Table of Contents s t


