1998 HONDA ODYSSEY dashboard
[x] Cancel search: dashboardPage 32 of 272
Protecting Children
Additional Precautions for Infants Never hold a baby on your lap. If
you are not wearing a seat belt in a crash, you could be thrown
forward into the dashboard and crush the child.
If you are wearing a seat belt, the
baby can be torn from your arms. For example, if the vehicle crashes
into a parked vehicle at 30 mph (48 km/h), a 20 Ibs (9 kg) baby
will become a 600 Ibs (275 kg)
force, and you will not be able to
hold it.
Never put a seat belt over yourself
and a baby. During a crash, the
belt could press deep into the child and cause very serious injuries. Protecting Small Children
Child Seat Type
A child who can sit up without support, and who fits within the child
seat maker's weight and height
limits, should be restrained in a
forward-facing, upright child seat.
Of the different seats available, we
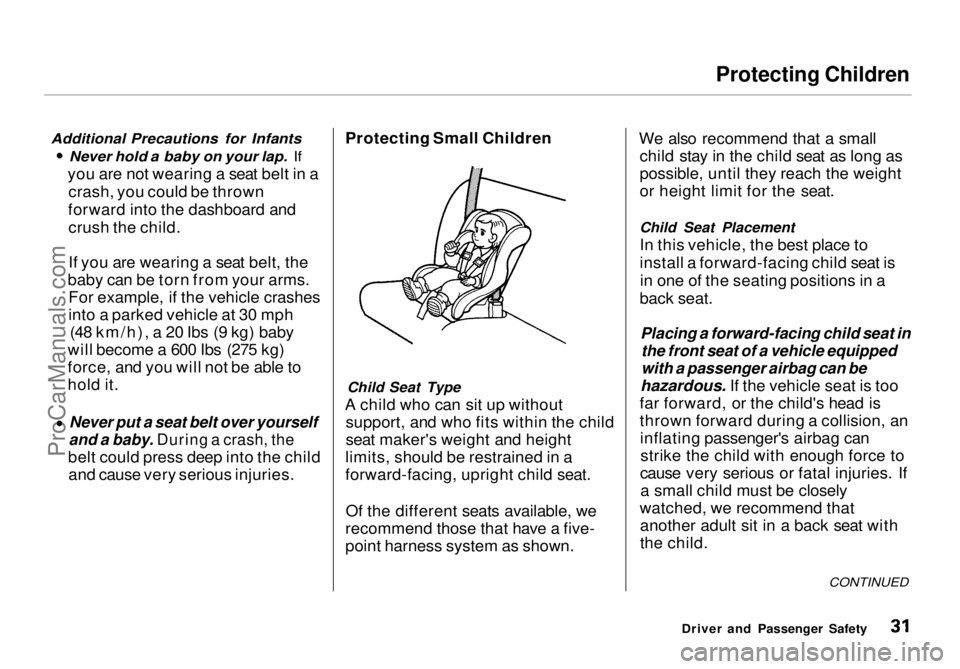
recommend those that have a five-
point harness system as shown. We also recommend that a small
child stay in the child seat as long as
possible, until they reach the weight
or height limit for the seat.
Child Seat Placement In this vehicle, the best place to
install a forward-facing child seat is in one of the seating positions in a
back seat.
Placing a forward-facing child seat inthe front seat of a vehicle equipped
with a passenger airbag can be
hazardous. If the vehicle seat is too
far forward, or the child's head is
thrown forward during a collision, an inflating passenger's airbag canstrike the child with enough force to
cause very serious or fatal injuries. If a small child must be closely
watched, we recommend that another adult sit in a back seat with
the child.
Driver and Passenger Safety
CONTINUEDProCarManuals.comMain Menu Table of Contents s t
Page 35 of 272
Protecting Children
To deactivate the locking
mechanism in order to remove a
child seat, unlatch the buckle,
unroute the seat belt, and let the belt
fully retract.
Installing a Child Seat With the Lap
Belt
Seven-passenger model only
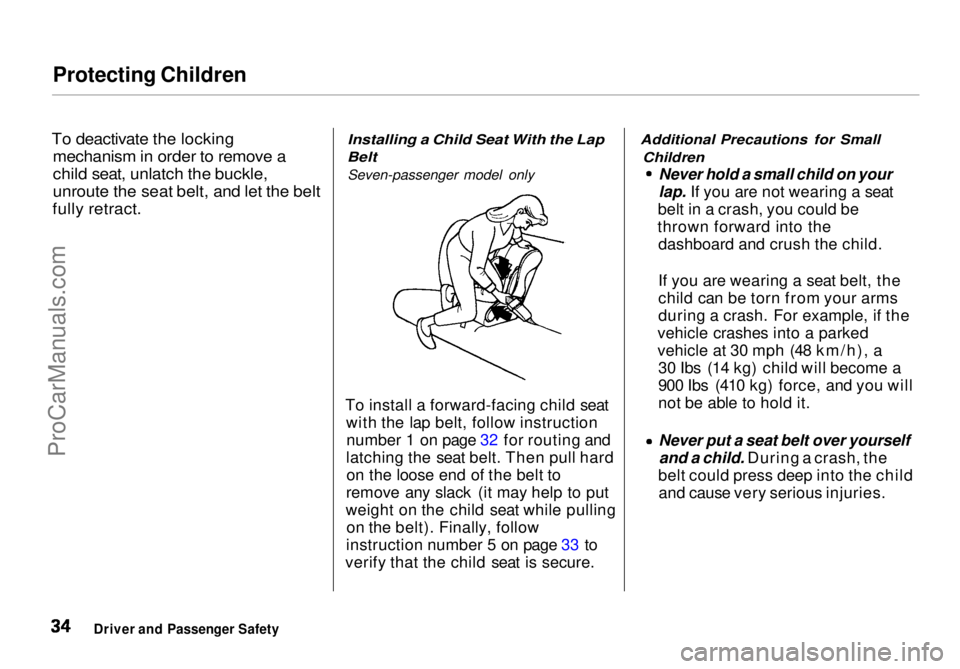
To install a forward-facing child seat with the lap belt, follow instructionnumber 1 on page 32 for routing and
latching the seat belt. Then pull hard on the loose end of the belt to
remove any slack (it may help to put
weight on the child seat while pulling on the belt). Finally, follow
instruction number 5 on page 33 to
verify that the child seat is secure.
Additional Precautions for Small
Children
Never hold a small child on your
lap. If you are not wearing a seat
belt in a crash, you could be
thrown forward into the dashboard and crush the child.
If you are wearing a seat belt, the
child can be torn from your arms
during a crash. For example, if the
vehicle crashes into a parked
vehicle at 30 mph (48 km/h), a 30 Ibs (14 kg) child will become a
900 Ibs (410 kg) force, and you will
not be able to hold it.
Never put a seat belt over yourself
and a child. During a crash, the
belt could press deep into the child and cause very serious injuries.
Driver and Passenger SafetyProCarManuals.comMain Menu Table of Contents s t
Page 45 of 272

Additional Information About Your SRS
SRS Components
Your Supplemental Restraint System (SRS) includes: Two frontal airbags. The driver's
airbag is stored in the center of
the steering wheel; the front
passenger's airbag is stored in the dashboard. Both are marked
"SRS".
Sensors that can detect a severe
frontal collision.
A sophisticated electronic system that continually monitors thesensors, control unit, the airbagactivators, and all related wiring
when the ignition is ON (II). An indicator light on the
instrument panel to alert you to a
possible problem with the system (see page 45). Emergency backup power in case
your vehicle's electrical system is disconnected in a crash. How Your Airbags Work
If you ever have a severe frontal collision, the sensors will detect
rapid deceleration and signal the
control unit to instantly inflate the
airbags.
During a crash, your seat belt helps
restrain your lower body and torso.
Your airbag provides a cushion to help restrain and protect your head
and chest. Since both airbags use the same
sensors, both airbags normally
inflate at the same time. However, it is possible for only one airbag to
inflate.
This can occur when the severity of a collision is at the margin, or
threshold, that determines whether or not the airbags will deploy. Insuch cases, the seat belt will provide
sufficient protection, and the
supplemental protection offered by
the airbag would be minimal.
Driver and Passenger SafetyProCarManuals.comMain Menu Table of Contents s t
Page 50 of 272

Instruments and Controls
This section gives information about
the controls and displays thatcontribute to the daily operation of
your Honda. All the essential
controls are within easy reach.
Control Locations............................ 50
Indicator Lights................................ 51
Gauges.............................................. 54
Tachometer.................................. 54
Trip Meter.................................... 54
Speedometer................................ 55
Odometer...................................... 55
Temperature Gauge.................... 55
Fuel Gauge................................... 55
Maintenance Required
Indicator.................................... 56
Controls Near the Steering
Wheel........................................ 57
Headlights.................................... 58
Daytime Running Lights............. 58
Instrument Panel Brightness..... 59
Turn Signals................................. 59
Windshield Wipers...................... 60
Windshield Washers................... 61
Rear Window Wiper and
Washer...................................... 61
Hazard Warning........................... 61
Rear Window Defogger.............. 62
Steering Wheel Adjustment....... 62
Steering Wheel Controls ................ 64
Cruise Control.............................. 64
Keys and Locks................................ 67
Keys............................................... 67
Immobilizer System..................... 68
Ignition Switch............................. 69
Power Door Locks....................... 70
Remote Transmitter.................... 71
Childproof Door Locks............... 72
Tailgate......................................... 72
Glove Box..................................... 73
Seats.................................................. 74
Passenger Seating....................... 74
Seat Adjustments......................... 74
Driver's Seat Power Height
Adjustment............................... 75
Armrests....................................... 76
Head Restraints........................... 76
Third Seat Access........................ 77
Removing the Second Seats
in the Six-Passenger Model.... 78
Folding the Second Seats
in the Seven-Passenger
Model.................................... 78
Reclining the Second Seat.......... 79
Folding the Third Seat
in All Models............................ 80
Power Windows............................... 82
Sunroof.............................................. 83
Mirrors.............................................. 84
Adjusting the Power Mirrors..... 84
Parking Brake.................................. 85
Digital Clock..................................... 86 Beverage Holder.............................. 86
Dashboard Compartment............... 88
Center Pocket.................................. 88
Vanity Mirror................................... 88
Cigarette Lighter............................. 89
Ashtrays............................................ 89 Interior Lights.................................. 90
Ceiling Lights............................... 90
Spotlights...................................... 90
Tailgate Light............................... 91 Courtesy Lights........................... 91
Instruments and ControlsProCarManuals.comMain Menu s t
Page 58 of 272
Controls Near the Steering Wheel
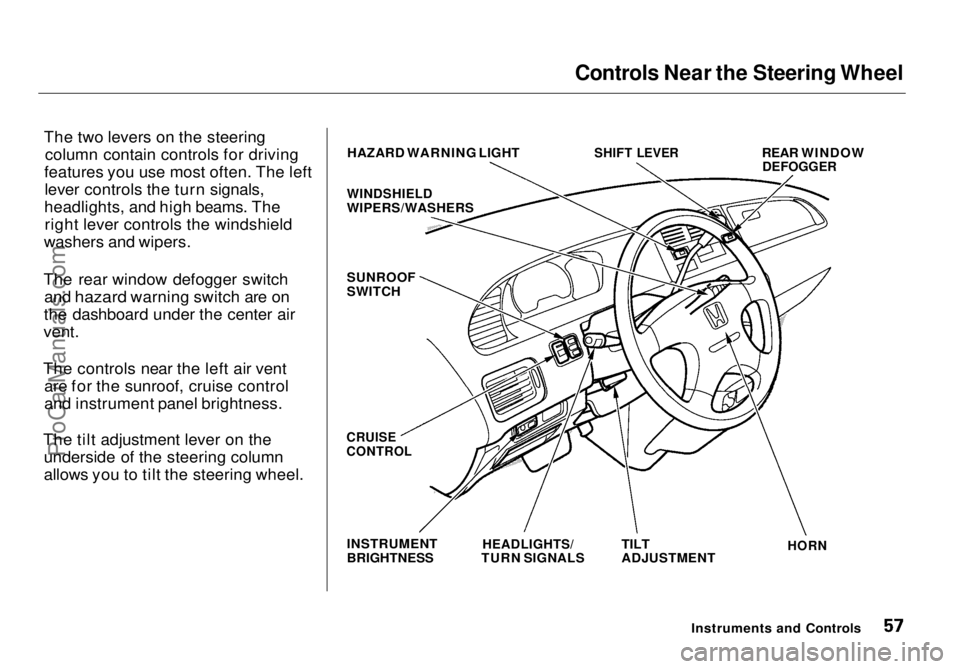
The two levers on the steering column contain controls for driving
features you use most often. The left lever controls the turn signals,
headlights, and high beams. The right lever controls the windshield
washers and wipers.
The rear window defogger switch and hazard warning switch are on
the dashboard
under the center air
vent.
The controls near the left air vent are for the sunroof, cruise control
and instrument panel brightness.
The tilt adjustment lever on the underside of the steering column
allows you to tilt the steering wheel. HAZARD WARNING LIGHT
WINDSHIELD
WIPERS/WASHERS
SUNROOF
SWITCH
SHIFT LEVER
REAR WINDOW
DEFOGGER
CRUISE
CONTROL
INSTRUMENT
BRIGHTNESS
HEADLIGHTS/
TURN SIGNALS
TILT
ADJUSTMENT
HORN
Instruments and ControlsProCarManuals.comMain Menu Table of Contents s t
Page 60 of 272
Controls Near the Steering Wheel
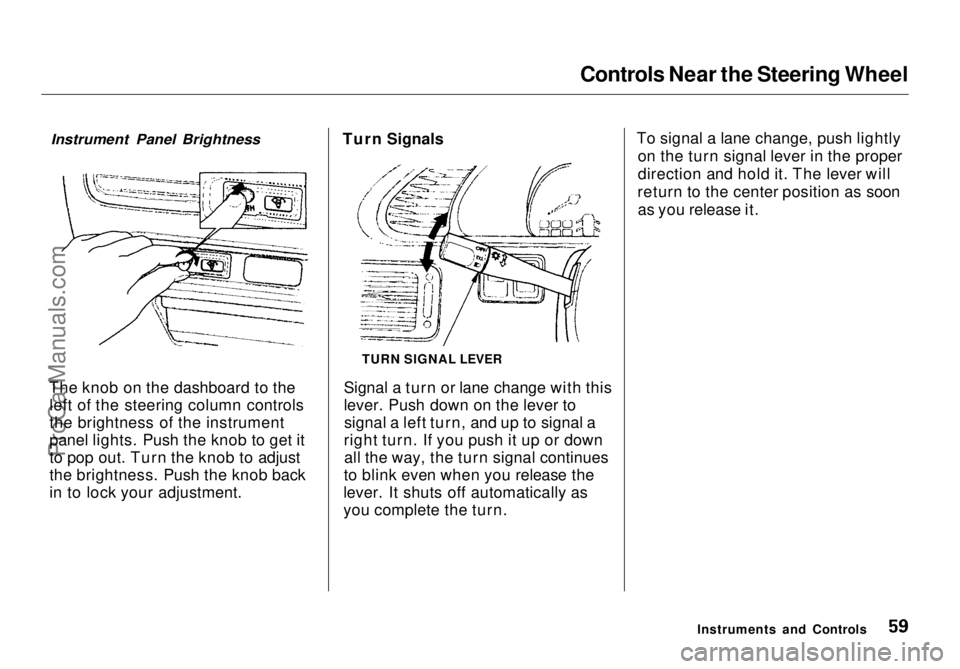
The knob on the dashboard to the left of the steering column controls
the brightness of the instrument
panel lights. Push the knob to get it
to pop out. Turn the knob to adjust
the brightness. Push the knob back
in to lock your adjustment. Turn Signals
Signal a turn or lane change with this
lever. Push down on the lever tosignal a left turn, and up to signal a
right turn. If you push it up or down all the way, the turn signal continues
to blink even when you release the
lever. It shuts off automatically as
you complete the turn. To signal a lane change, push lightly
on the turn signal lever in the proper
direction and hold it. The lever will
return to the center position as soon as you release it.
Instruments and Controls
TURN SIGNAL LEVER
Instrument Panel BrightnessProCarManuals.comMain Menu Table of Contents s t
Page 84 of 272
Power Windows, Sunroof
The MAIN switch controls power to the passengers' windows. With thisswitch off, the passengers' windows
cannot be raised or lowered. The
MAIN switch does not affect the
driver's window. Keep the MAIN
switch off when you have children in
the vehicle so they do not injure
themselves by operating the
windows unintentionally.
Sunroof
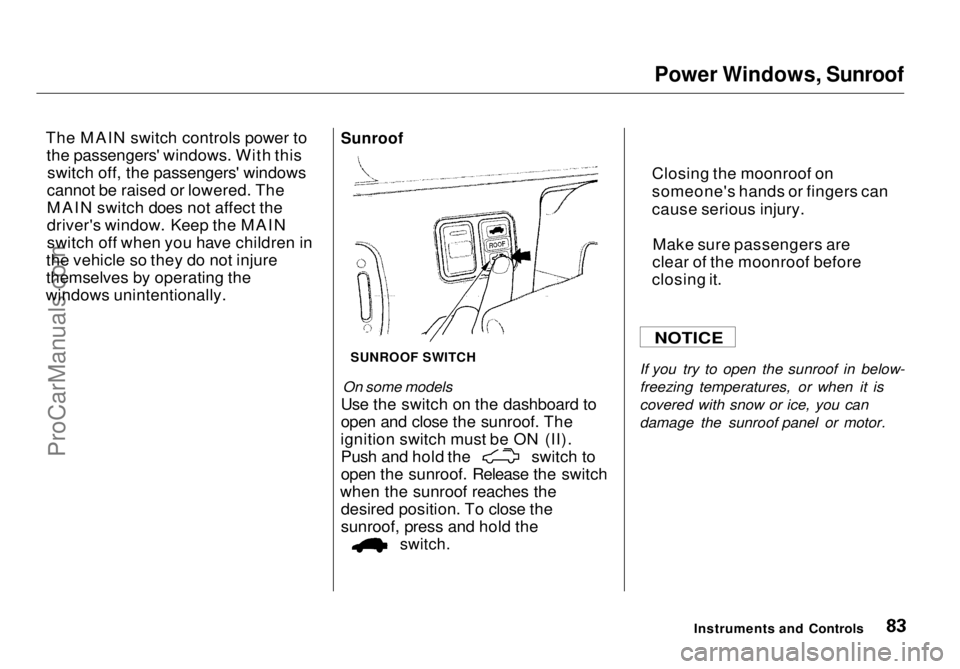
SUNROOF SWITCH
On some models
Use the switch on the dashboard to
open and close the sunroof. The
ignition switch must be ON (II). Push and hold the switch to
open the sunroof. Release the switch
when th
e sunroof reaches the
desired position. To close the
sunroof, press and hold the
switch.
If you try
to open the sunroof in below-
freezing temperatures, or when it is
covered with snow or ice, you can
damage the sunroof panel or motor.
Instruments and Controls
NOTICE
Closing the moonroof on
someone's hand
s or fingers can
cause serious injury.
Make sure passengers are
clear of the moonroof before
closing it.
ProCarManuals.comMain Menu Table of Contents s t
Page 89 of 272
Dashboard Compartment, Center Pocket, Vanity Mirror
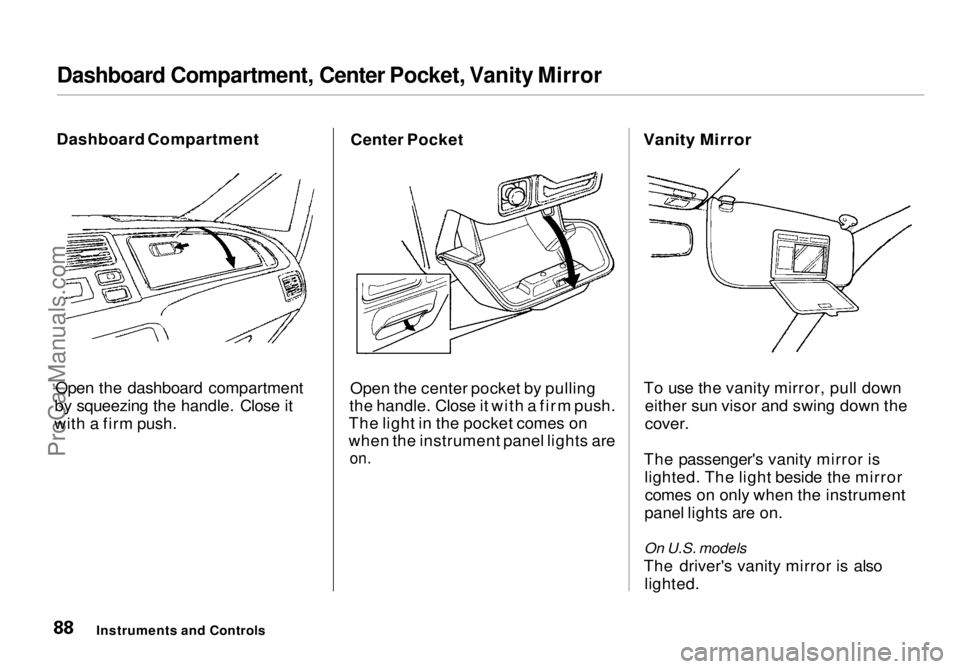
Dashboard Compartment
Open the dashboard compartment
by squeezing the handle. Close it
with a firm push. Center Pocket
Open the center pocket by pulling
the handle. Close it with a firm push.
The light in the pocket comes on
when the instrument panel lights are
on.
Vanity Mirror
To use the vanity mirror, pull down either sun visor and swing down the
cover.
The passenger's vanity mirror is lighted. The light beside the mirrorcomes on only when the instrument
panel lights are on.
On U.S. models
The driver's vanity mirror is also lighted.
Instruments and ControlsProCarManuals.comMain Menu Table of Contents s t