Page 1172 of 1681

)
t
J
Altelnator ttelr Inspecuon ano Aol
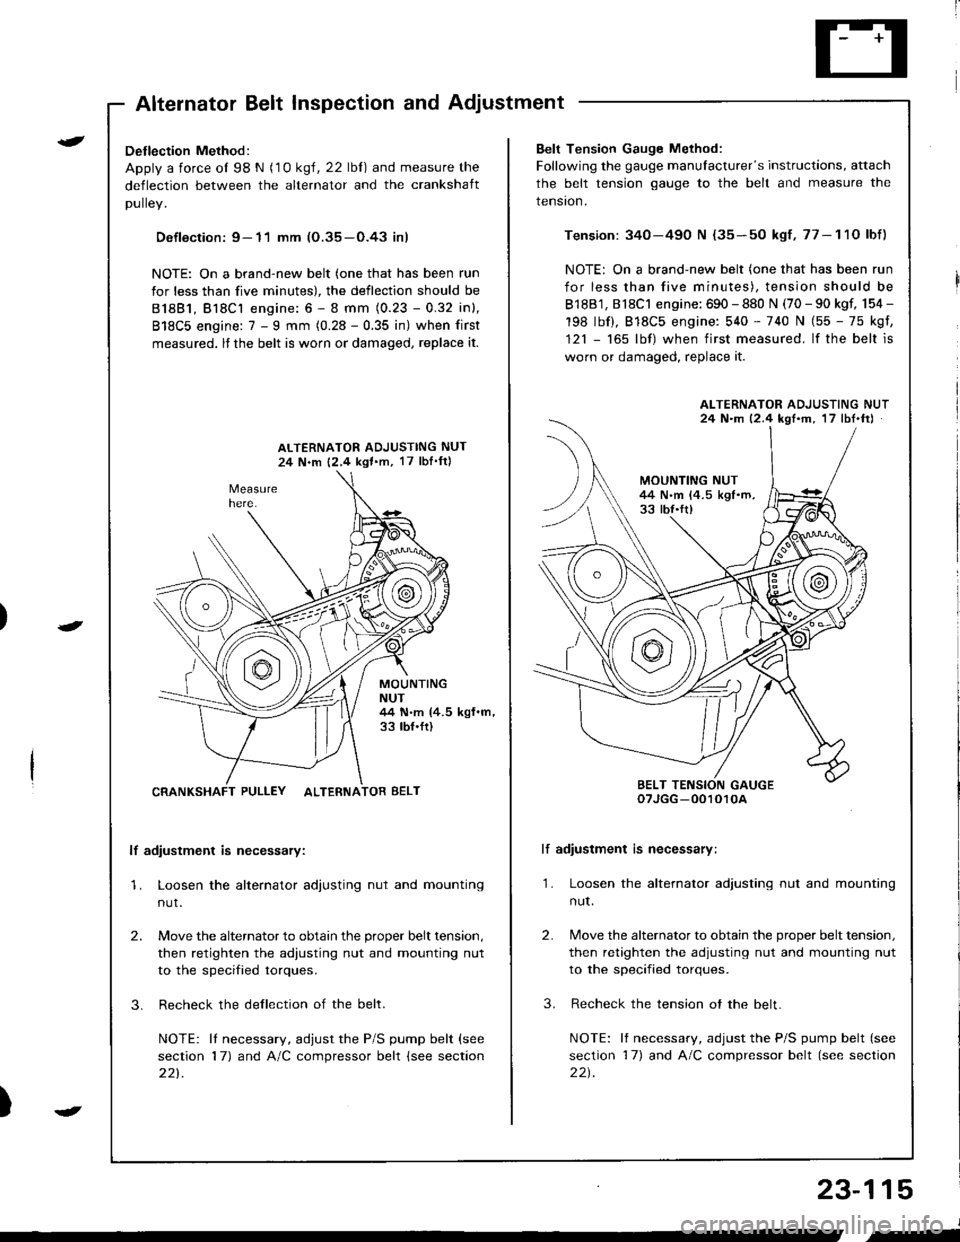
Detlection Method:
Apply a force ol 98 N (1 0 ksl, 22 lbl) and measure the
deflection between the alternator and the crankshaft
DUllev,
Defloction: 9- 11 mm (O.35-O.43 inl
NOTE: On a brand-new belt (one that has been run
for less than five minutes), the deflection should be
81881, Bl8Cl engine: 6 - 8 mm (0.23 - 0.32 inl,
818C5 engine: 7 - I mm (0.28 - 0.35 in) when first
measured, lf the belt is worn or damaged, replace it.
ALTERNATOR ADJUSTING NUT
24 N.m 12,4 kgl.m, 17 lbI'ftl
MOUNTINGNUT44 N.m (4.5 kgf.m,33 tbf.ft)
CRANKSHAFT PULLEY ALTERNATOR BELT
lf adiustment is necessary:
1. Loosen the alternator adjusting nut and mounting
nut.
2.
3.
Move the alternator to obtain the proper belt tension,
then retighten the adiusting nut and mounting nut
to the specified torques.
Recheck the dellection of the belt.
NOTE: lI necessary, adjust the P/S pump belt (see
section 17) and A/C compressor belt (see section
221.
Belt Tension Gauge Method:
Following the gauge manulacturer's instructions, attach
the belt tension gauge to the belt and measure the
tension.
Tension: 340-490 N {35-50 kgf,77-11O lbf)
NOTE: On a brand-new belt (one that has been run
for less than five minutes), tension should be
818B1, 818C1 engine: 690 - 880 N (70 - 90 kgf, 154 -
198 lbf), 818C5 engine: 540 - 740 N (55 - 75 kgf,
121 - 165 lbf) when first measured. lf the belt is
worn or damaged, replace it.
lf adiustment is necessary:
1. Loosen the alternator adjusting nut and mounting
nut.
2.
3.
Move the alternator to obtain the proper belt tension,
then retighten the adjusting nut and mounting nut
to the specified torques.
Recheck the tension ot the belt.
NOTE: It necessary, adjust the P/S pump belt (see
section 17) and A/C compressor belt (see section
22t.
ALTERNATOR ADJUSTING NUT24 N.m 12.4 kgf'm, 17 lbt.ftJ
BELT TENSION GAUGEoTJGG -0010r0A
23-115
J
,-
Page 1183 of 1681
1.
2.
Gauge Assembly
Removal
Remove the two screws from the instrument panel.
Remove the instrument panel.
NOTE: Remove the instrument panel carefully
without damaging the clips.
23-126
3.
5.
Tilt the steering wheel down with the tilt adjustment
lever.
Remove the three mounting screws, and spread a
protective cloth on the steering column.
PROTECTIVE CLOTH
Pry the gauge assembly out, and disconnect all con
nectors from it.
6:
GAUGE ASSEMBLY
Take out the gauge assembly as shown.
GAUGE ASSEMBLY
Page 1184 of 1681
{
Disassembly
NOTE: Handle the terminals and Drinted circuit boards carelully to avoid damaging them.
FUEL GAUGEMOUNTING SCBEW {x 3l
e
o
SPEEDOMETER MOUNTING SCREW (x 4)ENGINE COOLANTTEMPERATURE {ECT)GAUGEMOUNTING SCREW {x 3}
t)ENGINE COOLANTTEMPERATURE IECTIGAUGE UNITTest, page 23-134TACHOMETEF UNITSpecification, page 23-121
SRS PRINTEDCIRCUIT BOARD
d'dP
METER HOUSTNG
FUEL GUAGE UNITTest, page 23 131
'
/*'
r@/ ror
6rH"
SPEEDO/ODO/TRIP METER UNTT' SPEEDOMETERSpecification, page 23-121Troubleshooting, Page 23_128. ODOMETERTroubleshooting, page 23-128. TRIP METERTroubleshooting, Page 23 128
TACHOMETER MOUNTING SCREW {x 3)
PRINTED CIRCUIT BOARD
It
23-127
Page 1187 of 1681

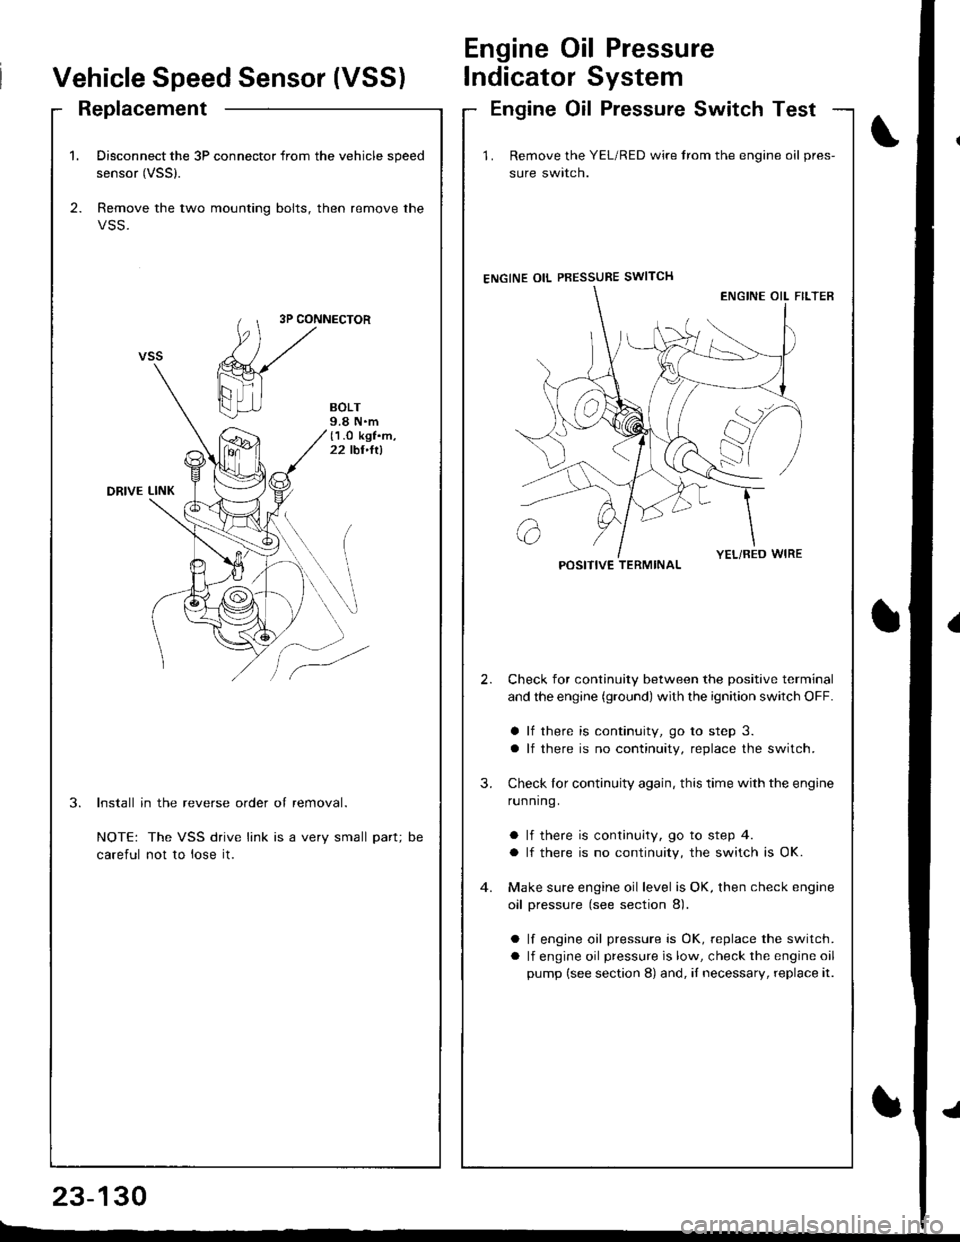
1. Disconnect the 3P connector from the vehicle speed
sensor (VSSl.
2. Remove the two mounting bolts, then remove the
VSS.
3P CONNECTOR
BOLT9.8 N.m(1.O kgf.m,22 tbt,ltl
DRIVE LINK
3.Install in the reverse order of removal.
NOTE: The VSS drive link is a very small part;
careful not to lose it.
DC
Vehicle Speed Sensor (VSS)
Engine Oil Pressure
lndicator System
ReplacementEngine Oil Pressure Switch Test
23-130
E-_
1 . Remove the YEL/RED wire trom the engine oil pres-
sure swlrcn.
ENGINE OIL PBESSURE SWITCH
Check for continuity between the positive terminal
and the engine (ground) with the ignition switch OFF.
a lf there is continuity, go to step 3.
a lf there is no continuity, replace the switch.
Check lor continuity again, this time with the engine
running.
a lf there is continuity, go to step 4.
a lf there is no continuity, the switch is OK.
Make sure engine oil level is OK, then check engine
oil pressure (see section 8).
a lf engine oil pressure is OK, replace the switch.
a lf engine oil pressure is low, check the engine oil
pump (see section 8) and, iI necessary, replace it.
2.
3.
POSITIVE TERMINAL
Page 1202 of 1681

Replacement
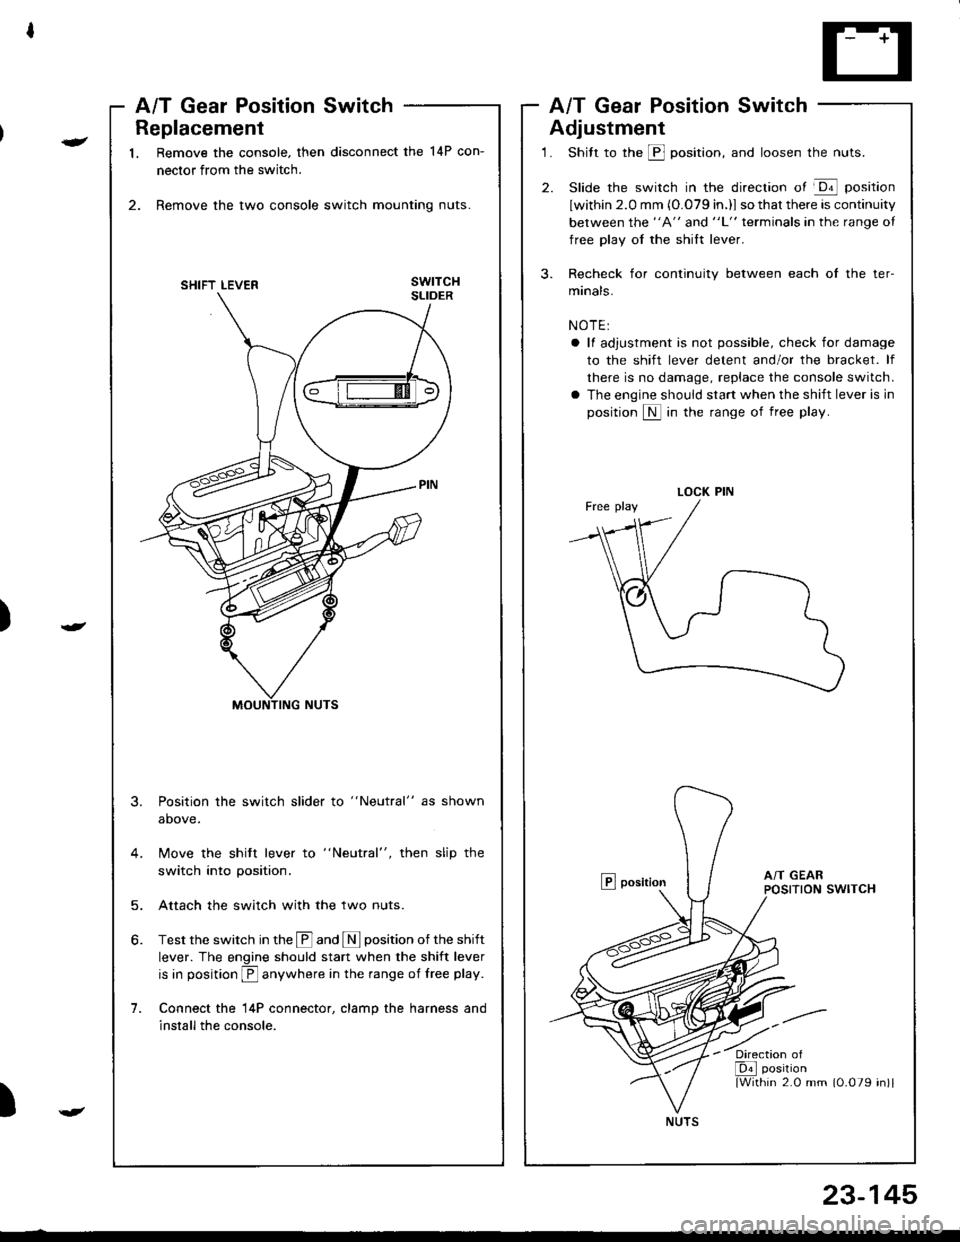
1. Remove the console. then disconnect the 14P con-
nector from the switch.
2. Remove the two console switch mounting nuts.
3.
1.
Position the switch slider to "Neutral" as shown
above.
Move the shitt lever to "Neutral", then slip the
switch into position.
Attach the switch with the two nuts.
Test the switch in the @ and I position of the shift
lever. The engine should start when the shift lever
is in position E anywhere in the range of free play.
Connect the l4P connector, clamp the harness and
install the console.
5.
)
-
A/T Gear Position SwitchA/T Gear Position Switch
Adjustment
1. Shitt to the @ position, and loosen the nuts.
2. Slide the switch in the direction of @ position
lwithin 2.0 mm (O.079 in.)l so that there is continuity
between the "A" and "L" terminals in the range oI
free play oI the shift lever.
3. Recheck for continuity between each of the ter-
manals.
NOTE:
a ll adjustment is not possible, check for damage
to the shift lever detent and/or the bracket. lf
there is no damage, replace the console switch.
a The engine should start when the shift lever is in
position S in the range of free play.
E position
)
LOCK PIN
'/ia
NUTS
23-145
Page 1227 of 1681

Headlight
Adjustment
Befole adiusting the headlights:
a Park the car on level ground.
a Make sure the fuel tank is full.
The driver or someone who weighs the same should
sit in the driver's seat.
Load the trunk with the items you usually carry (if you
usually pull a trailer, attach jt to the car).
Push down on the front and rear bumpers several
times to make sure the car is sitting normally.
When installing a new headlight assembly, tighten the
four mounting bolts so that the indicator in the verti-
cal gauge comes to the "O" mark.
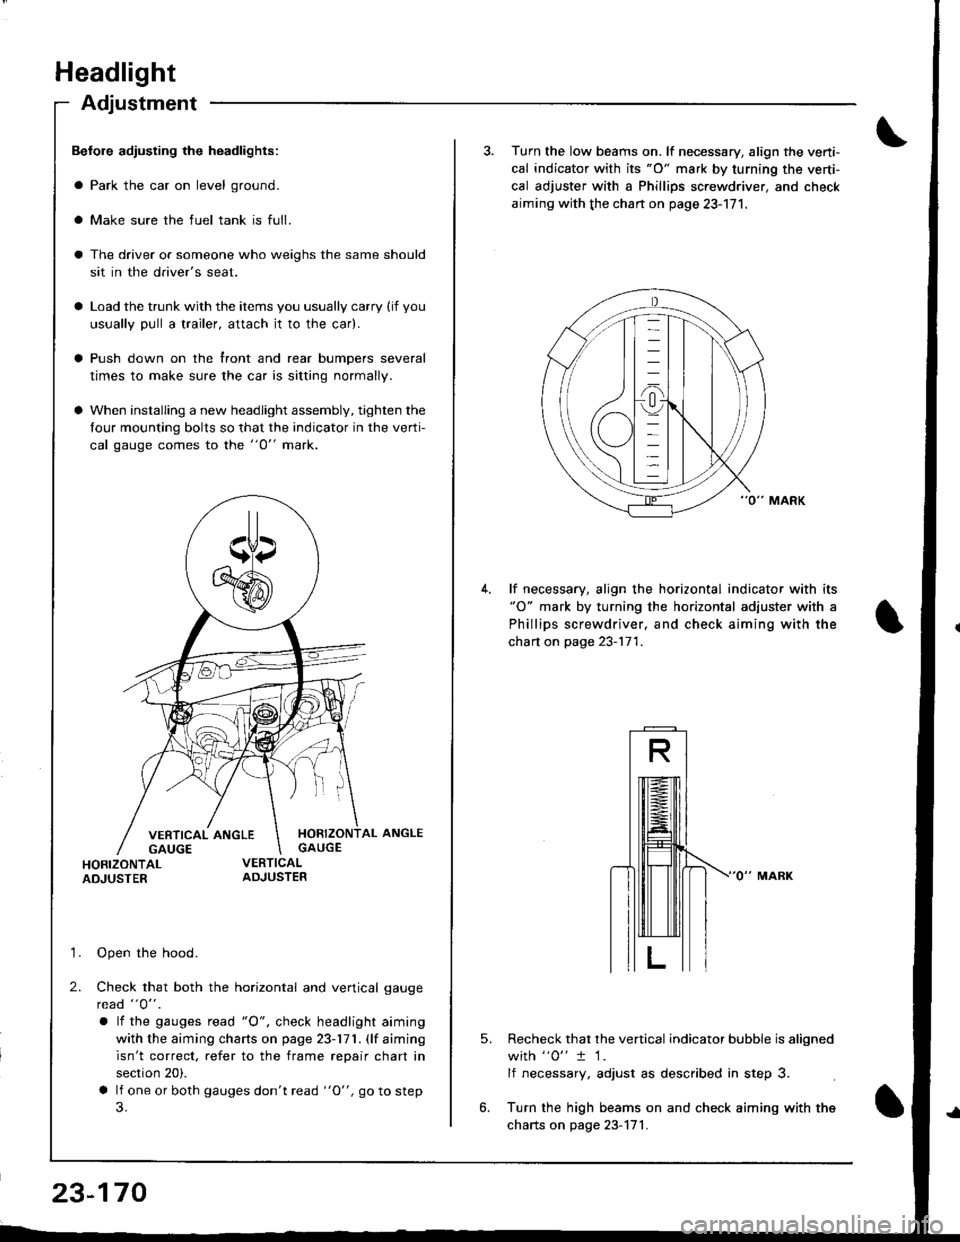
HORIZONTAL ANGLEGAUGE
HORIZONTALADJUSTER
'1. Open the hood.
2. Check that both the horizontal and vertical gauge
rcad "O" .
a lf the gauges tead "O", check headlight aiming
with the aiming charts on page 23-171. (lf aiming
isn't correct. refer to the frame repair chart in
section 20).
a lf one or both gauges don't read "O", go to step
23-170
3. Turn the low beams on. lf necessary, align the verti-
cal indicator with its "O" mark by turning the verti-
cal adjuster with a Phillips screwdriver, and check
aiming with the chan on page 23-171.
lf necessary, align the horizontal indicator with its"O" mark by turning the horizontal adjuster with a
Phillips screwdriver, and check aiming with the
chart on page 23-171.
5.Recheck that the vertical indicator bubble is aligned
with "0" t 1.
lf necessary, adjust as described in step 3.
Turn the high beams on and check aiming with the
charts on page 23-171.
Page 1229 of 1681
Headlight
Headlight Replacement
1. Remove the front bumper (see section 20).
2. Remove the mounting bolts, then pull out the head-
light, and disconnect the connectors from it.
After replacement, the horizontal and venical aim-
ing must be checked using conventional methods.
Use the aiming charts on page 23-171.
Bulb Replacement
CAUTION:
a Halogen headlights can becomo very hot in use; do
not touch them or the attaching haldware imm6diately
after they have been tuh6d ott.a Do not try to replace or cl6an the headlights with tho
lights on.
1. Disconnect the 2P connector(s) from the headlight.
Turn the bulb(s) counterclockwise and remove the
bulb(s).
2P CONNECTORS
HEADLIGHT
2PCONNECTOR
2P CONNECTOR
23-172
Page 1231 of 1681
Taillights (Hatchback)
Replacement
1.
2.
Open the rear hatch.
Remove the rear panel lining and the side lining (see
section 20).
Disconnect the 5P connector from the taillight.
Remove the six mounting nuts, then pull out the
taillight.
NOTE:
a lnspect the gasket. Replace it if it is distorted or
stays compressed.
a After installation, run water over the lights to
make sure they don't leak.
6P CONNECTOR
Replacement
Rear turn signal/Rear parking lighis.
1 . Open the rear hatch, then remove the access panel.
2. Remove the bulb from the bulb socket.
O: REAR TURN SIGNAL LIGHT BULB (32 CP)
@: REAR PARKING LIGHT BULB {3 CP)
Brake/Taillighr/Back-up lights:
1. Open the rear hatch.
2. Remove the rear panel lining {see section 20).
(i): BACK-UP LIGHT BULB (32 CF,
(Dr BRAKE/TAILLIGHT BULB (32/3 CP)
ACCESS PANEL
23-174
----