Page 1583 of 1681
97. Behind Left Side of Rear Seat (Right Similar)
Component Location
t
100. Behind Bight Quarter Panel Trim (Hatchback)
98. Below Center ot Rear Seat101. Below Left Side of Dash (with Security)
99. Behind Right Side ot Rear Seat
201-16
102. Center of Rear Shelf
Page 1586 of 1681
115. Center of Hatch (All except GS and GS'R)118. Left Side of Trunk Lid (Bight Similar) (Sedan)
116. Left Side of Hatch119. Center of Trunk Lid (Sedan)
117. Right Side of Hatch120. Behind Center ot Front Bumper (with Security)
\
201-19
Page 1608 of 1681

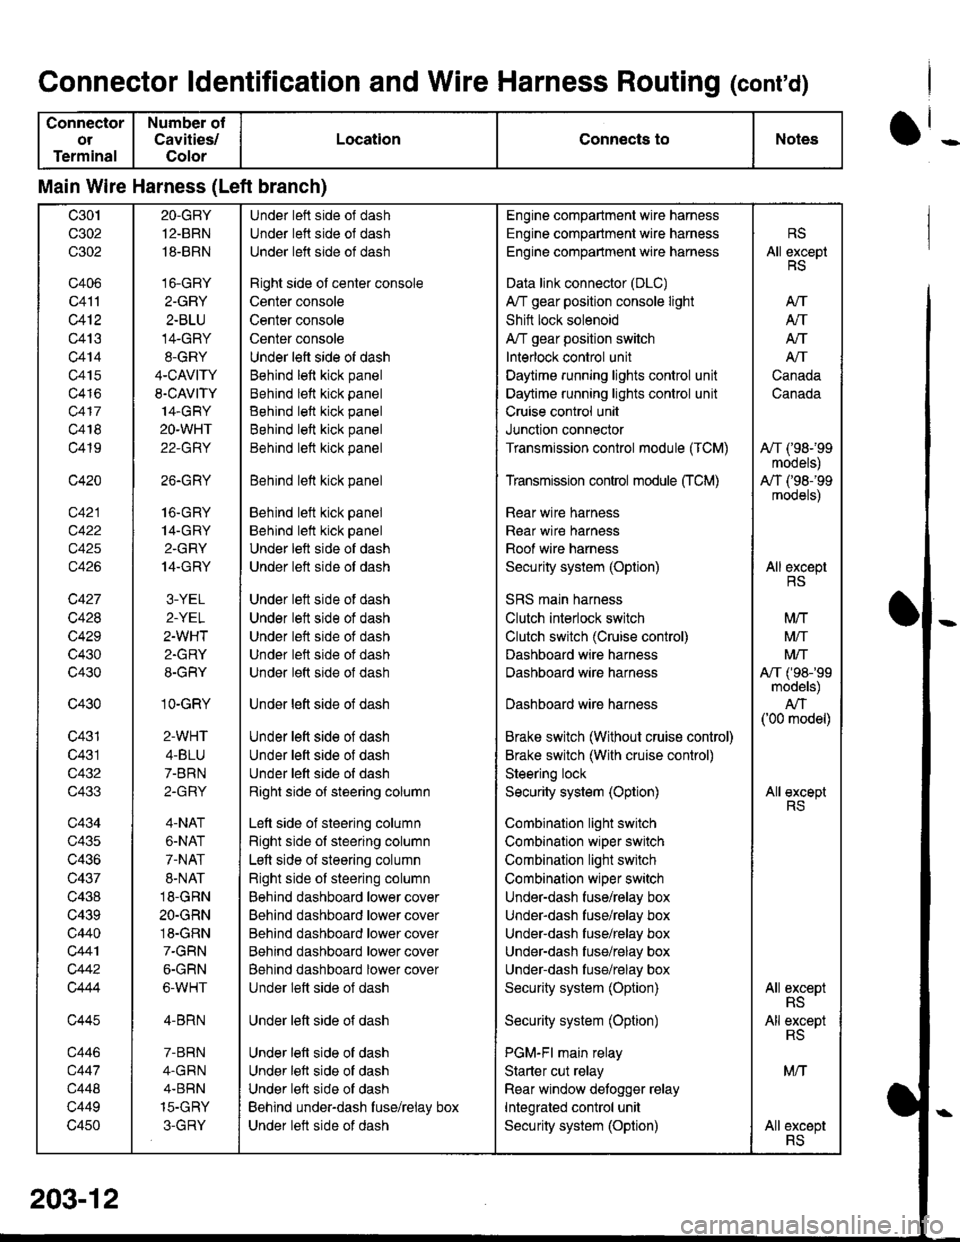
Connector ldentification and Wire Harness Routing (conrd)
Connector
ot
Terminal
Number of
Cavities/
Color
LocationConnects toNotes
Main Wire Harness (Left branch)
c30t
c302
c302
c406
c41'l
c412
c413
c414
c415
c416
c417
c418
c419
c420
c422
c425
c426
c427
c428
c429
c430
c430
c430
c431
c431
c432
c433
c434
c435
c436
c437
c438
c439
c440
c441
c442
Q444
c445
c446
c447
c448
c449
c450
2O-GBY
12.BRN
18-BRN
16-GRY
2-GRY
2-BLU
14-GRY
8-GRY
4-CAVITY
S.CAVITY
14.GRY
2O-WHT
22-GRY
26.GRY
16.GRY
14-GRY
2.GRY
14.GRY
3-YEL
2-YEL
2-WHT
2.GRY
8-GRY
1O-GRY
2-WHT
4-BLU
7-BRN
2-GRY
4-NAT
6-NAT
7-NAT
8-NAT
18-GRN
2O-GRN
18-GRN
7-GRN
6-GRN
6-WHT
4-BRN
7-BRN
4.GRN
4.BBN
15-GHY
3-GRY
Under left side of dash
Under lett side ol dash
Under left side of dash
Right side ol center console
Center console
Center console
Center console
Under left side of dash
Behind left kick panel
Behind lett kick panel
Behind left kick panel
Behind left kick panel
Behind lett kick panel
Behind lett kick panel
Behind left kick panel
Behind lelt kick panel
Under left side of dash
Under left side ot dash
Under lett side of dash
Under lett side of dash
Under left side of dash
Under left side of dash
Under left side of dash
Under lett side of dash
Under left side of dash
Under left side of dash
Under lett side of dash
Right side of steering column
Lett side of steering column
Right side of steering column
Left side of steering column
Right side of steering column
Behind dashboard lower cover
Behind dashboard lower cover
Behind dashboard lower cover
Behind dashboard lower cover
Behind dashboard lower cover
Under left side of dash
Under left side of dash
Under left side of dash
Under left side of dash
Under left side of dash
Behind under-dash fuse/relay box
Under lett side of dash
Engine compartment wire harness
Engine compartment wire harness
Engine comparlmenl wire harness
Data link connector (DLC)
A/T gear position console light
Shitt lock solenoid
A/T gear position switch
Interlock control unit
Daytime running lights control unit
Daytime runnang lights control unit
Cruise control unit
Junction connector
Transmission control module (TCM)
Transmission control module CrCM)
Rear wire harness
Rear wir€ harn€ss
Roof wire harness
Security system (Option)
SRS main harness
Clutch interlock switch
Clutch switch (Cruise control)
Dashboard wire harness
Dashboard wire harness
Dashboard wire harness
Brake switch (Without cruise control)
Brake switch (With cruise control)
Steering lock
Security system (Option)
Combination light switch
Combination wiper switch
Combination light switch
Combinalion wiper switch
Under-dash fuse/relay box
Under-dash fuse/rglay box
Under-dash fuse/relay box
Under-dash fuse/relay box
Under-dash fuse/relay box
Security system (Option)
Security system (Option)
PGM-Fl main relay
Starter cut relay
Rear window detogger relay
Integrated control unit
Security system (Option)
RS
All exceptRS
AtT
Atf
AN
A/T
Canada
Canada
A,/T ('98-'99
models)
A,/T (,98-'99
models)
All exceptRS
M/T
Mtf
Mrf
A,/T ('98-'99models)
AN('00 model)
All exceptRS
All exceptRS
All exceptRS
MN
AII excsptRS
203-1
Page 1671 of 1681
Radiator
Engine Goolant Refilling and Bleeding
CAUTION: When pouring engine coolant, be sure to
shut the relay box lid and not to let coolant spill on the
electrical parts or the paint. lf any coolant spills, rinse it
off immediately.
1. Slide the heater temperature control lever to maxi-
mum heat.
Make sure the engine and radiator are cool to the
touch.
2. Remove the radiator caD.
3. Loosen the drain plug, and drain the coolant.
4. Remove the drain bolt from the cylinder block.
ENGINE DRAIN BOLT78 N.m (8.0 kgf.m,58 lbf.ftlApply liquid gasket tobolt thread when installing.WASHERReolace.
DRAIN PIUG
I \.--
\_-l - I
\
6.
7.
5. Apply liquid gasket to the drain bolt threads, then
reinstall the bolt with a new washer and tighten it
securely.
Tighten the radiator drain plug securely.
Remove, drain and reinstall the reservoir. Fill the
tank halfway to the MAX mark with Honda All
Season Antifreeze/Coolant Type 2.
COOLANTRESERVOIR
tW.
\-