1998 HONDA INTEGRA glove box
[x] Cancel search: glove boxPage 650 of 1681

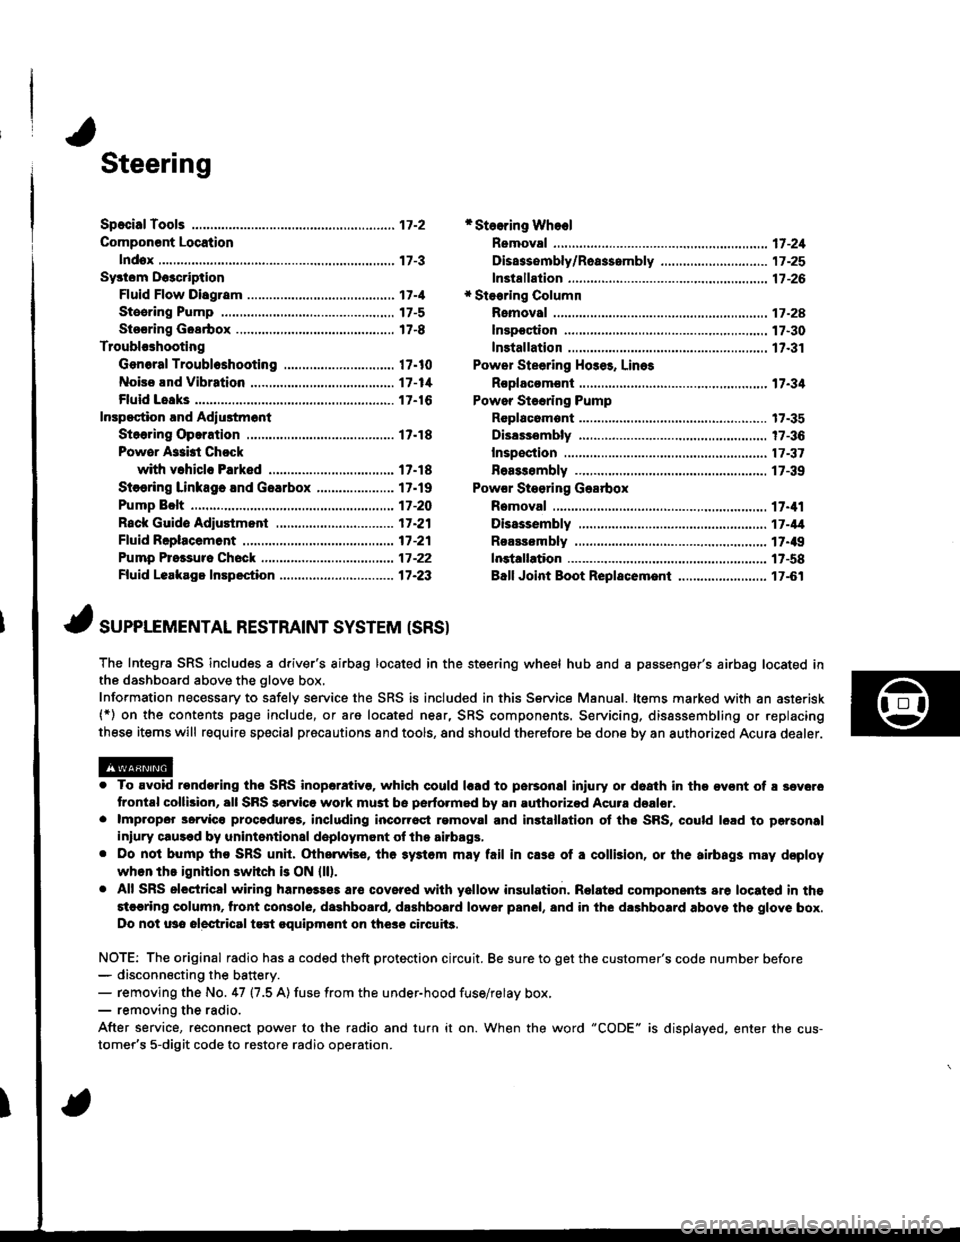
Steering
Componsnt Location
lndox
*Stooring Wheel
Removal ....
Disassombly/Ro8$.mbly
Disassombly ......
F08$€mbly
Powcr Stosring Gosrbox
R6moval
............................ 17-3
............. 17 -1
................ 17-16
............................. 17_25
17-30
17.31
.......17-21
Sy3tom DGcription
Fluid Flow Disgram
Steering Pump .............. 17-5
Stocring Goarbox ...17.8
Troublorhooting
Gonoral Troubleshooting .............................. 17.10
Noiso lnd Vibration ...... 17-1i[
Fluid Losk3
lnspoction
Installation
Powor Steering Hos6, Lino3
Roplacom€nt .................. 17.34
Powor Steoring Pump
RGplac6montlolpeqtion lnd Adiu3tm6nl
Stoo.ing Operation
Powor A$bi Chock
with v.hiclo Parked
Stcering Linkage 6nd Goarbox
Pump Bolt
17.18
17.18
17.19
17-20
17.35
t7-36
17 -37
r7-39
Inspoction
................... 17.41
Rack Guide Adiustmont ..........................-.-.-. 17 -21
Ffuid Rcplacemont ........17-21
Pump Prc&suro Chock ...,........................,..,..., 17 -22
Fluid Leakage Inrpection ............................... 17-23
Dissssembly
R€aEs€mbly
In3tallation........... 17_58
Ball Joint Boot Replacem.ni ........................ 17-61
17-U
17.49
J ,urrar*TNTAL REsrRArNr sysrEM (sRsr
The Integra SRS includes a driver's airbag located in the steering wheel hub and a passenger's airbag located inthe dashboard above the glove box,
Information necessary to safely service the SRS is included in this Service Manual. ltems marked with an asterisk(*) on the contents page include, or are located near, SRS components. Servicing, dissssembling or replacing
these items will require special pr6cautions and tools, and should therefore be done by an authorized Acura dealer.
. To avoid rondoring ths SRS inoparstivo. which could |rad to parsonal iniury or doath in the ov€nt of ! sev6.o
trontal collision, all SRS sarvice work must be perto.med by an authorizod Acura dsalor.. lmpropor 3orvic€ procadures, including inco[6ql rgmoval and inrtallation of the SRS, could l6ad to pgrsonal
iniury clus€d by unintentional doployment of the airbags,. Do nol bump tho SRS unh, (Xherwise, th6 3ystom may fail in cas€ ol a collision, or the airbags may d€ploy
when ths ignition switch is ON {ll).. All SRS electrical wiring harness€s aro covered with yallow insulation. Related component3 are located in ths
stcaring column. tront con3ol6, dashboard, d.shbolrd lower panel, and in the dashboard above ths glove box.
Do not u3o electrical test oquipm€nt on the3e circuii3.
NOTE: The original radio has a coded theft protection circuit. Be sure to get the customer's code number before- disconn€cting the battery.- removing the No. 47 (7.5 A) fuse from the under-hood fuse/relay box,- removing the radio.
After service, reconnect power to the radio and turn it on. When the word "CODE" is displayed. enter the cus-
tomer's 5-digit code to restore radio operation.
Page 789 of 1681

I
\
I
Diagnostic Trouble Code (DTC)
DTG lndication
a
t
NOTE: This operation can also be done with the Honda PGM Tester.
1. Connect the SCS short connector to the service check connector (2P) under the glove box,
2. Turn the ignition switch ON (ll) without the brake pedal depressed.
NOTE: lf the brake pedal is depressed when turning the ignition switch ON (ll), the system shifts to the DTC Erasure
mode.
3. The blinking frequency indicates the DTC.
NOTE: lf the DTC is not memorized, the ABS indicator will go off fo r 3.6 seconds, and then come back on.
4. Turn the ignition switch OFF, and remove the SCS short connector.
NOTE: The Malfunction Indicator Lamp (MlL) will stay on after the engine is started if the SCS shon connector is con-
nected.
Conditions lor DTC indication
. Vehicle speed is 6 mph (10 km/h) or less.
. The SCS short connector is connected before the ignition switch is turned ON {ll).
. The brake pedal is released.
ABS INOICATOB
SCS SHORT CONNECTORo?PAZ - 0010100
SERVICE CHECKCONNECTOR I2PI
DTC : 3 3
b
Page 790 of 1681

Diagnostic Trouble Code (DTC)
DTG Erasure (MES Mode)
NOTE: This operation can also be done with the Honda PGM Tester.
1. Connect the SCS short connector to the service check connector (2P) underthe glove box.
2, Deoress the brake pedal.
3. Turn the ignition switch ON (ll) while keeping the brake pedal depressed.
4. Afterthe ABS indicator goes off, release the brake pedal.
5. After the indicator comes on, depress the brake pedal again
6. After the indicator goes off, release the brake pedal again.
7. After a few seconds, the ABS indicator blinks twice and the DTC is erased. lf the indicator does not blink twice, repeat
steps 1 through 6. lf the indicator stays ON after the indicator blinks twice. check the DTC because a problem was
detected during initial diagnosis before shifting to DTC Erasure mode.
8. Turn the ignition switch OFF, and remove the SCS short connector.
Conditions lor DTC erasure
. Vehicle speed is 6 mph (10 km/h) or less.
. The SCS short connector is connected before the ignition switch is turned ON (ll).
. The brake pedal is depressed before the ignition switch isturned ON (ll)
ON
ABS INDICATOF
OFF
DEPRESSED
BRAKE PEDAL
RELEASED
Snilion switch
illr'I'
0.3soc.
'-------t
II2 sec,4 sgc.4 sec.5 aac.
0.3s6c.with in 3 s6c.with in 3 ssc.with in 3 s€c.
T
19-38
Page 952 of 1681

Clock removal:
Carefully pry the clock at the lett edge, then pull it out.
Disconnect the connecto..
CONNECTOE
t:
o
Glove box removal:
1. Open the glove box.
2. Remove the screw, then remove the damper from
the glove box.
3. Remove the screw, then remove the glove box.
: Bolt, scrow
Al : Bolt, 2
A
ql
locations
B<: Scr€w, 1
il
4. Remove the damper and striker.
>: Nut, screw locations
A>: Nul, 1 B : Screw, 2
9;
E
e_)
5. Installation is the reverse of the removal procedure.
20-137
Page 953 of 1681

Dashboard
Replacement Precautions
SRS wire harnesses are routed near the dashboard and
steenng column.
CAUTION:
a All SRS wire hsrnesses are covered wiih yellow insu-
lation. Before you disconnect any pan of an SRS wire
harness, disconnect the airbag conneclors.
a Whenever the ignition switch is ON (ll), or has been
tulned OFF for less than three minules, be careful not
to bump the SRS unit; the ai.bags could accidentally
deploy and cause damage or injuries.
a For additional precautions, refer lo the SRS sub-section
in section 23.
PASSENGER'S AIRBAG
Belore removing the dashboard:
1. Disconnect the battery negative cable, then discon-ne.r rhe n^.iriua.ahla
NOTEr The original radio has a coded thett protec,
tion circuit. Be sure to get the customer's code num
ber before- disconnecting the battery.- removing the No. 47 (7.5 A) fuse from the under-
hood tuse/relay box.- removing the radio.
After service, reconnect power to the radio and turn
it on. When the word "CODE" is displayed, enter
the customer's 5-digit code to restore radio
operation.
DRIVER'S AIRBAG
SRS UNIT
20-138
2.Install the short connectors (RED).
Driver's:
Remove the access panel, then disconnect the con-
nector between the cable reel and driver's airbag.
CABL€ REELCONNECTOR--_--._-_-----
Front passenger's:
Remove the glove box (see page 20-137), thendisconnect the connector between the front pas-
senger's airbag and SRS main harness.
FRONT PASSENGER'SAIRBAG CONNECTOR
SRS MAIN HARNESSCONNECTOR
ORIVER'S AIRBAG
Page 954 of 1681

Replacement
1. To remove the dashboard, tirst remove the:
a Front seats {see page 20-'103)
a Front and rear consoles (see page 20-130)
a Oashboard lower cover {see page 20-133)
a Knee bolster (see page 20-134)
. Glove box (see page 20-137). Clock (see page 20-1371
. Moonroof switch (see page 20-136)
a Stereo radio/cassette (see page 20-134)
2. Lower the steering column (see section 17).
NOTE: To prevent damage to the steering column,
wrap it with a shop towel.
l ; Boh, nut locations
AA : Bolr, 28
: Nut, 2
8 x 1.25 mm22 N.m 12.2 kgl.n,16 tbf.ft)o21 13 N m 11.3 kgl m,
\€J' Prbl rll
_Urr'rr,t __)
STEERING JOINTCOVER
STEERING COLUMN
3. Remove the nuts, then remove the front passenger's
airbag bracket.
: Nut locations, 4
6 x 1.0 mm L9.8Nm
{1.o kgt m,7.2tbt.rrUFRONT PASSENGEB'SAIRBAG
PASSENGER'S
SRS MAINAIRBAG BRACKET
HARNESS
4. Disconnect the air mix control cable and connectors.
AIR MIX CONTROLCABLE
HEATERCONTROLPANELCONNECTORS
(cont'd)
20-139
Page 1007 of 1681

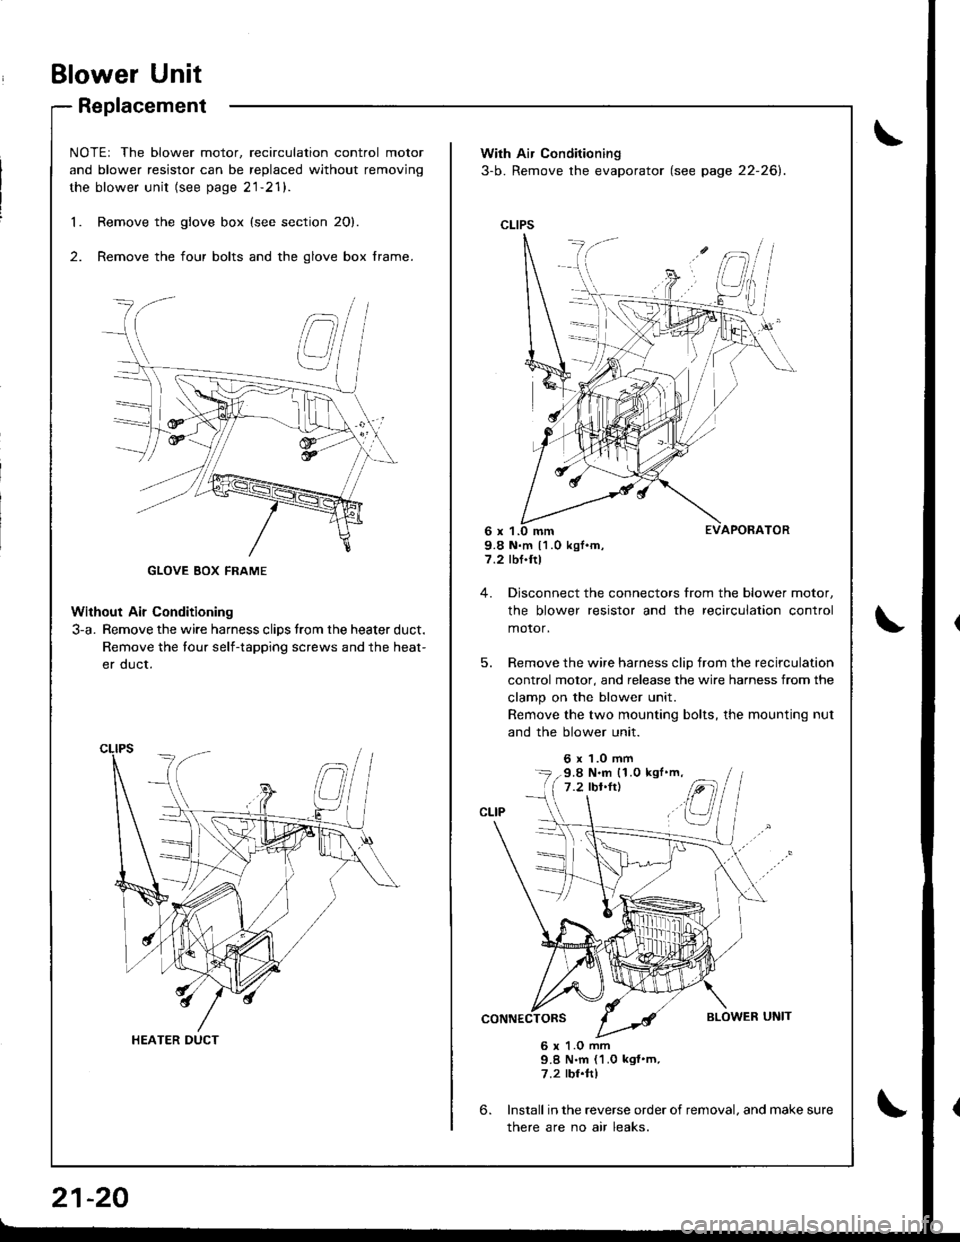
Blower Unit
Replacement
NOTEr The blower motor, recirculation control motor
and blower resistor can be replaced without removjng
the blower unit (see page 21-21).
Remove the glove box {see section 20}.
Remove the four bolts and the glove box frame.
Without Air Conditioning
3-a. Remove the wire harness clips trom the heater duct.
Remove the tour self-tapping screws and the heat-
er duct.
1.
2.
HEATER DUCT
21-20
With Air Conditioning
3-b. Remove the evaporator (see page 22-26).
CLIPS
9.8 N.m 11.0 kgf.m,7.2 rbf.ftl
4. Disconnect the connectors from the blower motor,
the blower resistor and the recirculation control
motor,
5. Remove the wire harness clip from the recirculation
control motor, and release the wire harness from the
clamp on the blower unit.
Remove the two mounting bolts, the mounting nut
and the blower unit.
6 x 1.0 mm
6.
6 x 1.O mm9.8 N.m (1.0 kgf'm,7.2 rbr.ftl
Install in the reverse order of removal. and make sure
there are no air leaks.
9.8 N.m (1.0 kgl'm,
Page 1044 of 1681

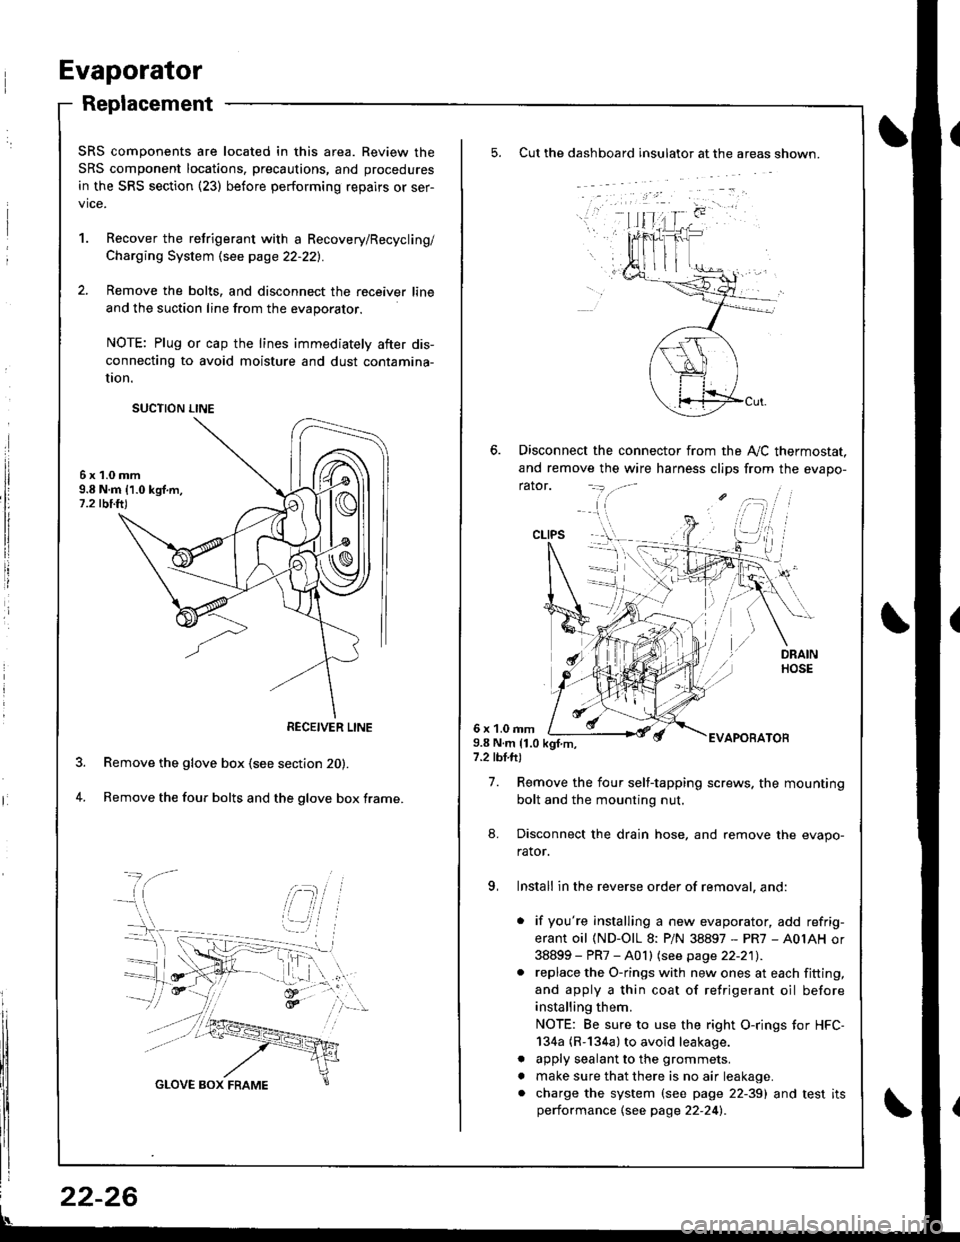
Evaporator
Replacement
Cut the dashboard insulato. at the areas shown.
Disconnect the connector from the A,,/C thermostat.
and remove the wire harness clips from the evapo-
rator.
6 x 1.0 rnm9.8 N.m 11.0 kgf.m,7.2 tbl.ft)
EVAPOBATOB
7. Remove the four self-tapping screws. the mounting
bolt and the mounting nut.
8. Disconnect the drain hose, and remove the evapo-
rator.
9, Install in the reverse order of removal, and:
. if you're installing a new evaporator, add refrig-
erant oil (ND-OlL 8: PiN 38897 - PR7 - A0IAH or
38899 - PR7 - A0 I I lsee page 22-21) .. replace the O-rings with new ones at each fitting,
and apply a thin coat of refrigerant oil before
installing them.
NOTE: Be sure to use the right O-rings tor HFC-
134a (R-134a) to avoid leakage.
. apply sealant to the grommets.
. make sure that there is no air leakage.. charge the system (see page 22-39) and test itsperformance {see page 22-24l�.
CLIPS
SRS components are located in this area. Review the
SRS component locations, precautions, and procedures
in the SRS section {23) before performing repairs or ser-
vice.
1. Recover the retrigerant with a Recovery/Recycling/
Charging System \see page 22-221.
2. Remove the bolts, and disconnect the receiver line
and the suction line from the evaporator.
NOTE: Plug or cap the lines immediately after dis-
connecting to avoid moisture and dust contamina-
UOn.
6x1.0mm9.8 N.m 11.0 kgf.m,1.2 tbi.ft)
Remove the glove box (see section 20).
Remove the four bolts and the glove box frame.4.
SUCTION LINE
RECEIVER LINE
22-26