1998 HONDA CR-V tensioner
[x] Cancel search: tensionerPage 1321 of 1395
Precautions/Procedures
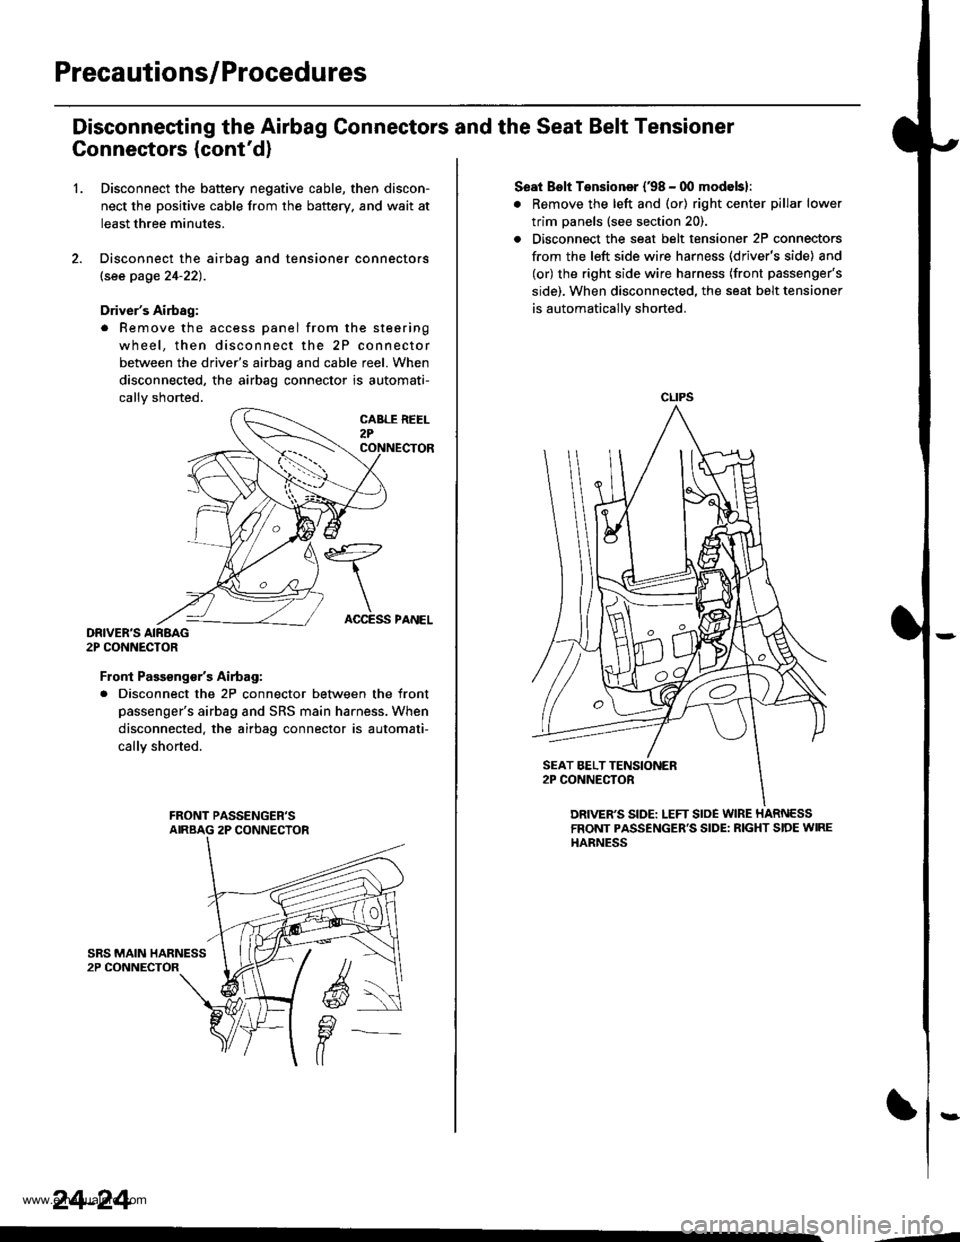
Disconneeting the Airbag Connectors and the Seat Belt Tensioner
Connectors (cont'd)
1.Disconnect the battery negative cable, then discon-
nect the positive cable from the battery. and wait at
least three minutes.
Disconnect the airbag and tensioner connectors
lsee page 24-22).
Driver's Airbag:
. Remove the access panel from the steering
wheel, then disconnect the 2P connector
between the driver's airbag and cable reel. When
disconnected, the airbag connector is automati-
callv shorted.
DRIVER'S AIRBAG2P CONNECTOR
Front Passsng€/sAirtag:
. Disconnect the 2P connector between the front
passenger's airbag and SRS main harness. When
disconnected. the airbag connector is automati-
callY shorted.
24-24
ACCESS PANEL
Seat Bslt Tensioner (38 - 00 modebl:
. Remove the left and (or) right center pillar lower
trim panels (see section 20).
. Disconnect the seat belt tensioner 2P connectors
from the left side wire harness (driver's side) and
(or) the right side wire harness (front passenger's
side). When disconnected. the seat belt tensioner
is automatically shorted.
CLIPS
DRIVER'S SIDE: LEFT SloE WIRE HARNESSFRONT PASSENGER'S SIDE: RIGHT SIDE WIREHARNESS
,--4
www.emanualpro.com
Page 1323 of 1395
Troubleshooting
Self-diagnostic Procedures
The self-diagnostic function of the SRS system allows it to locate the causes of system problems and to store this informa-
tion in memory, For easier troubleshooting, this data can be retrieved via a data link circuit.
. When you turn the ignition switch ON (ll). the SRS indicator will come on. lf it goes off after six seconds, the system is
normal.
. lf there is 8n abnormality, the system locates and defines the problem. stores this information in memory, and turns
the SRS indicator light on. The data will remain in the memory even when the ignition switch is turned off or if the bat-
terv is disconnected.
. When you connect the SCS service connector to the service check connector (2P), and turn the ignition switch ON (ll),
the SRS indicator light will indicate the diagnostic trouble code (DTC) by the number of blinks.
. After reading and recording the DTC, proceed with the troubleshooting forthis code.
Precsutions
. Use only a digital multimeter to check the system. lf it's not a Honda multimeter. make sure its output is 10 mA (0.01 A)
or less when switched to the smallest value in the ohmmeter range. A tester with a higher output could damage the
airbag circuit or cause accidental airbag deployment and possible injury.
. Whenever the ignition switch isON (ll). or has been turned OFF for less than three minutes, be careful nottobumpthe
SRS unit; the airbags could accidentally deploy and cause damage or injuries.
. Before you remove the SRS main harness, disconnect the airbag and tensioner connectors (see page 24-23).
. Make sure the battery is sufficiently charged (see section 23). lf the battery is dead or low, measuring values won't be
correct.
. Do not touch a tester probe to the terminals in the SRS unit or harness connectors, and do not connect the terminals
with a jumper wire. Use only the backprobe set and the SCS service connector.
For backprobing spring-loaded lock type con nectors, .efet to page 24-22.
Reading the DTC
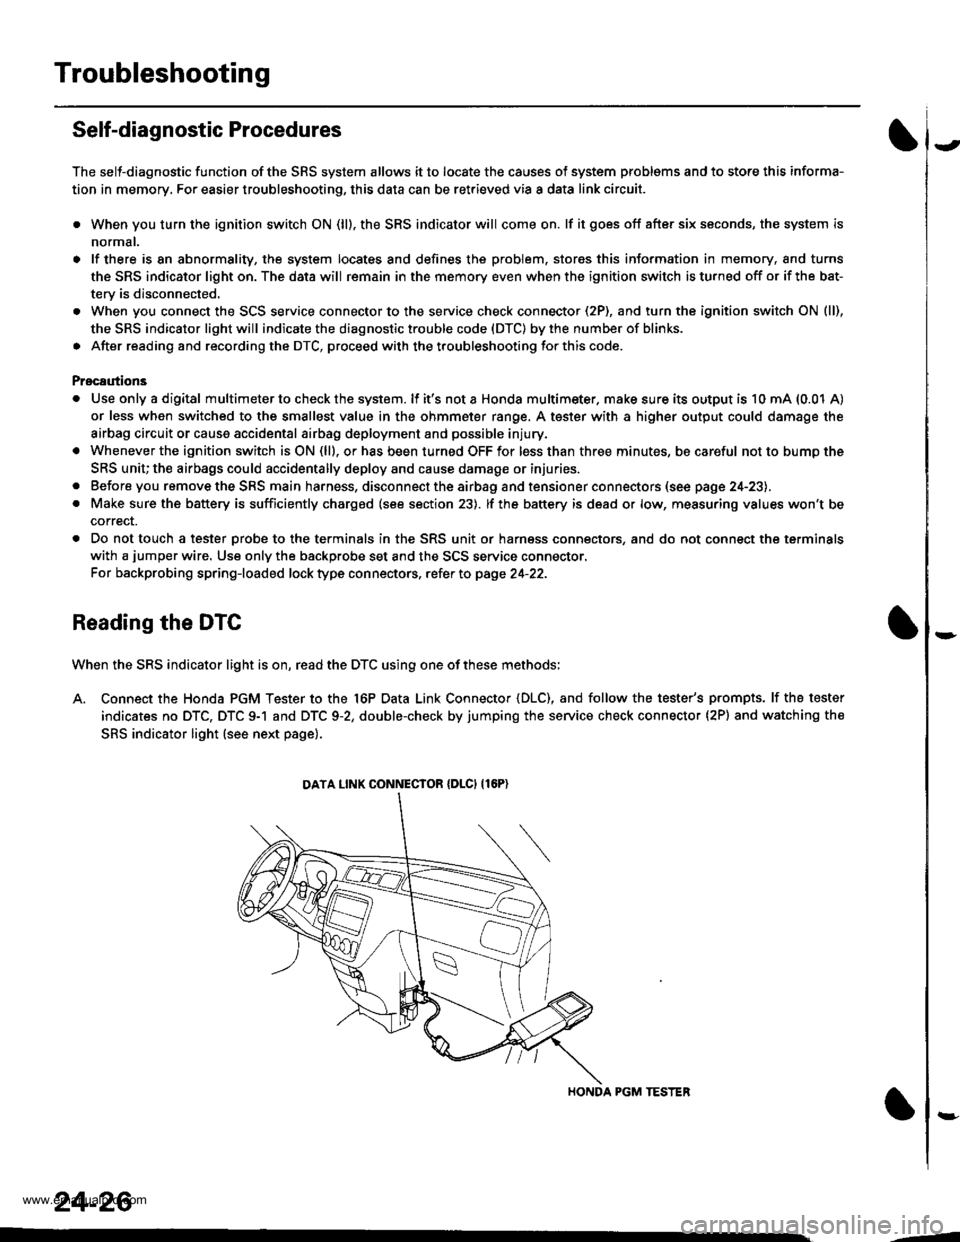
When the SRS indicator light is on, read the DTC using one of these methods;
A. Connect the Honda PGM Tester to the 16P Data Link Connector {DLC), and follow the tester's prompts. lf the tester
indicates no DTC, DTC 9-1 and DTC 9-2, double-check by jumping the service check connector (2P) and watching the
SRS indicator light (see next page).
HONDA PGM TESTER
DATA LINK CONNECIOR {DLCI {16P)
24-26
,1
www.emanualpro.com
Page 1328 of 1395
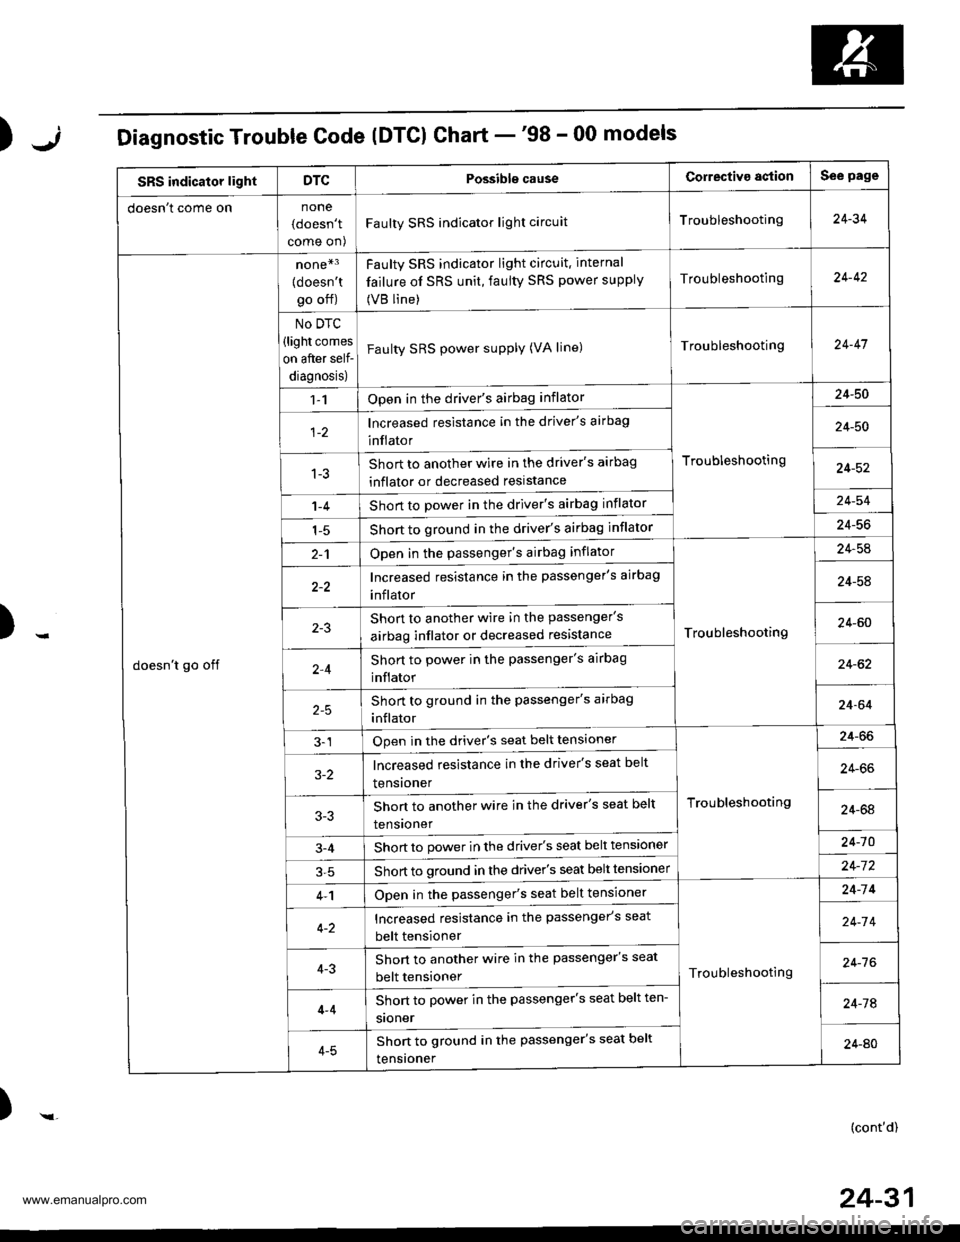
);Diagnostic Trouble Code (DTCI Chart -'98 - 00 models
SRS indicator lightDTCPossibls causeCorrectiva agtionSee page
doesn t come onnone
(doesn't
come on)
Faulty SRS indicator light circuitTroubleshooting24-34
doesn't go off
none*3
{doesn'tgo off)
No DTC
(light comes
on after self-
diagnosis)
Faulty SRS indicator light circuit. internal
failure of SRS unit, faulty SRS power supply
(VB line)
Troubleshooting24-42
Faulty SRS power supply (VA line)Troubleshooting24-47
1-1Open in the driver's airbag inflator
Troubleshooting
24-50
lncreased resistance in the driver's airbag
inflator24-50
1-3Short to another wire in the driver's airbag
inflator or decreased reslstance24-52
1-4Short to power in the driver's airbag inflator24-54
1-5Short to ground in the driver's airbag inflator24-56
2-1Open in the passenger's airbag inflator
Troubleshooting
24-54
Increased resistance in the passenger's airbag
inflator24-58
Shon to another wire in the passenger's
airbag inflator or decreased resistance24-60
2,4Short to power in the passenger's airbag
inflator24-62
Short to ground in the passenger's arrbag
inflator24-64
3-1Open in the driver's seat belt tensioner
Troubleshooting
24-66
3-2lncreased resistance in the driver's seat belt
tensroner24-66
Shon to another wire in the driver's seat belt
tensroner24-64
3-4Short to power in the driver's seat belt tensioner24-10
Short to ground in the driver's seat belt tensloner24-7 2
4-1Open in the passenger's seat belt tensioner
Troubleshooting
24-14
Increased resistance in the passenger's seat
belt tensioner24-7 4
4-3Short to another wire in the passenger's seat
belt tensioner24-7 6
4-4
4-5
Short to power in the passenger's seat belt ten-
sroner24-74
Shon to ground in the passenger's seat belt
tensroner24-AO
)-(cont'd)
24-31
www.emanualpro.com
Page 1333 of 1395
Troubleshooting
From page 24-35
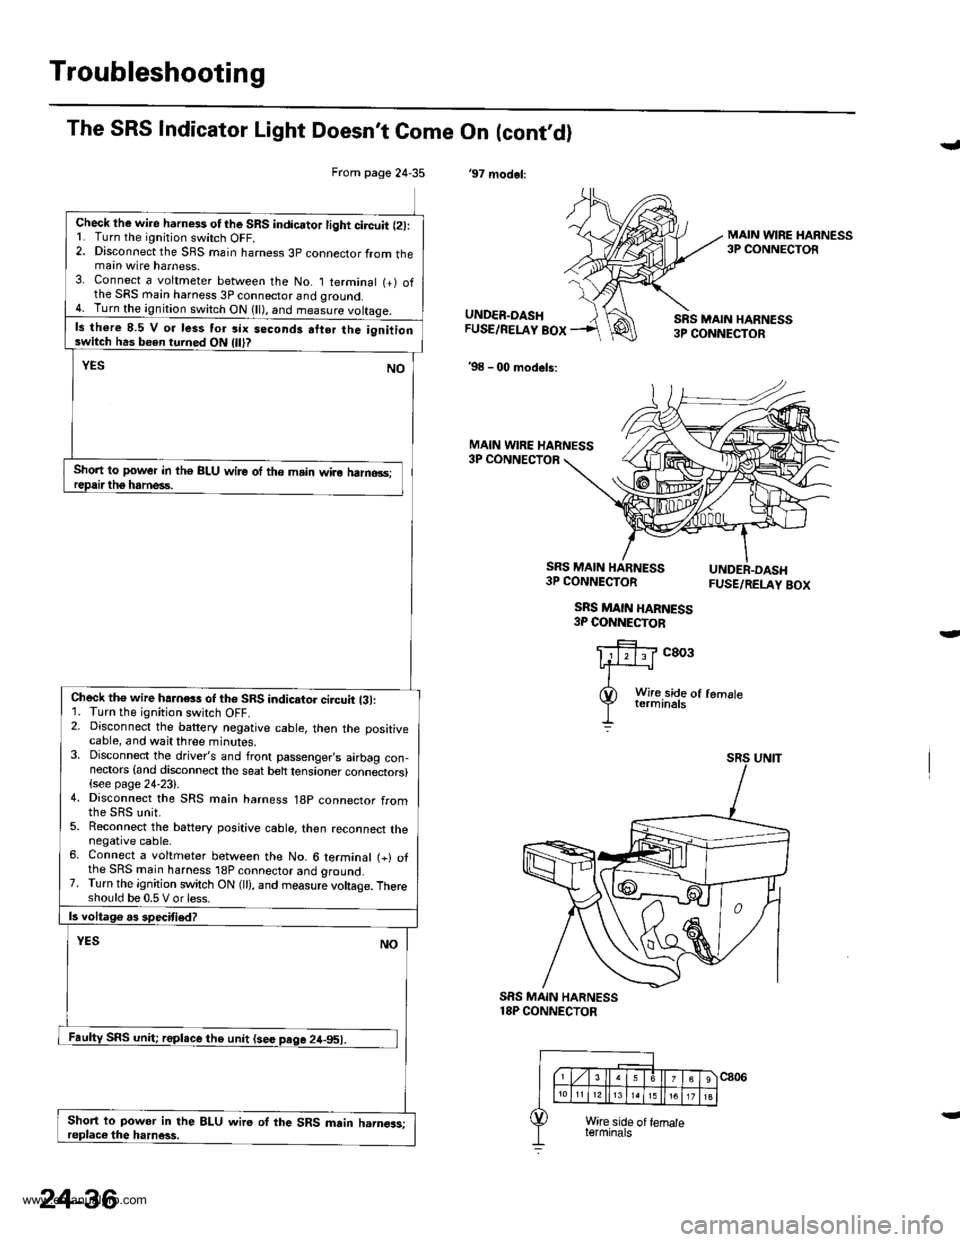
Check lhe wire harness otthe SRS indicator light circuit l2l:L Turn the ignitjon switch OFF.2. Disconnect the SRS main harness 3p connector from themain wire harness.3. Connect a voltmeter between the No. I terminal (+) ofthe SRS main harness 3P connector and qround.4. Turn the ignition switch ON (ll), and measure voltaqe.
ls there 8.5 V o. less tor six seconds atter the ignitionswitch has been turned ON
Short to power in th€ BLU wire of the main wiro halno3s;
Check th€ wire hahess of th6 SRS indicator ci.cuit {31:1. Turn the ignition switch OFF.2. Disconnect the battery negative cable, then the positivecable, and wait three minutes.3. Disconnect the driver's and front passenger,s airbag con-nectors {and disconnect the seat belt tensioner connectors}(see page 24-23).4. Disconnect the SRS main harness 18p connector from
5. Reconnect the battery positive cable, then reconnect thenegative cable.6. Connect a voltmeter between the No. 6 terminal (+) ofthe SRS main harness 'l8P connector and ground.7. Turn the ignition switch ON (ll), and measure voltage. Thereshould be 0.5 V or less.
Short to power in the BLU wire oI the SRS main harngas;
The SRS Indicator Light Doesn't Come On (cont,dl
'97 modol:
J
MAIN WIRE HARNESS3P CONNECTOR
UNDER.DASHFUSE/RELAY BOX
'98 - 00 models:
SRS MAIN HARN€SS3P CONNECTOR
MAIN WIRE HARNESS3P CONNECTOR
SRS MAIN HARNESS3P CONNECTOR
SRS MAIN HARNESS3P COI{NECTOB
FUSE/RELAY BOX
c803
SRS MAIN HARNESS18P CONNECTOR
24-36
www.emanualpro.com
Page 1339 of 1395
Troubleshooting
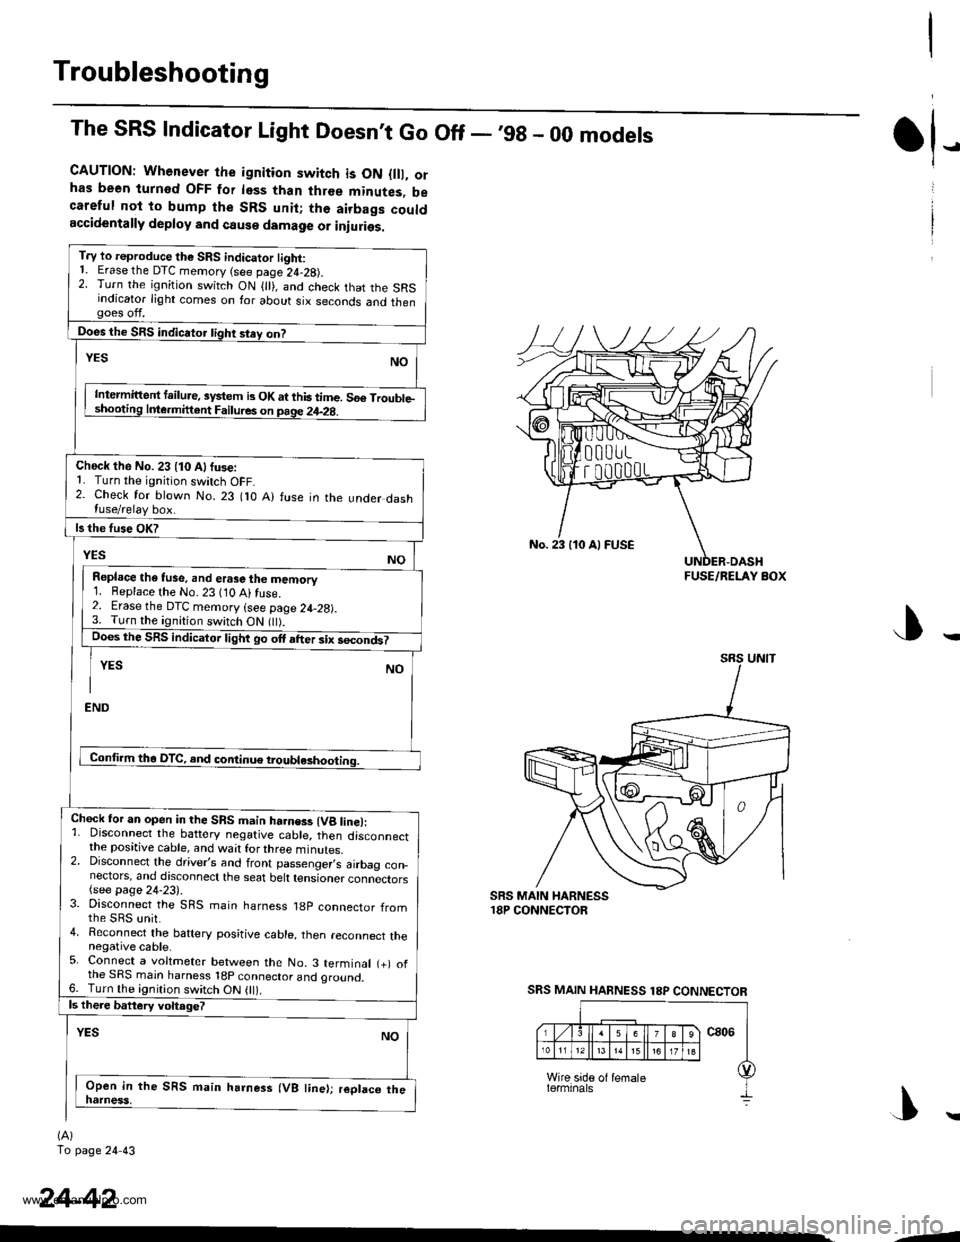
The SRS Indicator Light Doesnt Go Off - ,99 - 00 models
CAUTION: Whenever the ignition switch is ON {lll, orhas been turnod OFF for less than three minutes, becareful not to bump the SRS unit; the airbags couldaccidentally deploy and cause damage or iniuries.
T.y to reproduce the SRS indicator tight:1. Erase the DTC memory (see page 24-28).2. Turn the ignition switch ON { }, and check that the SRSindicator light comes on for about six seconds and thengoes off.
Does the SRS indicator tight stey on?
NOYES
Intermittent failure, system b OK at this time. 56€ Trouble-shooting Inle.mittent Failures on page 24-2g.
Check the No. 23 (10 Alfuse:1. Turn the ignition switch OFF.2. Check for blown No. 23 flO A) fuse in the under dashluse/relay box.
ls the fuse OK?
YESNO
Repl.ce the tuse, and erase the memory1. Beplace the No. 23 (10 Ai fuse.2. Erase the DTC memory (see page 24-28).3. Turn the ignition switch ON flt).Does the SRS indicator light go ott after six secondt
YES NO
I
END
Conti.m tha DTC, and continue troubl*hooting.
Chock for an open in the SRS main harness (Vg line):1. Disconnect the battery negative cable, then disconnectthe positive cable, and wait for three minutes.2. Disconnect the driver,s and front passenger,s airbag con_nectors, and discoonect the seat belt tensioner connectors(see page 24-23).3. Disconnect the SRS main harness 18p connector fromthe sRs unit.4. Reconnect the baftery positive cable, then reconnect thenegative cable.5. Connect a voltmeter between the No. 3 terminal (+) ofthe SRS main harness 18p connector and oround.6. Turn the ignition switch ON 0l).ls there battery voltage?
YESNO
Open in the SRS main harness (VB line); replaco thenatness,
(A)
To page 24 43
tl-
24-42
No. 23 110 Al FUSE
FUSE/RELAY BOX
SRS MAIN HARNESS 18P CONNECTOR
|\
-1
www.emanualpro.com
Page 1344 of 1395
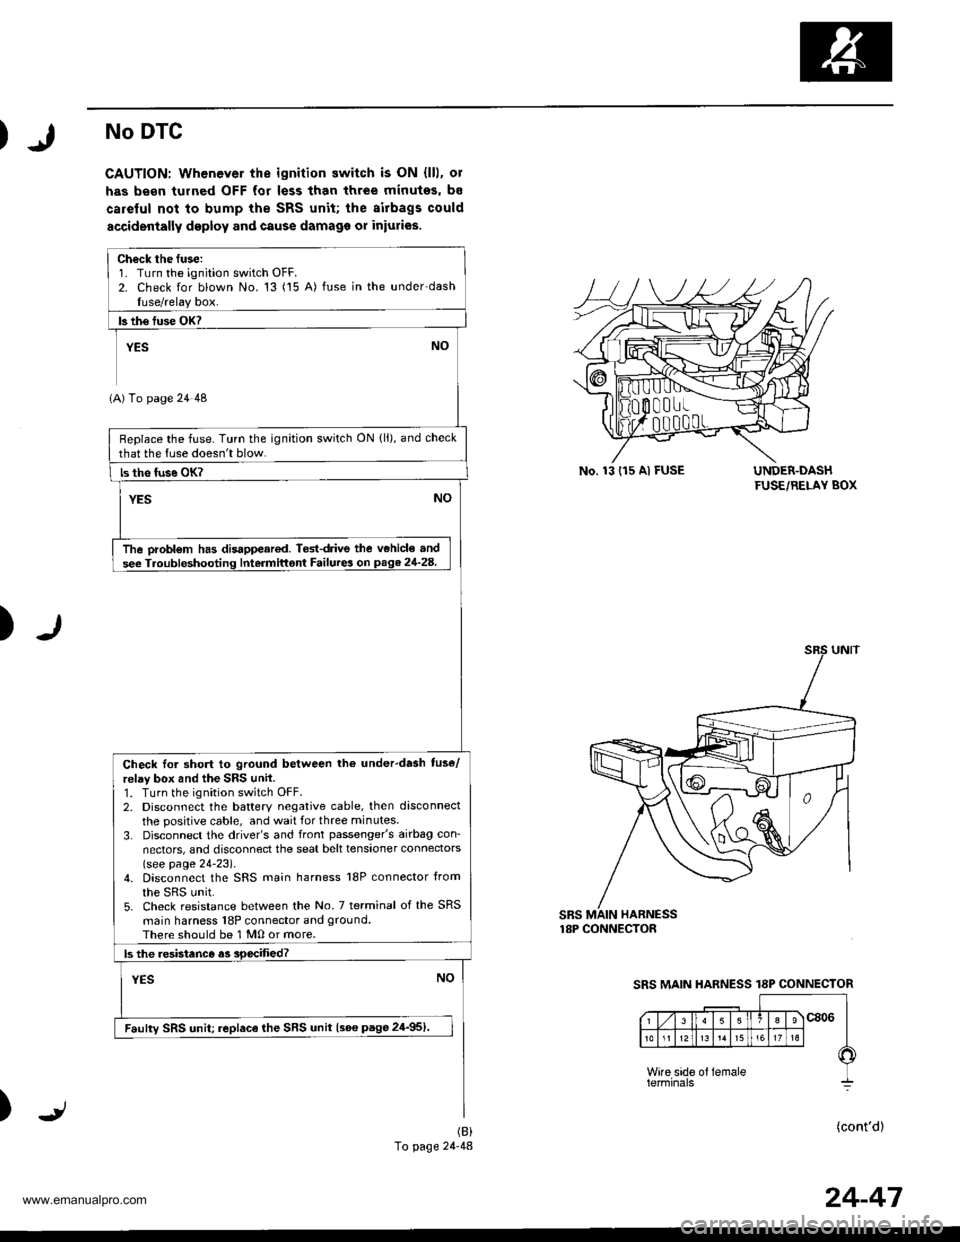
No DTC
CAUTION: Whenever the ignition switch is ON {lll, ol
has been tulned OFF for less than three minutes, bs
careful not to bump the SRS unit; the airbags could
accidenially deploy and cause damago or iniuries.
UNDER-DASHFUSE/RELAY BOX
)
SBS MAIN HARNESS18P CONNECTOR
)(cont'd)(B)
To page 24-48
Ch€ck the fuse:1. Turn the ignition switch OFF.2. Check for blown No. 13 ('15 A) fuse in the under-dashIuse/relay box.
b th€ fuse OK?
YEs NO
1A) To page 24 48
Replace the fuse. Turn the ignition switch ON {ll), and check
that the luse doesn't blow.
ls the fuse OK?
YESNO
The probl€m has disappeared. Ted{rive the v€hicle and
see Troubfeshooting Intermittont Failurea on page 21-28.
Check Ior short to ground between tho underdash tuse/
relay box and the SRS unil.1. Turn the ignition switch OFF.2. Disconnect the battery negative cable, then disconnect
the positive cable, and wait for three min utes.
3. Disconnect the driver's and front passenger's airbag con-
nectors, and disconnect the seat belt tensioner connectors(see page 24-23).4. Disconnect the SRS main harness l8P connector from
the sRs unit.5. Check resistance between the No. 7 terminal of the SRS
main harness 18P connector and ground.
There should be 1 M0 or more.
ls the .esistanco as soecified?
YESNO
Faulty SRS unit; replace lhe SRS unit {see page 24-951.
No. 13 (r5 Al FUSE
SRS MAIN HARNESS 18P CONNECTOR
24-47
www.emanualpro.com
Page 1348 of 1395
)
)
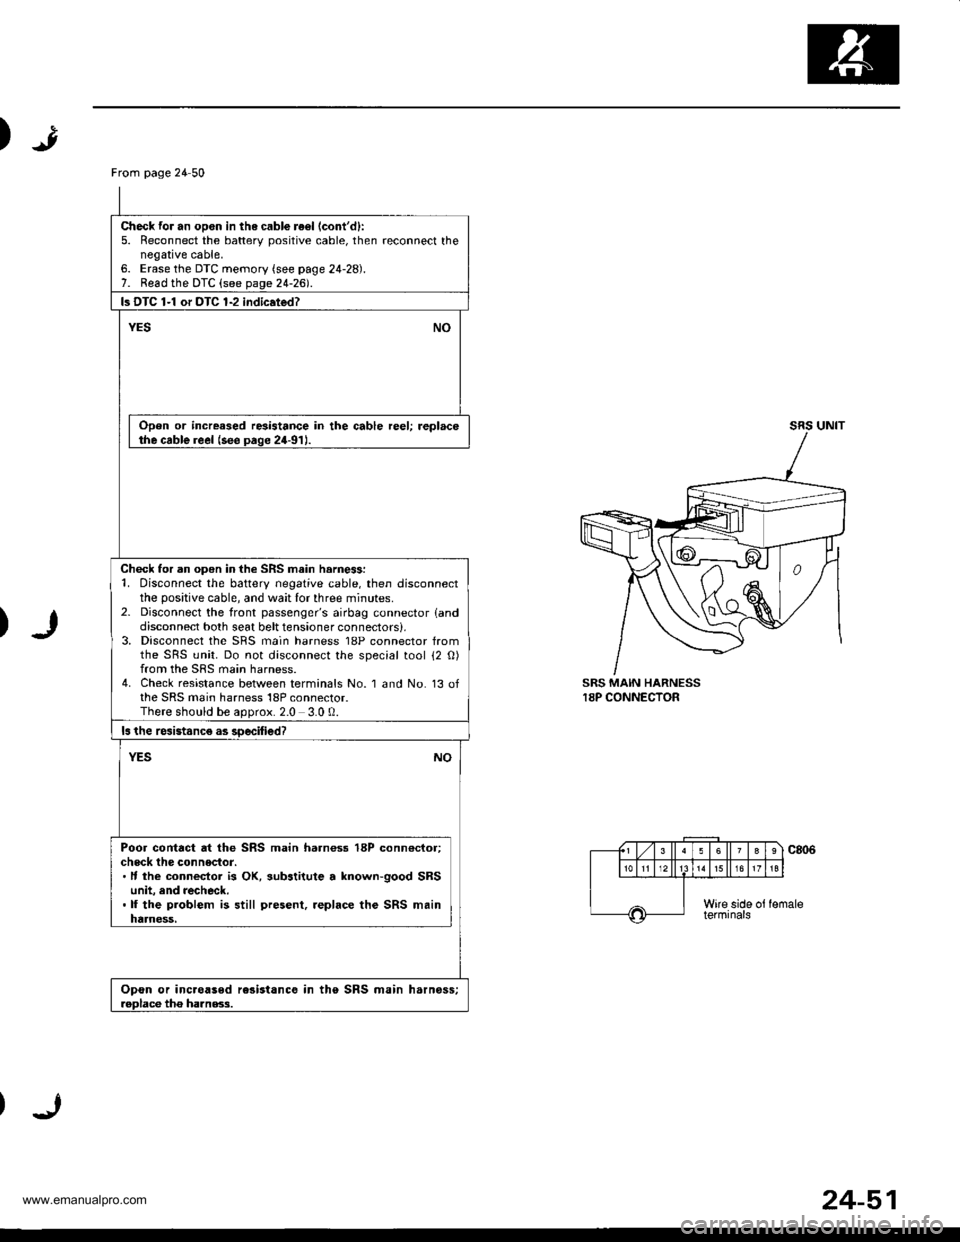
SRS MAIN HARNESS18P CONNECTOR
From page 24 50
Check for an opon in the cabl€ re€l (cont'd):
5. Reconnect the batterv positive cable, then reconnect thenegative cable,6. Erase the DTC memory (see page 24-28).7. Read the DTC (see page 24-2d.
ls DTC 1-1 or DTC 1-2 indic.ted?
YESNO
Open or increased resistance in the cable reel; replacethe cable reel (see paqe 24-91J.
Check for an open in the SRS main harne$:1. Disconnect the battery negative cable, then disconnectthe positive cable, and wait lor three minutes.2- Disconnect the front passenger's airbag connector landdisconnect both seat belt tensioner connectors),3, Disconnect the SRS main harness 18P connector fromthe SRS unit. Do not disconnect the special tool 12 O)from the SRS main harness.4. Check resistance between terminals No. 1 and No. 13 ofthe SRS main harness 18P connector.There should be aoorox.2.0 3.0 0.
ls the rcsistanc€ as soecified?
NOYES
Poor contact at the SRS main harnoss 18P conn€ctor;check the connector.. It the connecior is OK, substitute a lnown-good SRSunit, and recheck..lf the problem is still present, .eplace the SRS mainharness,
Opon or inc.oased rc3istance in the SRS main harnoss;roDlace tho ha]nss.3.
24-51
www.emanualpro.com
Page 1350 of 1395
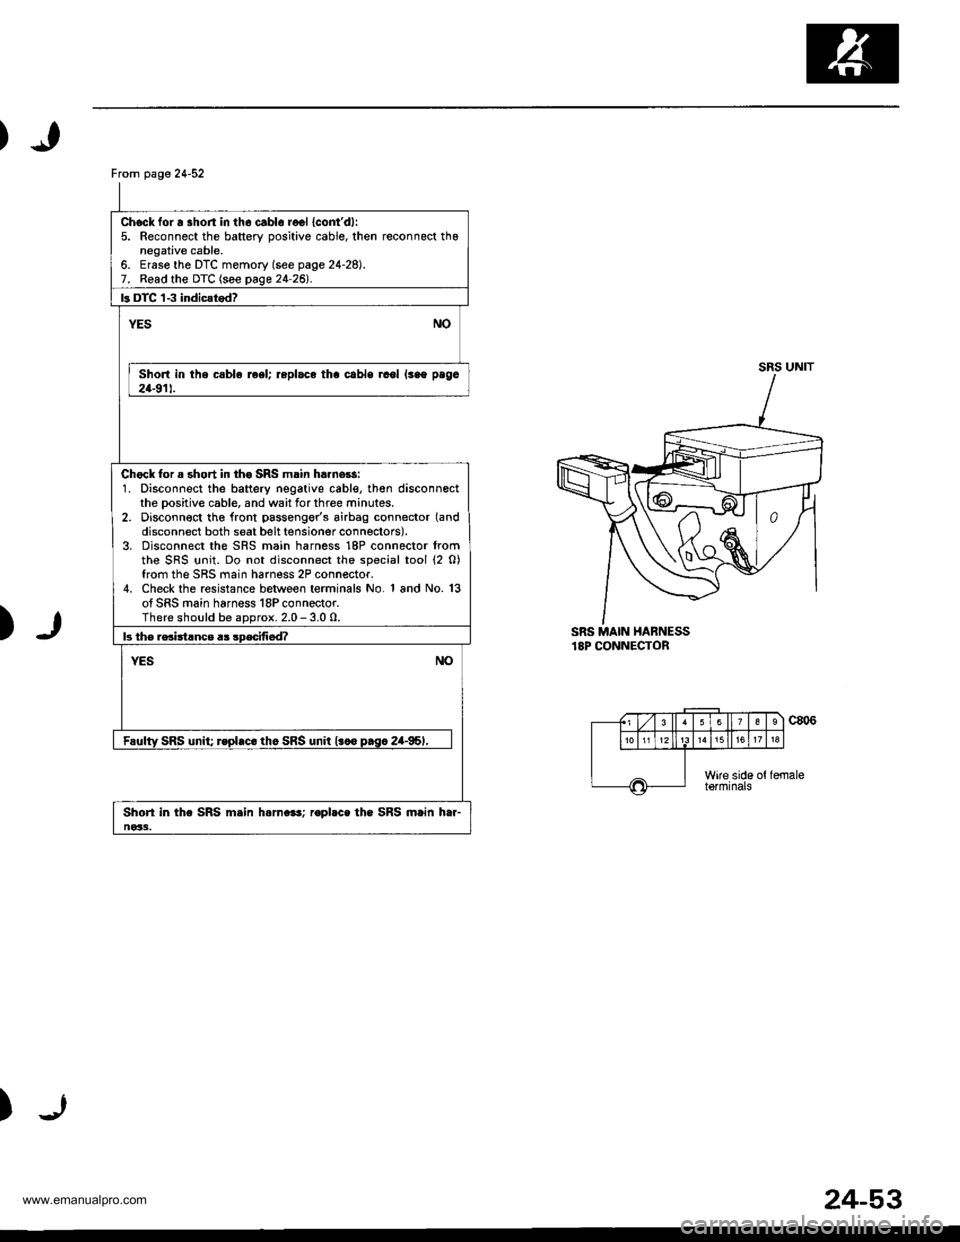
From page 24-52
Chock for a shon in th6 cablo recl {cont'dl:5. Reconnect the battery oositive cable, then reconnect thanegative cable.6. Ersse the DTC memory (see page 24-28).7. Read the DTC (see page 24-26l'.
ls DTC 'l-3 indic{tod?
NOYES
Short in the csble reel; replace tha cabls rcol lsao paga
24-911.
Chock for a short in th€ SRS main ha.nors:1. Disconnect the battery negative cable, th€n disconnectthe Dositive cable, and wait for three minutes.2. Disconn€ct tho lront passengor's airbag connector (and
disconnect both seat belt tensioner connectors).3. Disconnect the SRS main harness 18P connector fromthe SRS {rnit. Do not disconnect the special tool (2 0)from the SRS main harness 2P connector.4. Check the resistance between terminals No. 1 and No. 13of SRS main harness 18P connector.There should be aDorox. 2.0 - 3.0 0.
b th€ rsciitlnce a3 sDecifi6d?
NOYES
Faulty SRS unit; rspl.c. th6 SRS unit l.co p.sc 2a-95,,
Shori in the SRS m.in h.rn.e!; ropbce the SRS main htr-ne33.
SRS UNIT
)SRS MAIN HABNESS18P CONNECTOR
c806
)
(., Lzl 3 ll63
1518
Wire side ottormrnats
24-53
www.emanualpro.com