Page 40 of 2189

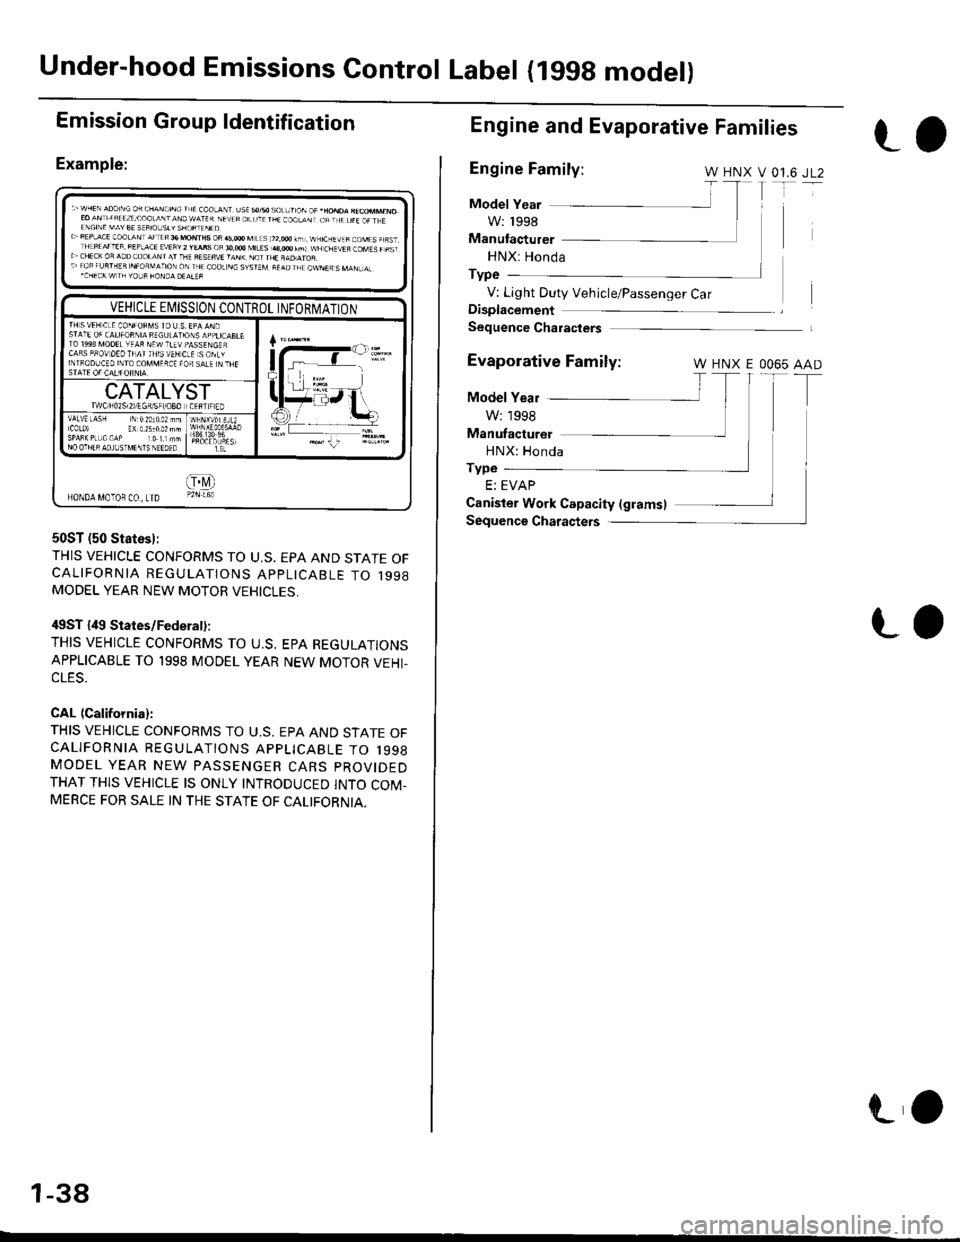
Under-hood Emissions Control Label (lggg model)
Emission Group ldentification
Example:
50ST (50 Statosl:
THIS VEHICLE CONFORMS TO U,S. EPA AND STATE OFCALIFORNIA REGULATIONS APPLICABLE TO 1998MODEL YEAR NEW MOTOR VEHICLES,
ilgsT 149 States/Federal):
THIS VEHICLE CONFORMS TO U.S. EPA REGULATIONS
APPLICABLE TO 1998 MODEL YEAR NEW MOTOR VEHI.CLES.
CAL (California):
THIS VEHICLE CONFORMS TO U.S. EPA AND STATE OFCALIFORNIA REGULATIONS APPLICABLE TO 1998MODEL YEAR NEW PASSENGER CARS PROVIDEDTHAT THIS VEHICLE IS ONLY INTRODUCED INTO COM.MERCE FOR SALE IN THE STATE OF CALIFORNIA.
oR3.'@M|LES|3,@|frlw!cs
VEHICLE EI\4ISSION CONTROL INFORIVATIONrH SVEH CLE CONFOFMS IO U S EPA ANDSTA1E OF CALIFORNIA RE6ULAIIONS APPLICABLEIO 199A MODEL YEAR NEWTIEV PASSENGERCA8S PFOV OEO TI]AI 'HIS VEI CLE S OILYINIBODUCEDINTOCOMMEfiCE FOR SALE N TNC
CATALYSTIWCINO?S]2)EGR6F /OBO ] CEFT]F EDVALVE LASH1C0L0l EX 0 r51002mm
NO OTHTR AO.]USIMI\IS NI'TOEO
I]ONDA MOTOB CO.,ITDOE
1-38
ro
Engine and Evaporative Families
rf
Engine Family:v 0't.6 JL2
Model Year
W: 1998
Manufacturer
HNX
HNX: Honda
Type
V: Light Duty Vehicle/Passenger CarDisplacement
Sequence Characters
Evaporative Family:W HNX E 0065
HNX: Honda
Type
E:
Model Year
AAD
TW: 1998
Manufacturel
Canister Work C.pacity (glamsl
Sequence Characters
EVAP
LO
Page 41 of 2189

(1999 modell
Emission Group ldentification
Example:
VEHICLE EMISSION CONTROL INFOEMATION
13 S VEH CLE CONFORMS IO U S EAPPL CABLETO I999 MOOELYEAR NEW PASSENCER
CATALYST
IAIV€ L{SHCOLDSPARTPLU6CAPEv
@oHONDA MOTOECO LTD
FEDERAL TIER 1:
THIS VEHICLE CONFORMS TO U.S, EPA REGULATIONS
APPLICABLE TO '1999 MODEL YEAR NEW PASSENGER
CARS.
CALIFORNIA + NLEV {RESTRICTEDI TLEV:
THIS VEHICLE CONFORIVIS TO CALIFORNIA REGULA-
TIONS APPLICABLE TO 1999 MODEL YEAR NEW TLEV
PASSENGER CARS AND TO U.S. EPA NLEV PROGRAM
REGULATIONS APPLICABLE TO 1999 NEW TLEV PAS-
SENGER CARS.
THIS VEHICLE MAY ONLY BE INTRODUCED INTO COM-
MERCE FOR SALE IN CALIFORNIA, A STATE THAT HAS
THE CALIFORNIA STANDARDS IN EFFECT TO WHICH
THIS VEHICLE HAS BEEN CERTIFIED, A STATE THAT
HAS OPTED INTO THE NLEV PROGRAM, OR A STATE
CONTIGUOUS THERETO.
50 STATE LEV + CFFV + NLEV {UNRESTRICTED}:
THIS VEHICLE CONFORMS TO U.S. EPA NLEV AND
CLEAN-FUEL VEHICLE AND CALIFORNIA REGULA'
TIONS APPLICABLE TO GASOLINE FUELED 1999
MODEL YEAR NEW LEV IPASSENGER CARS/LIGHT
DUW TRUCKS].
50 STATE TLEV + NLEV (UNRESTRICTED):
THIS VEHICLE CONFORMS TO U.S. EPA NLEV REGULA'
TIONS APPLICABLE TO 1999 MODEL YEAR NEW TLEV
PASSENGER CARS AND CALIFORNIA REGULATIONS
APPLICABLE TO 1999 MODEL YEAR NEW TLEV IPAS'
SENGER CARS/LIGHT DUW TRUCKS].
Engine and Evaporative Families
Engine Family:
Model Yeal
X:1999
X
T
JF1
T
AAD_T
Manutacturer
HNX: Honda
Tvpe
V: Light Duty Vehicle/Passenger Car
Disolacement
Sequence Characters
Type
R: ORVR
Canister Work CaPacitY (gramsl
Sequence Characters
Evaporative FamilY: + +
ModelYearIX:1999 lManufacturer
HNX: Honda
0090
T_
R
HNX V
rT
rl
0 t.6
1-39
Page 42 of 2189

Under-hood Emission Control Label (2000 model)
Emission Group ldentification
Example:
oRs'MM|LESt4,0oorml,wtscN
VEHICLE EMISSION CONTROL INFOBI\4ATIONT8ISVEH CLE CONFOfiMS TO U,S EPA RECIJLATIONSAPPLICABLE IO 'OOO MODEL YEAS NEW PASSENGER
CATALYST
vAtw LcsH rN 0.20:0 0? nnlcorDr EX 0 25:0 0? mhSPAAKPIIJGCAPNO OTNER AD.IUSIMENIS NE€OTO
t0N0a M0T08 (0. Lro
FEDERAL TIER 1:
THIS VEHICLE CONFORMS TO U,S. EPA REGULATIONSAPPLICABLE TO 2OOO MODEL YEAR NEW PASSENGERCARS.
CALIFORNIA + NLEV (RESTR|CTEDt TLEV:THIS VEHICLE CONFORMS TO CALIFORNIA REGULA-TIONS APPLICABLE TO 2OOO MODEL YEAR NEW TLEVPASSENGER CARS AND TO U,S. EPA NLEV PROGRAMREGULATIONS APPLICABLE TO 2OOO NEW TLEV PAS-SENGER CARS.
THIS VEHICLE MAY ONLY BE INTRODUCED INTO COM.MERCE FOR SALE IN CALIFORNIA. A STATE THAT HASTHE CALIFORNIA STANDARDS IN EFFECT TO WHICHTHIS VEHICLE HAS BEEN CERTIFIED, A STATE THATHAS OPTED INTO THE NLEV PROGRAM, OR A STATECONTIGUOUS THERETO.
50 STATE LEV + CFFV + NLEV {UNRESTRTCTED):THIS VEHICLE CONFORMS TO U.S, EPA NLEV ANDCLEAN.FUEL VEHICLE AND CALIFORNIA REGULA,TIONS APPLICABLE TO GASOLINE FUELED 2OOOMODEL YEAR NEW LEV PASSENGER CARS.EPA CERTIFICATION TEST FUEL: EPA UNLEADEDGASOLINE
50 STATE TLEV + NLEV (UNRESTRICTED}:
THIS VEHICLE CONFORMS TO U.S. EPA NLEV REGULA.TIONS APPLICABLE TO 2OOO MODEL YEAR NEW TLEVPASSENGER CARS AND CALIFORNIA REGULATIONSAPPLICABLE TO 2OOO MODEL YEAR NEW TLEV PAS-SENGER CARS.
n
1-40
L,
Engine and Evaporative Families
ro
Engine Family:Y HNX V 01,6 JF1
Model Yeal
Y; 2000
Manufaqturer
HNX: Honda
Type
V: Light Duty Vehicle/passenger CarDisplacoment
Sequence Charaqtgrs
Evaporative Family:Y HNX R OO99 AAD
Model Year
Y: 2000
Manufaeturer
HNX: Honda
Type
R: ORVR
Canister Work Capacity (grams)
Ssquence Characters
LO
Page 586 of 2189

Transmission Assembly
Removal (cont'dl
8. Remove the driveshafts (see section 161.
NOTE: Coat all the precision finished surfaces with
clean engine oil or grease. Tie plastic bags over the
driveshaft ends,
DRIVESHAFT
10 x 1.25 mrn43 N.m 14.4 kgt.m,32 rbf.frl
COTTER PINReplace. SELF12 x 1.25 mm49-59 N.m (5.0 -6.0 kgt.m,36-43 lbf.ft)
9. Remove exhaust pipe A.
Replace.12 x 1.25 mm64 N.m {6.5 kgt.m,47 lbf.tr)
GASKETSReplace.
IF\sELF-LocKtNG NUT.''1/Replace.8 x 1.25 mm16 N.m {1.6 kgf'm,12 tbf.ft)
EXHAUSTPIPE A
SELF-LOCKING NUTReplace.I x 1.25 mm22 N.m (2.2 kgf.m,16 tbt'fr)
SELF-LOCKING NUTReplace.D16Y5, D16Y7 engines:
33 N.m {3.4 kgf.m,25 lbt.ft)D16YB engine:10 x 1.25 mm54 N.m 15.5 kgl'm,40 lbf.ttl
SET RING
13-6
v'10. Remove the shift rod and extension rod.
SI'IIFT BOD
8x22mmSPRING PINReplace.
EXTENSION ROD
PIN PUNCH, 8.O mm(Commercially available)f-
'1'1. Remove the engine stiffeners and clutch cover.
D16Y5, D16Y8 engines:
10 x 1.25 mm44 N.m (4.5 kgt.m,33 tbf.tr)
I x 1.25 mm24 N.m (2.4 kgf.m17 lbt.frl
COVER
8 x 1.25 mm24 N.m 12.4 kgf'tn,17 tbt.tr)
Page 630 of 2189
Transmission Assembly
Removal(cont'd)
14. Remove the driveshafts and the intermediate shaft(see section 16).
NOTE: Coat all precision the finished surfaces with
clean engine oil or grease. Tie plastic bags over the
driveshaft ends,
Remove the bolt, then disconnect the change elden-
sion.
Remove the clip and the spring pin, then disconnectthe change rod.
8x22mmSPRING PINCLIP Replace.
15.
13-50
17. Remove the front and the rear engine stiffensrs.
18. Remove the clutch cover.
CLUTCH COVER
6x1.0mm12 N.m (1.2 kg{.m,9 tbf.ftl
x 'l .25 mm
tJ
24 N.m {2.4 kgt m,17 rbt ftl
Page 1059 of 2189

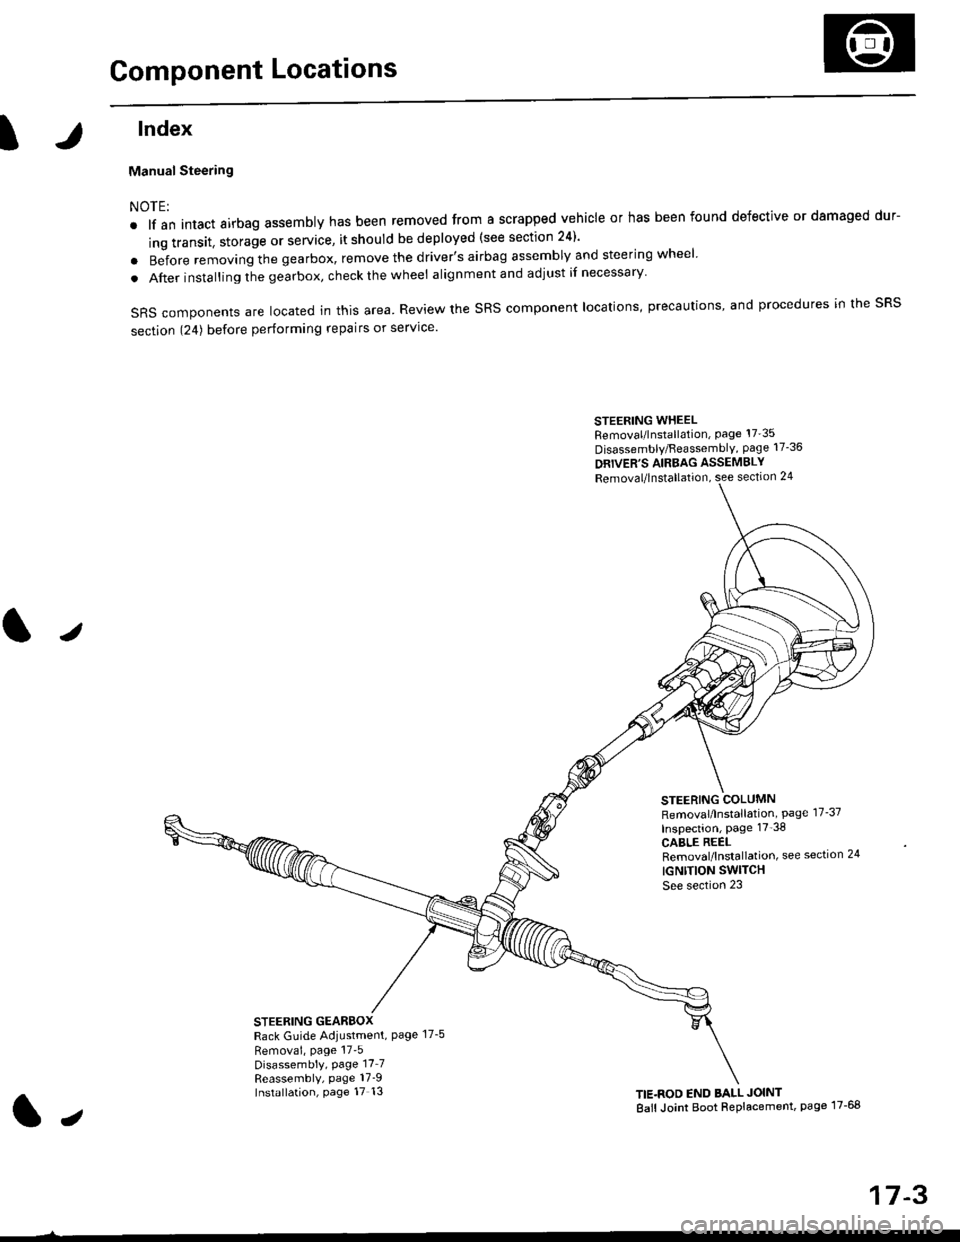
Component Locations
tlndex
Manual Steering
NOTE:
. lf an intact airbag assembly has been removed from a scrapped vehicle or has been found defective or damaged dur-
ing transit. storage or service, it should be deployed (see section 24)'
o Before removing the gearbox, remove the driver's airbag assembly and steering wheel
. After insta lling the gearbox, check the wheel alignmentand adjust if necessary
SRS components are located in this area. Review the SRS component locations, precautions, and procedures in the SRS
section 124) before performing repairs or service'
STEERING WHEELRemoval/lnstallation, Page 17'35
Disassembly/FeassemblY, page 17-36
DRIVER'S AIRBAG ASSEMBLY
Removal/lnstallation, see section 24
STEERING COLUMNRemoval/lnstallation, Page 17-37
Inspection, page 17'38
CABLE REELRemoval/lnstallation, see section 24
IGNTTION SWITCH
See section 23
STEERING GEARBOXRack Guide Adiustment, Page 17-5
Removai, page 17'5Disassembly, Page 17_7Reassembly, page 17_9Installation, page 17 13TIE.ROD END BALL JOINT
Ball Joint Boot Replacement, page 17-68
J
t,
17-3
Page 1062 of 2189

Steering Gearbox
Removal(cont'd)
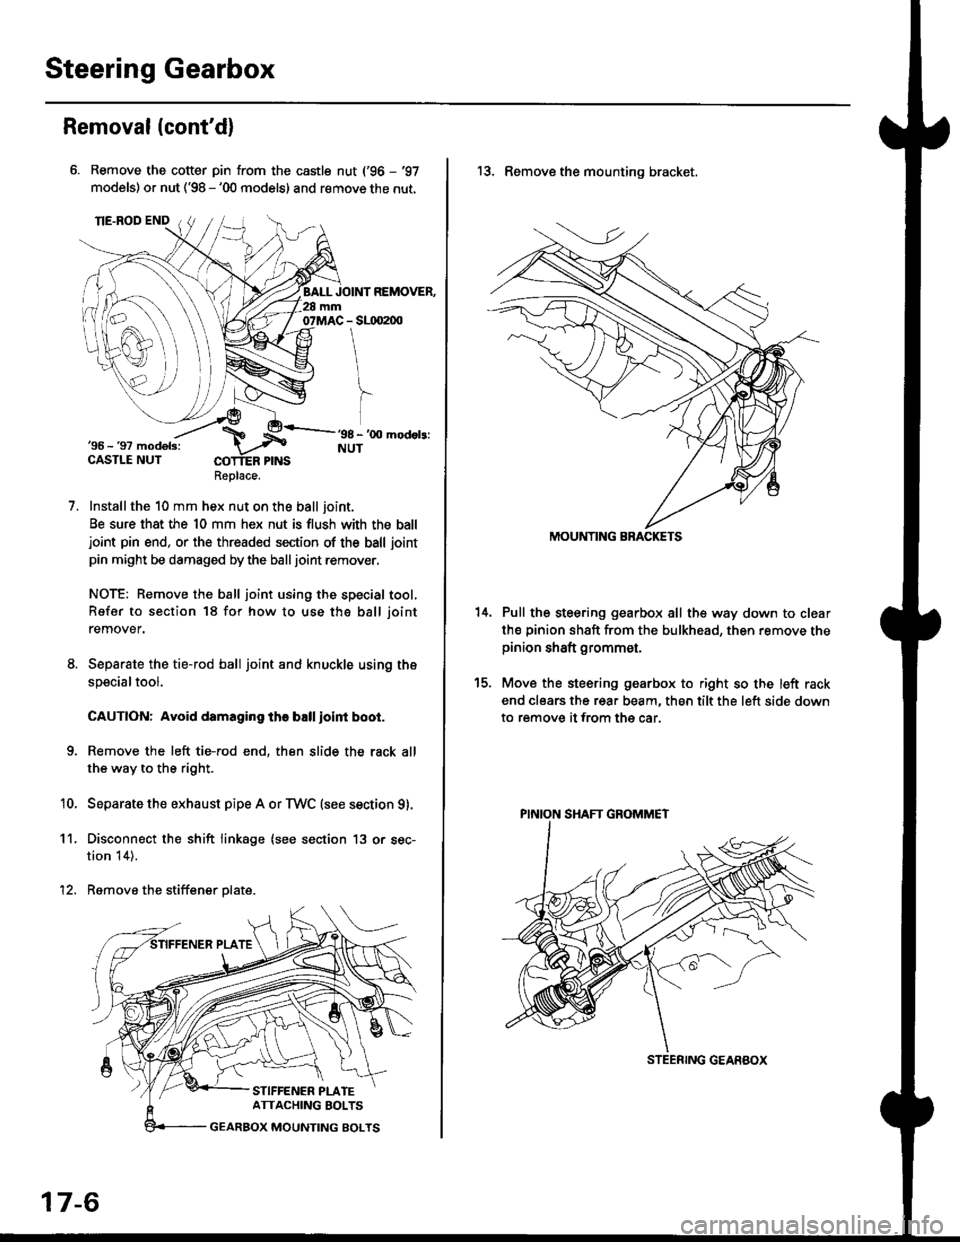
Remove the cotter pin from the castle nut ('96 - '97
models) or nut ('98 - '00 models) and remove the nut.
Installthe 10 mm hex nut on the ball joint.
Be sure that the 10 mm hex nut is flush with the balljoint pin end, or the threaded section of the ball joint
pin might be damaged by the balljoint remover.
NOTE: Remove the ball joint using the special tool,
Refer to section 18 for how to use tho ball joint
remover.
Separate the tie-rod ball joint and knuckle using the
specialtool.
CAUTION: Avoid damaging the ball ioint boot.
Remove the left tie-rod end, then slide the rack all
the way to the right.
Separate the exhaust pipe A or TWC (see section g).
Disconnect the shift linkage (see section 13 or sec-
tion 14).
Remove the stiffener plate.
7.
'10.
11.
12.
Replace.
17-6
13. Remove the mounting bracket,
Pull the steering gearbox all the way down to clear
th€ pinion shaft from the bulkhead, then remove thepinion shaft grommet,
Move the steering gearbox to right so the left rack
end clears the rear beam, then tilt the left side down
to remove it from the car.
t5.
STEENING GEARBOX
PINION SHAFT GROMMET
Page 1063 of 2189

)
Disassembly
'1.
2.
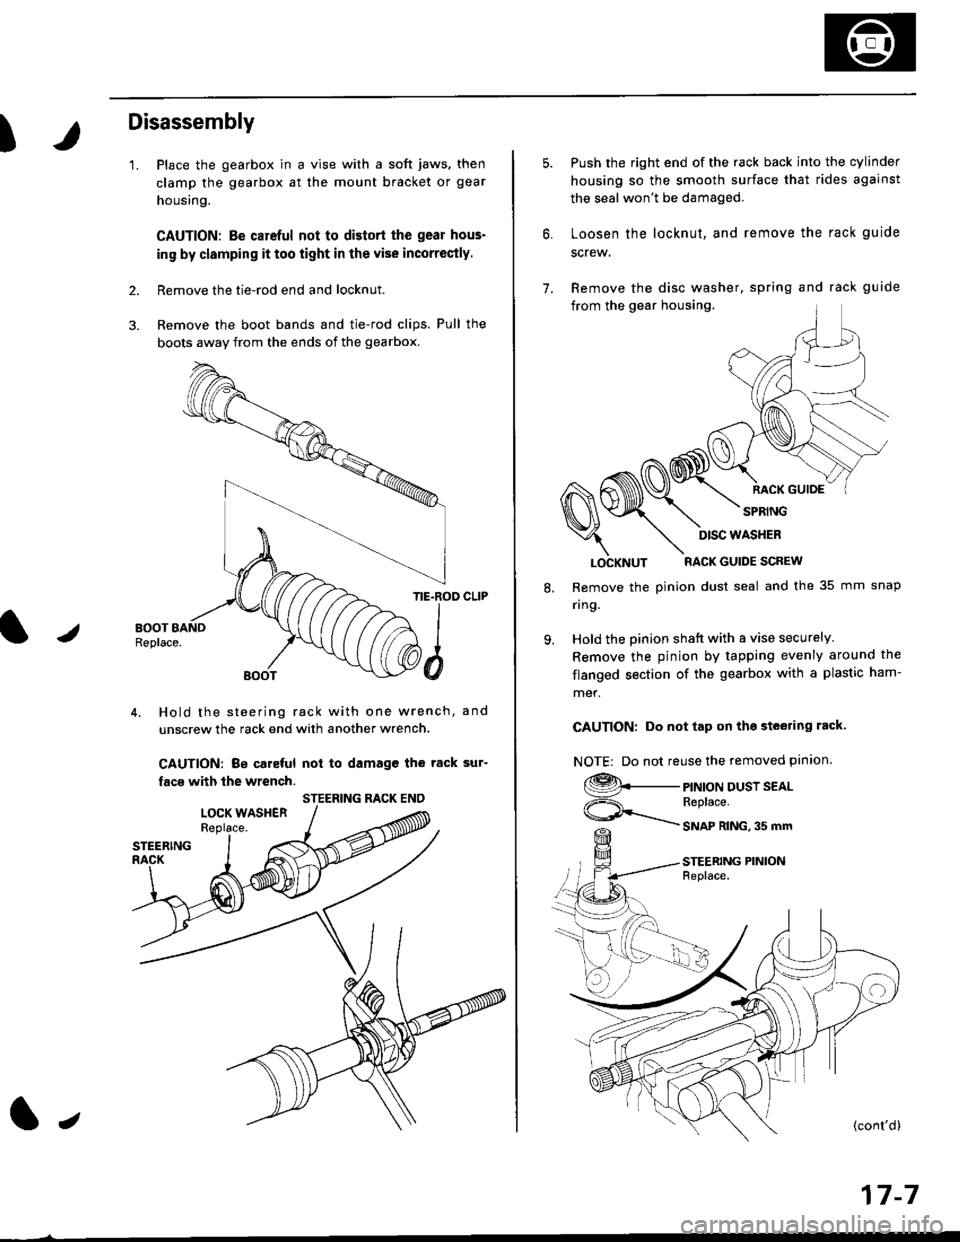
Place the gearbox in a vise with a soft jaws, then
clamp the gearbox at the mount bracket or gear
housing.
CAUTION: Be carcful not to distort the gear hous-
in9 by clamping it too iight in the vise incorrectly.
Remove the tie-rod end and locknut.
Remove the boot bands and tie-rod clips. Pull the
bogts away from the ends of the gearbox.
/
TIE.ROD CLIP
4. Hold the steering rack with one wrench, and
unscrew the rack end with another wrench.
CAUTION: Be caleful not to damagc the rack sur'
facs with the wrench.
STEERING RACK ENO
l,
17-7
7.
Push the right end of the rack back into the cylinder
housing so the smooth surface that rides against
the seal won't be damaged.
Loosen the locknut, and remove the rack guide
screw.
Remove the disc washer, spring and rack guide
from the gear housing.
RACK GUIOE
SPRING
8.
9.
LOCKNUT RACK GUIDE SCREW
Remove the pinion dust seal and the 35 mm snap
nng.
Hold the pinion shatt with a vise securely
Remove the pinion by tapping evenly around the
flanged section of the gearbox with a plastic ham-
met.
CAUTION: Do not tap on tho steering rack.
NOTE| Do not reuse the removed pinion.
9._
ViF=\_
PINION DUST SEALReplace.
SNAP RING,35 mm
STEERING PINIONFeplace.
DISC WASHER