1998 HONDA CIVIC COUPE tires
[x] Cancel search: tiresPage 206 of 251
Compact Spare Tire
Your vehicle has a compact spare tire that takes up less space. Use this spare tire as a temporary replace-
ment only. Get your regular tire
repaired or replaced and put back on
your vehicle as soon as you can.
Check the inflation pressure of the
compact spare tire every time you
check the other tires. It should be
inflated to:
60 psi (420 kPa , 4.2 kgf/cm2)
Follow these precautions whenever
you are using the compact spare tire:
Do not exceed 50 mph (80 km/h)
under any circumstances.
This tire gives a harsher ride and less traction on some road sur-
faces than the regular tire. Use
greater caution while driving on
this tire.
Do not mount snow chains on the
compact spare.
The wheel of the compact spare tire is designed especially to fit
your vehicle. Do not use your spare tire on another vehicle
unless it is the same make and
model.
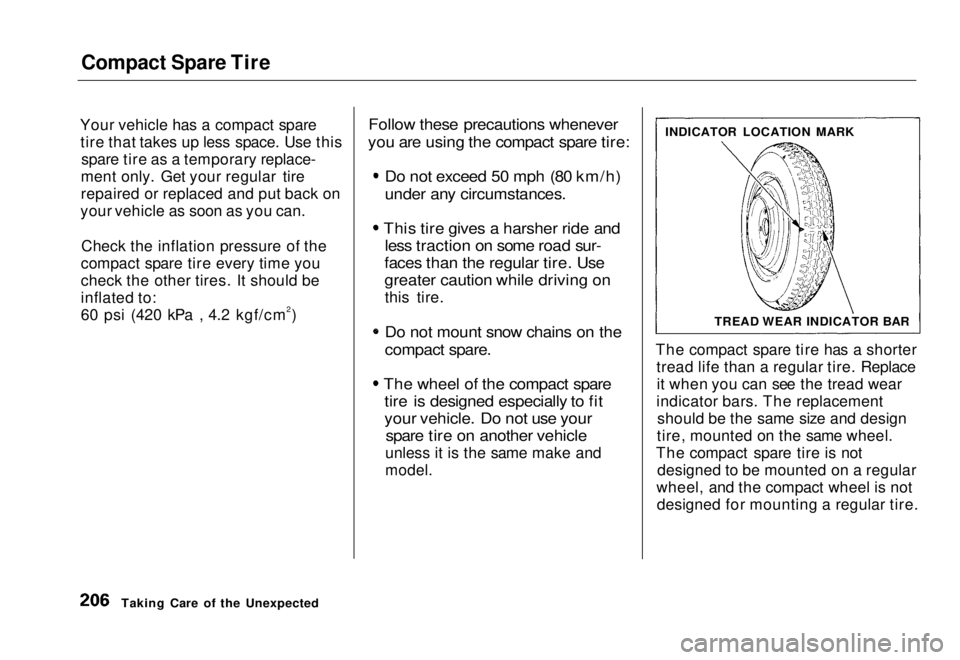
The compact spare tire has a shorter
tread life than a regular tire. Replaceit when you can see the tread wear
indicator bars. The replacement should be the same size and design
tire, mounted on the same wheel.
The compact spare tire is not designed to be mounted on a regular
wheel, and the compact wheel is not designed for mounting a regular tire.
Taking Care of the Unexpected INDICATOR LOCATION MARK
TREAD WEAR INDICATOR BARMain Menu Table of Contents s t
Page 227 of 251
Emergency Towing
If your vehicle needs to be towed,
call a professional towing service or,
if you belong to one, an organization
that provides roadside assistance.
Never tow your vehicle behind another vehicle with just a rope or
chain. It is very dangerous.
There are three popular types of
professional towing equipment.Flat-bed Equipment - The operatorloads your vehicle on the back of a
truck. This is the best way to transport your Honda.
Wheel-Lift Equipment - The tow
truck uses two pivoting arms that go under the tires (front or rear) and lift
them off the ground. The other two
tires remain on the ground.This is an acceptable way to tow
your Honda.
Sling-type Equipment - The tow
truck uses metal cables with hookson the ends. These hooks go around parts of the frame or suspension and
the cables lift that end of the vehicle off the ground. Your vehicle's
suspension and body can be seriously
damaged. This method of towing is
unacceptable.
If your Honda cannot be transported
by flat-bed, it should be towed by
wheel-lift equipment with the front
wheels off the ground. If, due to damage, your vehicle must be towed
with the front wheels on the ground, do the following.
5-speed Manual Transmission
Release the parking brake.Shift the transmission to Neutral.
Automatic Transmission Release the parking brake.Start the engine.
Shift to D4, then to N.
Turn off the engine.
Improper towing preparation will
damage the transmission. Follow
the above procedure exactly. If you
cannot shift the transmission or
start the engine (automatic
transmission), your vehicle must be
transported with the front wheels
off the ground.
With the front wheels on the
ground, it is best to tow the vehicle
no farther than 50 miles (80 km), and keep the speed below 35 mph
(55 km/h).
If you decide to tow your vehicle
with all four wheels on the ground,
make sure you use a properly-
designed and attached tow bar.
Prepare the vehicle for towing as
described above, and leave theignition switch in Accessory (I) so
the steering wheel does not lock.
Make sure the radio and any items
Taking Care of the Unexpected
NOTICEMain Menu Table of Contents s t
Page 235 of 251
Tire Information
Tire Size Designation
A tire's sidewall is marked with a tire size designation. You will need this
information when selecting replace-
ment tires for your vehicle. The
following explains what the letters and numbers in the tire size
designation mean.
(Example tire size designation)
P185/65R14 85S
P — Applicable vehicle type (tires
marked with the prefix "P" are
intended for use on passenger
vehicles; however, not all tires have this marking).
185 — Tire width in millimeters.
65 — Aspect ratio. The tire's section
height as a percentage of its width.
R — Tire construction code (Radial).
14 — Rim diameter in inches. 85 — Load Index, a numerical code
associated with the maximum load
the tire can carry.
S — Speed Symbol. See the speed
rating chart in this section foradditional information.
Wheel Size Designation
Wheels are also marked with important information that you need
if you ever have to replace one. The
following explains what the letters and numbers in the wheel size
designation mean.
(Example wheel size designation)
14 x 5J
14 — Ri
m diameter in inches.
5 — Rim width in inches.
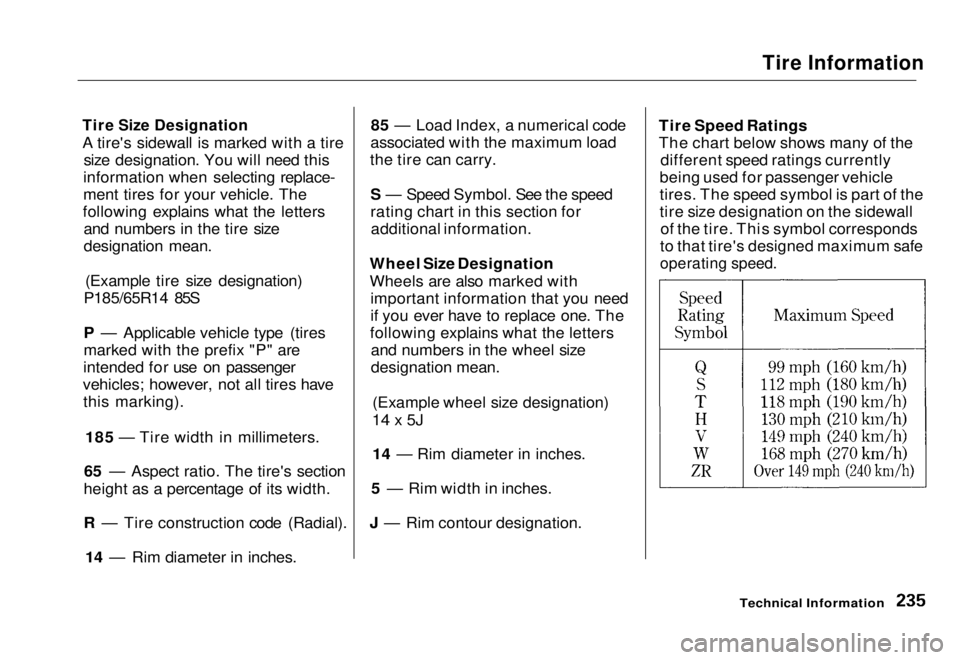
J — Rim contour designation. Tire Speed Ratings
The chart below shows many of the
different speed ratings currently
being used for passenger vehicle
tires. The speed symbol is part of the
tire size designation on the sidewall of the tire. This symbol corresponds
to that tire's designed maximum safe
operating speed.
Technical InformationMain Menu Table of Contents s t
Page 236 of 251
Tire Information
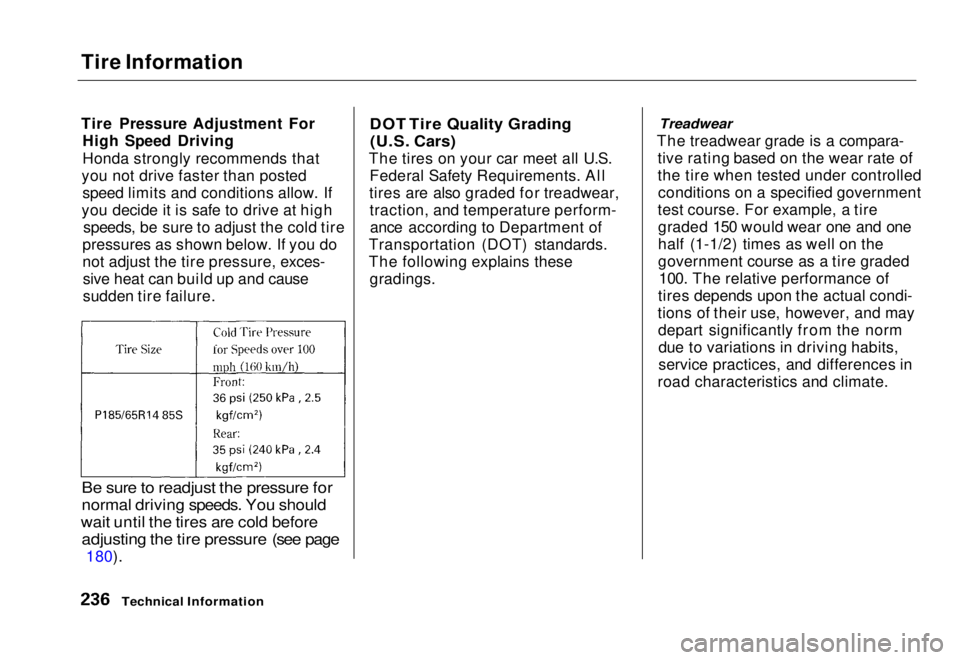
Tire Pressure Adjustment For
High Speed Driving
Honda strongly recommends that
you not drive faster than posted speed limits and conditions allow. If
you decide it is safe to drive at high speeds, be sure to adjust the cold tire
pressures as shown below. If you do
not adjust the tire pressure, exces- sive heat can build up and cause
sudden tire failure.
Be sure to readjust the pressure for
normal driving speeds. You should
wait until the tires are cold before
adjusting the tire pressure (see page
180).
DOT Tire Quality Grading
(U.S. Cars)
The tires on your car meet all U.S. Federal Safety Requirements. All
tires are also graded for treadwear, traction, and temperature perform-ance according to Department of
Transportation (DOT) standards.
The following explains these gradings.
Treadwear
The treadwear grade is a compara- tive rating based on the wear rate of
the tire when tested under controlledconditions on a specified government
test course. For example, a tire graded 150 would wear one and one
half (1-1/2) times as well on the
government course as a tire graded 100. The relative performance of
tires depends upon the actual condi-
tions of their use, however, and may depart significantly from the normdue to variations in driving habits,
service practices, and differences in
road characteristics and climate.
Technical InformationMain Menu Table of Contents s t
Page 237 of 251

Tire Information
Traction
The traction grades, from highest to lowest, are A, B, and C, and they
represent the tire's ability to stop on
wet pavement as measured under controlled conditions on specified
government test surfaces of asphaltand concrete. A tire marked C may
have poor traction performance.
Warning: The traction grade as- signed to this tire is based on brak-
ing (straight ahead) traction tests
and does not include cornering (turning) traction.
Temperature
The temperature grades are A (the highest), B, and C, representing the
tire's resistance to the generation of
heat and its ability to dissipate heat
when tested under controlled conditions on a specified indoor
laboratory test wheel. Sustained high
temperature can cause the material of the tire to degenerate and reduce
tire life, and excessive temperature can lead to sudden tire failure. The
grade C corresponds to a level of
performance which all passenger car tires must meet under the Federal
Motor Vehicle Safety Standard No. 109. Grades B and A represent
higher levels of performance on the laboratory test wheel than the
minimum required by law. Warning: The temperature grade for
this tire is established for a tire that
is properly inflated and not over-
loaded. Excessive speed, underinfla- tion, or excessive loading eitherseparately or in combination, can
cause heat build-up and possible tire
failure.
Technical InformationMain Menu Table of Contents s t
Page 244 of 251

Warranty Coverages
U.S. Owners
Your new Honda is covered by these
warranties:
New Vehicle Limited Warranty —
covers your new vehicle, except for
the battery, emissions controlsystems and accessories, against
defects in materials and
workmanship.
Emissions Control Systems Defects Warranty and Emissions
Performance Warranty — these two
warranties cover your vehicle's emis- sions control systems. Time, mileage,
and coverage are conditional. Please
read the warranty manual for exact
information.
Original Equipment Battery Limited
Warranty — this warranty gives up
to 100 percent credit toward a
replacement battery. Seat Belt Limited Warranty — a seat
belt that fails to function properly is covered for the useful life of the
vehicle.
Rust Perforation Limited Warranty
— all exterior body panels are
covered for rust-through from the
inside for the specified time period
with no mileage limit.
Accessory Limited Warranty —
Genuine Honda Accessories are
covered under this warranty. Time
and mileage limits depend on the
type of accessory and other factors.
Please read your warranty manual
for details.
Replacement Parts Limited Warranty — covers all Genuine
Honda replacement parts against
defects in materials and workman-
ship.
Replacement Battery Limited
Warranty — provides prorated
coverage for a replacement battery
purchased from a Honda dealer.
Replacement Muffler LifetimeLimited Warranty — provides
coverage for as long as the pur-
chaser of the muffler owns the
vehicle.
Restrictions and exclusions apply to
all these warranties. Please read the 1998 Honda Warranty Information
booklet that came with your vehicle for precise information on warranty
coverages. Your Honda's original
tires are covered by their manufactur- er. Tire warranty information is in a
separate booklet.
Canadian Owners
Please refer to the 1998 Warranty
Manual that came with your vehicle.
Warranty and Customer RelationsMain Menu Table of Contents s t
Page 247 of 251
Index
Accessories and Modifications.... 114 Accessories................................. 114
Additional Safety Precaution.... 115Modifications............................. 115
ACCESSORY (Ignition Key Position)........................................ 68
Accessory Power Socket................ 83
Adding Automatic Transmission
Fluid........................................ 164
Brake Fluid................................. 167 Clutch Fluid................................ 167
Engine Coolant........................... 159
Engine Oil................................... 155
Manual Transmission Fluid..... 166Power Steering Fluid................. 168
Windshield Washer Fluid......... 164
Additional Information About Your Seat Belts........................ 40
Lap Belt......................................... 41
Lap/Shoulder Belt....................... 40
Seat Belt Maintenance................ 42
Seat Belt System Components... 40 Additional Information About
Your SRS................................... 43
Additional Safety Precautions.... 46 How Your Airbags Work............ 43
How Your SRS Indicator
Works........................................ 45
SRS Components......................... 43
Additives, Engine Oil..................... 156
Adjustments
Headlights.................................. 188
Head Restraints........................... 75
Mirrors.......................................... 79
Seats.............................................. 74
Steering Wheel............................ 63
Airbag (SRS)...................................... 7
Air Cleaner Element...................... 169
Air Conditioning............................... 86 Maintenance............................... 177
Usage............................................. 86
Air Outlets (Vents).......................... 88
Air Pressure, Tires........................ 180 High Speed Driving................... 236
Normal Driving.......................... 180
Alcohol in Gasoline........................ 238
Antifreeze....................................... 159
Anti-lock Brakes (ABS)
Indicator Light.....................
53, 137
Operation.................................... 13 6
Anti-thef
t Steering Column
Lock...............................................68
Appearance Care........................... 199
Ashtrays (Optional)......................... 83
Audio System................................... 94
Automatic Speed Control................ 64
Automatic Transmission............... 124
Capacity, Fluid........................... 233
Checking Fluid Level................ 164
Shifting........................................ 125
Shift Lever Position Indicator.. 124
Shift Lever Positions................. 125
Shift Lock Release..................... 128
Battery Charging SystemIndicator............................ 53,
218
Jump Starting............................ .
213
Maintenance............................... 173
Specifications............................. 234
CONTINUEDMain Menu s t